Build Your Own Custom E-Ink Display with the TRMNL DIY Kit
Tired of ready-to-use e-paper with little room for customization? A custom e-ink display could be the solution.
If you’ve looked into the e-ink world, you’ve probably heard of TRMNL. It helps you stay focused with a clean glanceable dashboard. TRMNL has gained real popularity thanks to its highly customizable and powerful plugins.
Today, I’ll walk you through how to build your own custom e-ink display(the TRMNL 7.5” OG) using the TRMNL 7.5″ (OG) DIY Kit. With hardware parts, plugin support, and open-source integrations, you can diy an e-ink display that truly feels yours—whether for work, home, or smart space.
What is TRMNL and Why It’s Perfect for a Custom E-Ink Display?
If you’re new to TRMNL:
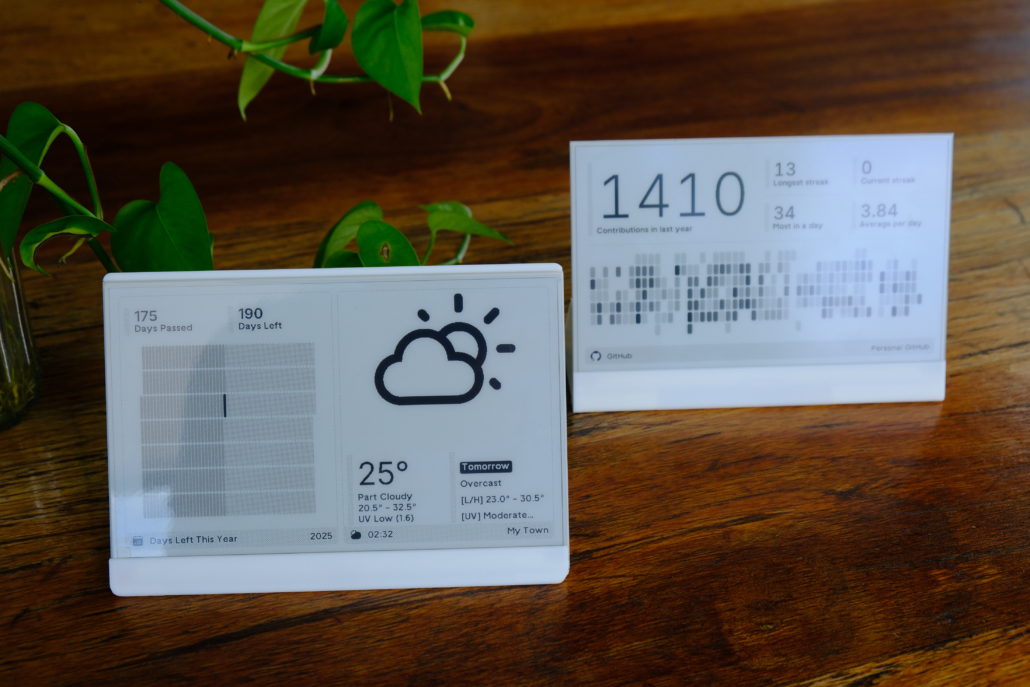
TRMNL is an open-source e-ink display with powerful plugin support, allowing it to connect with hundreds of apps. It helps you create a personalized dashboard of information that matters to you at a glance, such as calendars, to-dos, and analytics—without phone distractions. Think of it as a “glanceable” digital bulletin board for work or personal life.
Why TRMNL works best for DIY:
1. No-Code Customization with Powerful Plugin Library
TRMNL offers a growing library of plugins, its plugin ecosystem allows you to easily configure and customize your display without coding. With over 500 plugins, 8 layouts and regular updates, it’s perfect for DIY projects, offering flexibility and simplicity for all skill levels.
2. Developer-Friendly Open API and BYOD License
TRMNL’s open API and BYOD(Bring Your Own Device) license allow developers to create custom plugins and integrations. You can adapt TRMNL’s firmware to your DIY hardware, such as a Kindle based on the license.
As YouTuber MrMobile put it in his review for TRMNL: “there’s more of a DIY sensibility here that mirrors the maker vibe of the device itself.”
This open-source nature gives you full control over your display and allows you to tailor it exactly to your requirements, making TRMNL the perfect starting point for your custom e-ink display project.
Getting Started with the TRMNL DIY Kit
TRMNL 7.5″(OG) DIY Kit Part List:
- XIAO ePaper Display Dev Board with ESP32-S3 Plus*1
- 7.5-inch monocolor ePaper display (800×480 pixels)*1
- FPC extension cable (10 cm)*1
- FPC connector*1
- 2000mAh rechargeable Li-ion battery*1

This kit includes all the essential parts of the TRMNL 7.5″(OG), so you don’t have to source the screen, battery, or controller separately. Instead, just focus on customization. However, the kit does not include an enclosure, but you can download 3D enclosure files or create your own. We will explore that in the next section.
Without further ado, let’s dive in and tinker with the epaper!
Custom E-Ink Display Enclosures
3D Printed Enclosures
You can create a custom enclosure using open-source 3D-printable designs. Available shapes include an L-shaped stand and a triangular prism enclosure, both of which you can download and modify to fit your needs.
These designs allow you to adjust the size, material, and color to suit your needs—whether you’re looking for a functional desktop stand or a more decorative piece. It’s easy to build an e-ink display that matches both your space and your style.
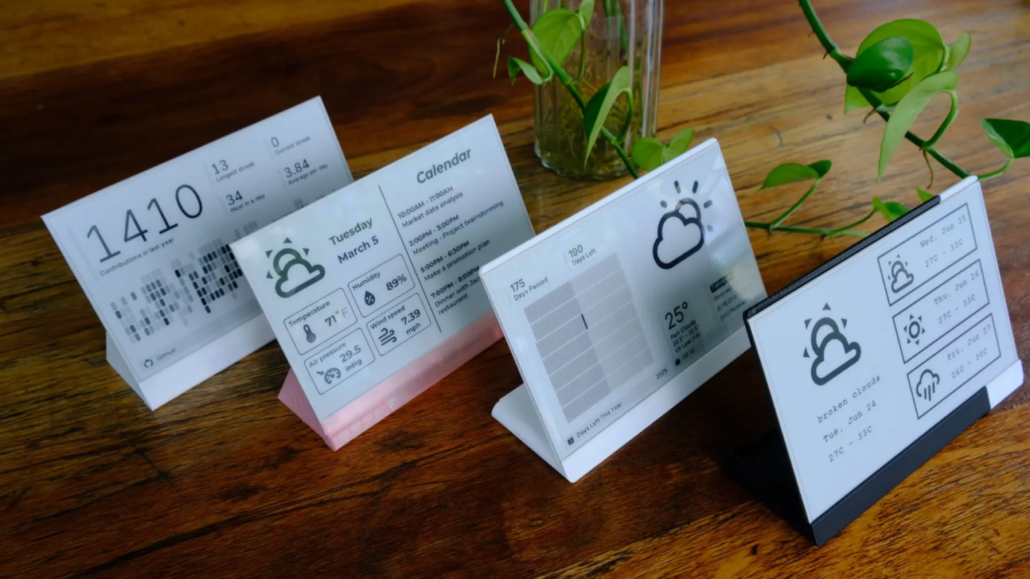
Standard Cases
If you don’t have access to a 3D printer, you can still house your e-ink display in simple enclosures like photo frames, box frames, or repurposed cases. These options provide a quick, low-cost way to create a neat setup without needing to print or design your own enclosure.
Dashboard Customization with Plugins
As we mentioned earlier, TRMNL’s extensive plugin library is what truly makes it stand out in DIY e-ink customization. But what exactly is a plugin?
Plugins are modular apps or widgets that you can add to your display to show a wide variety of information and content. With over 500 ready-to-use plugins, you can build a highly customized dashboard in just a few clicks.
For this DIY Kit, you’ll need to purchase TRMNL BYOD license ($50) to unlock the TRMNL web application and private plugin API for DIY devices. This is a one-time fee for a perpetual license for one device. Of course, if you prefer hands-on coding, you can also use Arduino or ESPHome to program your e-paper without purchasing the license— we’ll cover that later in the last section.
Now, plugins generally fall into three categories:
1. Official Plugins:
Developed and maintained by TRMNL’s team, these cover almost every daily need. Examples include Google Calendar, Spotify, Reddit, and more.
2. Private Plugins:
Created by individual users for personal use, ranging from college football rankings to XKCD comics. Thanks to the Recipes feature, private plugins can be shared easily without hosting user data. This makes distributing custom functionality secure and simple — other users can install them with just one click.
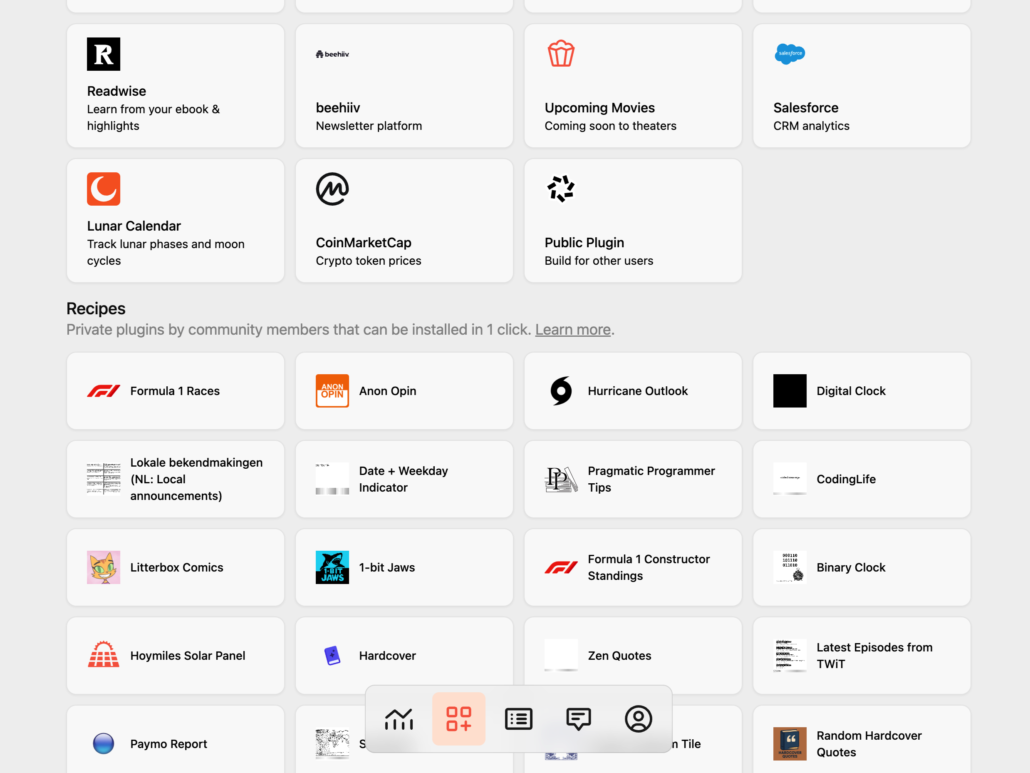
3. Third-party Plugin:
Built by independent developers for the wider community. Examples include the ISS (International Space Station) tracker, Subbly subscription management, and more.
Together, these categories — plus the Recipes system — form a marketplace of over 500 plugins, up from just 300 two months ago. The ecosystem is growing rapidly, making TRMNL one of the most powerful platforms for e-ink dashboard customization.
Created a plugin that shows a closest aircraft from my house
byu/nasigoreng intrmnl
Programming Your DIY E-Paper Displays (Arduino & ESPHome)
While plugins cover most needs, some makers prefer deeper control. With the TRMNL 7.5″ (OG) DIY Kit, you can program the device directly using Arduino or ESPHome to unlock more DIY features.
Arduino: A Classic Path for Makers
If you’re already familiar with microcontrollers, Arduino is the classic way to get your custom e-ink display running. The kit’s ESP32-based controller is fully compatible with Arduino IDE, so you can flash sketches, test simple demos, or connect your screen to APIs. It’s flexible, but requires some coding—perfect for those who want hands-on control over their open-source e-ink display.
ESPHome: Smart Home Integration
For those who prefer more integration with Home Assistant, ESPHome is the easier entry point. ESPHome is an open-source firmware creation tool specifically designed for ESP8266/ESP32 devices. It allows you to configure your e-ink display through YAML files instead of writing sketches, making it beginner-friendly. Once set up, the device can integrate directly into Home Assistant, turning your DIY e-paper display into a smart-home dashboard of home status, energy data, or automation triggers.
Both options expand your e-ink display DIY journey beyond plugins—whether you prefer Arduino’s full flexibility or ESPHome’s quick smart-home integration, programming ensures your device truly matches your style.
There are already discussions about Home Assistant support for TRMNL in the HA community. You can check here for more: TRMNL e-ink Display
Build Your Own Custom E-Ink Display Now!
After exploring all the customization features of the DIY e-ink display Kit, you might be ready to build your own e-ink dashboards, smart home interfaces, or creative digital signage. The TRMNL 7.5″ (OG) DIY Kit is an excellent choice, thanks to its low-power efficiency and limitless customization options.
Here’s a simple cost breakdown to help you decide:
- TRMNL 7.5″ (OG) Ready-to-Use Version: $139
- TRMNL 7.5″ (OG) DIY Kit: $48.99
Pair the DIY Kit with the official TRMNL BYOD license($50), and the total comes to under $100—still more affordable than the pre-assembled version. If you enjoy coding, you can even skip the license and customize everything yourself using just the $48.99 kit.
👉 Order the TRMNL 7.5” (OG) DIY Kit today to start your own e-ink display project.
For more detailed tutorials, you can refer to the following tutorial:
TRMNL 7.5″ (OG) DIY Kit Works with ESPHome
TRMNL 7.5″ (OG) DIY Kit Setup and Configuration
FAQs
Q: How long does the battery last?A: Powered by a 3.7V 2000mAh rechargeable Li-ion battery, the kit can operate for up to 3 months on a single charge in deep sleep mode (6-hour refresh interval).
Q: Does the kit include a case?A: No, but free 3D-print designs are available.
Q: Can the TRMNL 7.5″ DIY Kit be used with a Raspberry Pi?A: No. The kit is ESP32-S3 based. It is compatible with ESPHome and Arduino.
Q: Is a TRMNL BYOD license required for the DIY Kit, and can the kit be used without a license for custom programming?A: A BYOD license is not required if users plan to program the DIY Kit using Arduino or ESPHome. However, a license is necessary to access TRMNL’s official plugins. Users can fully program the kit independently without a license.