Arduino Bootloader Programming – Getting Started with ARM Microcontrollers
Bootloaders are an important yet less talked about component of microcontroller programming. You may have come across the term, or even directly interacted with the bootloaders on your microcontrollers, but how much do you really know about what they do? Join us in this article to learn all about bootloader programming and how to get started with ARM microcontrollers!
In this guide, we will be covering the following and more!
- What are ARM Microcontrollers?
- Introduction to Bootloaders & What They Do
- What problems do bootloaders solve?
- Popular ARM Microcontrollers with Programmable Bootloaders
- Tutorial: How to use a Bootloader to Flash Firmware
- Programming a Custom Bootloader
What are ARM Microcontrollers?
Quite simply, ARM Microcontrollers are microcontrollers that utilise an ARM processor. ARM is short for Advanced RISC Machines, in which RISC stands for Reduced Instruction Set Computing.
In contrast with CISC (Complex Instruction Set Computing) processors, RISC processors use simpler instructions to interface with hardware. This brings a few key benefits, including:
- Better performance due to simpler instructions
- Less chip-space is required due to a reduced number of instructions
- Reduced per-chip cost due to simpler hardware design
Because of this, ARM processors are very suitable for microcontrollers, where high performance, low resource consumption, and low cost are critical. For example, the ATSAMD51 used in the Wio Terminal and the Seeeduino XIAO’s ATSAMD21 are both ARM based processors. The popular STM32 microchip series is also based on ARM architecture.
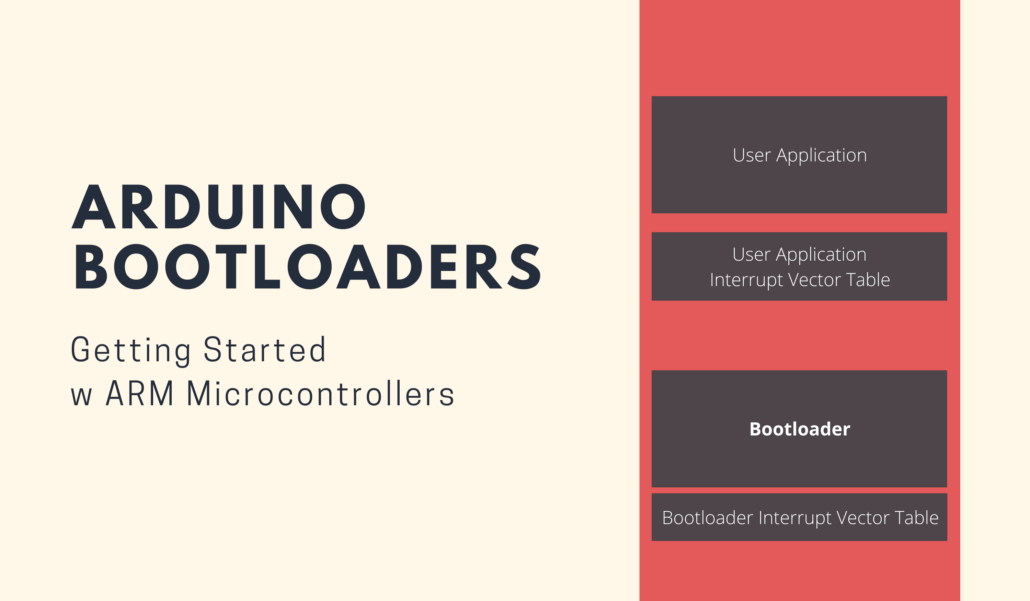
Introduction to Bootloaders
A bootloader is a small piece of code that runs when the microcontroller is first started. This code is used to copy the actual application from internal or external memory (usually internal flash for microcontrollers) to the device RAM, where it can be executed. Because the bootloader is run at every boot, we can easily change or upgrade the device firmware at any time.

What Problems do Bootloaders Solve?
Bootloaders allow us to update a deployed system easily to fix bugs or simply update its features. Without a bootloader, we would have to interface with the chip on the PCB directly with specialised hardware like the JTAG debugger shown below, even for simple changes.

While it isn’t the focus of this article, JTAG is an industry standard that is commonly used for hardware debugging. Naturally, it can also be used to upload new firmware to our microcontrollers. However, in addition to the fact that using JTAG requires some expertise beyond that of the common hobbyist, some modern microcontrollers do not provide direct access to the PCB – rendering JTAG infeasible.
Thus, the bootloader was born. With a common interface for loading new applications, we can update our firmware without using JTAG!
Bootloader Benefits
While bootloaders were developed out of convenience, they have also evolved to bring the following benefits.
1. Bootloaders are Customisable
Since bootloaders are code, we can program them to behave differently. For example, we can customise the bootloader to receive the firmware from different interfaces such as an SD card, from the internet, I2C / UART etc. depending on which is more convenient.
Here are some examples of how bootloaders may differ.
- Wired Connection – Eg. Arduino bootloader, where the binary (compiled sketch) is transmitted via USB
- Wireless Connection – Eg. OTA or Over The Air updates, which behave similarly except that data transfer is made wireless
- Secure Bootloaders – Data is transferred in an encrypted form with mutual authentication
2. Bootloaders Make Development Safer
If the main code is bugged and causes our microcontroller to freeze, the bootloader acts as a failsafe to allow that result to be easily reversed, since we can easily replace the bugged firmware through it.
If there is no bootloader, or if the bootloader is faulty, there would be no way to easily recover from a bugged program. When this happens, we say that our device has become “bricked”. The procedure to recover from a “bricked” state varies from device to device. In some cases, it may even be impossible.
3. Bootloaders Contribute to User Experience
While a comparatively minor benefit compared to the first two, bootloaders allow the user to recognise that the device is ON and loading by providing indications of early initialisation of certain peripherals and boot decisions.
UF2 Bootloader Format
The most common format that you’ll come across when working with microcontroller bootloaders is UF2. The UF2, or USB Flashing Format, is a bootloader standard developed by Microsoft that allows us to program microcontrollers with different firmwares over the Mass Storage Class (removable drive).
The bootloader is compatible with many platforms, including the Arduino IDE, MakeCode, ArduPy and CircuitPython. To read more about the history of bootloader formats and UF2, visit the official Microsoft Makecode page on the subject here.
Later in this article, I will show you how we can use UF2 to easily flash a new firmware onto our microcontroller through a simple drag and drop, so stay tuned!
Popular ARM Microcontrollers
At this point, you might be wondering about what kinds of microcontrollers can take advantage of the convenient UF2 bootloader. Well, the practical answer to that is… all of them – as long as the UF2 bootloader has been ported to the device!
In this section, I’d like to recommend a few ARM microcontrollers for your consideration. The team at Seeed has ported the UF2 bootloader for all of these devices, so you can use it to easily flash new firmware !
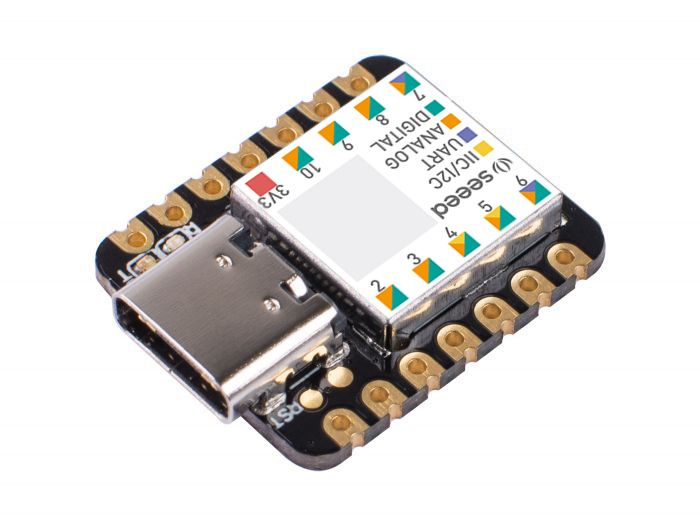
Seeeduino XIAO
The Seeeduino XIAO is the smallest Arduino compatible board in the Seeeduino Family. Despite its small size, the Seeeduino XIAO is equipped with the powerful SAMD21 microchip and a variety of hardware interfaces. The Seeeduino XIAO uses the UF2 bootloader, which gives us convenient access to both Arduino and MicroPython firmwares.
Product Features:
- ARM Cortex-M0+ 32bit 48MHz microcontroller (SAMD21G18) with 256KB Flash, 32KB SRAM
- Compatible with Arduino IDE & MicroPython
- Easy Project Operation: Breadboard-friendly
- Small Size: As small as a thumb(20×17.5mm) for wearable devices and small projects.
- Multiple development interfaces: 11 digital/analog pins, 10 PWM Pins, 1 DAC output, 1 SWD Bonding pad interface, 1 I2C interface, 1 UART interface, 1 SPI interface.
Keen to learn more about the Seeeduino XIAO? Visit its product page on our Seeed Online Store now!
Wio Terminal
The Wio Terminal is a complete Arduino development platform based on the ATSAMD51, with wireless connectivity powered by Realtek RTL8720DN. As an all-in-one microcontroller, it has an onboard 2.4” LCD Display, IMU, microphone, buzzer, microSD card slot, light sensor & infrared emitter.
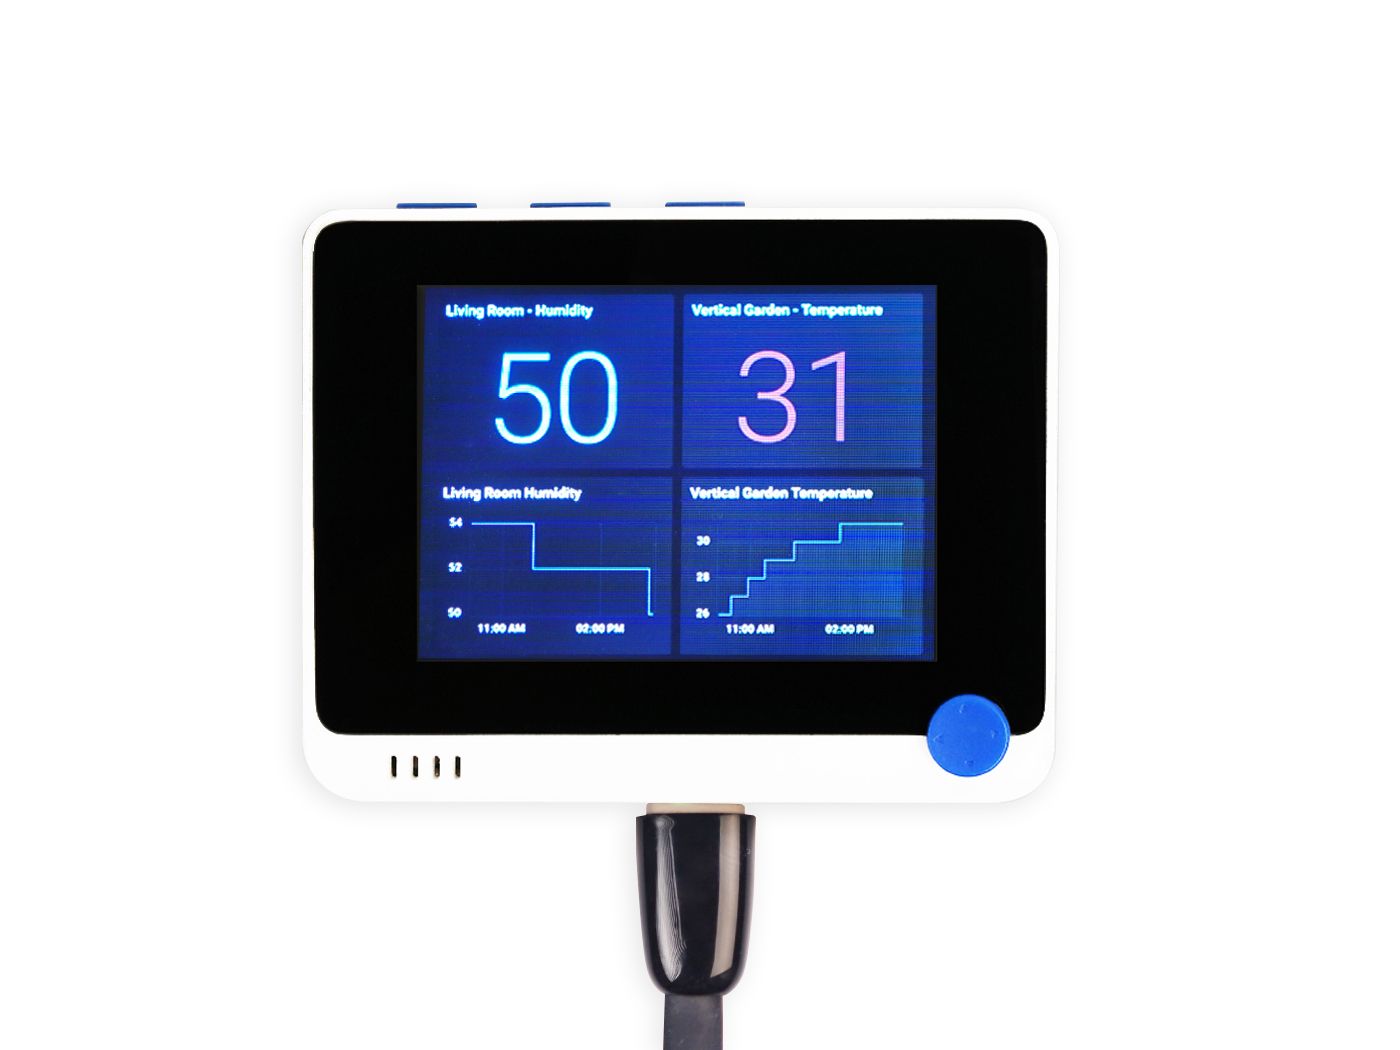
The Wio Terminal also uses the UF2 bootloader, which allows us to flash different firmwares to it. As a result, it can be programmed through a variety of platforms, including the resource-rich Arduino IDE and the beginner friendly MicroPython!
Product Features:
- Powerful MCU: Microchip ATSAMD51P19 with ARM Cortex-M4F core running at 120MHz
- Reliable Wireless Connectivity: Equipped with Realtek RTL8720DN, dual-band 2.4GHz / 5GHz Wi-Fi (supported only by Arduino)
- Highly Integrated Design: 2.4” LCD Screen, IMU and more practical add-ons housed in a compact enclosure with built-in magnets & mounting holes
- Raspberry Pi 40-pin Compatible GPIO
- Compatible with over 300 plug&play Grove modules to explore with IoT
- USB OTG Support
- Support Arduino, CircuitPython, Micropython, ArduPy, AT Firmware, Visual Studio Code
- TELEC Certified
If you’re interested to pick up a Wio Terminal, please visit its product page on the Seeed Online Store!
Tutorial: Flashing Firmware with the UF2 Bootloader
Now that we know what bootloaders do, it’s time for a simple tutorial on how we can use it to flash different firmwares onto our ARM microcontrollers! In this example, I will demonstrate how to use the UF2 bootloader to conveniently flash the ArduPy firmware onto a Seeeduino XIAO or Wio Terminal, which have Arduino firmwares by default. Let’s go!
Required Materials
To follow along with this tutorial, you will need the following materials.
- Seeeduino XIAO or Wio Terminal
- Windows, Mac or Linux Computer
- Wired USB Connection
This tutorial is also applicable to other microcontroller boards with the UF2 bootloader. However, you will need to obtain the firmware in UF2 format for your particular device. Otherwise, your device may not work as intended!
Step 1: Enter Bootloader Mode
First, connect your device to your PC via USB connection. Then, enter the bootloader mode by resetting the device quickly.
- For more details on how to do this with the Wio Terminal, please refer here.
- For the Seeeduino XIAO, please refer here.
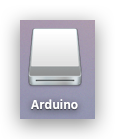
If done successfully, a USB drive named Arduino should appear on your PC. Navigate to this drive location.
Step 2: Download ArduPy UF2 Firmware (Wio Terminal / Seeeduino XIAO)
Step 3: Flash the ArduPy Firmware
Drag the downloaded .UF2 file and drop it in the ARDUINO USB drive. The board will automatically be ejected. Now, reset the board to load in the new ArduPy firmware!
Step 4: Test the New Firmware
If the previous steps were performed correctly, a USB drive named ARDUPY should have appeared on your PC. Open the main.py python file in the drive directory with a text editor of your choice, such as Microsoft Visual Studio Code, Atom, or Sublime Text.
Finally, copy the following code into main.py, save the file and reset your microcontroller.
Note: If you are using another microcontroller, you will have to redefine the LED pin to correspond to the one on your device.
from machine import Pin, Map
import time

LED = Pin(Map.LED_BUILTIN, Pin.OUT)

While True:
	LED.on()
	time.sleep(1)
	LED.off()
	time.sleep(1)
That concludes this tutorial! The LED on your microcontroller should now be flashing on and off every second. The steps we’ve followed here can also be used to flash any other kind of firmware, such as for MicroPython, MakeCode or CircuitPython. As you can see, the process is made very simple thanks to the UF2 bootloader!
How to Program a Custom Bootloader
With all that we’ve discussed about how bootloaders are customisable and useful in a variety of ways, you might be wondering how to program your very own custom bootloader.
Option 1: Simply Use an Existing Bootloader
Writing a bootloader from scratch is no simple task, even for an experienced low-level programmer. Fortunately, most manufacturers provide a bootloader with the essential functions so that you can focus on building your applications instead of the bare metal workings. For a list of processors supported by the UF2 bootloader used in today’s tutorial, please visit the UF2 GitHub Repository.
Option 2: Port an Existing Bootloader
If you absolutely must use a custom bootloader, your best bet would be to port an existing one. There are many open source bootloaders available, from compact ones built for 8 bit platforms to those for complex linux systems. If you can find a bootloader that matches your desired purpose, you can tweak the code to work for your microcontroller instead. However, note that this process will still not be easy!
Option 3: Write A Bootloader from Scratch
For the brave ones who still want to take on the challenge of writing a custom bootloader from zero, the first step will be to understand the ins and outs of how a bootloader really works. Here are some resources to help you get started:
- How to Develop Your Own Bootloader: A Comprehensive Tutorial on Apriorit
- ARM: How to Write a Bootloader on ARM Developer
Wrapping Up
That concludes today’s article on Arduino Bootloader Programming! I hope that you’ve developed a better understanding of what bootloaders are, why they’re important and how we can use the UF2 bootloader format to easily flash different firmwares to our microcontrollers.
To end off, here are some related resources that you might be interested in:
- Seeed Fork of UF2 Bootloader for SAMD21 and SAMD51
- Seeed Wiki: How to Build ArduPy Firmware from Source Code
- Forum: What is a Bootloader and when do you need one?
- Bootloader – ScienceDirect