Use Seeeduino Xiao to make a Pocket Distance Alarm – making sure others stay one meter away

A portable distance alarm that will give light and sound warning when people get into your one meter circle.
Things used in this project
| Hardware components | ||||
| Seeeduino XIAO | × | 1 | ||
| Grove – LED Pack | × | 1 | ||
| Grove – Buzzer | × | 1 | ||
| Grove – Time of Flight Distance Sensor(VL53L0X) | × | 1 | ||
| Software apps and online services | ||||
| Arduino IDE | ||||
| Hand tools and fabrication machines | ||||
| Electric Soldering Iron |
Story
According to a press release from the Ministry of Health on Thursday, Singapore has announced stiff fines and jail for those who do not observe social distancing measures put in place to contain the coronavirus outbreak. People who do not observe physical distancing of one meter in “non-transient” interactions can be fined up to 10, 000 Singapore dollars ($6, 985) or be jailed up to six months, or face both penalties.
Such interactions include people on seats not fixed to the floor, who intentionally sit less than one meter from another seated individual in a public place. People standing in a queue in public places who are less than one meter away from the next person, will also be prosecuted, according to the rules.
It is necessary in this critical period to keep distance from others. However, it is not that easy to keep this in mind every second or remind those careless people who used to be too close with others. I made this little pocket distance alarm to sovle this problem, which could give out light and sound warning when people getting into your one meter circle.
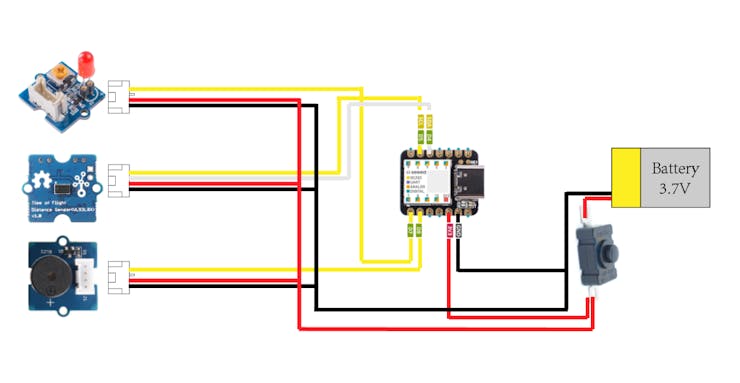
Step 1: Hardware Connection
Since it is a small wearable product that could not have too big size, I choose to use Seeeduino Xiao as the main board. Seeeduino Xiao is the new release product of Seeedstudio, and the smallest board I could ever have.
The hardward connection could be found as followed.
P.S.: I draw this as 1:1 ratio, and Seeeduino Xiao is really xiao!!!
BTW, “Xiao” means “Small”(小) in Chinese.
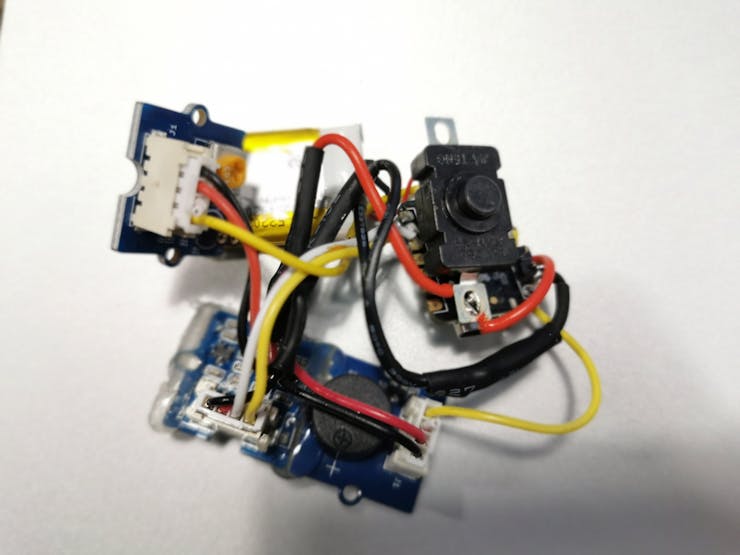
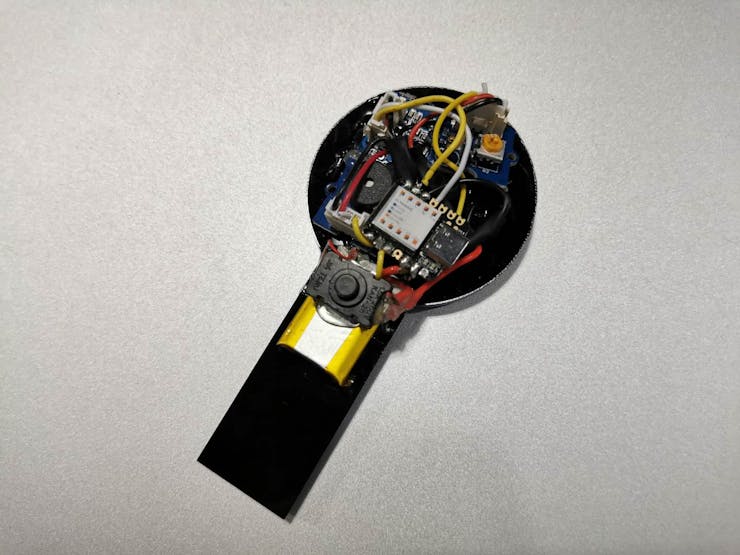
Step 2: Soldering
Though Xiao is really tiny and cute, the sodering part needs patience. It is said that the breakout board of Xiao will be released soon, therefore hopefully we could enjoy both the tiny size of Xiao and easy grove connection without sodering soon.
My sodering skill is far from excellent. As the outcome you could see.
1 / 2
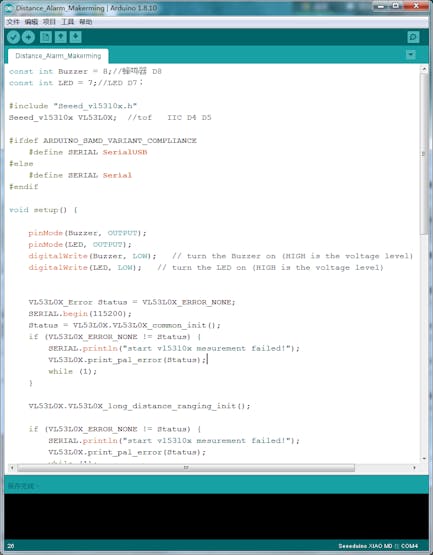
Step 3: Upload the Code and Test
- First you need to download the VL53L0X Library from Github.
- Extract the Grove-Ranging-sensor-VL53L0X-master.zip file into the Arduino library folder.
- Upload the demo. If you do not know how to upload the code, check How to upload code.
- Open the Serial Monitor of Arduino IDE by click Tool-> Serial Monitor. Or tap the Ctrl+Shift+M key at the same time. Choose 115200 serial, if every thing goes well, you will get the distance result from the monitor.
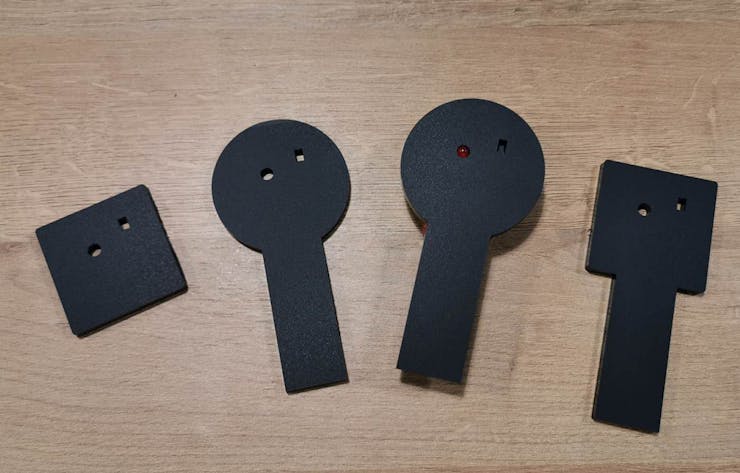
Step 4: Design the Shell and Laser Cutting
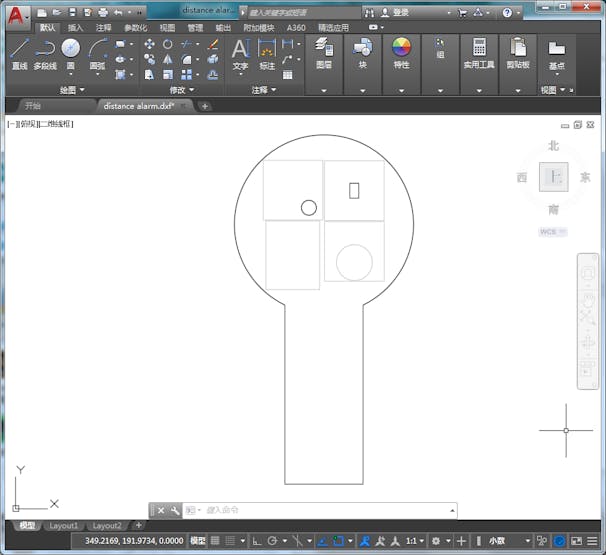
Note: The grey line is for indicating the module position, only black line should be cut.
Of cause you could design more shape of the shell as long as you could fit all things in.
Step 5: Assembling the Parts
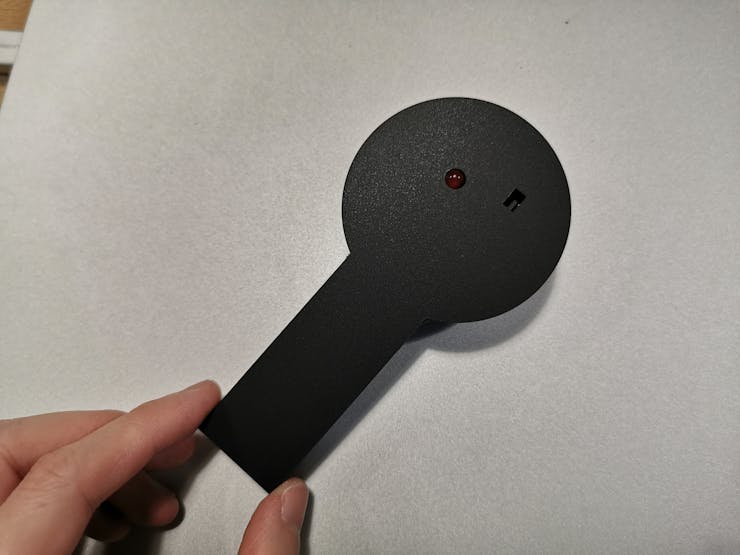
Step 6: Finish!
Arduino Code
const int Buzzer = 8;// D8
const int LED = 7;//LED D7

#include "Seeed_vl53l0x.h"
Seeed_vl53l0x VL53L0X;  //tof   IIC D4 D5

#ifdef ARDUINO_SAMD_VARIANT_COMPLIANCE
    #define SERIAL SerialUSB
#else
    #define SERIAL Serial
#endif

void setup() {

    pinMode(Buzzer, OUTPUT);
    pinMode(LED, OUTPUT);
    digitalWrite(Buzzer, LOW);   // turn the Buzzer on (HIGH is the voltage level)
    digitalWrite(LED, LOW);   // turn the LED on (HIGH is the voltage level)


    VL53L0X_Error Status = VL53L0X_ERROR_NONE;
    SERIAL.begin(115200);
    Status = VL53L0X.VL53L0X_common_init();
    if (VL53L0X_ERROR_NONE != Status) {
        SERIAL.println("start vl53l0x mesurement failed!");
        VL53L0X.print_pal_error(Status);
        while (1);
    }

    VL53L0X.VL53L0X_long_distance_ranging_init();

    if (VL53L0X_ERROR_NONE != Status) {
        SERIAL.println("start vl53l0x mesurement failed!");
        VL53L0X.print_pal_error(Status);
        while (1);
    }

}

void loop() {

    VL53L0X_RangingMeasurementData_t RangingMeasurementData;
    VL53L0X_Error Status = VL53L0X_ERROR_NONE;

    memset(&RangingMeasurementData, 0, sizeof(VL53L0X_RangingMeasurementData_t));
    Status = VL53L0X.PerformSingleRangingMeasurement(&RangingMeasurementData);
    if (VL53L0X_ERROR_NONE == Status) {
        if (RangingMeasurementData.RangeMilliMeter >= 2000) {
            SERIAL.println("out of range!!");
            digitalWrite(Buzzer, LOW);   // turn the Buzzer on (HIGH is the voltage level)
            digitalWrite(LED, LOW);   // turn the LED on (HIGH is the voltage level)

        }
           else if (RangingMeasurementData.RangeMilliMeter <= 1000) {
            digitalWrite(Buzzer, HIGH);   // turn the Buzzer on (HIGH is the voltage level)
            digitalWrite(LED, HIGH);   // turn the LED on (HIGH is the voltage level)
            SERIAL.print("Distance:");
            SERIAL.print(RangingMeasurementData.RangeMilliMeter);
            SERIAL.println(" mm");
           }
              else {
                  digitalWrite(Buzzer, LOW);   // turn the Buzzer on (HIGH is the voltage level)
                  digitalWrite(LED, LOW);   // turn the LED on (HIGH is the voltage level)
                  SERIAL.print("Distance:");
                  SERIAL.print(RangingMeasurementData.RangeMilliMeter);
                  SERIAL.println(" mm");
              }

    }
    else {
        SERIAL.print("mesurement failed !! Status code =");
        SERIAL.println(Status);
        digitalWrite(Buzzer, LOW);   // turn the Buzzer on (HIGH is the voltage level)
        digitalWrite(LED, LOW);   // turn the LED on (HIGH is the voltage level)

    }

    delay(250);


}
Details for this project could also be founded at Hackster.io
—————————————————————————————————————-
I guess you cannot wait showing off your great work to your families and friends already! Run and go shooting some great pictures and videos now! You are very welcomed to also share your unique work with us. Should you have any further question about this project, or want to share your work with me, feel free to drop an email to [email protected]. I am Makerming from Shenzhen, China. Finally, thanks for reading, your comments are the biggest support to my work.