BIOS Configuration Options on The ODYSSEY – X86J4105

What is BIOS (Basic Input/Output System)?
BIOS (Basic Input/Output System) is the firmware used for performing hardware initialization during the booting process, and to provide runtime services for operating systems and programs. In modern PCs, the BIOS initializes and tests the system hardware components, and loads a bootloader from a mass memory device which then initializes an operating system.
Normally modern PC user doesn’t have to access the BIOS during the entire life of their PC, as there aren’t many things they can do with it. The ODYSSEY – X86J4105 has provided many BIOS configuration options such as fan control, Arduino power control, wake-on-lan, etc. Here is an article explaining each configuration in detail, let’s jump into the BIOS configuration.
FAN Control

The EMMC version comes with a FAN on the back of the board, you may have noticed that the FAN isn’t always on when operation because there is a temperature trigger point for the FAN. By the path “Chipset”>>”FAN Control”, you are able to set the FAN in three modes: “normal”, “positive”, “and disabled”.

Arduino Power Control
One of the big differences between the ODYSSEY – X86J4105 and most other mini PCs such as the ODROID-H2 is the onboard Arduino compatible processor: ATSAMD21 Arm Cortex-M0. Onboard Arduino co=processor allows you to do some Arduino projects on the ODYSSEY – X86J4105 without attaching an extra Arduino Uno. We believe this provides a lot of convenience for Arduino users. However, if you are not a fan of Arduino, you can also turn the power off for the Arduino processor by accessing the path “Chipset”>>”Arduino power control” and choose “disabled”

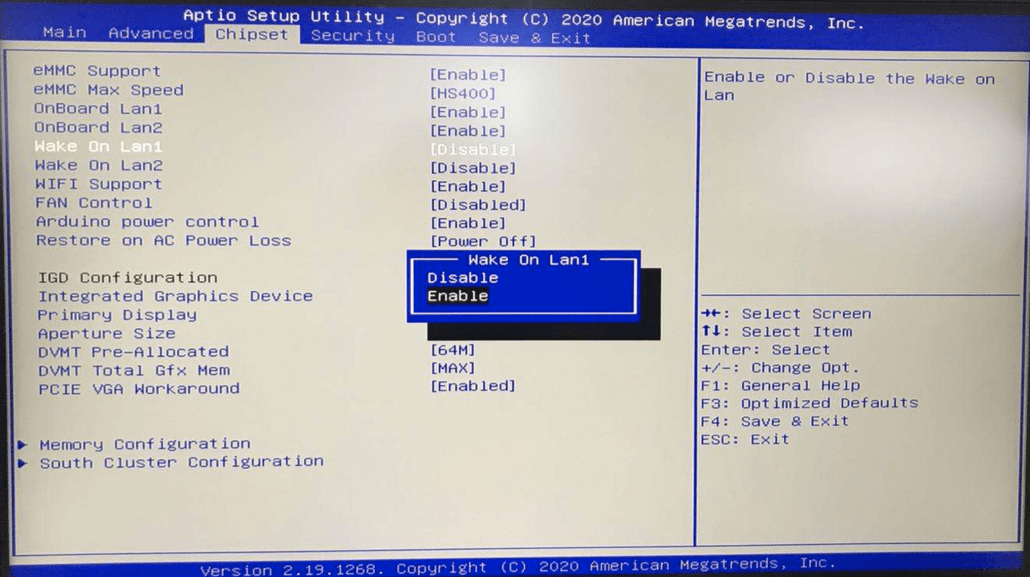
Wake On LAN
There are two Gigabit Ethernet ports on the ODYSSEY – X86J4105, both of them can be set up as Wake-On-Lan so that you can wake up the board from your mobile phone or a Raspberry Pi remotely. The Wake-On-Lan function is disabled by default. If you want to enable it, also under the “Chipset” section, you can find the corresponding “Wake On Lan1” or “Wake On Lan2” easily. And here is also a tutorial to teach you how to use Raspberry Pi 4 as a WOL server for the ODYSSEY – X86J4105.
CPU Power Configuration
The TDP for the Celeron J4105 is 10 watts. In the BIOS of the ODYSSEY – X86J4105, the CPU power can be increased to 15 or decreased to 6 based on your application needs. However, the CPU will perform underclocking when CPU temperature exceeds 85℃.

GPIO Configuration
Another interesting feature of the ODYSSEY – X86J4105 is the onboard Raspberry Pi compatible 40-Pin, which makes it possible to add Raspberry Pi HAT on the ODYSSEY – X86J4105. In addition, you are able to configure every pin to have different functions from the BIOS.


Summary
We believe these configuration options make the ODYSSEY – X86J4105 a lot more different from regular mini PCs, and we hope that even in the BIOS configuration, all of our users can have fun playing with the board. If you have any thoughts, good ideas, and projects that you want to share with us, welcome to discuss in our forum the ODYSSEY section.