Accelerometers: Piezoelectric, MEMs and Piezoresistive Accelerometers Explained
Have you ever wondered how does your phone screen auto-rotates? This is all thanks to the Accelerometers! In today’s article, we will be covering everything you need to know about Accelerometers, as well as related motion sensors!
Before we get onto our main dish, let’s recap a few concepts that would help you understand accelerometers better:
- I2C: Also known as Inter-Integrated Communication, it is a popular serial communication protocol, a two-wire data transfer bus.
- SPI: Also known as Serial Peripheral Interface, it is a synchronous serial data protocol that acts as an interface bus.
- ADC: Also known as Analog-to-Digital Converters, they basically convert an analog input into a digital input.
Should you have any doubts about these concepts, do click on the links to read these articles in depth!
Putting that aside, let’s look at what will be covered in this article:
- Overview of Accelerometers
- Formulas and calculations
- Recommendations
- Applications
- Projects
- Related products
Overview of Accelerometers
What is an Accelerometer?
Accelerometers are electromechanical devices that measure acceleration, the rate of change in velocity of an object. Simply put, it is a device used to respond to any vibrations associated with movement.

How does an Accelerometer work?
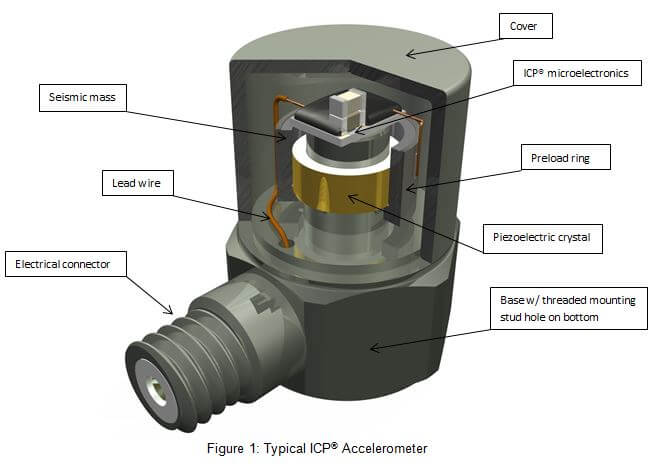
In order to understand how an accelerometer works, you need to know what goes into an accelerometer. Here’s a simple diagram to help you with that, here we’re using the commonly used piezoelectric accelerometer as an example:

As its name suggests, a piezoelectric accelerometer uses a piezoelectric natural quartz crystal or lead zirconate titanate (PZT) which could be referred to as the piezoelectric effect. When an accelerative force is applied upon it, the crystal will produce a voltage that is proportional to the accelerative force. The force will then be measured.
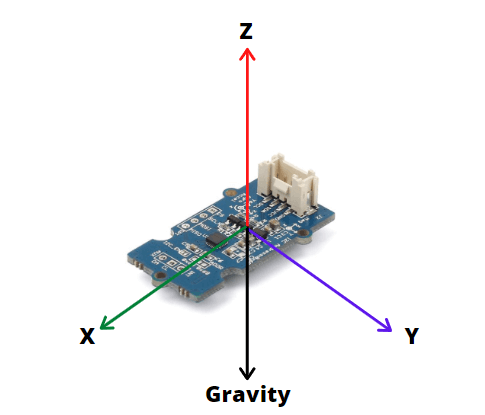
To give a simple example, the image below is a 3-axis MPU9250 accelerometer sensor. If you were to leave it flat on the ground with Z-axis facing up, Z-axis output of sensor = 1 g or 9.8m/s^2 while X and Y = 0. This is because there is no other force acting upon the X and Y-axis, the gravitational force does not affect them.
Note: With “g” referring to the gravitational force and m/s^2 as the unit of measurement for acceleration (we will go in-depth in the latter part).
If you’re interested to learn the working of an accelerometer in-depth, do check out Instrumentation Today’s page on how a natural quartz crystal is cut and used in replacement of lead zirconate titanate (PZT).
Variations of Accelerometer
We did briefly mention about Piezoelectric accelerometer earlier, but do you know that there are many other accelerometers? Though we will only focus on the few common ones. Let’s take a closer look at each of them!
Piezoelectric Accelerometer
As we know the name of this accelerometer comes from the Piezoelectric quartz crystal, but a common piezoelectric accelerometer uses lead zirconate titanate (PZT). This sensing element would produce a proportional electric charge or output under acceleration, and it measures vibration.
The Piezoelectric accelerometers are often used for test and measurement purposes. What’s great about them is that they’re easy to install, provides a wide frequency response as well as high sensitivity. Thus, making them a popular choice for vibration testing!
Piezoresistive Accelerometer
Though Piezoresistive accelerometer may sound similar to the Piezoelectric accelerometer, not to be mistaken, they are pretty different!
How a Piezoresistive accelerometer works are pretty alike to a strain gauge, it measures stress. It is made with a Piezoresistive material and it’ll be deformed after a force is applied to it where the change in resistance is measured.

Piezoresistive accelerometer’s high bandwidth allows it to measure high frequency in short duration, which makes it perfect for crash or weapons testing. Though it is not as helpful for vibration testing due to its low sensitivity.
Capacitive MEMS Accelerometer
Do you know that MEMs stands for Micro-Electro-Mechanical Systems? So they’re technically a technology for manufacturing accelerometers. MEMS itself isn’t an accelerometer, but it is used to manufacture both Capacitive and Piezoresistive accelerometers! Unlike the other two accelerometers we mentioned, it measures the capacitance changes in the seismic mass under acceleration.

Capacitive MEMS accelerometers are actually the smallest and cheapest amongst its kind, and this is thanks to the MEMS fabrication technology! They excel in measuring low-frequency motion, vibration and steady-state acceleration. Thus they’re very prevalent and could be found in our daily lives, such as our phone.
Formulas and calculations
What is Acceleration?
Acceleration basically refers to the change in velocity over a period of time. So what is velocity? Velocity is your speed but in a certain direction.
As Newton’s three law of motion states:
- Things that will stay still and things that are moving keep moving with a steady speed unless a force of some kind pushes or pulls on them.
- When a force acts (pushes or pulls) on an object, it changes the object’s speed or direction (in other words, makes it accelerate). The bigger the force, the more the object accelerates.
- When a force acts on an object, there’s an equal force (called a reaction) acting in the opposite direction. This law is sometimes written, “action and reaction are equal and opposite.”
Formulas
Before you can calculate acceleration, you’ll need to calculate velocity, and this is the formula for velocity:
Velocity = d/t
where d = distance and t = time.
Though velocity shares the same formula for calculating speed, you’ll need to state the direction as well.
Once you’re able to find the velocity, you can use this formula to then find acceleration:
a = v/t

where a = acceleration, v(f) = final velocity, v(i) = initial velocity and t(f) = final time and t(i) = initial time. The S.I unit for acceleration is m/s2,
Calculation
Let’s look at an example: A race car accelerates from 15 m/s to 35 m/s in 3 seconds. What is its average acceleration?
So, looking at the question, we know that:
V(f) = 35 m/s , V(i) = 15 m/s, T(f) = 3s and T(i) = 0s.
From here, we can slot the values into the formula:
A = (35 – 15)/(3-0)
A = 20/3
A = 6.66 m/s2
Ref: prepscholar
Applications of Accelerometer
Roller Coasters
How do roller coasters provide so much excitement and thrills for passengers? By using an accelerometer, anyone can test the acceleration of a roller coaster! Though it is often used in conjunction with a gyroscope.
Smartphone
Though we did mention about screen rotation earlier, there are also apps that utilise the accelerometer as well! For instance, health tracker apps. By using an accelerometer, they’re able to track your calories and how much you’ve exercise as long as you keep your phone on you!
Projects with Accelerometer
Before we get into the projects, here are some accelerometers we offer at Seeed that you might be interested to check out:
ADXL 3-Axis Accelerometers series


Now that we have understood how an accelerometer works, let’s look at some interesting projects you can do with it!
Wireless Batteryless Mouse
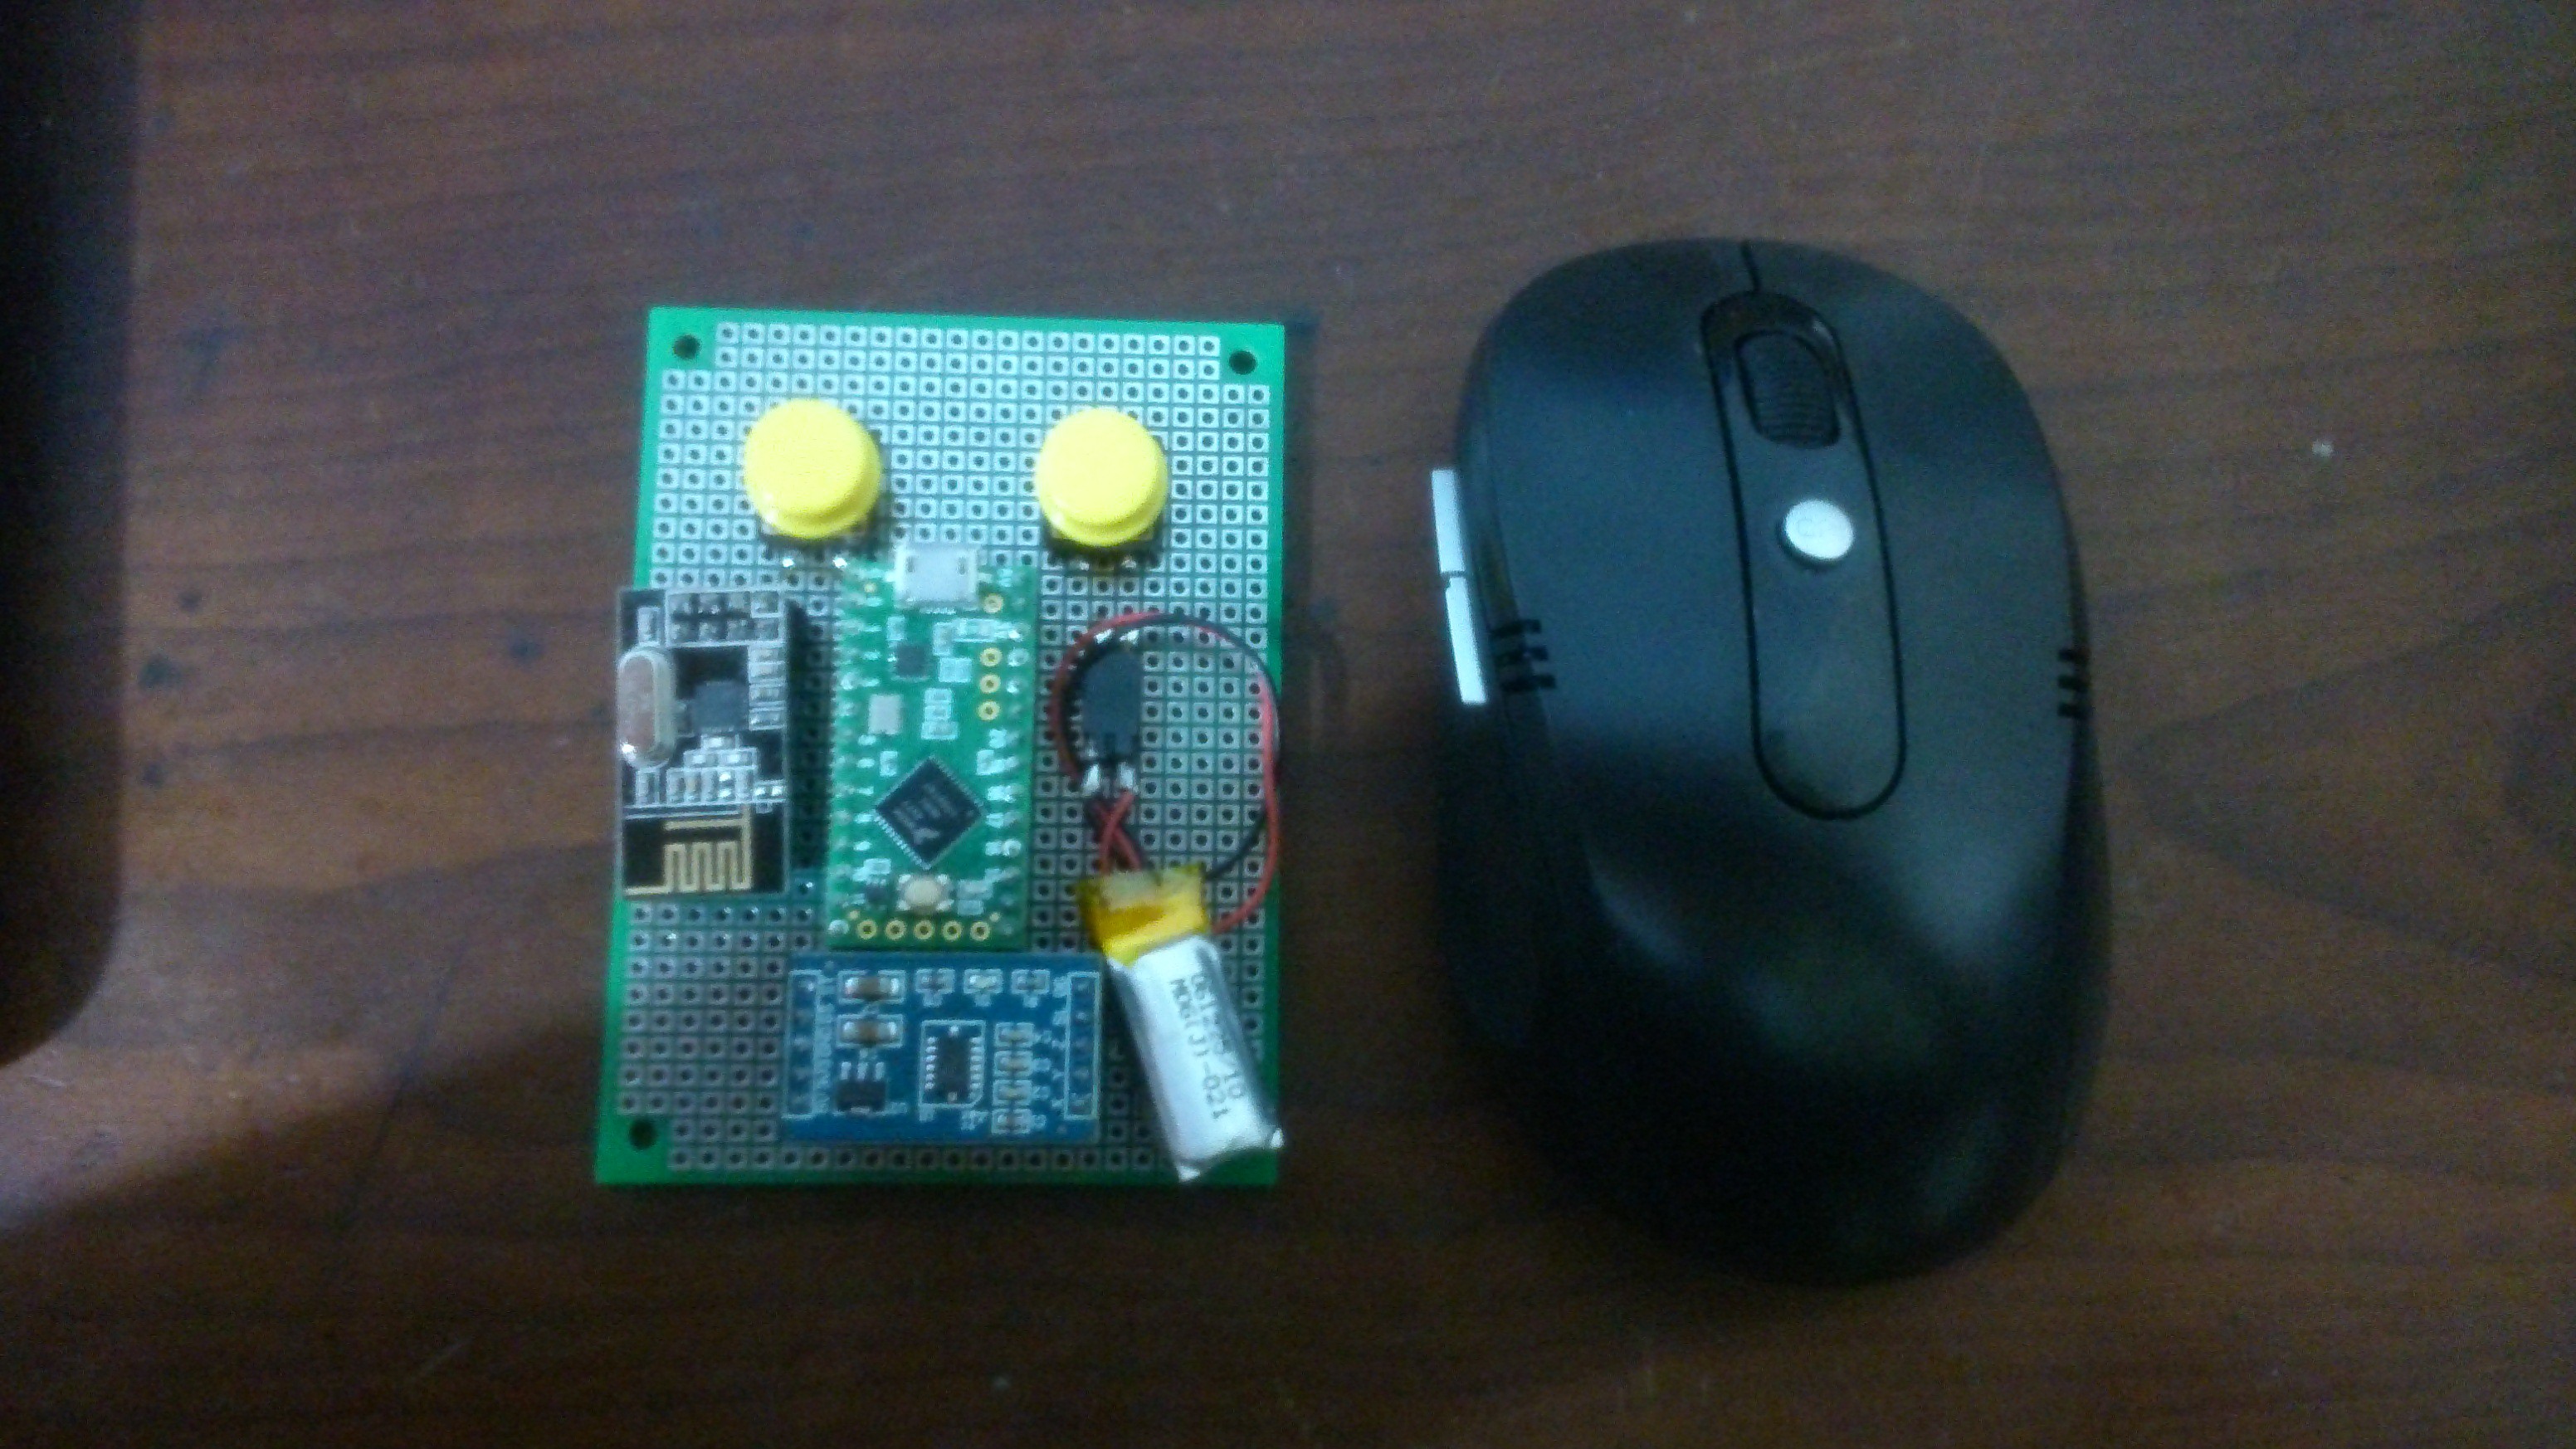
Yes, You can say goodbye to batteries and not have to worry about charging or changing the batteries in your mouse anymore! Moreover, you don’t require a lot of components to make this project, which makes it relatively simple!
What you’ll need:
- Accelerometer breakout board
- Microcontroller
- Resistors
- Boost
- PCB
If this project sounds interesting to you, do check out the description in details here!
A Posture Detector Sending Bluetooth Data to a Cordova App
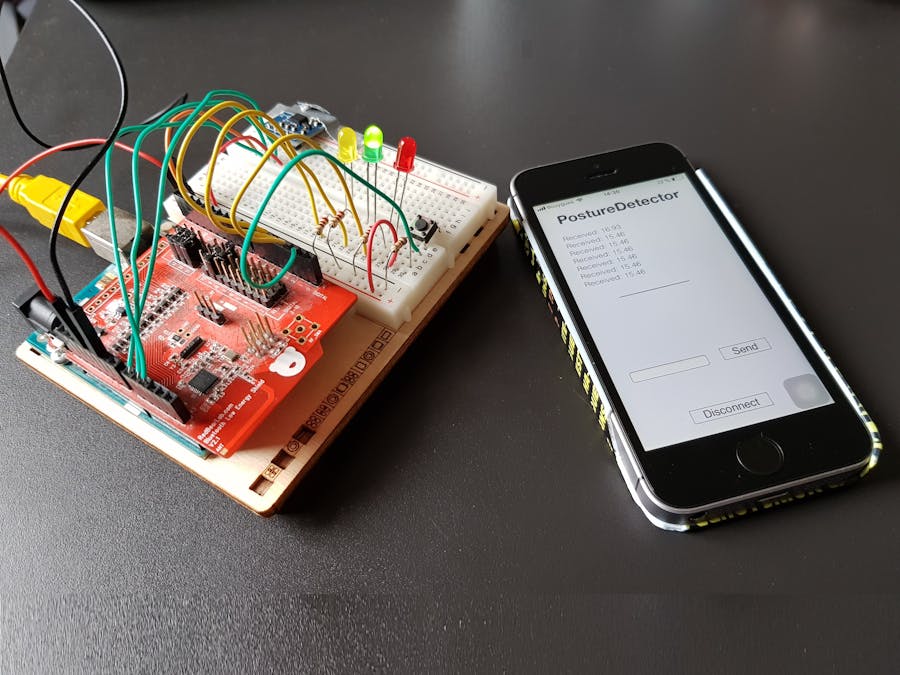
Do you struggle with back pain? This could be due to your bad posture! With this project, you’ll be alerted through your phone immediately which would help to improve your health in the long run!
What you’ll need:
- Arduino UNO/ Seeeduino V4.2
- Analog accelerometer
- LEDs: Red, Yellow, Green
- pushbutton switch
- breadboard
- BLE shield
Sounds appealing? Do check out this project for more information here!
Related Motion-Sensing sensors
As we know, accelerometers are usually used in conjunction with other motion-sensing sensors. Thus, we’ll introduce gyroscopes as well as IMUs:
Gyroscope
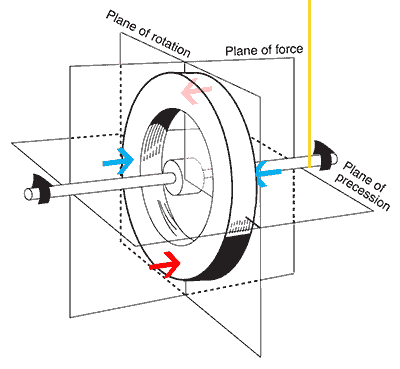
- Contains a rotor that’s suspended inside three rings called the gimbals.
- With the precession effect, this allows the gyroscopes to defy gravity when the spin-axis is rotated. Thus, it’ll automatically adjust itself sideways.
Speaking of Gyroscopes, Seeed also offers the following 6-axis gyroscope and accelerometer products:


Inertial Measurement Unit (IMU)

- IMU refers to Inertial Measurement Unit, a 9-axis sensor that measures orientation, velocity, and gravitational forces.
- Combines Accelerometer, Gyroscope, and Magnetometer into one.
Similarly, Seeed does offer a few IMUs here!


Summary
And that’s all on Accelerometers and a little about related motion-sensing sensors! We covered everything from the basics to interesting projects you can do with an accelerometer. Hope that this has helped you understand the background of accelerometers better! If you’re interested in more motion-sensing sensors related articles, do check out the links below.
Suggested Readings
How to use an MPU9250 Accelerometer and Gyroscope With Arduino – Own an MPU9250 but don’t know how to use it? Check out this blog!
Accelerometer vs Gyroscope sensor, and IMU, how to pick one? – Not sure which motion-sensing sensor suits you the best? Click on this blog to find out!
Arduino Accelerometers: ADXL356, ADXL345 vs ADXL335 – Want an in-depth accelerometers review? This blog is just what you need!