The thermal performance of single-board computers (SBCs) like the Raspberry Pi 5 is crucial for their stability and longevity. These compact devices operate in diverse environments and handle various workloads, making efficient thermal management essential. Monitoring tools like s-tui play a pivotal role by providing real-time insights into temperature, power consumption, and overall thermal dynamics. This ensures reliable performance and contributes to the SBC’s lifespan, making thermal performance a key consideration for enthusiasts and developers alike.
How we can measure/monitor thermal performance?
When it comes to monitoring the thermal performance of your Raspberry Pi 5, the s-tui module emerges as a powerful ally. S-tui, a terminal-based User Interface, provides an intuitive and graphical representation of critical performance metrics, including CPU temperature, frequency, power consumption, and utilization. This tool offers a unique advantage for those who prefer the command line, allowing users to delve into the intricacies of their Raspberry Pi’s thermal dynamics with ease. By leveraging s-tui, enthusiasts and developers can gain valuable insights into the real-time behavior of their Pi’s CPU, facilitating informed decisions about cooling solutions and optimizing performance. In this blog post, we will explore how s-tui opens a window into the thermal world of Raspberry Pi, providing a deeper understanding of its capabilities and potential challenges.
Exploring Raspberry Pi 5 Thermal Performance without Active Cooling Mechanisms
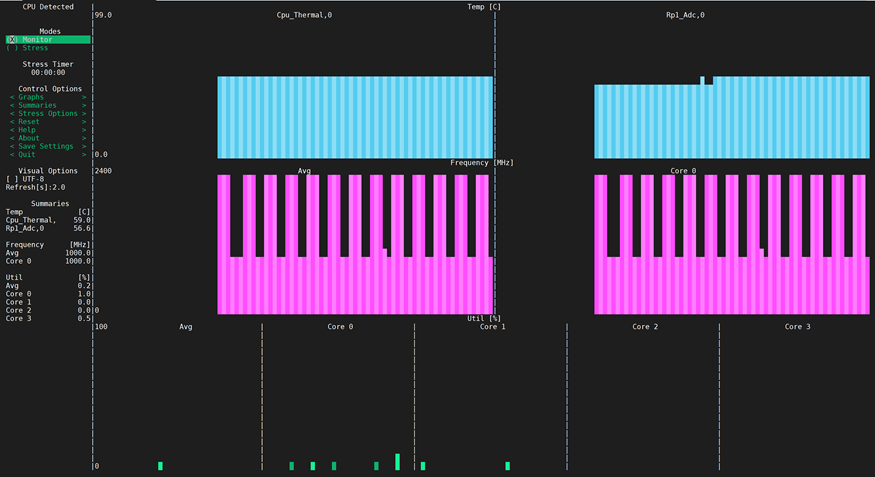
Figure01: Thermal performance visualization without active cooling mechanism (no stress applied)
It becomes evident that without the presence of a heat dissipation device, the Raspberry Pi 5 experiences an operating temperature of approximately 60°C shortly after being powered on.
Subsequently, a stress test is conducted to further examine its thermal performance.
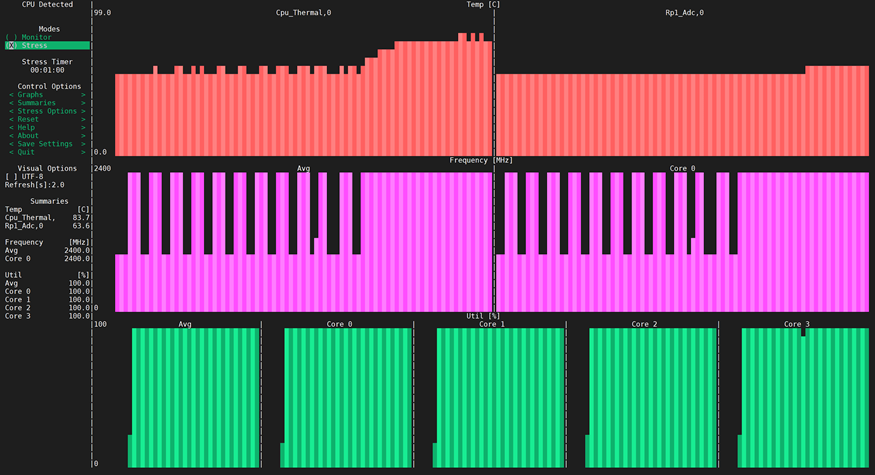
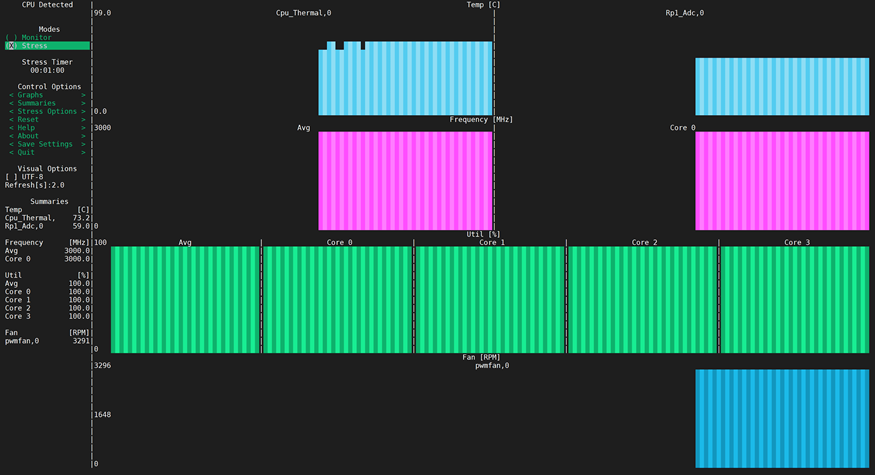
Figure02: Thermal performance visualization without active cooling mechanism (stress applied)
Time to install Active Cooler and Check Pi5 thermal performance
After subjecting the Raspberry Pi 5 to a one-minute stress test, the results reveal that operating all four cores at maximum capacity without any cooling mechanisms leads to a CPU temperature peaking at around 83°C, stabilizing at approximately 84°C. Importantly, it’s noteworthy that despite this temperature rise, no throttling is observed in this scenario.
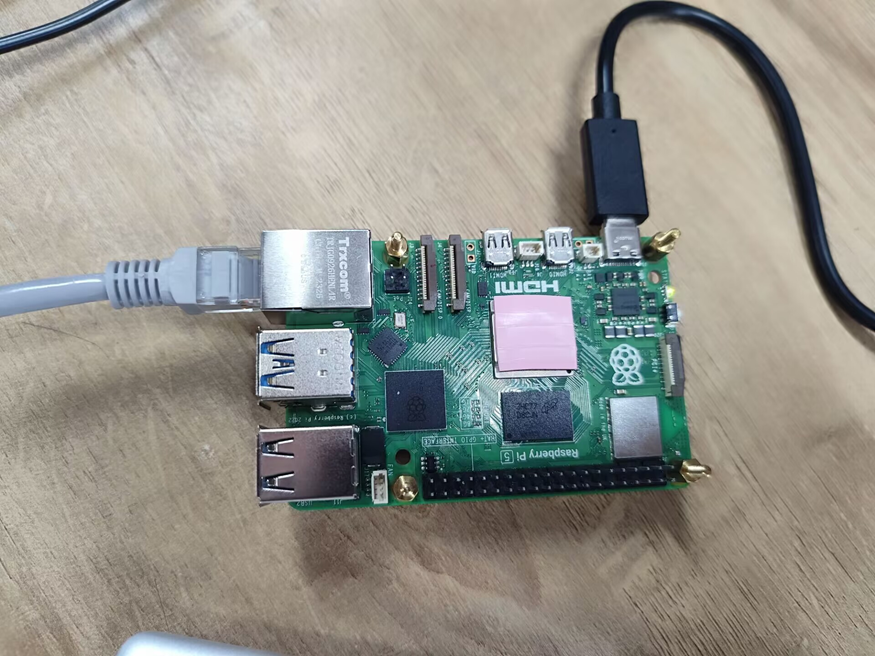
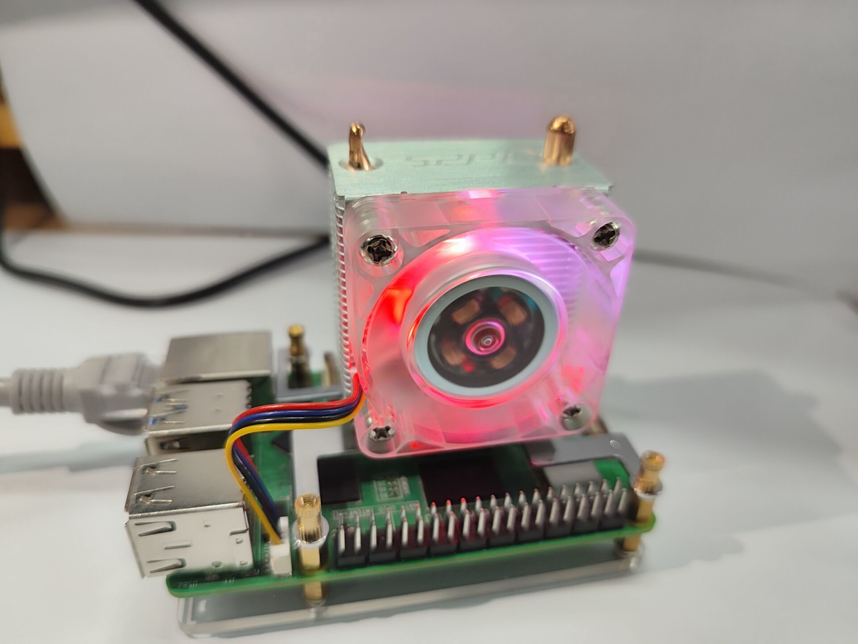
Figure 03: Active cooler which we are using for test
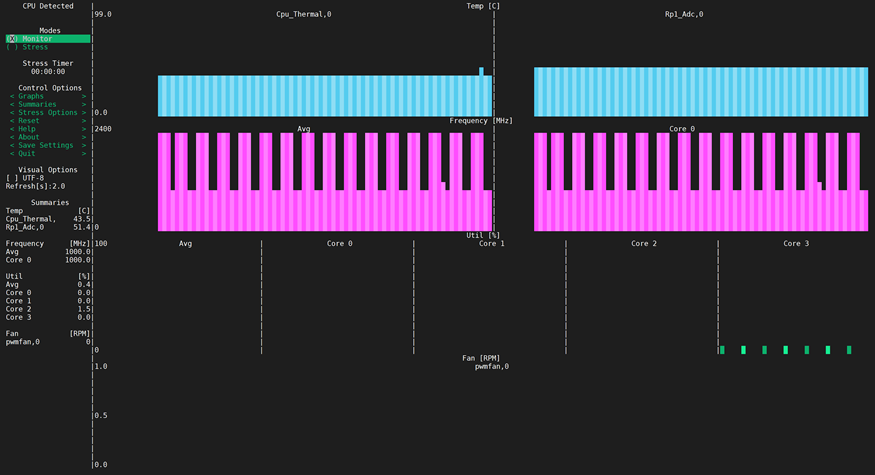
After initial power-up, the Raspberry Pi 5 registers an operating temperature of 43.5°C, a noteworthy 15°C lower than the previous reading. Notably, during this period, the cooling fan remains inactive.
Figure04: Thermal performance visualization with active cooling mechanism (no stress applied)
Then we perform a stress test on it with Active cooler
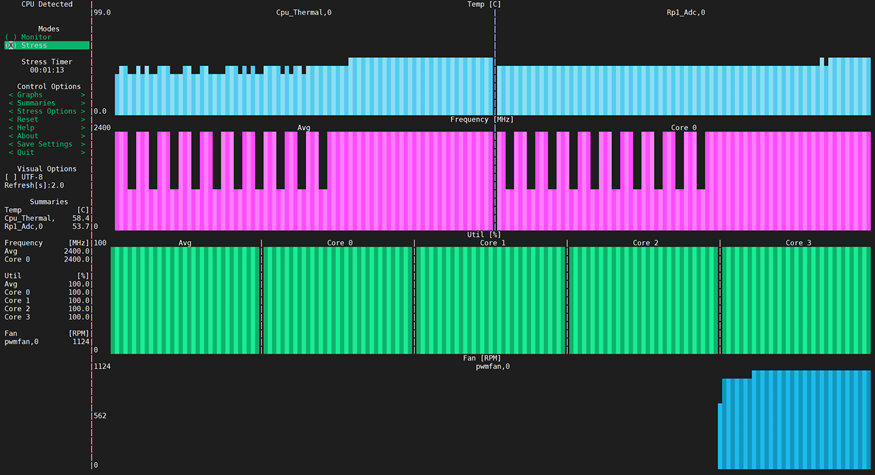
After subjecting the Raspberry Pi to a one-minute stress test, with all four cores operating at full capacity, the CPU temperature stabilized at approximately 58.4℃, hovering around 59℃. Remarkably, no throttling occurred under these conditions. This marked a significant temperature drop of 25°C compared to the initial reading. Notably, during this test, the cooling fan operated at a speed of 1124rpm. Using a silent version of the fan ensured that there was no noticeable noise during the testing phase.
Figure05: Thermal performance visualization with active cooling mechanism (stress applied and fan speed is 1124rpm)
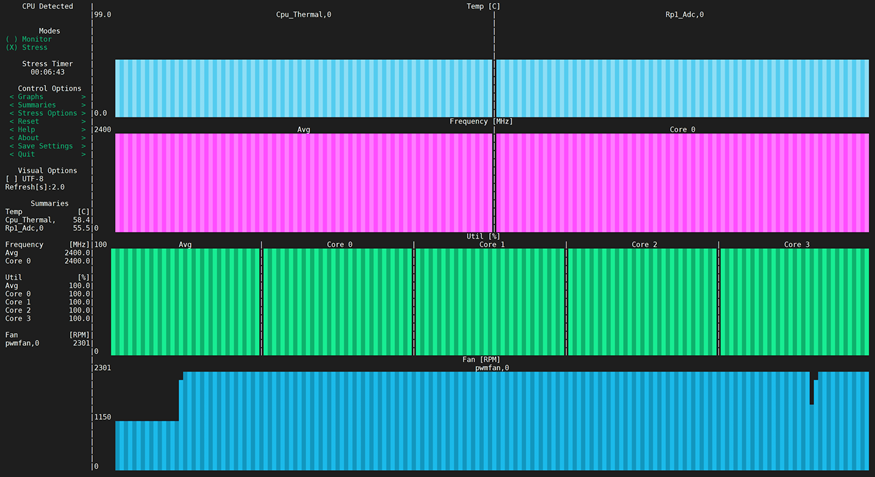
Figure06: Thermal performance visualization with active cooling mechanism (stress applied fan speed is 2301)
Following the stress test, the subsequent operation of the Raspberry Pi remains stable and essentially stress-free.
Thermal performance with Overclocking
To unlock additional performance from your Raspberry Pi, overclocking can be a valuable tool. Begin by accessing the configuration file by running ‘sudo nano /boot/config.txt’ in the terminal. In this file, you’ll find various parameters related to system settings. Locate the overclocking section and carefully adjust parameters such as ‘arm_freq’ and ‘over_voltage’ to enhance CPU performance. Keep in mind that overclocking may increase heat generation, so monitoring temperatures using tools like ‘s-tui’ is advisable. Experiment with settings incrementally and reboot to apply changes. Be cautious not to push the hardware beyond its stable limits to avoid potential instability. With careful adjustments, overclocking can offer a noticeable boost in performance for your Raspberry Pi.
Having officially tested the CPU at a successful overclock of 3GHz and the GPU at 1GHz without any hitches, we are currently in the midst of an initial orthodox test. In this phase, the CPU is conservatively configured at 2.8GHz, showcasing a seamless start and run. This deliberate approach prioritizes stability, particularly in light of the triumphant official overclocking attempt at 3GHz.
Without further ado, let’s dive straight into the stress test phase.
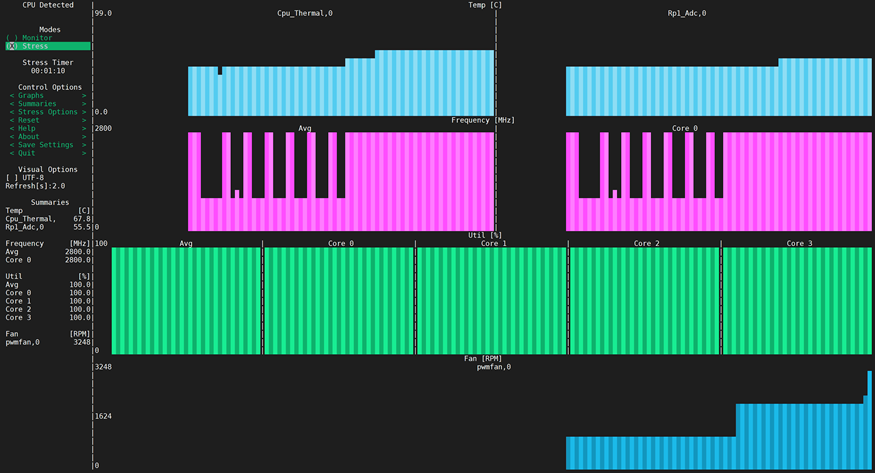
Figure 07:Thermal performance visualization active cooling mechanism with 2.8GHz overclocking
After a one-minute stress test, the 4-core 2.8GHz configuration runs smoothly without signs of stress, maintaining a stable CPU temperature at 68°C. Notably, no frequency reduction occurs under these conditions.
What will can see by setting these parameters ? CPU:3.0GHz GPU:1GHz
Upon successful startup, we proceed directly to the stress test phase.
Figure08 :Thermal performance visualization active cooling mechanism with 3.0GHz overclocking
As anticipated, overclocking to 3GHz proved successful with the 4-core processor operating seamlessly under stress conditions. The CPU temperature remained stable at 73°C, and notably, no frequency reduction occurred during this stress-free operation.
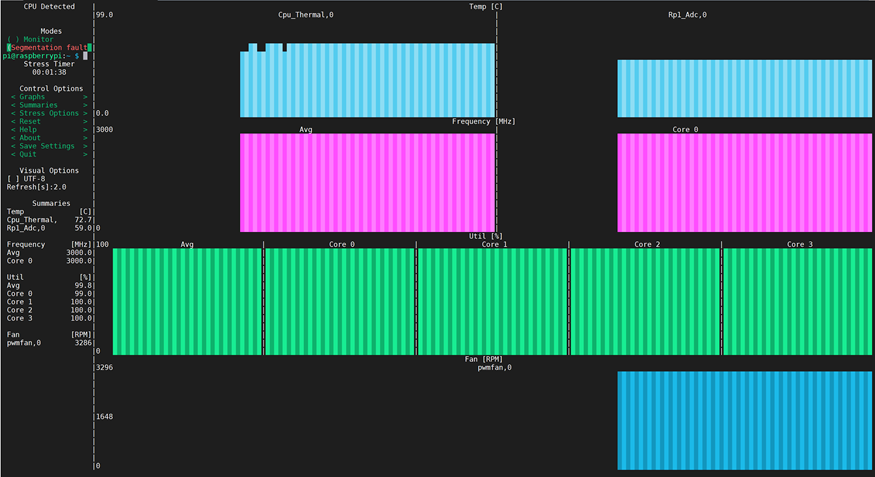
Figure09 :Thermal performance visualization active cooling mechanism with 3.0GHz overclocking system restating after while
At 1 minute and 38 seconds into the test, the system initiates an automatic restart, signaling the upper limit of Raspberry Pi overclocking at 3GHz. It’s crucial to note that surpassing this threshold can lead to system instability. Therefore, it is strongly recommended that users refrain from overclocking beyond 3GHz to ensure a stable operation. Following the test, reverting the CPU frequency back to its original setting allowed the computer to start normally without any abnormalities.
Figure10 :Pi variation comparision with standard benchmarks, source: https://www.youtube.com/watch?v=npwBOWdNUFk
In community testing, the observer utilized the official Raspberry Pi fans and simultaneously compared the results with the Pi 4B. The test bench incorporated the built-in benchmarking tool of 7-Zip, along with its POSIX port p7zip. This tool allowed us to assess the compression and decompression performance on the Pis. Additionally, we could see that the Pi demonstrated remarkable performance improvements in tasks such as memset, reflecting sequential DRAM write access, and memcpy, reflecting copying a sequential memory region. These comprehensive tests provided valuable insights into the overall performance of the Raspberry Pi system under different workloads.
Conclusion
In summary, our exploration of the Raspberry Pi 5’s thermal performance has been comprehensive and insightful. We initiated our discussion with an introduction emphasizing the importance of thermal management in single-board computers.In our investigation into Raspberry Pi 5 thermal performance, we began by adopting user-friendly tools like s-tui for effective temperature monitoring. The exploration commenced without active cooling, revealing a commendable stability at 2.8GHz with a temperature drop from 43.5°C to 68°C during stress testing. Further pushing the limits to 3GHz showcased the system’s upper overclocking boundary, emphasizing the need for caution.
The introduction of an active cooler brought transformative results, with a cooling fan operating at 1124rpm. Stress tests at 2.8GHz demonstrated a substantial temperature drop to 58.4°C, underlining the cooling fan’s efficacy. However, overclocking to 3GHz led to a restart at 1 minute and 38 seconds, underscoring the importance of respecting thermal limitations. Incorporating benchmark tests underscored the value of official Raspberry Pi fans, enhancing performance under diverse workloads. In conclusion, active cooling, while beneficial, requires judicious consideration, especially for overclocking enthusiasts, as we navigate the delicate balance between performance and thermal constraints in the Raspberry Pi 5 ecosystem.