Meshtastic Node Explained: Types, Range, Kits, and How to Choose the Best Setup
You are expanding an off-grid mesh network. Maybe a hiking club placing LoRa radios on hilltops, or a community group building redundant comms before a long weekend with no cell coverage. What you are actually deploying is Meshtastic nodes, battery- or solar-powered radio devices that talk to each other without any internet or cell towers.
Each Mehtastic node consists of four components: a LoRa radio, a microcontroller, an antenna, and a power source. The network handles the rest, i.e., relaying messages device-to-device across however many hops it takes to reach the destination.
When you get the Meshtastic firmware right, your nodes extend reliable coverage for everyone. When it is wrong, you will degrade the mesh for everyone.
This guide covers what you need to know before you deploy a Meshtastic node, including hardware types, node roles (Client, Router, Repeater, Sensor), realistic range expectations, and how to decide between a kit and a DIY build. We will also flag common mistakes the community faces that can silently degrade your mesh before you even notice.
(If you are new to the ecosystem, we explain the full architecture and protocol in our detailed guide on “What Is Meshtastic“.)
What Is a Meshtastic Node
A meshtastic node is a low-power radio device running Meshtastic firmware. It uses LoRa (Long Range) modulation (slow data rates, impressive range, and long battery life) to join a decentralized mesh network where every node can relay packets for others.
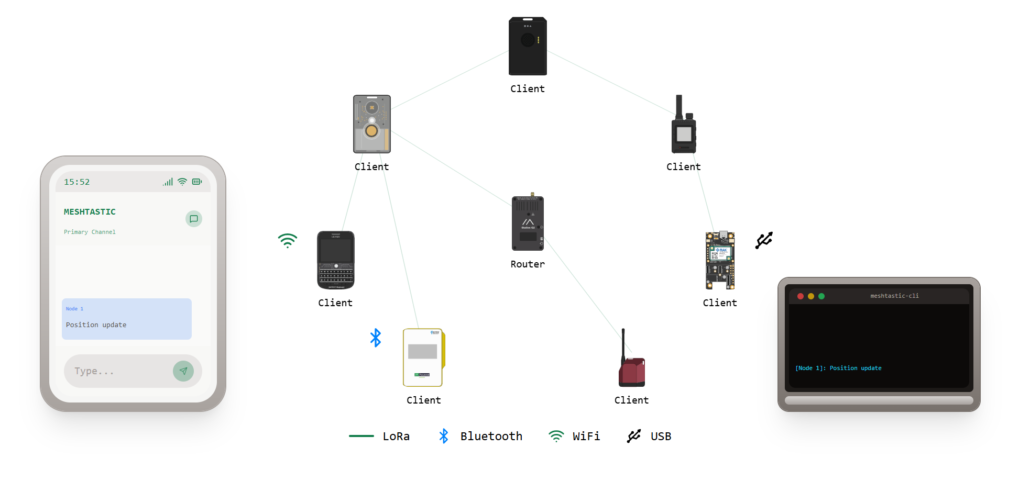
Every meshtastic node has four core components:
- LoRa radio chip to handle RF transmission. The SX1262 is one of the most popular chips used in modern Meshtastic-compatible devices.
- Microcontroller to run the firmware or any user interface (buttons, display, Bluetooth). ESP32 for Wi-Fi/BT connectivity; nRF52840 for ultra-low power.
- Antenna to determine range.
- Power source (USB, battery, mains, or solar). This decides where you can deploy.
Quick Tutorial: Programming Meshtastic: Connect Nodes in Minutes
Meshtastic Node Roles Explained
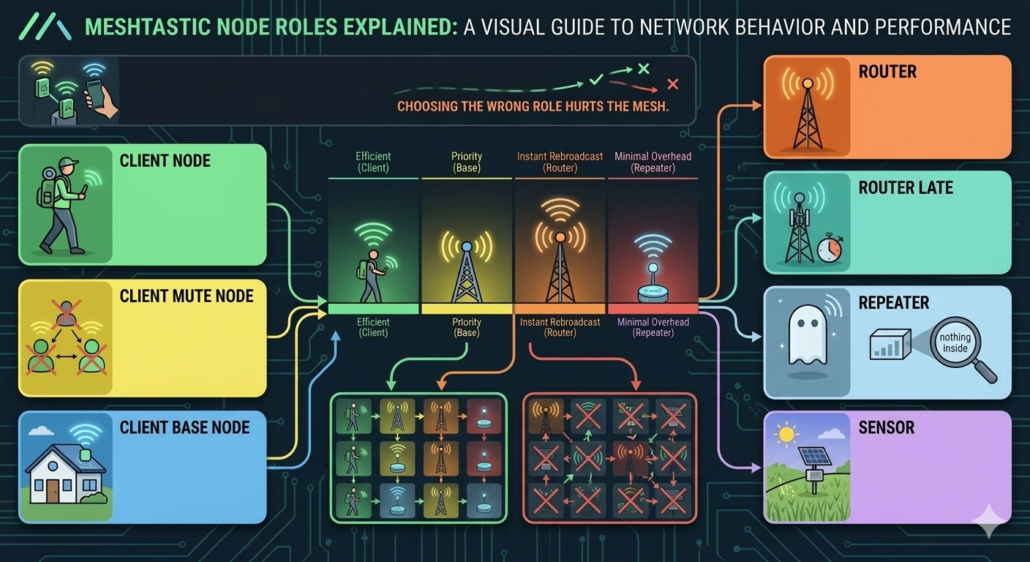
Every Meshtastic node can be set to a role that tunes its behavior in the network. The role tells the mesh how it should behave, how aggressively it forwards packets, whether it broadcasts its own telemetry, and when it sleeps. Choosing the wrong role is the most common way people hurt their local mesh.
The main Meshtastic node roles are:
Client Node
Client is the default role, and the right choice for most people. A Client node sends and receives messages and forwards packets it hears only if no better-positioned node picks them up first. It listens before it rebroadcasts, which keeps airtime usage efficient. This is the role to choose if you are carrying a node in your pack.
(If you are wondering what people actually build with these portable nodes, we previously documented several real-world deployments in our “Meshtastic Projects: Real-Life Use Cases” guide.)
Client Mute Node
This Meshtastic node role is the same as Client, but it won’t forward anything. Use this if you are running two or more devices on the same mesh. Your second and third nodes should be Client Mute so they don’t generate duplicate rebroadcasts and eat up hop budget.
Client Base Node
The Client Base node role is similar to Client, but it prioritizes rebroadcasting messages from/to any of its favorited nodes. It is useful when you want to ensure that nearby nodes make full use of your well-positioned and stronger “base station” node.
Router Node
The Meshtastic Router node always rebroadcasts and cuts ahead of other nodes in the relay queue. That makes it powerful in the right spot and harmful in the wrong one. So, assign the Router only to a node at a genuinely high elevation or with a high line-of-sight. A tower, a ridge, a rooftop with clear sky in every direction.
(This is the most misused role in Meshtastic. The community regularly flags misconfigured Routers as the leading cause of degraded mesh performance.)
Router Late
Router Late is a mandatory rebroadcast role. It will always repeat packets it hears, but waits if it detects another Router already handling it. It is meant for sites that are critical for coverage but are not optimally placed, such as a rooftop that covers a dead zone or a node filling a gap where your main Router can’t reach.
Repeater
Meshtastic Repeater node relays packets like a Router but publishes nothing about itself. There is no position, no battery stats, and no presence on node lists. It’s a ghost on the mesh, which is exactly the point. You mount it somewhere remote and walk away.
The purpose is pure coverage extension with no overhead and no noise on the network. Just silent packet forwarding. It’s the right choice for permanent infrastructure installs where the node’s only job is bridging a gap between two parts of the mesh that can’t otherwise reach each other.
Sensor
A Sensor node’s job is to collect and transmit environmental data, such as temperature, humidity, air quality, etc. It sleeps between readings, wakes up, sends a packet, and goes back under. The radio doesn’t stay on between transmissions to save battery life. So, a Sensor node on a small solar panel can sit in a field and report for months without anyone touching it.
| Meshtastic Node Role | Primary Purpose | Forwarding Behavior | Typical Deployment |
| Client Node | Standard personal node for messaging | Forwards packets only if no better node does | Portable devices, handheld nodes, backpacks |
| Client Mute Node | Secondary personal device on the same mesh | Does not forward packets | Extra devices owned by the same user |
| Client Base Node | Strong home/base station node | Prioritizes forwarding messages for favorited nodes | Home base stations, strong rooftop nodes |
| Router Node | High-priority network infrastructure node | Always rebroadcasts and jumps ahead in the relay queue | Towers, mountain ridges, tall rooftops |
| Router Late | Backup infrastructure router | Always rebroadcasts but waits if another router handles it first | Coverage gaps or imperfect but important locations |
| Repeater Node | Silent coverage extender | Forwards packets but does not broadcast telemetry or presence | Remote infrastructure, gap bridging between networks |
| Sensor Node | Environmental telemetry device | Sleeps most of the time, sends periodic data packets | Weather stations, environmental monitoring, solar nodes |
(There are also niche roles like Tracker for special use-cases.) In community forums, there is one guiding principle: “don’t overuse routers/repeaters”. If a node isn’t in an optimal spot, making it a Router can actually hurt the network. New nodes often start as Clients until you see a real coverage gap.
Meshtastic Node Map — Why It Matters
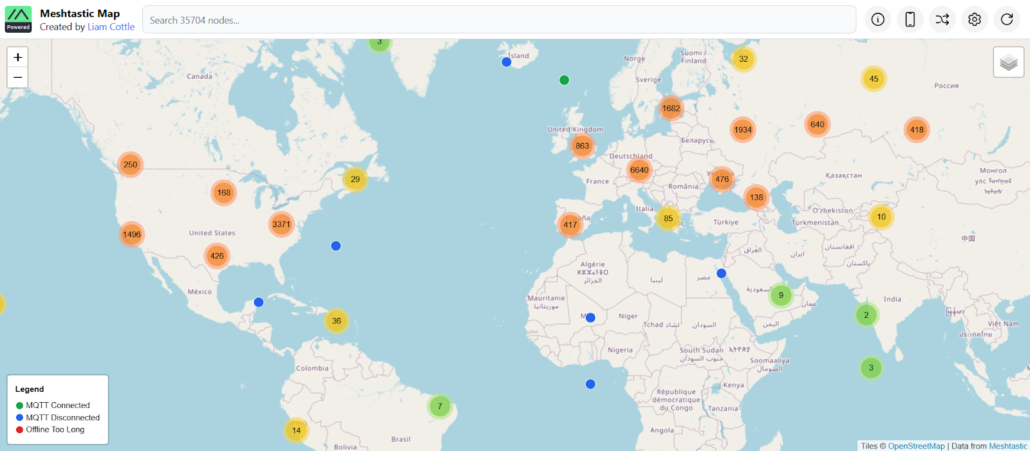
Experienced operators on the Meshtastic Discord recommend checking the node map before deploying anything. It is because adding routers blindly can create unnecessary congestion.
The two top community-maintained options are meshmap.net and meshtastic.liamcottle.net. Both pull from the public Meshtastic MQTT server and show:
- Active Nodes: Which devices are currently online and their roles, if shared.
- Geographic Distribution: Where nodes are placed. Clusters indicate existing coverage.
- Coverage Gaps: Dark spots on the map where few nodes exist. These are potential areas to add repeaters/routers.
When you check the Meshtastic node map before deploying, you can avoid redundancy. If your area already has well-placed Routers and Repeaters, adding another Router just creates congestion. Set your node to Client and let the existing infrastructure do the work.
But if you spot a genuine gap, such as a valley with no coverage or a rural stretch between two clusters, that’s where a solar Router or Repeater earns its place.
Therefore, planning node placement from the map ensures you expand the mesh efficiently. (Our guide on setting up your first Meshtastic network walks through this config step-by-step.)
Meshtastic Node Range — What Affects It?
LoRa range in practice is situational. Did you know that nodes can reach tens of kilometers in flat open line-of-sight, but might only do a few hundred meters in cities or forests? The major factors that affect the Meshtastic node range are:
| Factor | Impact on Range |
| Frequency | Meshtastic nodes operate on 868 MHz (EU), 915 MHz (US/AU), or 433 MHz (some regions). These aren’t interchangeable. Your region determines which band you use, and each has different legal power limits. |
| Antenna (Gain) | Antenna choice is critical. A simple 2 dBi rubber duck might give a few km, whereas a 5–8 dBi omni or directional antenna can double or triple that range. |
| Elevation | Height above ground is often the single biggest factor. A node on a mast or building can see over terrain. Users emphasize that “the higher you can get the node, the better”. |
| Environment | Open fields and water allow maximum range. Urban areas and dense forests attenuate signals to a great extent. A node that reaches 10 km over a lake might manage 800 m through a city block. |
| Power & Settings | Legal transmit power caps vary by region, such as +22 dBm in the US and +10 dBm ERP in the EU. Also, LoRa spreading factor and bandwidth settings trade range for data rate. Higher power and long-range settings increase range but use more airtime and battery. |
As discussed on Reddit /r/Meshtastic, nodes on high locations (towers and hills) with great visibility can achieve 20+ miles of range. Urban environments drop that to 1–5 km.
Solar Meshtastic Node — When and Why to Use One
The hardest deployment problem is keeping a relay alive when there’s no mains power and no practical way to swap batteries regularly. That’s where the solar Meshtastic node comes into play.
Solar nodes are perfect when you need always-on coverage. Use them for fixed routers or repeaters on mountain tops, remote cabins, farms, or anywhere you lack mains power. The main benefits include:
- Continuous Operation: Solar charging keeps the node always online (day/night).
- Low Maintenance: Once installed, you rarely need to change batteries.
- Extended Coverage: Acts as a permanent relay between other nodes.
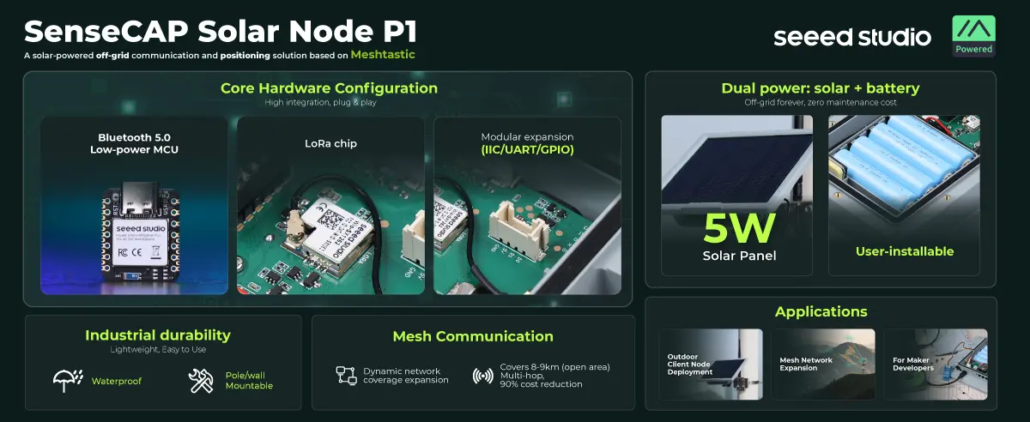
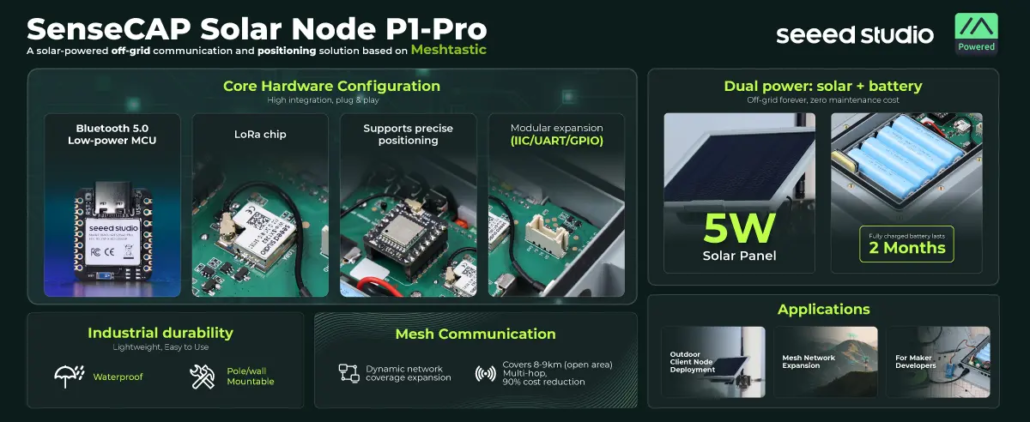
For example, Seeed Studio’s SenseCAP Solar Node P1 ($69.90) and P1-Pro ($89.90) are the lowest-cost purpose-built solar Meshtastic nodes. They use a Wio-SX1262 LoRa module paired with a Nordic nRF52840 MCU. This efficient combination draws just 48 mA in relay mode and drops to 1.3 µA in deep sleep. They cover 862–930 MHz, which spans both 915 MHz (US) and 868 MHz (EU).
Meshtastic Node Kit vs DIY Meshtastic Node
One of the common debates on Meshtastic Discord and Reddit /r/Meshtastic is Meshtastic Node Kit vs DIY Meshtastic Node. Some believe kits are overpriced for what you get, while others argue that the pre-flashed firmware and out-of-the-box reliability are worth the premium.
The Meshtastic node kit is sold as a complete package, including a LoRa board (pre-flashed with Meshtastic), an antenna, a battery, and a case. These kits are fast to deploy and usually come with weatherproof cases or holders. They cost more but offer tested reliability and support.
The DIY Meshtastic node involves purchasing individual components yourself. For example, an ESP32 dev board such as the Seeed Studio XIAO ESP32 series (XIAO ESP32C6 or XIAO ESP32S3) paired with a Semtech LoRa module, plus connectors, a case, and an antenna. Building yourself is cheaper and gives you complete customization control on choosing antenna, battery, housing, etc. However, it requires soldering and firmware flashing.
Most DIY builders reference the official Meshtastic firmware repository on GitHub when verifying compatible boards and radio modules.
Comparison Table: Meshtastic Node Kit vs DIY Meshtastic Node
| Meshtastic Node Kit | DIY Meshtastic Node | |
| Cost | $30–$100+ depending on features | $15–$60 for components |
| Setup time | Minutes (unbox and configure) | Hours to days |
| Firmware | Pre-flashed (ready to go) | You flash it via flasher.meshtastic.org |
| Antenna | Included (quality varies) | You choose with full control over gain and type |
| Solar option | Available on select kits (like SenseCAP P1-Pro) | Possible, but requires custom wiring |
| Soldering required | No | Sometimes |
| Customization | Limited to what the kit offers | Full control on board, antenna, battery, housing |
| Reliability | Tested combination | Depends on your component choices and build quality |
| Support | Manufacturer docs and community | Community only |
| Best for | Infrastructure deployments, beginners, permanent installs | Experimenters, budget builds, custom applications |
How to Choose the Best Meshtastic Node for Your Setup
There’s no single best Meshtastic node. Follow these steps to find the right one for what you are actually trying to do:
Step 1: Define Your Goal
Carrying a node on weekend hikes and want to stay in contact with your group? That’s a personal Client node, a compact and battery-powered node that pairs with your phone. (Outdoor communication is one of the most common deployments. We cover more real-world scenarios in our “Meshtastic Use Case Stories” guide.)
Trying to fill a coverage gap in your area? You need a Router or Repeater at a high-LOS site. Alternatively, building something permanent that runs unattended for months? That’s a different hardware conversation entirely.
Step 2: Choose Power Type
You have to match your power source to your location. USB power works fine for a fixed indoor or rooftop node with a nearby outlet.
A good 18650 battery covers most portable use cases.
Solar is only useful for remote and unattended installations, like a hilltop, a fence post, a tower, or any other place that nobody’s visiting.
Step 3: Consider Location
Think about placement before you buy. An indoor node has very different range expectations than a rooftop one.
A remote hilltop install needs weatherproofing, solar, a quality antenna, and other protections. Decide where it’s going first, then spec the hardware around that.
Step 4: Evaluate Network Density
See what’s already in your area before committing to a role or location.
| Scenario | Hardware | Role | Power |
| Weekend hiking trip | LILYGO T-Beam | Client | 18650 battery |
| Urban rooftop relay | RAK WisBlock + antenna | Router Late | USB / mains |
| Remote hilltop repeater | SenseCAP P1-Pro | Repeater | Solar |
Common Mistakes When Deploying a Meshtastic Node
If you look at the debates on the Meshtastic Discord or Reddit /r/Meshtastic, the same mistakes come up over and over. It is usually from people who did everything right on paper but still ended up with a node that hurts the mesh more than it helps.
So, what are those common mistakes? Check out the points below:
- Too Low Placement: Don’t leave the node on the ground or under metal. A few meters of extra height can make a big difference.
- Poor Antenna: Many cheap boards come with stubby PCB antennas. Replace them with a proper SMA antenna.
- Wrong Frequency/Settings: Ensure your node is set to the correct regional band. Using the wrong firmware region means almost no connectivity.
- Overbuilding: Don’t add routers or repeaters where one already covers. As one community expert notes, a misplaced Router can reduce mesh reliability. Use the map to avoid redundancy.
- Underestimating Power/Solar: If running on solar, be generous with panel size and battery. Bad weather or a small panel can leave your node offline.
- No Antenna Connected: Never power a high-gain transmitter with no antenna. It can burn out the radio chip.
- Ignoring Antenna Orientation: Mount your antenna vertically and keep cables short. The Chicagoland Mesh guide reminds us of antennas upright at the highest level and short coax for the best reception.
- Fake Batteries: Buy genuine brands (Samsung/Panasonic) when using 18650 cells. Avoid counterfeits, which may have far less capacity.
You can also check out Meshtastic’s official documentation for device roles, radio settings, and more to avoid configuration mistakes.
Conclusion
What we have learned so far is that a well-deployed Meshtastic node makes the mesh better for everyone around it. A poorly deployed one with either the wrong role, bad placement, or wrong antenna does the opposite.
The decisions aren’t complicated when you have the right framework. Check the node map before you commit to anything and match your Meshtastic node role to your actual location. Also, don’t treat a Router as a default upgrade over a Client. Most problems the community sees trace back to skipping one of those three steps. So, get the placement right, get the role right, and the hardware will do the rest.
>> Read more