Build Your Own Raspberry Pi 4 Retro Game Console – Retropie

Turning your Raspberry Pi into a Retro Game Console has always been a popular and fun project. With the release of the Raspberry Pi 4, with faster processing speeds and better performance, it has the potential now to run games that were previously beyond Pi’s power!
There are various gaming Emulators out there right now for the Raspberry Pi like Retropie, Recalbox, Lakka and many more. Today, we are going to look at one of our favourite gaming Emulators: Retropie. Through this blog, you will learn:
- What is RetroPie?
- What do you need to run RetroPie?
- How to Install RetroPie on your Raspberry Pi 4
- Tips on Improving your Retro Game System
SALE on Raspberry Pi 4 Accessories!

Before you move on, we have good news for you makers! Right now, Seeed is having a sale on Raspberry Pi 4 accessories!
Don’t miss out! Use code: ACCESSORIES10 to get 10% off selected Raspberry Pi 4 accessories! Click here to check out what’s on sale!
And now, without further ado, let’s dive right into RetroPie!
What is RetroPie?

RetroPie builds upon Raspbian, EmulationStation, RetroArch and other projects which allow you to turn your Raspberry Pi not only into a retro-gaming station but also as an awesome one-stop entertainment system.
The Retropie not only act as an EmulationStation where you can launch and play your games, it also features KODI which is a personal media centre that means you now, not only have games, but you have access to movies, songs and many more!
In addition, the RetroPie has a variety of user-created themes for EmulationStation and also supports over 50 Retro gaming systems for the Raspberry Pi like the Atari Lynx, Dreamcast, Game Boy Advance, GameCube, MAME, Nintendo 64 (N64), PlayStation 2 and 43 more!
What do you need to get started?
We recommend the Raspberry Pi 4 due to its processing speeds and performance. You can still use the older versions of the Raspberry Pi, but it may not have full game compatibly and speed.
Raspberry Pi 4B – Starter Kit – 4GB($79.80)
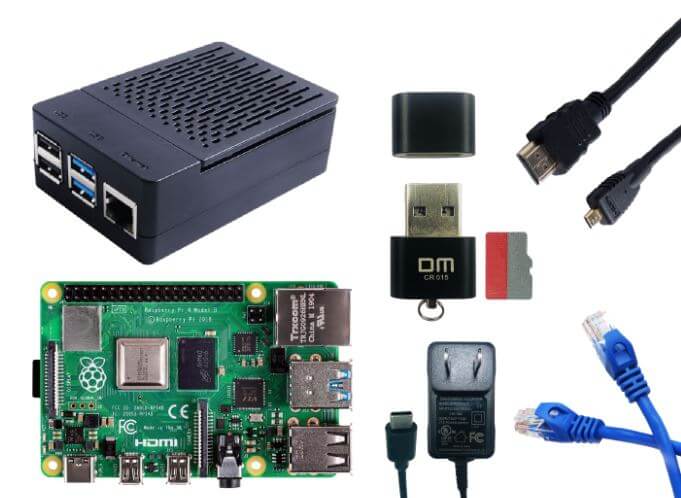
This starter kit has all the basic essentials, including:
- Raspberry Pi 4 Computer Model B 4GB
- Wall Adapter Power Supply – 5VDC 3A Type-C
- Micro SD Card with Card Reader-32GB(Class 10)
- ABS H-Type Black Case for Raspberry Pi 4 B (It Contains Fans and Heat Sinks)
- Micro HDMI to Standard HDMI Male Cable – 1m(Support Pi 4)
- Cat6 Ethernet Cable – 1 Meter
Already have some of these parts and only require some of these accessories? You can get them individually here on our Bazaar!
Raspberry Pi Acrylic DIY Retro Game Arcade Kit ($129.00)

This acrylic DIY Retro Game Arcade Kit is simple to set up as you just have to download the Game ROMs from the internet and upload it to your Raspberry Pi and restart and your controller is good to go!
Experience retro arcade gamic as it was meant to, with the original joystick and buttons layout!
We also offer a retro game kit for double players here($69.99) and Single players here.($36.99)
15.6 Inch 1920×1080 Full HD IPS Touch Screen Portable Monitor($169.00)
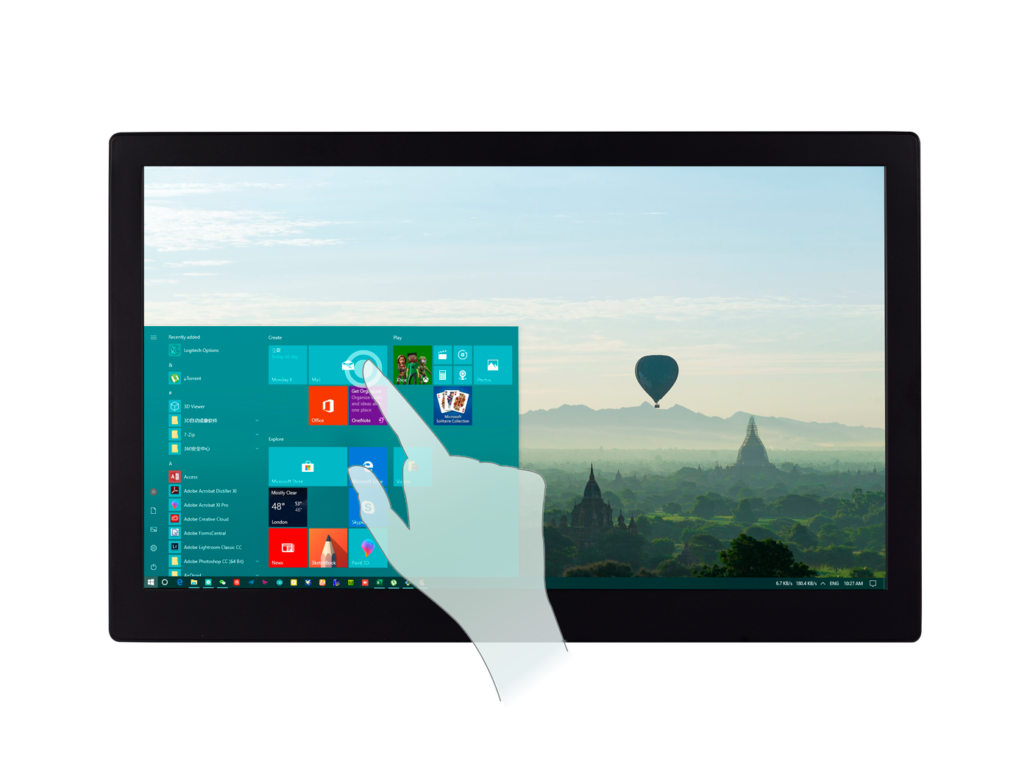
Take note that any TV or monitor will work fine too! However, if you do not have a monitor or looking for a new one, our Touch Screen Portable Monitor will be a perfect choice for you!
It is high quality but cost-effective multifunction monitor which features an excellent visual experience, supports 1080P FHD @85Hz, and has a wide viewing range of 178 degrees, 400cd/m2 brightness LED backlight, 1000:1 contrast ratio. It is also ultra-thin and ultra-light! With a thickness of 12mm and weight of 720g, which makes this monitor portable too!
Apart from your Raspberry Pi 4, the display supports notebooks, mobile phones, BeagleBone and other SBC, PS4/Xbox/Nintendo Switch and other game consoles thanks to its multiple video input interfaces.
How to Install RetroPie on Raspberry Pi 4
For this setup, you will have to install RetroPie manually as of this date as RetroPie does not officially support the Raspberry Pi 4 yet. You can follow the guide below to install RetroPie manually.
Step 1: Get Raspberry Pi OS Up and Running
First, download a Raspberry Pi OS Desktop Image using the Raspberry Pi Imager.
To make things easier, preconfigure your WiFi in the RPi Imager using these steps.
Flash the OS image to your SD card using the RPi imager.
Once done, transfer SD card from desktop to your Raspberry Pi 4, and let it boot.
If you need help with completing this step, there are detailed official instructions that you can reference here.
Note: On your first boot, you may wish to update your system with the following commands first:
sudo apt update
sudo apt upgrade
Step 2: Retrieve the RetroPie Files
First, launch a terminal window on the Raspberry Pi 4 on the top left-hand corner of your screen.
Next, download RetroPie setup files by keying in:
sudo apt install git lsb-release
cd
git clone --depth=1 https://github.com/RetroPie/RetroPie-Setup.git
Step 3: Run the Setup
cd RetroPie-Setup
chmod +x retropie_setup.sh
sudo ./retropie_setup.sh
Step 4: Install RetroPie
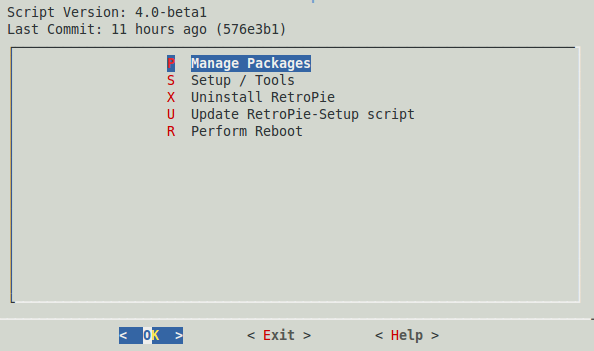
In the GUI that pops up, select Basic Install >> Quick Install. This will install the core and main packages of RetroPie.
Step 5: Copy ROMs to ROMs Directory
Copy your ROMs (Game Files) into the ROMs directory, which can be found at:
~/RetroPie/romsMake sure you place the ROMs in the correct subdirectory which corresponds to the device you are emulating.
Step 6: Open EmulationSystem
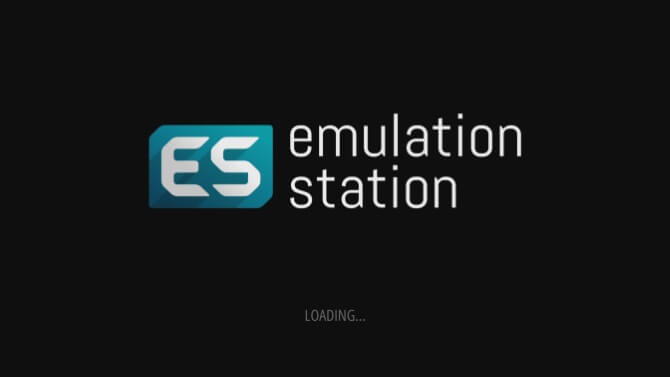
After installation, begin your emulation session by running the following in a terminal window.
emulationstationVoila! It should bring you to this screen where you can then configure your controllers and start playing your games!
Improving Your Retro Gaming System
Now you got your own awesome Retro Gaming system, but feel that it is not fast or good enough? Well are some tips that you can make your retro gaming experience even better! Not only does it work for the RetroPie, it will work for other gaming emulators like Recalbox, Batocera, Pi Entertainment system, Lakka and PiPlay (previously PiMAME) too!
Use a Reliable Power Supply
Using your mobile phone charger is probably not the best way to power your Raspberry Pi 4 when you are using an emulator that requires a tad bit more power.
With a poor power supply, your Raspberry Pi performance without a doubt will be affected which means slower games.
How can we solve this problem? Well, use a reliable official Raspberry Pi power supply which you can get here at Seeed!
Raspberry Pi Official Power Supply 15.3W USB-C with 1.5M Cable – UK Plug 5.1V 3A White
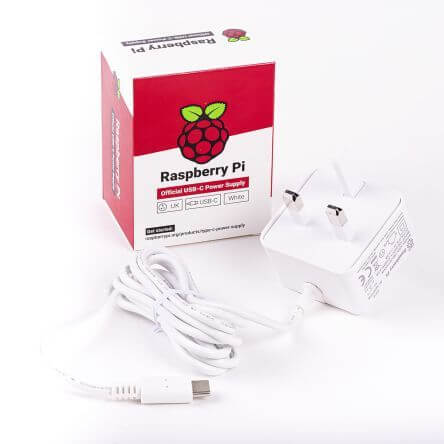
Cannot use a UK plug? We also offer various different plugs like the EU plug and US Plug here! We also offer a black version with the US plug here!
Use a Controller
You can’t possibly play N64 or MAME arcade games with a keyboard, right? By using an authentic controller, it can elevate your gaming experience and truly bring you back to the past.
Our Raspberry Pi Acrylic DIY Retro Game Arcade Kit will bring you back in time and allow you to relive your past joys!
This arcade kit is 1. Easy to Setup, 2. High Performance, 3. Highly Integrated, and has a 4. Sleek Appearance!
Here is a video of the easy setup and the entire kit in action!
Overclock your Raspberry Pi
If you want better and faster performance, overclocking your Raspberry Pi will be the way to go to boost your frame rates while gaming. It brings your Raspberry Pi 4 from a base clock of 1.5GHz, all the way up to 2.147GHz! That’s a lot of power!
Overclocking is easy, and you can follow our comprehensive guide on how to do so here. Do take note that you will need a cooler as an overclocked Pi will tend to run hot – resulting in potential damage!
Blink Blink ICE Tower CPU Cooling Fan for Raspberry Pi

It has a tower structure with a 5 mm copper tube, multi-layer heat sinks, 7 powerful fan blades.
In the case of overclocking, it can reduce the temperature of the Raspberry Pi from 80℃ to 40℃. With the help of this super fan, you can now unlock the powerful performance of the Raspberry Pi 4.
Pick one up on the Seeed Online Store by clicking here!
Summary
That is all for how on how to build your own Raspberry Pi 4 RetroPie game console! With tips on how to improve the performance of your Raspberry Pi 4, you can now enjoy your retro games smoothly just like back in the days!
You can also use your Raspberry Pi 4 in many other ways apart from a retro gaming console! Interested? Check out our blog on the Top 40 Raspberry Pi 4 Projects That You Must Try Now to find out more!
Hi Yida, I have this error, why?
git clone –single-branch -branch=fkms_rpi4 -depth=1 https://github.com/RetroPie/RetroPie-Setup.giterror: unknown switch `d’
Hi there,
Can you try using the master branch command?
git clone –-branch master -–depth=1 –-single-branch https://github.com/RetroPie/RetroPie-Setup.git
When i type in git clone –-branch master -–depth=1 –-single-branch https://github.com/RetroPie/RetroPie-Setup.git I get the message error: unknown non-ascii option in string: ‘–depth=1″ any and all help would be greatly appriciated
Hi Zach,
How about you try this command instead: git clone –single-branch –branch=fkms_rpi4 –depth=1 https://github.com/RetroPie/RetroPie-Setup.git
Try replacing – with two hyphens in that command.
Hi this worked for me i can go into retropie etc but i don’t see any games how can i fix this or what am i doing wrong?
thanks in advance
Hi Gisfish,
In order to get games, you will have to transfer ROMs to your Raspberry Pi. They are essentially digital copies of old game cartridges which allow you to play games.
You can check out this tutorial on Github on how to transfer ROMs to your Retropie via USB, SSH, etc.
Tutorial link: https://github.com/RetroPie/RetroPie-Setup/wiki/Transferring-Roms
Everything seemed to install correctly, but when i try and run “emulationstation” i get ” * failed to add service – already in use? “. How do i Fix this?!
Hi Jim,
Can you try starting emulationstation on boot through the setup page?
You can do this by selecting configuration/tools > autostart > Start Emulation Station at boot
Hello, thank you for the guide!
But how do I start kodi now?
Thank’s a lot!
Hi Danial,
You can follow the installation guide for KODI via this guide on github here: https://github.com/RetroPie/RetroPie-Setup/wiki/KODI
there is an error in first script, “depth 1” should be ‘depth=1’
Hi Josh,
Thank you for your feedback! I have just fixed it, sorry about that.
Thanks for the guide! I have it running, but how do I make it boot into emulationstation automatically?
Hi Jonesey,
You can select configuration/tools > autostart > Start Emulation Station at boot
Hey, I did absolutely everything you advised and nothing works for me: everytime “too many arguments”… Can you help me ?
Hi Roiiban,
Can you elaborate on your problem? Which command did you key in? Which step did you face this problem?
Hello,
I am getting:
pi@raspberrypi:~ $ git clone –single-branch –branch fkms_rpi4 –depth=1 https://github.com/RetroPie/RetroPie-Setup.git
fatal: Too many arguments.
Hi Planetdune,
As C.Bennett said, can you try this command instead?
git clone –branch fkms_rpi4 –depth 1 –single-branch https://github.com/RetroPie/RetroPie-Setup.git
–single-branch
Those are two different hyphens you have in your post. Likely a copy and paste error because the person writing the guide is using something that is replacing two hyphens – – (no space, but only included the space so you could see that it was two hyphens) with a LONG hyphen (which is a special character. MS Word, for example will replace — with –… that might be hard to see so try highlighting that…. you’ll see that — is two hyphens and – is a single long hyphen.)
Linux will not recognize –. Replace – with two hyphens in that command:
git clone –single-branch –branch fkms_rpi4 –depth=1 https://github.com/RetroPie/RetroPie-Setup.git
and you should be fine. (I REALLY hope this comment software doesn’t automatically replace the two hyphens that I put in with a long one… we’ll see when I complete the post)
Hi, I’ve tried
git clone –single-branch -branch fkms_rpi4 –depth=1 https://github.com/RetroPie/RetroPie-Setup.git
It shows the error of “fatal: repository ‘fkms_rpi4’ does not exist”
I then tried the following as suggested, but get the samse error.
git clone –branch fkms_rpi4 –depth=1 https://github.com/RetroPie/RetroPie-Setup.git
Can you hel please?
many thanks
Andy.
Hi Andy,
Can you try this command?
git clone –branch fkms_rpi4 –depth 1 –single-branch https://github.com/RetroPie/RetroPie-Setup.git
Hi when I copy and paste the line
git clone –single-branch -branch fkms_rpi4 –depth=1 https://github.com/RetroPie/RetroPie-Setup.git
all I get is fatal error: to many arguments HELP..
Hi Bill,
You can refer to C Bennett comment! You can try this command
git clone –branch fkms_rpi4 –depth 1 –single-branch https://github.com/RetroPie/RetroPie-Setup.git
Hi, I’ve tried
git clone –single-branch -branch fkms_rpi4 –depth=1 https://github.com/RetroPie/RetroPie-Setup.git
It shows the error of “fatal: repository ‘fkms_rpi4’ does not exist”
I also tried
sudo git clone –depth=1 https://github.com/RetroPie/RetroPie-Setup.git
then
git fetch && git checkout fkms_rpi4 using root
it shows the error of “fatal: not a git repository (or any of the parent directories): .git”
Please help
Hi Luke,
Can you try this command:
git clone –branch fkms_rpi4 –depth=1 https://github.com/RetroPie/RetroPie-Setup.git
Do let me know if it works!
I get the same thing even with trying your suggestion.
Hi Kyle,
Can you try this command?
git clone –branch fkms_rpi4 –depth 1 –single-branch https://github.com/RetroPie/RetroPie-Setup.git
When I got to etcher and click on the Raspbian file; I get this error:
Error opening image
Something went wrong while opening 2019-09-26-raspian-buster-full.zip
Error: end of central directory record signature not found
Any suggestions on how to fix this?
Hi Tyler,
This may be a problem with your Raspbian image. Please try using 7Zip (Windows) or The Unarchiver (Macintosh). Both are free of charge and have been tested to unzip the image correctly if your download is corrupted or not unzipping correctly.
when i type in the following:
“git fetch && git checkout fkms_rpi4” it says permission denied.
Any fix for this? i’ve tried multiple things and cant figure it out.
Hi Taylon,
You can try to change into root user and run the following command:
“git fetch && git checkout fkms_rpi4”.
For the root user, there is no password set by default. Thus, you will be required to set your password with the following command: “passwd root”
Lastly, to change into root user simply type the following command:
“su root”
thanks for sharing, although when i run “sudo git clone –depth=1 https://github.com/RetroPie/RetroPie-Setup.git” i get unable to create /home/pi/retropie-setup/.git/index.lock’: permission denied
perhaps i needed to setup RPI4 before running this line?
Hi Jesus Alfonzo Bastardo Romero,
You can try this instead:
git clone –single-branch –branch fkms_rpi4 –depth=1 https://github.com/RetroPie/RetroPie-Setup.git
When I copy and paste the first step into the terminal it says “depth=1 does not exist”
Hi Kyle!
You can try this instead:
git clone –single-branch –branch fkms_rpi4 –depth=1 https://github.com/RetroPie/RetroPie-Setup.git
YIDA, please fix your article / look for a “preformatted” tag option or a “code” tag option and make sure your lines have two hyphens instead of that single long hyphen that keeps showing up: – is wrong – – without a space. Either the blog software or something like MS Word is seeing the – – (without space) and replacing it with the long hyphen which is an invalid character.)
Hi MEMYSELFANDI,
I have fixed it! Thank you for the feedback!