How To Configure WiFi on Raspberry Pi: Step By Step Tutorial
One of the first things you’ll want to do with your Raspberry Pi is definitely to configure the WiFi.
Today, we’ll show you three ways to configure WiFi on your Raspberry Pi with both Raspberry Pi OS desktop and server. We’ll also cover how to do it on a headless Raspberry Pi!
Let me first introduce you to the reTerminal, a future-ready Human Machine Interface (HMI) device. It can easily and efficiently collaborate with IoT and cloud systems to unlock endless scenarios at the edge. It can be placed at the heart of an IoT/Edge system where you can connect multiple sensors to the reTerminal via different wireless protocols (e.g. LoRa, Zigbee, Wi-Fi, Bluetooth, Sub-1G) and connect the reTerminal to the Ethernet, Wi-Fi, 5G/4G or connect to edge servers to store and process data.
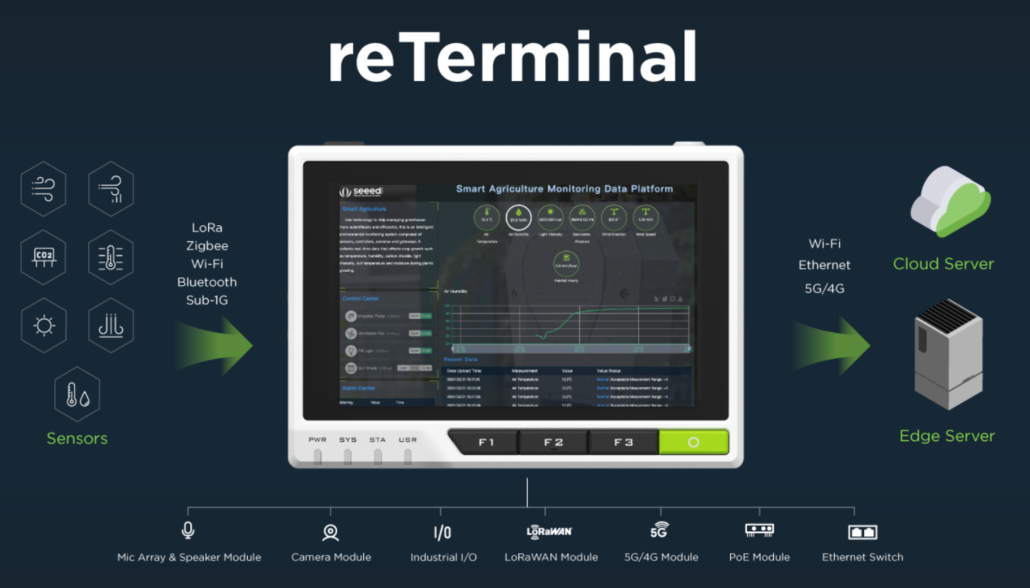
reTerminal – Embedded Linux with Raspberry Pi CM4 is shipped with Raspberry Pi OS out-of-the-box. So, all you have to do is connect it to power and start building your IoT, HMI, and Edge AI applications right away!
You can refer to the Get Started Wiki for the wifi configuration of the device and others.
Wired Ethernet Connection
To set up a wired internet connection, simply connect your Raspberry Pi to the back of your network router with an ethernet or RJ45 cable. Once plugged in, you should observe the network LED blinking on your Raspberry Pi.
In most cases, your wired internet connection will now be up and ready for use, provided that your router has DHCP enabled. DHCP stands for Dynamic Host Configuration Protocol and basically assigns IP addresses to devices that connect to your router.
To enable DHCP, access your home router’s management console with another computer that has already been connected. You can typically do this by entering your router’s IP address into the address bar of any internet browser.
For more details, Computer Hope has a free and detailed guide here.
Wireless Connection – WiFi Hardware
To set up a WiFi connection, we will first need a WiFi module for our Raspberry Pi. Fortunately, all Raspberry Pi models from the Raspberry Pi 3 Model B (2016) and later ship with on-board WiFi. If you have an older model on hand or your on-board WiFi module is not functioning, you will need to use an external USB WiFi adapter.

When choosing a WiFi adapter, ensure that there is driver support. For example, WiFi adapters with the RTL8192cu chipset will work readily since there is Raspberry Pi OS support built in.
Another consideration is the power draw. WiFi can require a lot of power, especially if a heavy amount of data is being transmitted. For older Raspberry Pi in particular, you may require an external power supply like a powered USB hub to power the WiFi adapter.
For more details on selecting a suitable USB WiFi adapter, you can read this page on eLinux.org. They also have a list of compatible WiFi adapters for the Raspberry Pi!
[Updated Mar 2021] The Only Method You Need to Set Up Raspberry Pi WiFi!
With a new update to the Raspberry Pi Imager, it’s become easier than ever to set up your Raspberry Pi’s WiFi connection, regardless of if you’re going for a headless setup or not. Let’s get started!
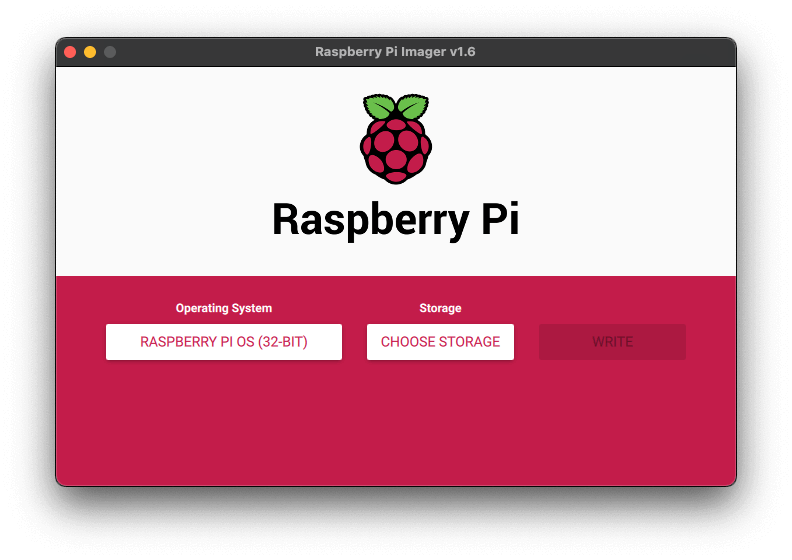
Step 1: Install the latest version of the Raspberry Pi Imager for your operating system here.
Step 2: Open the Raspberry Pi Imager. You should be greeted with the same screen as always.
Step 3: Press Ctrl + Shift + x to open the advanced menu (CMD + Shift + x for Mac OSX).
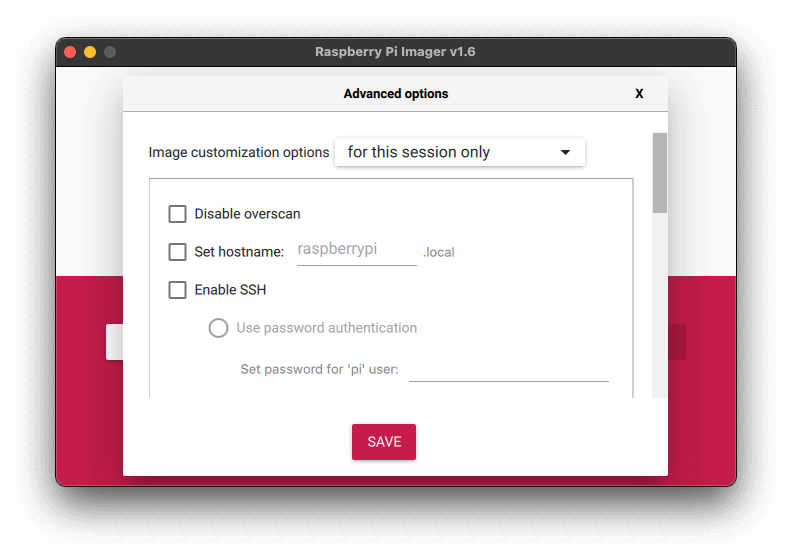
Step 4: Scroll down to Configure wifi, check the box and enter your WiFi credentials.
Note: Be sure to change your Wifi country according to your country code!
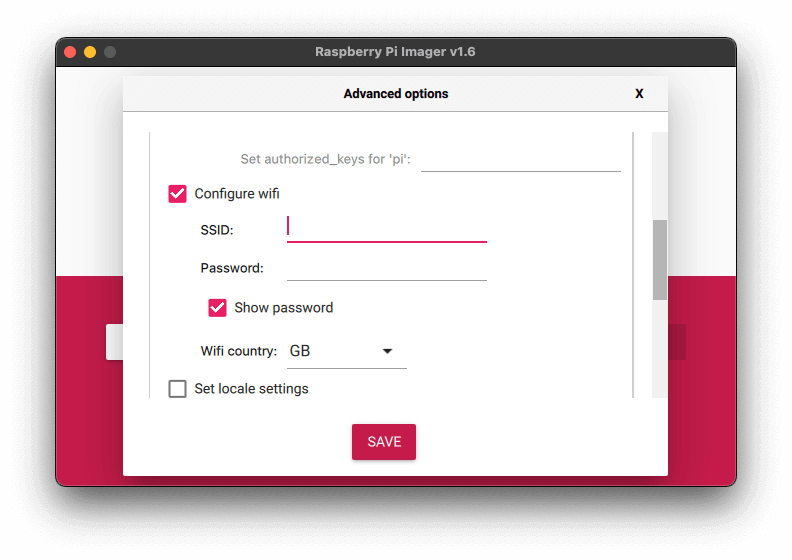
Step 5: Click SAVE and flash your OS to your microSD card for your Raspberry Pi! That’s it!
There are also other settings in the Advanced options menu that you can explore. For example, you can turn on SSH for easier headless installations and even configure the hostname of your Raspberry Pi!
Other Methods to Set Up Raspberry Pi Wi-Fi
The methods shared in the following sections are still valid and will work for setting up the Wi-Fi on your Raspberry Pi. However, I recommend you follow the latest method as you’ll find it much easier!
Method 1: Configure WiFi with Raspberry Pi OS GUI
For users running Raspberry Pi OS Desktop on their Raspberry Pi, you can simply use the provided GUI to set up your WiFi connection. This works just as you’d expect it to with your other laptops or smartphones.

Method 2: Configure WiFi from Command Line with Raspi-Config
If you are running a server distribution of Raspberry Pi OS without a GUI, you will have to use Raspi-Config instead. This method works in Raspberry Pi OS Desktop as well.
Raspi-Config is a console based application used to configure various settings on the Raspberry Pi. It can be used for network configuration, setting up remote access, boot options etc.
To open Raspi-Config n the command line, type the command:
sudo raspi-config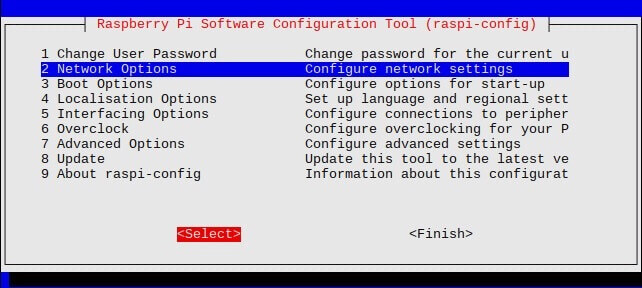
Using the arrow keys on your keyboard, navigate to “Network Options” and press Enter.
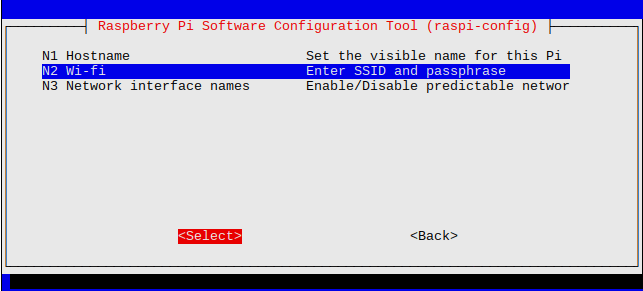
Select Wi-fi, then follow the on-screen instructions to enter your network’s SSID and password. When you’re done, select “Finish” on the main menu to close Raspi-Config.
Finally, reboot the Raspberry Pi to apply the settings we’ve just changed. Your WiFi connection should then be good to go!
Configuring WiFi on a Headless Raspberry Pi
A headless Raspberry Pi is one that we would like to run without a monitor, keyboard, or mouse. As you can imagine, it won’t be as straightforward to apply the methods we’ve covered so far.
Enable SSH (Secure Shell)
For this section, we will first want to enable SSH on our Raspberry Pi. This is something that you’ll want to do if you’re running your raspberry pi headless anyway.
With SSH, you can use an internet connection to remotely run terminal commands on the Raspberry Pi from your primary computer through an internet connection.
To enable SSH on a headless Raspberry Pi, simply place a file named “ssh”, without any extension, onto the boot partition of the SD card from another computer. This will tell Raspberry Pi to enable SSH when booting. The content of the file does not matter.
Note: Do not connect your Raspberry Pi directly to a public network if you have not yet set up secure passwords for all users. Your device may be compromised by hackers.
Method 1: Enable WiFi Via Ethernet Cable
This method involves using an ethernet connection to utilise SSH for setting up our WiFi.
Once our ethernet connection is established via wired connection with our router, refer to the DHCP allocation table on your router management console to obtain the IP address of your Raspberry Pi.

Once we have obtained the IP address, we can use any SSH client such as PuTTY on Windows to access the Raspberry Pi. Linux and MacOS users can utilise SSH without any additional software.
On Linux or MacOS, simply enter the following command with the <IP> for your device.
ssh pi@<IP>Once the connection is successful, we can simply use:
sudo raspi-configto configure our WiFi connection like we covered before!
Method 2: Enable Wifi via wpa_supplicant
This method involves replacing the wpa_supplicant.conf file on our Raspberry Pi to provide our WiFi configuration.
First, you’ll want to create a wpa_supplicant.conf file with the following content. You can do this with any text editor.
ctrl_interface=DIR=/var/run/wpa_supplicant GROUP=netdev
update_config=1
country=<Country Code>

network={
     ssid="<SSID>"
     psk="<PASSWORD>"
     scan_ssid=1
}
Remember to replace <Country Code>, <SSID>, and <PASSWORD> with your own country code, WiFi SSID and password.

Then, mount your SD card with Raspberry Pi OS onto your computer and copy the wpa_supplicant.conf file to the root of the /boot partition of your SD card. Similar to how we enabled SSH, the file will be used on boot to apply our new WiFi settings to our Raspberry Pi.
Since we are going entirely headless, it can be difficult to troubleshoot this method of Wifi configuration. If it doesn’t work the first time, check and ensure that the name of your wpa_supplicant.conf file and its contents are correct before trying again.
Once we successfully configure our WiFi connection using either method above, we can now use SSH over WiFi to interface with our Raspberry Pi’s command line!
Test Your WiFi Connection
Check IP Address
To ensure that our WiFi connection has been established correctly, first unplug your ethernet cable. We can check our IP address through the command line with:
ifconfig wlan0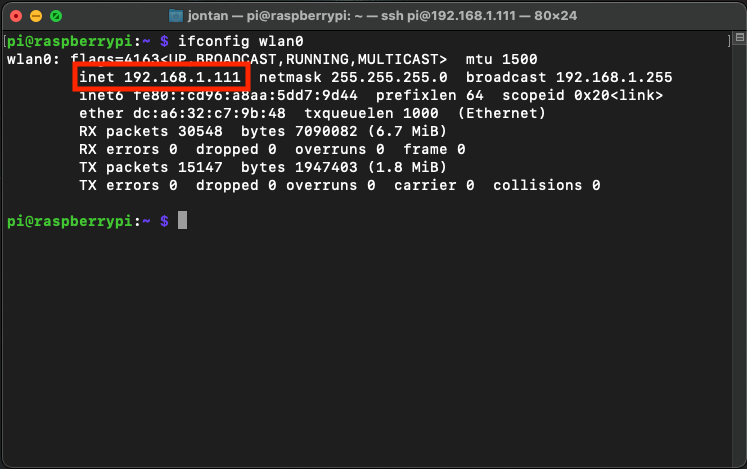
Next to “inet”, we should see our IP address, which indicates a successful connection.
Ping a Website
Next, we can check if our WiFi connection successfully allows us to send and retrieve data to and from our favourite websites. Try ping google.com to see if you can reach it!
Summary
We’ve shown you a number of ways that you can configure the WiFi on the Raspberry Pi!
If you’re just getting started with your Pi, consider setting it up as a VPN server! Visit our blog to learn how to set up a Raspberry Pi VPN server using PiVPN and browse securely on public networks.
The following articles from Seeed will also give you more knowledge and ideas on what to do:
- Learn all about the Raspberry Pi: Getting started, Projects, Software, Tutorial
- Top Raspberry Pi AI Projects for Beginners and Up
- Top 10 Raspberry Pi 5 Projects You Must Try in 2025
- How to Build a NAS with Raspberry Pi 5: Step-by-Step Guide
- Top 35 Raspberry Pi 4 Projects That You Must Try Now
- Raspberry Pi Tutorials – Guides and Projects
- Multi-stage inference with Edge Impulse/Tensorflow Lite – reTerminal (Raspberry Pi CM4 inside)
For more information and things you can do with Raspi-Config or SSH, try these articles from the Raspberry Pi foundation: