Programmable I/O with Raspberry Pi Pico
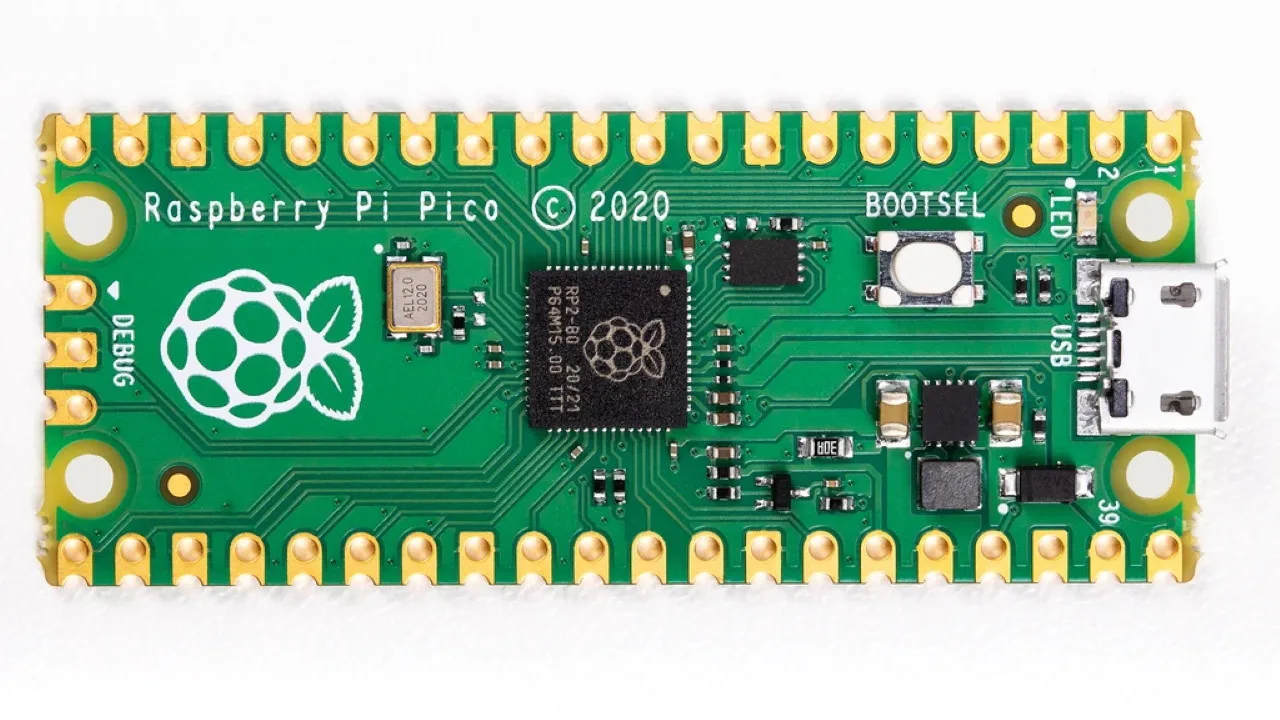
The Raspberry Pi Foundation has just announced the brand new Raspberry Pi Pico microcontroller board, with programmable I/O as one of its highlight features. Read our full coverage on the Raspberry Pi Pico release at Raspberry Pi Pico, the first microcontroller released by Raspberry Pi Foundation, based on the new RP2040 MCU.
In this article, we will focus on the programmable I/O feature on the Raspberry Pi Pico. We’ll cover what it is, how it works, and what it can be used for.
Raspberry Pi Pico and Programmable I/O
Programmable I/O or PIO stands for “programmable input-output”. Programmable I/O refers to input-output pins which can process data ingoing or outgoing data without requiring a CPU.
The Raspberry Pi Pico features 8 Raspberry Pi Programmable I/O (PIO) state machines. State machines are essentially simple processors that can be programmed with a special form of assembly language to separately handle data.
What can Programmable I/O be used for?
Microcontroller units (MCUs) like the Raspberry Pi Pico are small and perfect for many embedded electronics purposes. However, because they are small, they also have limited processing power and memory. Hence, resource management is very important for microcontrollers.
The programmable I/O on any MCU becomes extremely useful when we have a process that requires continuous instructions. For example, fading an LED, while a simple task, requires constant input to vary the PWM (pulse width modulation) duty cycle gradually. Yet, this can also be done easily with a state machine!
Thus, programmable I/O can transfer the burden of simple but resource-intensive tasks from the CPU to the state machine. That way, we can make better use of our microcontroller’s main processing power and resources to improve our devices!
State Machine Infrastructure
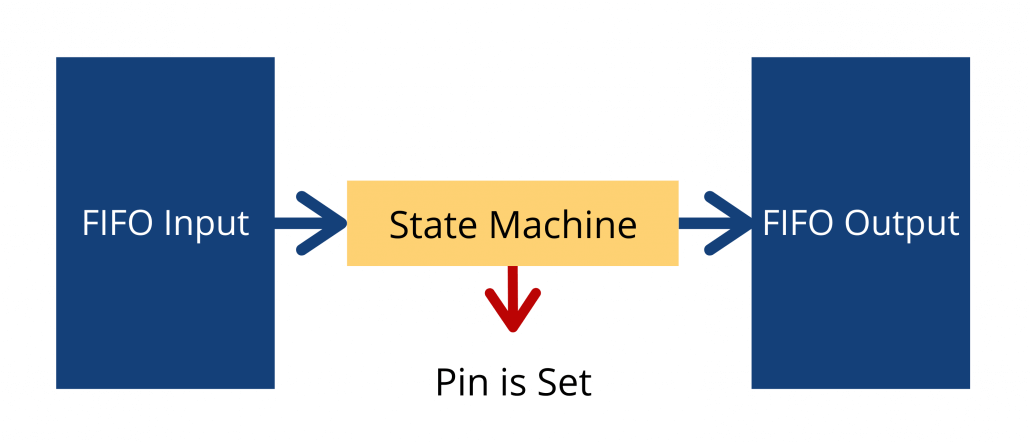
Each state machine on the Raspberry Pi Pico has 2 First-In-First-Out (FIFO) structures: One for incoming data, and another for outgoing data. In FIFO structures, the data that is written in first will then be the first to be read out. FIFO structures are also known as queues, since they work similarly to a queue of people.
The input FIFO is also known as the RX FIFO, since it receives data to be read by the state machine. On the other hand, the output FIFO is also known as the TX FIFO, since it holds data to be transmitted out.
Programmable I/O Benefits
When we want to send data to a pin via a state machine, we first push the data to the FIFO input. When the state machine is ready to process the data, it will pull it from the queue and perform the instruction.
The key benefit here is that we can decouple the need for the central CPU from the execution of the instruction, since it has been “delegated” to the PIO’s state machine.
Although each FIFO can only hold up to four words of data (each of 32 bits), we can link them with direct memory access (DMA) to transmit larger amounts. This way, we can once again free up the CPU from having to “babysit” the process.
Shift & Scratch Registers
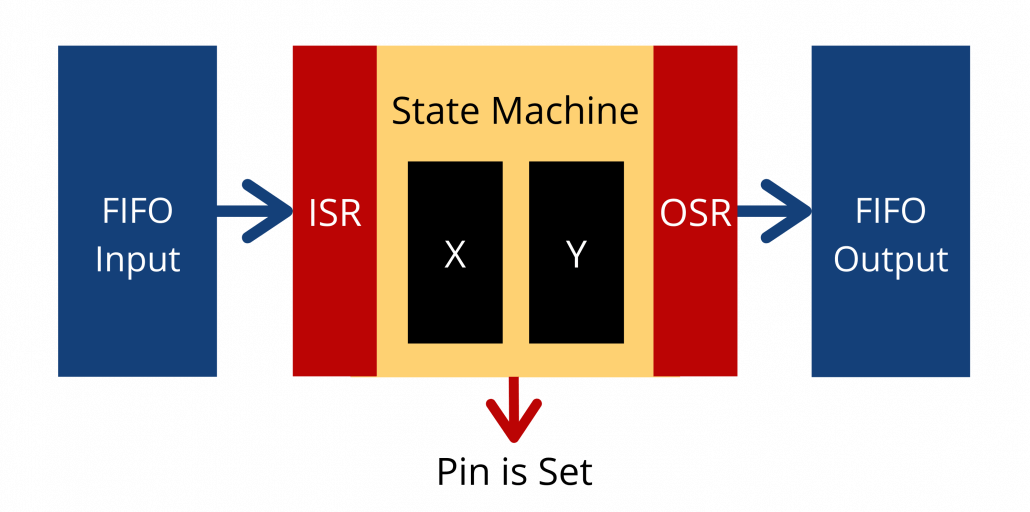
The FIFOs are linked to the state machine via the input and output shift registers (ISR / OSR).
Separately, each state machine also has two scratch registers called X and Y. Scratch registers are for storing temporary data. Think of them as variables for use when programming our PIO.
Adjusting our previous schematic, the complete structure becomes as follows. Cool!
Using Programmable I/O with MicroPython
The Raspberry Pi Pico comes with its official MicroPython port, so we can use the beginner-friendly Python programming language to program our Raspberry Pi Pico’s state machines.
The following section is based on Ben Everad’s Flashing lights with MicroPython and Programmable I/O part 1 Tutorial. We’ll use it to demonstrate how we can program a state machine to fade an LED with MicroPython – working all without the help of our CPU!
State Machine Instructions
We can issue nine different instructions to the state machines:
- IN – Shifts 1 word of 32 bits at a time into the ISR from another location
- OUT – Shifts 1 word of 32 bits from the OSR to another location
- PUSH – Sends data to the RX (input) FIFO
- PULL – Gets data from the TX (output) FIFO
- MOV – Moves data from one location to another
- IRQ – Sets or clears interrupt flag
- SET – Writes data to destination
- WAIT – Pauses until a defined action happens
- JMP – Jumps to a different point in the code
MicroPython Code
First, let’s look at the MicroPython code:
from rp2 import PIO, StateMachine, asm_pio
from machine import Pin
import time

@asm_pio(set_init=PIO.OUT_LOW)
def led_off():
    set(pins, 0)

@asm_pio(set_init=PIO.OUT_LOW)
def led_on():
    set(pins, 1)

sm1 = StateMachine(1, led_off, freq=20000, set_base=Pin(25))
sm2 = StateMachine(2, led_on, freq=20002, set_base=Pin(25))

sm1.active(1)
sm2.active(1)
The @asm_pio decorator is used to let the MicroPython compiler recognise the function that follows as written in PIO assembly. We can also use the decorator to define the initial state of the pin. In this case, it’s set to low.
Each state machine is defined with a StateMachine() object, which is initialised with a number of inputs. In this case, we only defined the
- state machine number,
- programme to be run,
- frequency that we want the program to be run at,
- and the target pin for the program.
With this code, one state machine continuously sets the LED Pin’s state to 1 (Pin 25), whereas the other continuously sets it to 0. However, because they are running at slightly different frequencies, the proportion of time spent in the on state vs the off state will vary. The result is a pattern that fades in, then out.
The last two lines simply activate each of the state machines, so our program will proceed to run. That’s it!
Pre-Order Your Raspberry Pi Pico
The Raspberry Pi Pico comes in at an extremely affordable price of only $4 and is available for preorder from the Seeed online store.
Summary
We’ve gone through the basics of programmable I/O, and how we can use it on the new Raspberry Pi Pico. To read more about programmable I/O, we recommend the following articles:
For the full documentation of the Raspberry Pi Pico and more information on what can be done with this flexible microcontroller board, please visit the official documentation.