Introducing Wio Terminal: A Simple Tiny Device to Build I/O with the Physical World
Today we are excited to introduce a brand-new product — Wio Terminal! It is quite different from the other development boards we have released on Bazaar. Instead of being a single embedded functional module, Wio Terminal is a simple and tiny device to build I/O with the physical world, equipped with a 2.4 inch LCD and a compact enclosure. Let’s have a look!
1. What can Wio Terminal Bring to you?
A Simple Tiny Device to Build I/O with the Physical World
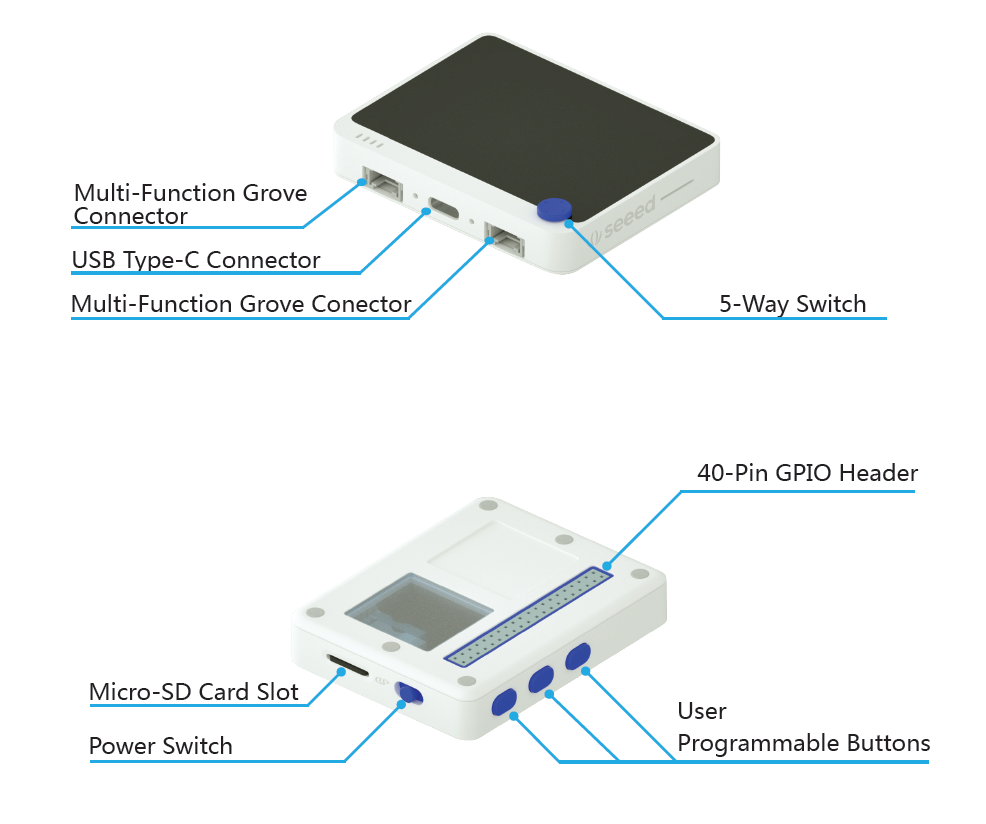
Getting tired of fixing your Dev board, LCD and sensors with a plain breadboard and tangled jumper wires? Wio Terminal can help you build I/O with the physical world in a more efficient way! It is equipped with a 2.4” LCD Screen, onboard accelerometer, microphone, buzzer, microSD card slot, light sensor, and infrared emitter (IR 940nm). All of these components are carefully housed in a compact enclosure.
Powerful Processor and Reliable Wireless Connectivity
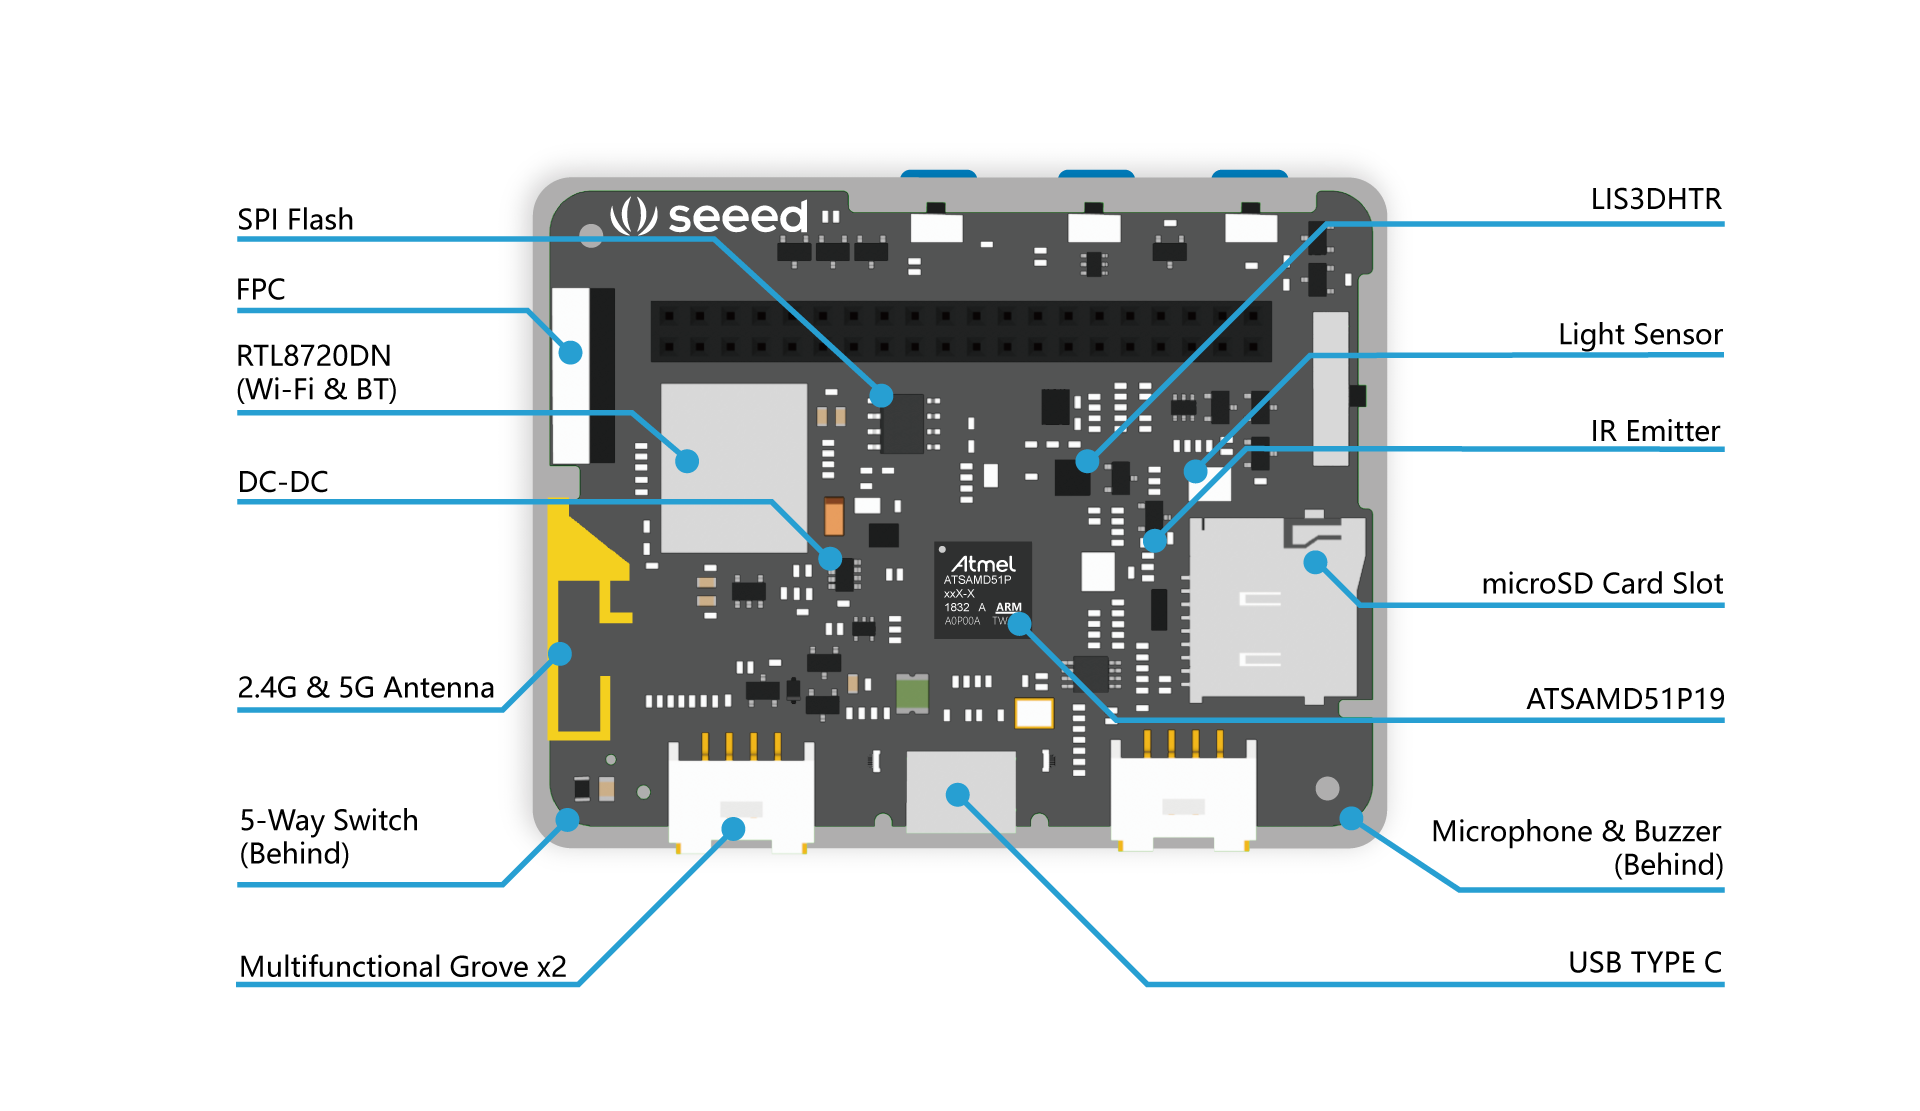
Wio Terminal is an ATSAMD51-based microcontroller with wireless connectivity supported by Realtek RTL8720DN. It runs at 120MHz (Boost up to 200MHz) and supports both Bluetooth (BLE4/5.0) and Wi-Fi (2.4G/5G), providing a backbone for IoT projects.
The Best Pi Hat with LCD Screen
Wio Terminal is equipped with various peripherals, including two multifunctional Grove ports for Grove Ecosystem and 40 Raspberry Pi compatible GPIO pins for more add-ons. By connecting Wio Terminal to Raspberry Pi, you can start programming and collect environmental data directly, with no need for soldering or breadboards. Over 300 Grove modules are available on Bazaar and waiting for you to explore!
Wio Terminal is much more than just an add-on board that brings Grove sensors to the Raspberry Pi. As we mentioned previously, Wio Terminal is equipped with onboard 2.4” LCD Screen, Wi-Fi, Bluetooth, accelerometer, microphone, buzzer, microSD Card, configurable buttons, light sensor, 5-way switch, infrared Emitter (IR 940nm), packing multiple functions in a 72 x 57 x 12mm tiny but stylish enclosure. Its highly integrated design allows your Pi to interact with the physical world more efficiently, not to mention that it supports all Arduino libraries which making programming easier.
2. Arduino Display Projects Using Wio Terminal
So what can we do with Wio Terminal? Here we prepared some awesome Arduino demos using Wio Terminal. If you are interested in our demos, detailed tutorials and Arduino libraries all can be found in our wiki. Follow the step-by-step instructions and you can build your demo within minutes. But don’t forget that those are just 4 examples and there are endless possibilities with Wio Terminal, just grab one and make your very own unique project!
Wio Terminal Displaying and Storing Analog Data
With the help of Wio Terminal, you can create a data displaying system for environmental monitoring, without worrying about compatibility and enclosure! This demo shows you how to use line graph functions to display the Grove – Light sensor readings on Wio Terminal, just like the Serial Plotter. In addition, the light sensor data can be stored on the SD Card.
The step-by-step tutorial is available here: Wio Terminal Storing Analog Data
Wio Terminal Displaying Photos
Want to make a digital picture frame? Wio Terminal provides a simple solution. This example demonstrates how to display images from an SD card in loop. Just follow the instructions and you can create your own digital picture frame in 3 steps!
You can find the full tutorial here: Wio Terminal Displaying Photos
Wio Terminal Displaying Accelerator Readings

In this example, the 3-axis accelerator readings are plotted onto one line graph to show the real-time positioning of the Wio Terminal. Here you can see the real-time positioning through the 2.4 inch LCD screen.
You can find the full tutorial here: Wio Terminal Displaying Gyro
Wio Terminal Interactive Emoji faces
This example demonstrates how to display multiple images (eyes) onto the LCD screen through SD card (BMP format), and with the use of the built-in buttons and gyroscope to interact with users.
Full tutorial can be found here: Wio Terminal Interactive Face
3. Explore Endless Possibility with Fully Open-Source Wio Terminal
As a fully open-source device, Wio Terminal development will continue to optimize its performance and every update will be publicized on our blog. From hardware and software development, to each step of manufacture and testing, you can find all you want to know about Wio Terminal. Stay tuned with us and don’t hesitate to let us know your ideas and thoughts! We welcome all voices from the community and will take action accordingly.
With the release of Wio Terminal, Seeed hopes to enable the community to customize products at a much lower risk and cost, even for those who have no hardware background. In the future, Seeed welcomes everyone to design and customize their own Wio Terminal. From custom enclosures to custom PCB’s, the possibilities are endless with Wio Terminal.

4. The Story behind “Wio”
Some newcomers may not be familiar with “Wio”, so what does “Wio” mean?
Wio means “Wireless input and output”. The Wio platform (Wio Link, Wio Node, etc.) was first introduced to the world at the end of 2015 by Seeed, designed for makers to simplify their IoT development.
The traditional process of building IoT applications consists of micro-controller programming, electronic engineering, network programming, IoT protocols handling and application development. Every step involves various hardware, software knowledge, which could be a challenge, especially for beginners and non-hardware engineers. To simplify all of these steps, Seeed defined a new way to create IoT applications — The Wio (Wireless input and output) series was created.

A Brief Introduction of the Wio Family
In 2015, we released Wio Link, an ESP8266 based open-source Wi-Fi development board. The second member of the Wio family came about in the form of Wio Node. Equipped with most of the features of its elder brother, Wio Node is lighter, has a smaller form factor for more space-constrained applications. After that, we released Wio Tracker, an Arduino compatible MCU which enable faster IoT GPS solutions, and Wio LTE, the LTE version.
With the help of the Wio Family, even beginners can build his/her own IoT application within 5 minutes, no hardware programming, no breadboard, no jumper wires, no soldering.
If you are interested in other Wio family members, please refer to our wiki for more information.
Inquiry:
How to purchase Wio devices to be recommended among various users;
How to run the devices, especially tinypython;
How to connect the devices with my Android smartphone and windows 10 PC; and
How to pay without credit card.
Request:
Inasmuch as I am truly abosolute kids level beginner, you’d be better teach me
details such as a plurality of flowcharts indicative of how to operate each member among each device, whereby such depicted drawings will spread worldwide profitably.
From a usoutsider expecting your reply as soon as possible
Hi Goichi Suenaga,
Glad to know that you love our wio series! We have detailed instructions and many awesome projects at our wiki to help you get started. Also, feel free to contact our support team for any technical issues at our forum or via email ([email protected]) and we are happy to help you!
The whole wio series can be purchased at Bazaar, our online store. We accept payment via Paypal or credit card.
Wiki: http://wiki.seeedstudio.com/Wio/
Forum: https://forum.seeedstudio.com/
Bazaar: https://www.seeedstudio.com/catalogsearch/result/?q=wio