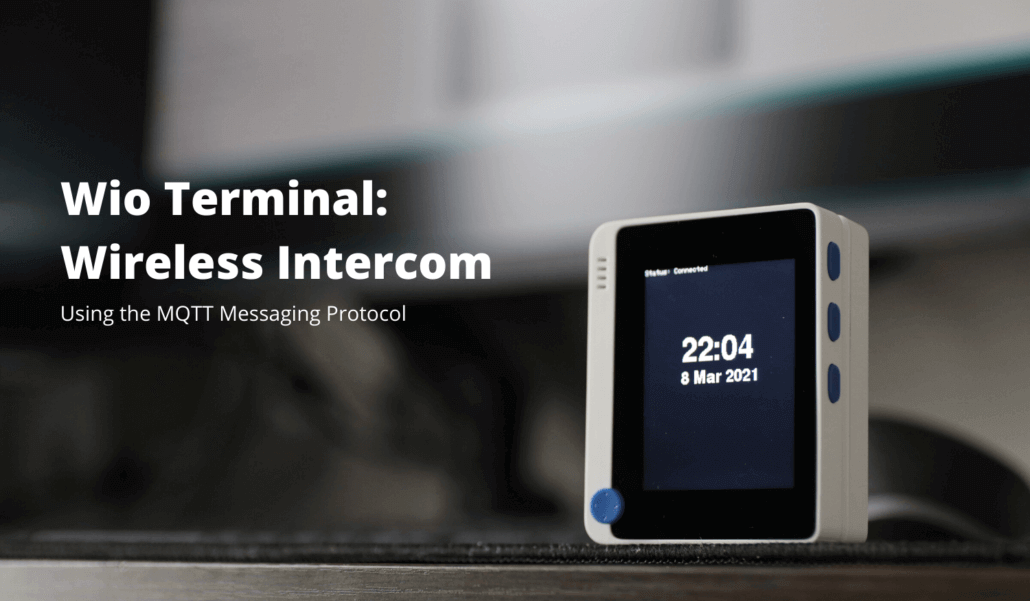
Build an MQTT Intercom with Wio Terminal (with Code!)
In today’s article, we are going to build an Arduino wireless intercom with our Wio Terminal! This project sets up your Wio Terminal as a desk clock, but also allows you to send and receive messages to other devices via the MQTT protocol.
Wireless Intercom Background & Overview
I had dinner at a friend’s place over the Lunar New Year holidays, and they had trouble calling everyone to the table. That’s when someone aptly remarked that some kind of intercom would be so useful! Sadly, a quick online search revealed that modern intercom systems cost anywhere from USD 1500 to 6000 for hardware and installation – that’s huge!
In addition, for many of us, it is an absolute must to be distraction free while working. This means that our mobile phones might be put away with notifications turned off, rendering us unreachable. With the WFH (work from home) situation persisting in many areas around the globe, we’re going to need an easy yet non-intrusive way of still carrying out essential household communications.
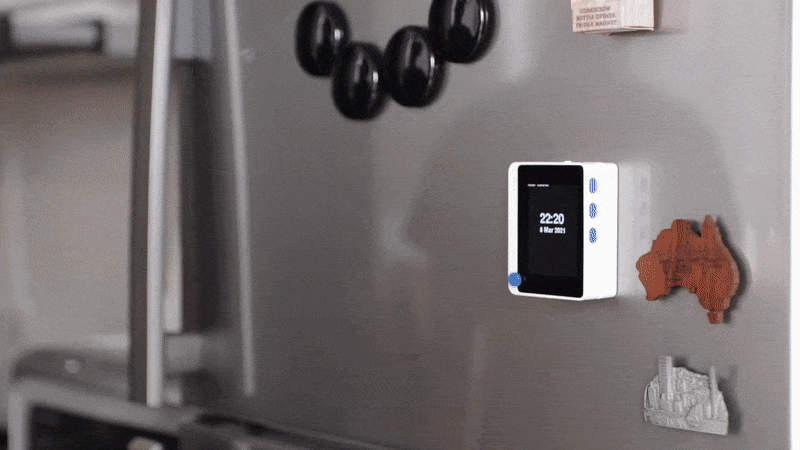
All of that said, why not build our very own wireless intercom system with Wio Terminal and Arduino? That way, we’ll gain similar conveniences at just a fraction of the cost!
Let’s first take a look at the short demo video that I’ve made for this project.
In summary, we will want to achieve three things on our Wio Terminal in this project:
- Display the date and time in realtime
- Be able to receive / send messages over WiFi
- Build a GUI for user navigation
What’s an Intercom?
Intercom is short for intercommunication device. Traditionally, an intercom is any electrical device that allows for one-way or two-way communication. One common use of intercoms is in housing estates, where home owners can let guests into the compound without having to physically open the gate. Some homes or offices may also have intercom systems to allow for convenient communication.

Brief on MQTT Communication
To send messages over WiFi, we are going to use the lightweight MQTT (or Message Queuing Telemetry Transport) protocol. MQTT is a publish/subscribe messaging protocol that works on top of our existing internet connection (TCP/IP).
The pub/sub structure works by linking different devices based on the topics that they subscribe or publish to. In the graphic below, the Temperature Sensor publishes to the temperature topic, which the Mobile device and Backend system are both subscribed to. Thus, both of them will receive the message of “24 oC”.
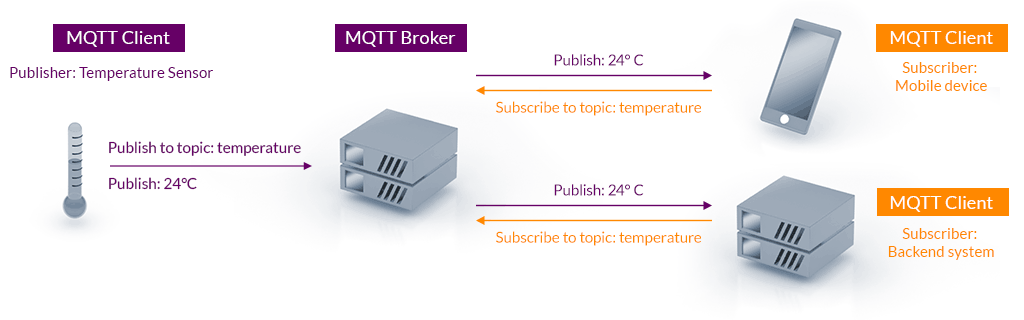
The device that coordinates the publishers and the subscribers of a given topic is known as the MQTT broker. You can think of the broker as the “brain” of our IoT network that coordinates communication between all our connected devices – communication would be messy and impossible without it!
Tools Required
To follow along or implement this project for your own use, you will need the following:
- Wio Terminal x2 (or as many as you’d like in your use-case)
- Raspberry Pi 4B 4GB x1 (for our MQTT Broker)
- A working local internet connection
While a Raspberry Pi 3 or a Raspberry Pi Zero W would also serve our purposes as an MQTT broker, I highly recommend getting the latest Pi 4B for more computing power that might be useful for your future projects!
Naturally, you can also use any Arduino compatible board with an LCD screen in place of the Wio Terminal. However, you will need to handle wiring and also add additional buttons to make full use of today’s Arduino wireless intercom project, as well as reconfigure the code to work with your hardware pins!
Set up Raspberry Pi MQTT Broker
First, we have to set up our Raspberry Pi as our MQTT broker, which will manage and route the topics and messages between our devices. If you haven’t set up an internet connection on your Raspberry Pi before, please first visit our How To: 3 Methods to Configure Raspberry Pi WiFi article.
Run the following two commands in your Raspberry Pi command line interface to install the Mosquitto MQTT platform.
sudo apt update
sudo apt install -y mosquitto mosquitto-clients
Next, run the following to enable the mosquitto service. This will make the MQTT service run on your Pi at boot, so it will automatically serve as the broker whenever it’s powered on and connected to the internet.
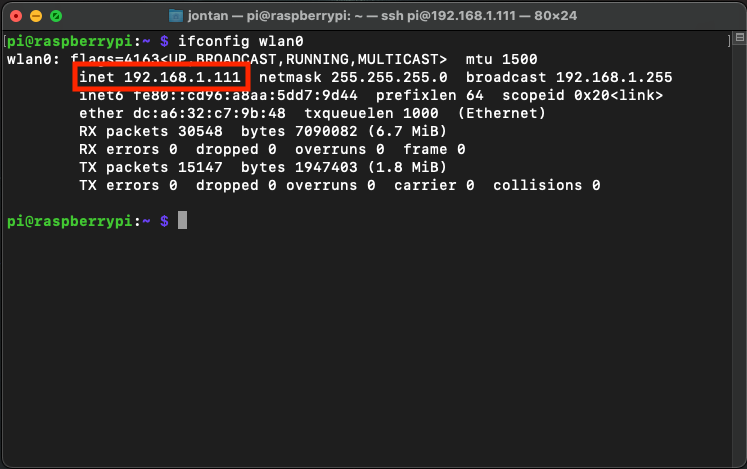
sudo systemctl enable mosquitto.serviceFinally, before we dive into how to publish and subscribe to various topics, run:
ifconfig wlan0Look at the output next to “inet”. This is the IP address of your Raspberry Pi. Record this down for later use, as we’ll need it for our Wio Terminal’s Arduino code.
MQTT: Publishing & Subscribing
Before we jump into programming our Wio Terminal, it’s good to check that our Raspberry Pi MQTT broker is working as intended. We’ll first set up a listener to a topic with the following command.
mosquitto_sub -t "testtopic"As you might be able to guess, the -t parameter marks the topic that we are subscribing to. In this case, it is simply testtopic.
Now, open a new window on your terminal and run the following command to publish a test message to the same topic.
mosquitto_pub -t "topic" -m "test message"The words “test message” should now appear on your first terminal window.
Congratulations! You’ve just sent your very first MQTT message.
Wildcard Subscriptions
MQTT topics are structured similarly to our computers’ file directory systems. For example, under a single device topic, we can have two other subtopics such as status and message.
device1/status
device1/message
This is useful to know when we want to use a wildcard subscription. For example, a topic of “+/status” will subscribe us to the status topics of all devices available. We will use this later on to reach all the devices in our network with a single publish.
To learn more about wildcards in MQTT communication, this article on HiveMQ is a good read.
Wio Terminal: Installing the Required Libraries
- If this is your first time working with your Wio Terminal, it’s highly recommended that you visit this page to install the required basic libraries for getting started.
- Next, follow the instructions at this link to set up the WiFi capabilities on your Wio Terminal. This will involve updating the firmware of your Wio Terminal and installing several Arduino libraries.
- Following that, download the Seeed RTC Library as a ZIP from this link and install it with your Arduino IDE.
- Finally, install the PubSubClient through the Arduino Library Manager, under Tools > Manage Libraries.

Implementing the Arduino Code
First, download the code from this Github repository and open the WioTerminal_Intercom.ino file with your Arduino IDE.
Although the Arduino code is mostly ready for use, there are a few things you need to adjust for your own use-case before flashing. First, find the following two lines and replace the SSID and password with your WiFi information. Take note that this has to be the same network that your Raspberry Pi is connected to.
const char *ssid = "YourWiFiSSID";
const char *password = "YourWiFiPassword";
Then, change the broker IP Address to the IP address that you took down from your Raspberry Pi in our earlier steps. Replace the “.” (dots) in your IP address with “,” (commas) for this input.
IPAddress broker(192,168,1,111); // If your broker IP is 192.168.1.111The next step is to update the preset messages as desired. These are the messages that you can send out from your Wio Terminal. You will also need to update the number of messages in the num_messages variable accordingly.
int num_messages = 4;
const char *messages[] = {
  "I need help!",
  "Food is ready!",
  "Give me 5 minutes!",
  "I'll take awhile."
};
Finally, for each Wio Terminal that you flash this sketch on, you will want to allocate a unique device ID to that device so that the MQTT broker can identify the device. Also update the PUBTOPIC to “<ID>/messages”. We will use this to indicate the sender of the messages we receive in the GUI.
const char *ID = "<MyID>";  // Must be unique
const char *PUBTOPIC = "<MyID>/messages";
Wireless Intercom Arduino Code: Things to Note
In this section, I will briefly cover some parts of the Arduino code which are important to enabling the functions of our Wio Terminal Arduino Wireless Intercom.
Pub/Sub Structure
The Arduino sketch has been designed so that all devices in the network will publish to their individual “<ID>/messages” topics, while being subscribed to the messages published by all devices with the “+/messages” topic.
This essentially converges all the messages being sent through the broker into a single stream that can be accessed by all devices.

Parsing Incoming Messages
In the setup() function, I set a callback for our PubSubClient by calling
client.setCallback(callback)This defines a callback function that will be run every time we publish a message or when client.loop() is called to maintain the connection. In our Arduino code today, the callback function is defined as follows:
void callback(char* topic, byte* payload, unsigned int length) {
  String response, identity;
  if (payload && strcmp(topic,PUBTOPIC) != 0) {
    for (int i = 0; i < length; i++) {
      response += (char)payload[i];
    }
    for (int i = 0; i < (strlen(topic)-9) ; i++) {
      identity += (char)topic[i];
    }
    fadetxt(identity + ":", FSS9, 40, 250, 160, TC_DATUM);
    fadetxt(response, FSS9, 40, 280, 240, TC_DATUM);
    alarm();
  }
}
Because our Wio Terminal is subscribed to all the “/messages” topics, it is also subscribed to its own topic. In order to avoid receiving our own messages, a conditional statement is added where the received payload is only parsed and displayed if the incoming topic and the Wio Terminal’s own topic is not the same.
In addition, the identity of the device from which the incoming message is sent is also parsed by removing the “/messages” tail of the incoming topic. For example, “WioTerminal2/messages” will simply become “WioTerminal2”.
Keeping Time: RTC & NTP
The sharp ones among you would have noticed that the time displayed in my demo video was completely incongruent with daylight!
The date and time is passed onto the Wio Terminal at compile time, and is maintained by the RTC (real time clock) module on the device. Hence, it is critical to avoid the use of the standard delay() function, since it is blocking and will introduce inaccuracies in the time kept over time. Instead, you will find that I have replaced all the delays with a millisDelay() function which is non blocking and will not affect timekeeping.
void millisDelay(int duration) {
    long timestart = millis();
    while ((millis()-timestart) < duration) {};
}
Nonetheless, relying solely on compile time and the RTC module is a limitation, since the module stops if the Wio Terminal is ever switched off after flashing. Hence, it would be ideal to obtain NTP time via the internet from the NTP server in the setup of our Arduino. This will ensure that the time displayed on the Wio Terminal is accurate, even if it has been switched off previously.
Visit here if you want to find out how to add this functionality to your code.
Smooth Graphics: Fading In & Out
For this project, I wanted to implement a smooth graphical user interface with the use of fading in and out of the displayed text. This can be done with a simple for loop like so:
sp.setTextColor(TFT_BLACK);
int r = 0; int g = 0; int b = 0;
for (int j = 0; j < 127; j++) {
    int color = sp.color565(r += 2, g += 2, b += 2);
    sp.setTextColor(color);
    if (datum == TL_DATUM) sp.drawString(text, 0, 0);
    if (datum == TC_DATUM) sp.drawString(text, 80, 0);
    sp.pushSprite(x,y);
}
We essentially initialise the text colour to the background colour of black, and continuously push the text with incremental colours towards the white RGB values of r = g = b = 255. This produces the effect of a fade in. Conversely, to achieve a fade out, we can initialise the text to white and incrementally push new colours towards the black RGB values.
Summary
And that concludes today’s tutorial on how to build a Arduino wireless intercom with your Wio Terminal. Let me know what kind of messages you will send or interesting things you will achieve with this device!

If you are interested to try other Wio Terminal projects, please check out:
- Wio Terminal: Arduino Customisable Timer (with Code!)
- Wio Terminal: Arduino Smart Doorbell (with Code!)
- Learn TinyML using Wio Terminal and Arduino IDE #1 Intro
- Learn TinyML using Wio Terminal and Arduino IDE #2 Audio Scene Recognition and Mobile Notifications