Cluster Computing on the Edge – What, Why & How to Get Started
Cluster computing is a powerful computing paradigm for addressing high workloads and deploying specific applications – but how about if we applied it in Edge Computing? Join me in this article today as we dive into the basics behind cluster computing on the edge, its benefits, and how you can utilise it in your various projects!
In this article, we will cover the following and more.
- What is Cluster Computing on the Edge?
- How does Clustering Really Work?
- What are the Uses & Benefits of Clustering?
- Hardware Recommendations for Cluster Computing on the Edge
- Examples, Projects & Use Cases of Cluster Computing on the Edge

What is Cluster Computing on the Edge?
When we mention Cluster Computing, the first thing that might come to your mind is rows and rows of huge computers lined up on shelves, chugging along endlessly at intensive computing tasks. And you’re right! By definition, computer clusters are groups of computers that work together so that they can be viewed as a single system.

However, today’s article is about Cluster Computing on the Edge. Now, what does “on the Edge” mean?
Edge Computing, or Computing on the Edge, refers to computational tasks or data processing being performed on devices which are physically located in the local space. This is in direct contrast to cloud computing, where these processes are handled remotely.
Some examples of common edge devices are mobile phones, smart watches, and even automobile vehicles! Edge computing brings numerous benefits such as reduced latency, lower costs, increased data security and system reliability.
You can also read more about edge computing in my previous article!

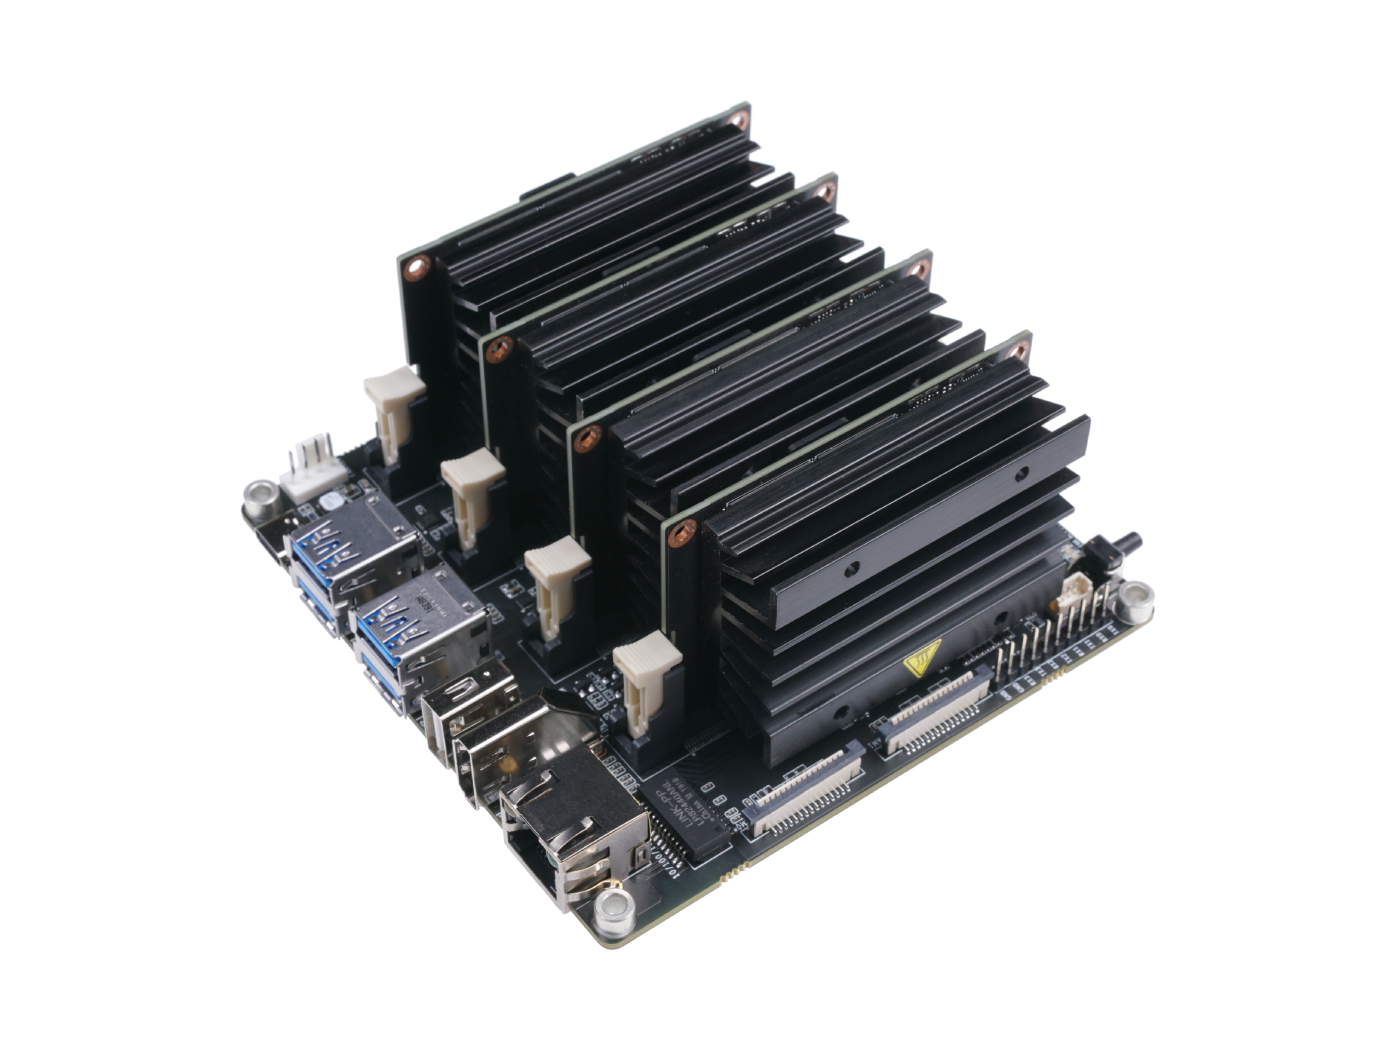
Traditionally, cluster computing was unique to cloud computing, but as advances in Single Board Computers (SBCs) & network infrastructure take strides, this is no longer the case. For example, the Jetson Mate Carrier Board shown below allows you to connect up to four Jetson Nano modules to create your very own computer cluster in an extremely compact footprint of 11 x 12 cm!
In simple terms, you can understand Cluster Computing on the Edge as a new paradigm which aims to bring the benefits of cluster computing into edge computing to get the best of both worlds!
How does Clustering Really Work?
We know so far that a computer cluster consists of multiple machines, each of which are known as a node. In each cluster, there is usually a single head node, followed by multiple slave nodes (or worker nodes). All of them are connected to and able to communicate with each other, and typically run the same operating system.

When the cluster receives a job, such as a request to process and return some data, the head node is responsible for delegating the jobs to the slave nodes. The way that the computing workload is distributed is largely where clusters differ from each other. Some clusters, for instance, focus on delivering the highest performance possible, while others are designed to guard against failure.
What are the Uses & Benefits of Clustering at the Edge?
There are three major types that you should know about. Each of them serve different purposes and contribute their own set of benefits to cluster computing!
- High Availability – Ensures that applications are always available by rerouting requests to another node in the event of a failure.
- Load Balancing – Spreads computing workloads evenly across slave nodes to handle high job volumes.
- High Performance – Multiple slave nodes are used in parallel to increase computing power for tasks with high computing requirements.
1. Robust Edge Computing Systems
In edge applications where low maintenance requirements are critical, clusters can bring greater system reliability. With a single computer, one failure would result in immediate system downtime. In a cluster, the multiple slave nodes build redundancies to guard against this, since other nodes can continue to function even if one fails. Repairing hardware faults in clusters is also easier, since you only have to reconfigure a single node instead of the entire infrastructure.
2. Flexible & Suitable for a Wide Range of Edge Applications
From the various types of clusters, it’s easy to see that cluster computing has a place in many different types of applications. For example, a high performance cluster can be used to run machine learning on the edge, whereas a high availability cluster will be suitable for hosting servers to process and report data from IoT devices. Furthermore, clustering paradigms are software based – meaning that the same hardware can be easily reconfigured to meet the needs of another application!
3. Greater Computing Power on the Edge
With a cluster, you can easily add more modules according to your computing requirements. For example, a cluster can have up to dozens of multiprocessor machines, delivering far greater power than a single computer! This drastically increases the possibilities of edge computing, since edge computing devices have traditionally offered less computational capacity.
Hardware Recommendations for Cluster Computing on the Edge
If you’re keen to get started with cluster computing in edge applications, it’s a good idea to get a feel for the hardware available. In this section, I’ll go through some of my top recommendations for your consideration!
Raspberry Pi 4 / Compute Module 4
The Raspberry Pi 4 is arguably the most popular Single Board Computer, offering decent computing power and rich I/O capabilities in a credit card sized form factor. Running a Linux operating system and with extensive documentation and community support, the Raspberry Pi 4 (and compute module) is a great option for building your very first computer cluster! In this official tutorial, a Raspberry Pi Cluster is used to speed up calculations by a factor of nearly five!

Product Features:
- Broadcom BCM2711, quad-core Cortex-A72 (ARM v8) 64-bit SoC @ 1.5GHz
- 1GB, 2GB or 4GB LPDDR4 RAM
- 2.4 GHz and 5.0 GHz IEEE 802.11b/g/n/ac wireless LAN, Bluetooth 5.0, BLE, Gigabit Ethernet
- 2 × USB 3.0 ports / 2 × USB 2.0 ports
- Standard 40-pin GPIO Header
- 2 × micro HDMI ports (up to 4Kp60 supported)
- 2-lane MIPI DSI display port / 2-lane MIPI CSI camera port
Interested to learn more? Learn more about the Raspberry Pi 4 on the Seeed Online Store now!
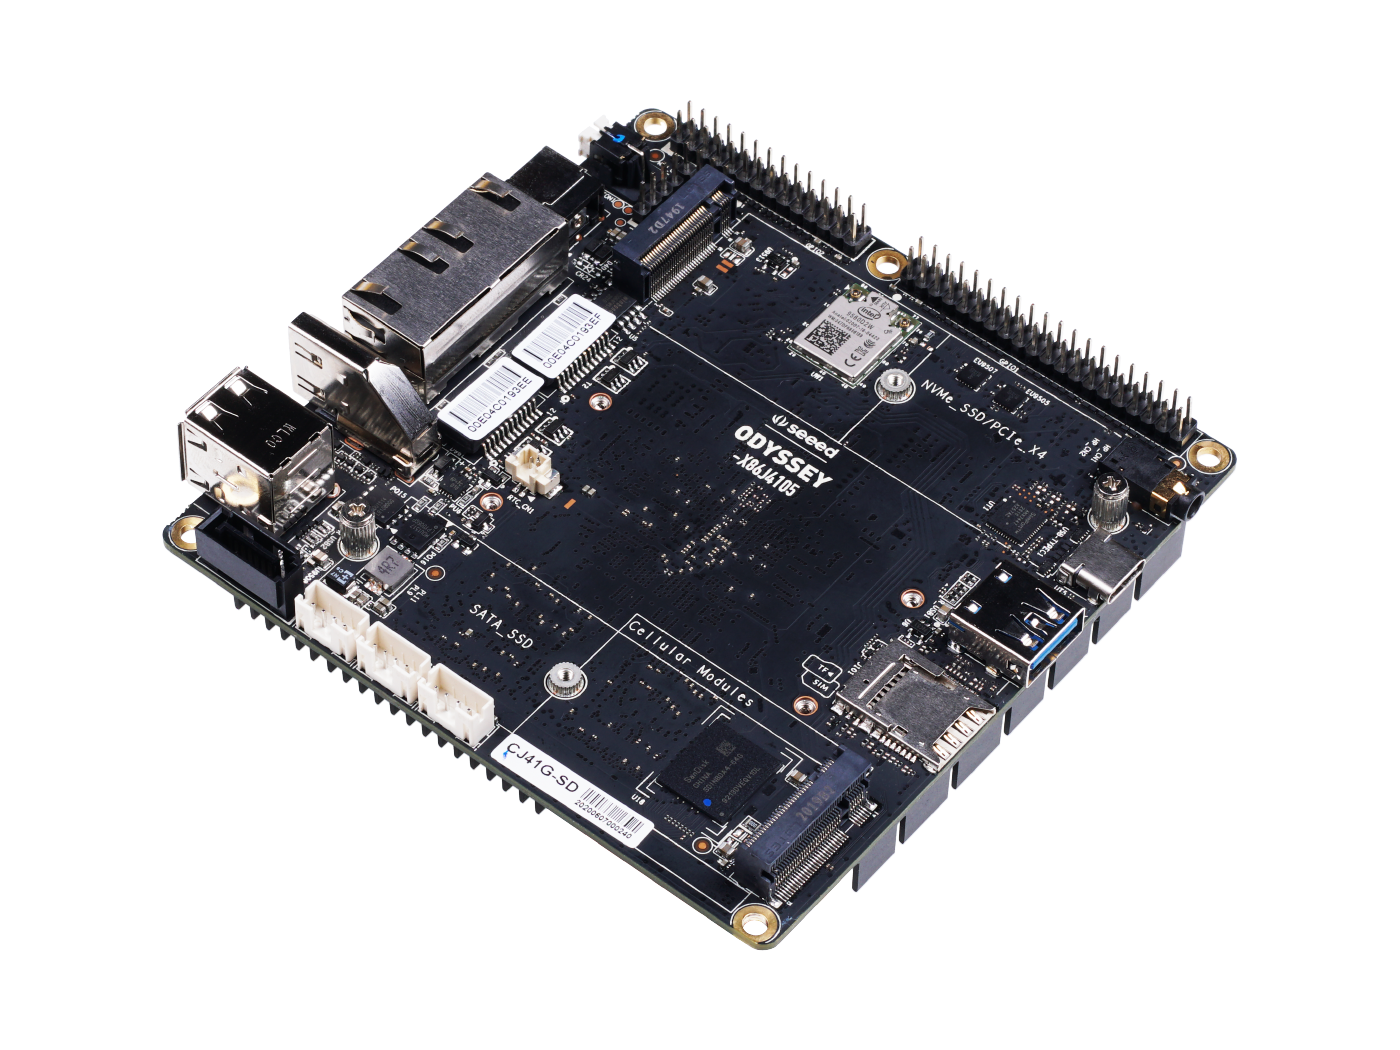
ODYSSEY X86J4105800
Running on the x86 CPU architecture, the ODYSSEY x86 is a powerful single board computer in its own right. With a cluster, you can extend these possibilities even further with much greater computing capabilities! With a wealth of I/O interfaces, the ODYSSEY x86 will definitely serve you well for any kind of edge application.
Product Features:
- Intel® Celeron® J4105, Quad-Core 1.5-2.5GHZ
- Dual-Band Frequency 2.4GHz/5GHz WiFi
- Intel® UHD Graphics 600
- Dual Gigabit Ethernet
- Integrated Arduino Coprocessor ATSAMD21 ARM® Cortex®-M0+
- Raspberry Pi 40-Pin Compatible
- 2 x M.2 PCIe (B Key and M Key)
- Support Windows 10 & Linux OS
- Compatible with Grove Ecosystem
Interested to learn more? Learn more about the ODYSSEY x86J4105800 on the Seeed Online Store now!
NVIDIA Jetson Nano Module
If you’re intending to run machine learning workloads on the edge, you should definitely consider the NVIDIA Jetson Nano Module. Designed specially for AI applications with NVIDIA’s JetPack SDK, you can easily build, deploy and manage powerful machine learning at the edge with low power consumption. The Jetson Nano can be paired with the Jetson Mate to easily build powerful clusters!

Product Features:
- Quad-Core ARM Cortex-A57 MPCore Processor
- NVIDIA Maxwell GPU with 128 NVIDIA CUDA Cores
- 4GB 64-Bit LPDDR4 Memory at 1600MHz 25.6GBps
- 16GB eMMC Storage
- NVIDIA JetPack SDK for AI Development
Pick up your very own NVIDIA Jetson Nano Developer Kit on the Seeed Online Store!
Cluster Computing Examples: Projects & Use Cases
Computer clusters can be used just about in any situation that you can imagine, providing improved performance and reliability in comparison to traditional single device computing. Here are a few examples where cluster computing on the edge can be especially useful!
Machine Learning Inference Server
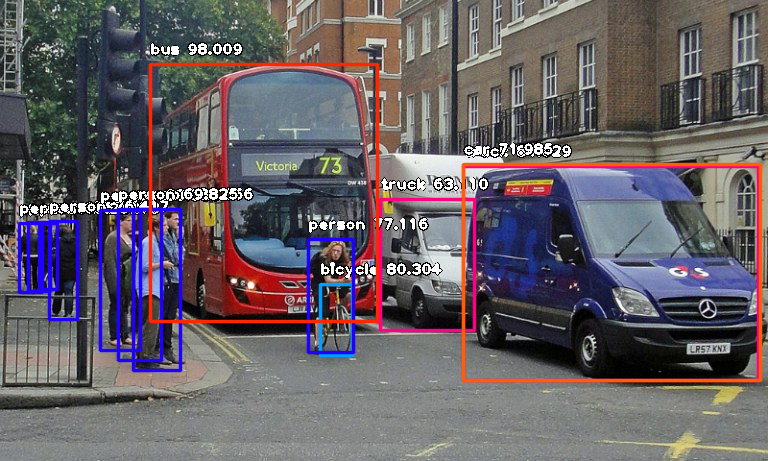
Run a GPU cluster to run rapid calculations required for machine learning! This is similar to cloud computing, except we bring computing capabilities much closer to where they are needed on the edge. For example, you can use a cluster of Jetson Nano modules and use multiple GPUs simultaneously to run low latency, real time person detection on multiple video feeds in security systems!
Self-Hosted Private Cloud Server
You can already do this with a single SBC setup, but deploying your own web server on a cluster allows you to scale this project up almost indefinitely – even to an enterprise level! This means you’ll be able to host more data and applications to meet any kind of needs that you or your organisation might have.
This is also a far more cost effective method compared to the traditional full server rack, since the hardware costs are greatly mitigated by affordable edge computing devices! In addition, enjoy the added security of your very own internal network!
Test & Deploy Applications with Kubernetes
It’s definitely worth mentioning that you can use Kubernetes to efficiently test and deploy any kind of application on your edge clusters. Kubernetes is an open-source platform for managing containerised workloads and services, and is one of the most popular ways to deploy computer clusters in 2021. You can think of it as a management interface that helps you manage your clusters, scaling resources up or down as required to make the most efficient use of your hardware and more!

Tutorial: Build a Kubernetes Cluster with Jetson Mate
In this section, I’m going to show you just how easy it is to set up your very own cluster with the Jetson Mate and the powerful Jetson Nano modules. You can also read the complete tutorial on our Seeed Wiki page.
Required Materials
To follow along with this tutorial, the following items are recommended. Take note that you will need to have at least two Jetson Nano modules, since we require a minimum of one master / head node and one worker / slave node.
- Jetson Mate Carrier Board
- Jetson Nano Module (at least 2)
- Qualified Type-C Power Adapter (65W minimum) with PD Protocol
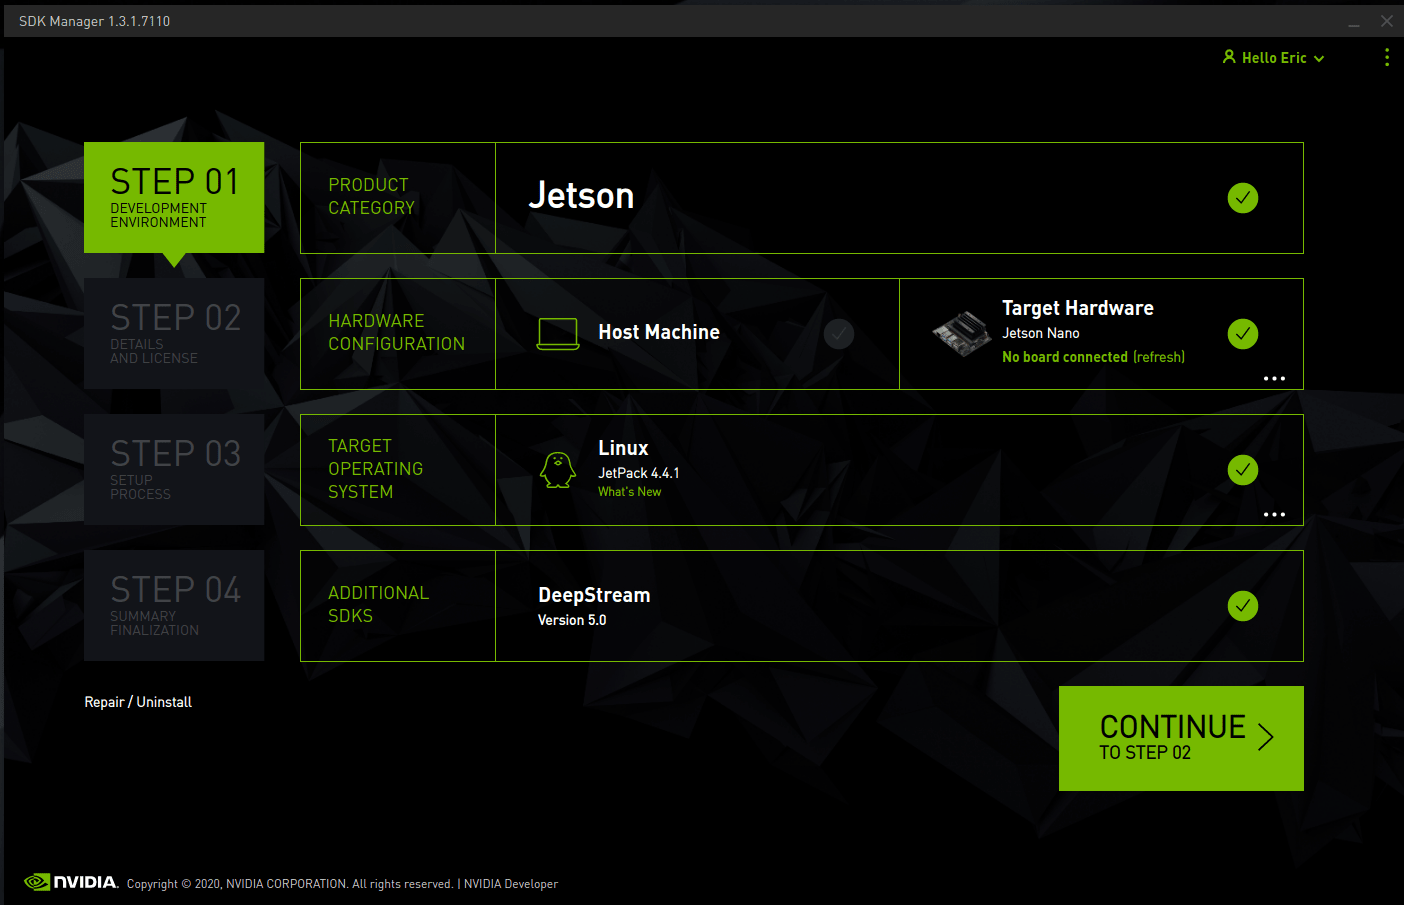
Install & Configure Jetson OS
We will have to configure the operating system for each of the modules using NVIDIA’s official SDK manager. First, choose the target hardware as shown below.
Then, choose the OS and Libraries you want to install:

Download and install the files. While downloading, insert the Jetson Nano compute module into the main node of the Jetson Mate.

Following this, short the 2 GND pins according to the picture shown.

Connect the Jetson Mate to your computer via the micro USB port and power on the machine by pressing the wake up button.
The final step is to flash the operating system onto the compute module. When the installation of the OS and software library is completed, you will see a window pop up. Select Manual Setup option, then click flash and wait until completion. That’s it!
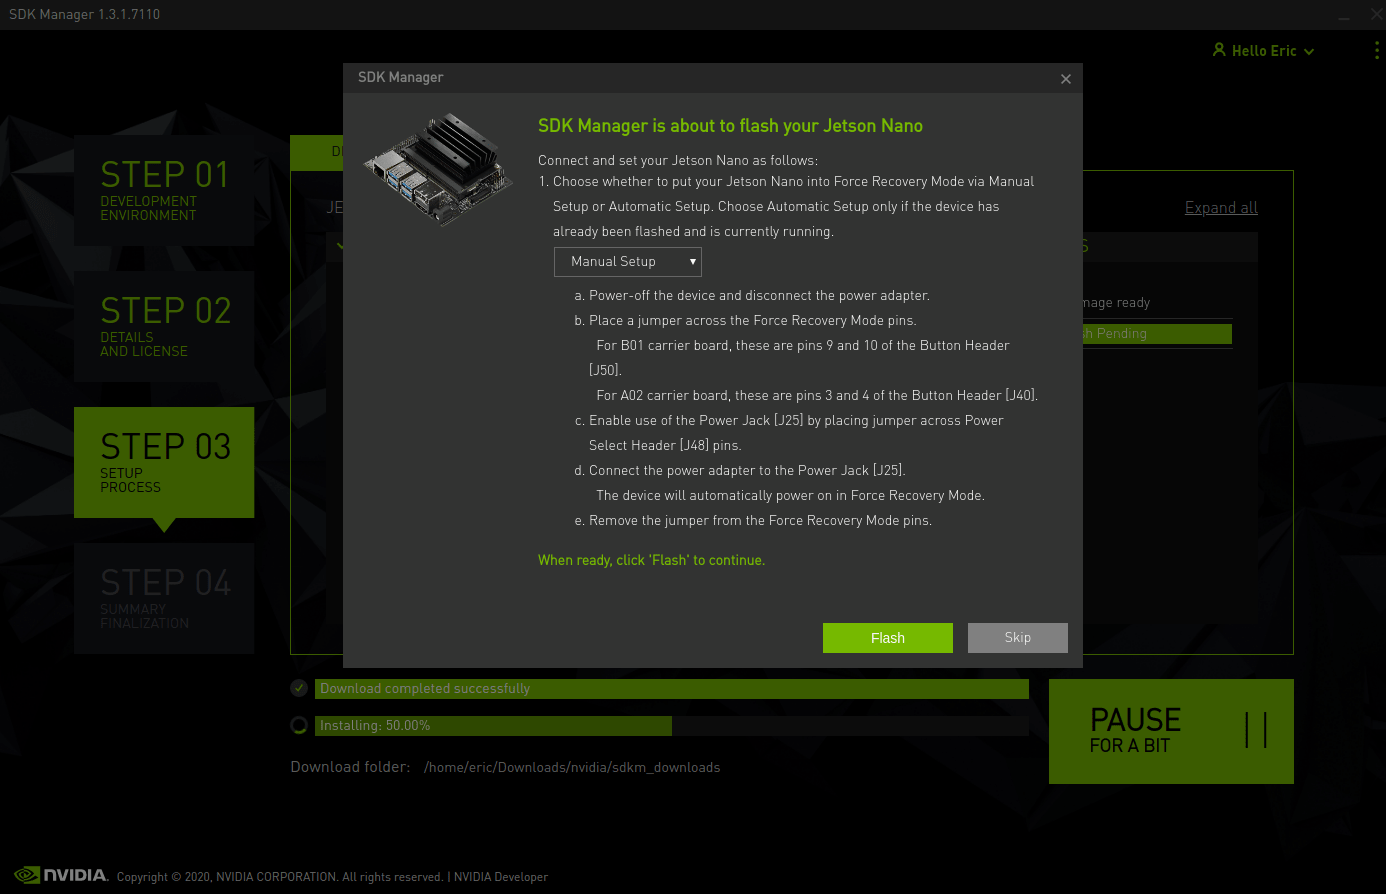
Take note that all the modules can only be flashed when installed on the main node. You are required to flash and configure all your modules one by one on the main node.
Running Kubernetes on our Cluster
In the following steps, we will install and configure Kubernetes to run on our cluster of NVIDIA Jetson Nano modules!
Configuring Docker
For both Worker & Master modules, we need to configure the docker runtime to use “nvidia” as default.
Modify the file located at /etc/docker/daemon.json as follows.
{
    "default-runtime" : "nvidia",
    "runtimes": {
        "nvidia": {
            "path": "nvidia-container-runtime",
            "runtimeArgs": []
        }
    }
}
Restart the Docker daemon with the following command,
sudo systemctl daemon-reload && sudo systemctl restart dockerthen validate the Docker default runtime as NVIDIA.
sudo docker info | grep -i runtimeHere’s a sample output:
Runtimes: nvidia runc
Default Runtime: nvidia
Installing Kubernetes
For both Worker & Master modules, install kubelet, kubeadm, and kubectl with the following commands in the command line.
sudo apt-get update && sudo apt-get install -y apt-transport-https curl
curl -s https://packages.cloud.google.com/apt/doc/apt-key.gpg | sudo apt-key add -

# Add the Kubernetes repo
cat <<EOF | sudo tee /etc/apt/sources.list.d/kubernetes.list
deb https://apt.kubernetes.io/ kubernetes-xenial main
EOF
sudo apt update && sudo apt install -y kubelet kubeadm kubectl
sudo apt-mark hold kubelet kubeadm kubectl
Disable the swap. Note: You have to turn this off every time you reboot.
sudo swapoff -aCompile deviceQuery, which we will use in the following steps.
cd /usr/local/cuda/samples/1_Utilities/deviceQuery && sudo makeConfigure Kubernetes
On the Master module only, initialize the cluster:
sudo kubeadm init --pod-network-cidr=10.244.0.0/16The output shows you the commands that can be executed for deploying a pod network to the cluster, as well as commands to join the cluster. If everything is successful, you should see something similar to this at the end of the output:
Your Kubernetes control-plane has initialized successfully!

To start using your cluster, you need to run the following as a regular user:

  mkdir -p $HOME/.kube
  sudo cp -i /etc/kubernetes/admin.conf $HOME/.kube/config
  sudo chown $(id -u):$(id -g) $HOME/.kube/config

You should now deploy a pod network to the cluster.
Run "kubectl apply -f [podnetwork].yaml" with one of the options listed at:
  https://kubernetes.io/docs/concepts/cluster-administration/addons/

Then you can join any number of worker nodes by running the following on each as root:

kubeadm join 192.168.2.114:6443 --token zqqoy7.9oi8dpkfmqkop2p5 \
    --discovery-token-ca-cert-hash sha256:71270ea137214422221319c1bdb9ba6d4b76abfa2506753703ed654a90c4982b
Following the instructions from the output, run the following commands:
mkdir -p $HOME/.kube
sudo cp -i /etc/kubernetes/admin.conf $HOME/.kube/config
sudo chown $(id -u):$(id -g) $HOME/.kube/config
Install a pod-network add-on to the control plane node. In this case, we use calico.
kubectl apply -f https://raw.githubusercontent.com/coreos/flannel/master/Documentation/kube-flannel.ymlMake sure that all pods are up and running:
kubectl get pods --all-namespacesHere’s the sample output:
NAMESPACE     NAME                                       READY   STATUS    RESTARTS   AGE
kube-system   kube-flannel-ds-arm64-gz28t                1/1     Running   0          2m8s
kube-system   coredns-5c98db65d4-d4kgh                   1/1     Running   0          9m8s
kube-system   coredns-5c98db65d4-h6x8m                   1/1     Running   0          9m8s
kube-system   etcd-#yourhost                             1/1     Running   0          8m25s
kube-system   kube-apiserver-#yourhost                   1/1     Running   0          8m7s
kube-system   kube-controller-manager-#yourhost          1/1     Running   0          8m3s
kube-system   kube-proxy-6sh42                           1/1     Running   0          9m7s
kube-system   kube-scheduler-#yourhost                   1/1     Running   0          8m26s
On the Worker modules only, it is now time to add each node to the cluster, which is simply a matter of running the kubeadm join command provided at the end of the kube init command. For each Jetson Nano you want to add to your cluster, log into the host and run:
 the cluster - your tokens and ca-cert-hash will vary
$ sudo kubeadm join 192.168.2.114:6443 --token zqqoy7.9oi8dpkfmqkop2p5 \
    --discovery-token-ca-cert-hash sha256:71270ea137214422221319c1bdb9ba6d4b76abfa2506753703ed654a90c4982b
On the Master node only, you should now be able to see the new nodes when running the following command:
kubectl get nodesHere’s the sample output for three worker nodes.
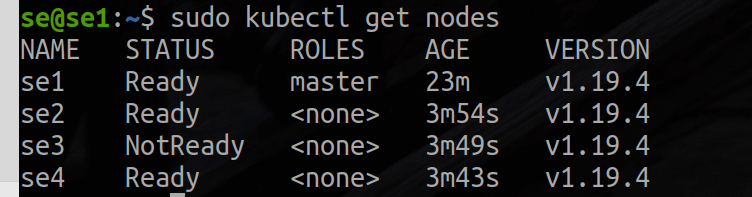
To keep track of your nodes, tag each worker node as a worker by running the following commands according to the number of modules you have! Since this example uses three workers, we will run:
kubectl label node se2 node-role.kubernetes.io/worker=worker
kubectl label node se3 node-role.kubernetes.io/worker=worker
kubectl label node se4 node-role.kubernetes.io/worker=worker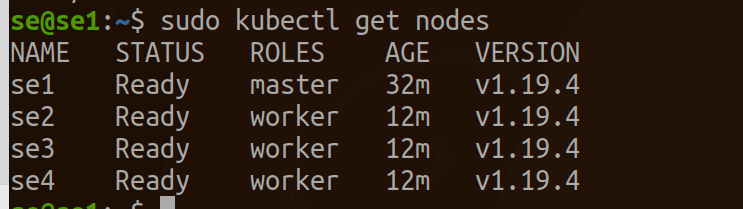
Now you have your very own kubernetes cluster running on your Jetson Mate & Jetson Nano modules! From here, you can do a variety of things, such as use a Jupyter runtime to run data analytics or machine learning workloads on the cluster!
To read more on how you can do that, be sure to visit the Seeed Wiki Page!
Summary & More Resources
Thank you for joining me in today’s article! In recent years, more power and possibilities are being brought to edge computing, and clustering is just one way of doing it! Specifically, cluster computing on the edge is a great way to build reliable applications, or simply offload intensive tasks from the main processor – but really, anything you want to run will probably work great on a cluster!
With many more products like the Jetson Mate, Raspberry Pi 4 (Compute Module 4), and Odyssey x86 J4105 Series, the possibilities of edge computing are only expanding every day!
To learn more about edge computing and its uses, the following articles may be of interest to you:
- How to Choose Hardware for Edge ML!
- Edge AI – What is it and What can it do for Edge IoT?
- What is Industrial IoT? [Case Studies]
- Best Single Board Computers of 2021