How to Use Azure Digital Twins to Enhance IoT Systems – Getting Started Guide
Microsoft has just recently released the Azure Digital Twins platform as a service at the end of 2020. As Azure Digital Twins is a relatively new platform, you might have some confusion about where it fits in the Internet of Things (IoT) ecosystem. In today’s article, join me in this introduction to the Azure Digital Twins platform and how it can become an indispensable tool in your IoT arsenal!
Today’s article covers the following content and more!
- What is Microsoft Azure Digital Twins?
- Benefits of Azure Digital Twins
- IoT Product Recommendations for Microsoft Azure
- Tutorial: Getting Started with Azure Digital Twins
What is Microsoft Azure Digital Twins?
Azure Digital Twins is a platform that allows you to create digital models (or a twin) of your IoT system’s deployment environment in the form of knowledge graphs. These environments could be buildings, factories, farms, energy grids, or even entire cities!
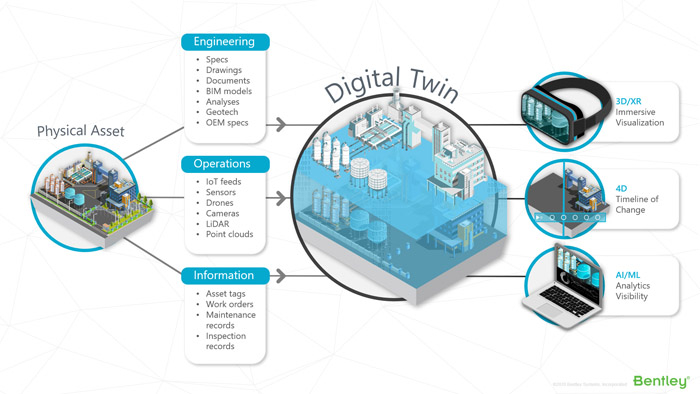
The digital twin concept was first conceptualised by NASA in 2010, and refers to a virtual representation that serves as a real-time digital counterpart of a physical object or process. This allows you to visualise how the system operates as a whole, while being able to zoom into granular details where necessary in the virtual environment. Digital twinning is becoming increasingly popular in system design and management, as it provides a powerful yet intuitive way to interact with complex environments!
Benefits of Azure Digital Twins
Like other digital twins, Azure Digital Twins is a powerful platform for visualising your systems in deployment. However, there are several reasons that make it the perfect complement to systems in the IoT context thanks to its integration with the Microsoft Azure ecosystem!

1. Visualise Vast IoT Systems in Real-Time
Modern IoT systems can have up to tens of thousands of connected devices. At that scale, they become difficult to manage and troubleshoot. Azure Digital Twins allows you to maintain a top-down view of your deployed systems for a more efficient live management interface. Furthermore, this enables existing IoT systems to be updated or reorganised in a systematic way to ensure future upgradability.
2. Manage Device Relationships
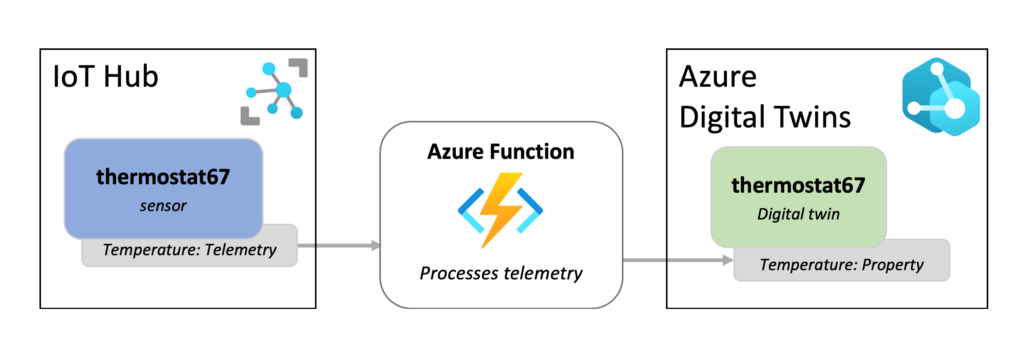
Azure Digital Twins allows you to manage the relationships between devices, right down to specific telemetry. As edge computing becomes more advanced and implements modern computing elements such as edge machine learning, each IoT device is becoming an entity in its own right. Azure Digital Twins allows you to manage these entities at scale and control what and how data is sent through your networks!
3. Process Data at Scale
Azure Digital Twins is also heavily integrated with Microsoft’s Azure suite of IoT services. This means that you can easily route live data from your Azure Digital Twins model into downstream Azure services for additional analytics or storage. For example, Microsoft suggests the following possibilities with Azure’s ecosystem:
- Storing Azure Digital Twins data in Azure Data Lake
- Analyzing Azure Digital Twins data with Azure Synapse Analytics
- Integrating larger workflows with Logic Apps
- Connecting Azure Digital Twins to Time Series Insights to track time series history of each twin
- Aligning a Time Series Model in Time Series Insights with a source in Azure Digital Twins
By doing so, you can make the most of your IoT systems to help you analyse data and make better, data-driven business decisions!
IoT Product Recommendations for Microsoft Azure
Before we jump into the tutorial, I wouldn’t want you to miss out on the latest and greatest IoT products from Seeed! These IoT platforms will give you the fastest and smoothest experience when working with Microsoft Azure and Azure Digital Twins – let’s go!
Wio Terminal
The Wio Terminal is a complete Arduino development platform based on the ATSAMD51, with wireless connectivity powered by Realtek RTL8720DN. As an all-in-one microcontroller, it has an onboard 2.4” LCD Display, IMU, microphone, buzzer, microSD card slot, light sensor & infrared emitter. At an affordable price of under 30 dollars, this is one piece of IoT hardware that you definitely won’t regret!
Even better, the Wio Terminal is Azure IoT Plug and Play Certified and can be used seamlessly with Azure Digital Twins! This will save you both time and effort when setting up your IoT systems. For more details, kindly visit our previous blog!

Product Features
- Powerful MCU: Microchip ATSAMD51P19 with ARM Cortex-M4F core running at 120MHz
- Reliable Wireless Connectivity: Equipped with Realtek RTL8720DN, dual-band 2.4GHz / 5GHz Wi-Fi (supported only by Arduino)
- Highly Integrated Design: 2.4” LCD Screen, IMU in a compact enclosure, with built-in magnets & mounting holes
- Raspberry Pi 40-pin Compatible GPIO
- Compatible with over 300 plug&play Grove modules to explore with IoT
- USB OTG Support & TELEC Certified
- Supports Arduino, CircuitPython, Micropython, ArduPy, AT Firmware, Visual Studio Code
If you’re interested to pick up a Wio Terminal, please visit its product page on the Seeed Online Store!
Seeed MT3620 Dev Board
Next up on the list is the Azure Sphere MT3620 Development Kit, which was developed in partnership with Microsoft to specifically be highly compatible with Microsoft Azure! It is part of a special class of Azure Sphere certified MCUs, featuring a built-in security subsystem with its own dedicated CM4F core for secure boot and system operation, along with dual-band WiFi. If you need a highly secure option for your IoT networks, the Seeed MT3620 Dev Board is for you.
Product Features
- Azure Sphere: End-to-end security for IoT devices
- Dual-band 802.11 b/g/n with antenna diversity
- Tri-core microcontroller with on-chip RAM & flash
- Microsoft Visual Studio development environment
- Online authentication & updates for device lifetime
The Seeed MT3620 Dev Board also comes in a Mini Version as well as an Azure Sphere Grove Starter Kit (Mini Version).
Don’t miss out and get started with the Seeed MT3620 Dev Board today!
Tutorial: Getting Started with Azure Digital Twins
What better way is there to show you what Azure Digital Twins can do than a demonstration? In this section, we will be going through Microsoft’s Quickstart Guide for Azure Digital Twins! This guide will:
- Set up an Azure Digital Twins instance and Azure Digital Twins Explorer.
- Upload pre built models and graph data to construct the sample scenario.
- Explore the scenario graph that’s created.
- Make changes to the graph.
Software Setup
- First, create a free Azure subscription here.
- Then, install Node.js on your machine here.
- Next, download the Azure Digital Twins Explorer sample by clicking Code > Download ZIP. Extract the ZIP file.
Setting Up Azure Digital Twin Instance & Permissions
The first thing we need to do is to set up an Azure Digital Twins instance and its required permissions. Make sure you are logged into your Microsoft Azure account before proceeding with the following steps.
Step 1: Select Create a resource in the Azure services home page menu.

Step 2: Search for Azure Digital Twins and select the corresponding result. Select Create.

Step 3: Fill in the resource details as follows.
- Subscription – Azure subscription that you are using. Create a new Resource group if needed.
- Resource groups help you manage your costs of using the Azure platform.
- Location – Select an Azure Digital Twins-enabled region. Currently, East, South Central, West Central and West US are supported.
- Resource Name – A unique name for your Azure Digital Twins instance.
Step 4: Select Review + create, then Create to complete setting up your instance. Verify that your deployment was successful by checking your Azure notifications, and select Go to resource.

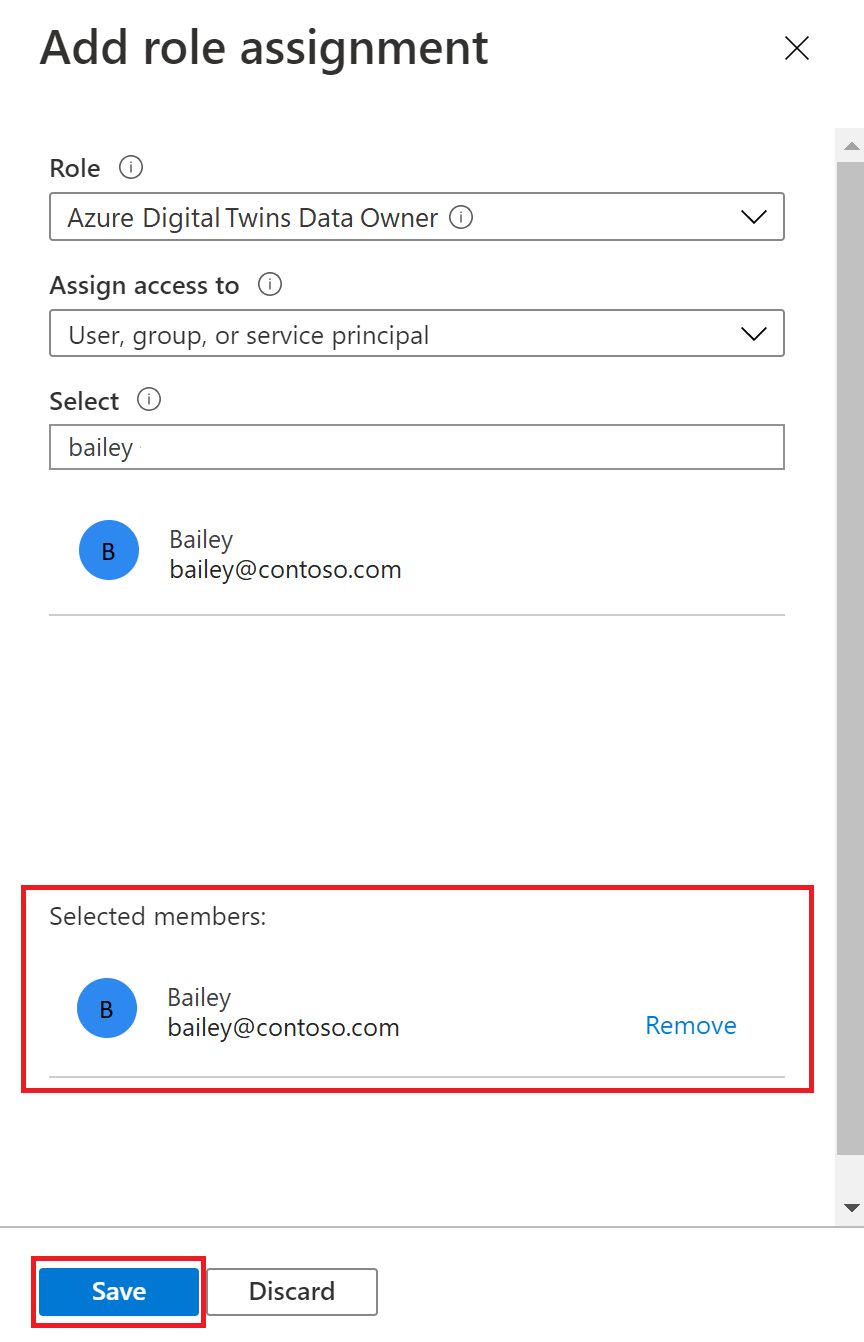
Step 5: Now, we will set up the appropriate permissions to access the Azure Digital Twins instance. From the instance menu, select Access control (IAM). Select the + Add button to add a new role assignment.
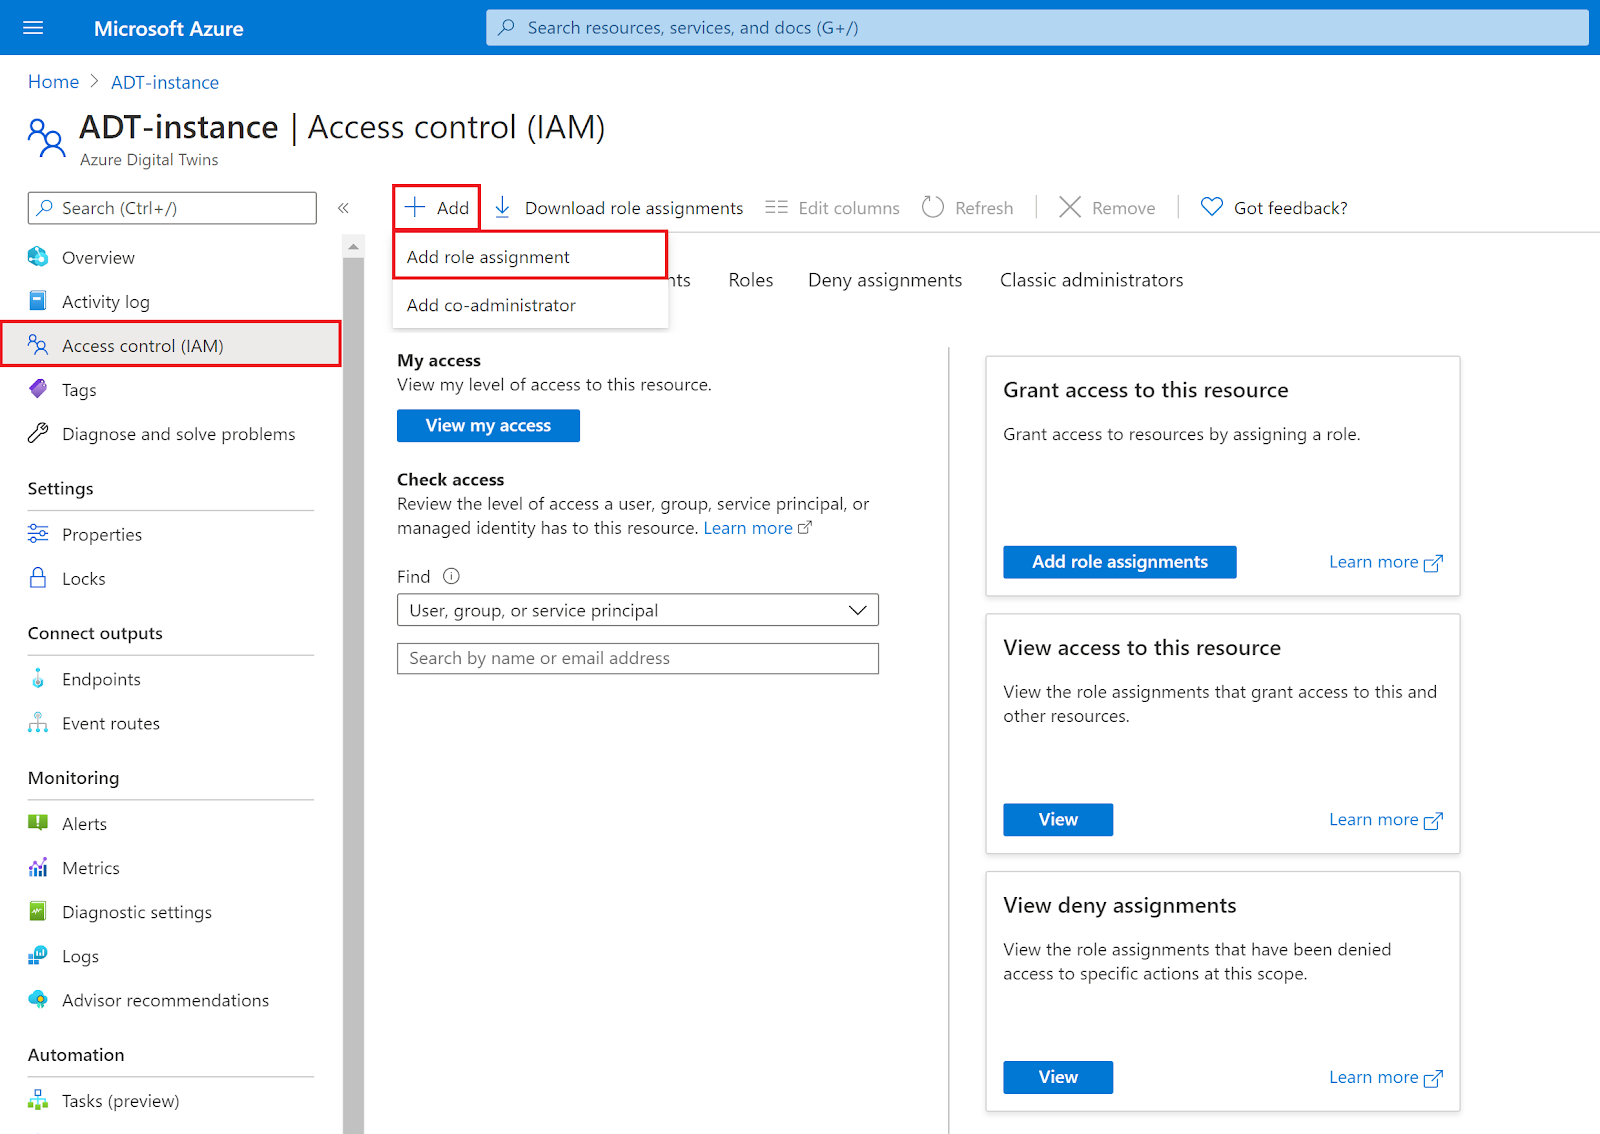
Step 6: On the following Add role assignment page, fill in the values as follows and click Save.
- Role – Select Azure Digital Twins Data Owner from the dropdown menu
- Assign access to – Use User, group or service principal
- Select – Search for the name or email address of the user to assign. When selected, they will show up in a Selected members section.
Before proceeding, ensure that you have the following information on hand:
- Azure Digital Twins instance host name (viewable from the Azure portal)
- Azure Subscription used to create the instance (name or ID)

Setting Up Local Azure Credentials
To access the Azure Digital Twins instance that we just created from our local machine, authentication must be present in the local environment. To achieve this, we will first log in through the local Azure CLI.
Step 1: Download the Azure CLI from this link.
Step 2: Open a console window on your computer.
Step 3: Run the following command and follow the prompts to sign in.
az loginRunning & Configuring the Azure Digital Twins Explorer
In this section, we’re finally going to run the sample application!
Step 1: Navigate to the extracted folder of the Azure Digital Twins Explorer ZIP.
Step 2: Open a console window at ./Azure_Digital_Twins_ADT_explorer/client/src
Step 3: Install the application & its dependencies with npm install, then run the application with npm run start.
A browser window should open and the application should start!

Step 4: Select Sign In at the upper-right corner to configure the application to work with your instance.
Step 5: Enter your Azure Digital Twins instance URL in the following format:
https://{instance host name}Adding Models to the Azure Digital Twins Explorer
The Azure Digital Twins Explorer includes some sample model data to get started. Models are defined in a language like JSON-LD, which Microsoft has coined as Digital Twin Definition Language (DTDL). Within the model, you can describe a digital twin entity by defining its properties, telemetry, relationships and components.
The quickstart demo already includes model files (Floor, Room) that have been written and validated, so it is skipped in this tutorial. However, models that you create from scratch will have to undergo those respective processes.
Step 1: In the Model VIEW box, select Upload a Model.
Step 2: In the file selector box, navigate to Azure_Digital_Twins_ADT_explorer/client/examples and select Room.json and Floor.json.
Step 3: Follow the pop-up and sign into your Azure account. Now, the models should be visible in the MODEL VIEW box.

Step 4: Now that the models are uploaded into your ADT instance, you can add digital twins based on their template definitions. For this example, we will use pre created twins that are connected in a pre created graph as follows.
Import the Graph
Step 1: In the GRAPH VIEW box, select Import Graph, which is represented by an arrow pointing to the cloud.
Step 2: In the file selector box, navigate to Azure_Digital_Twins_ADT_explorer/client/examples and select buildingScenario.xlsx.
Step 3: Confirm the graph upload by selecting the Save icon in the upper-right of the preview window. Let the upload process complete.
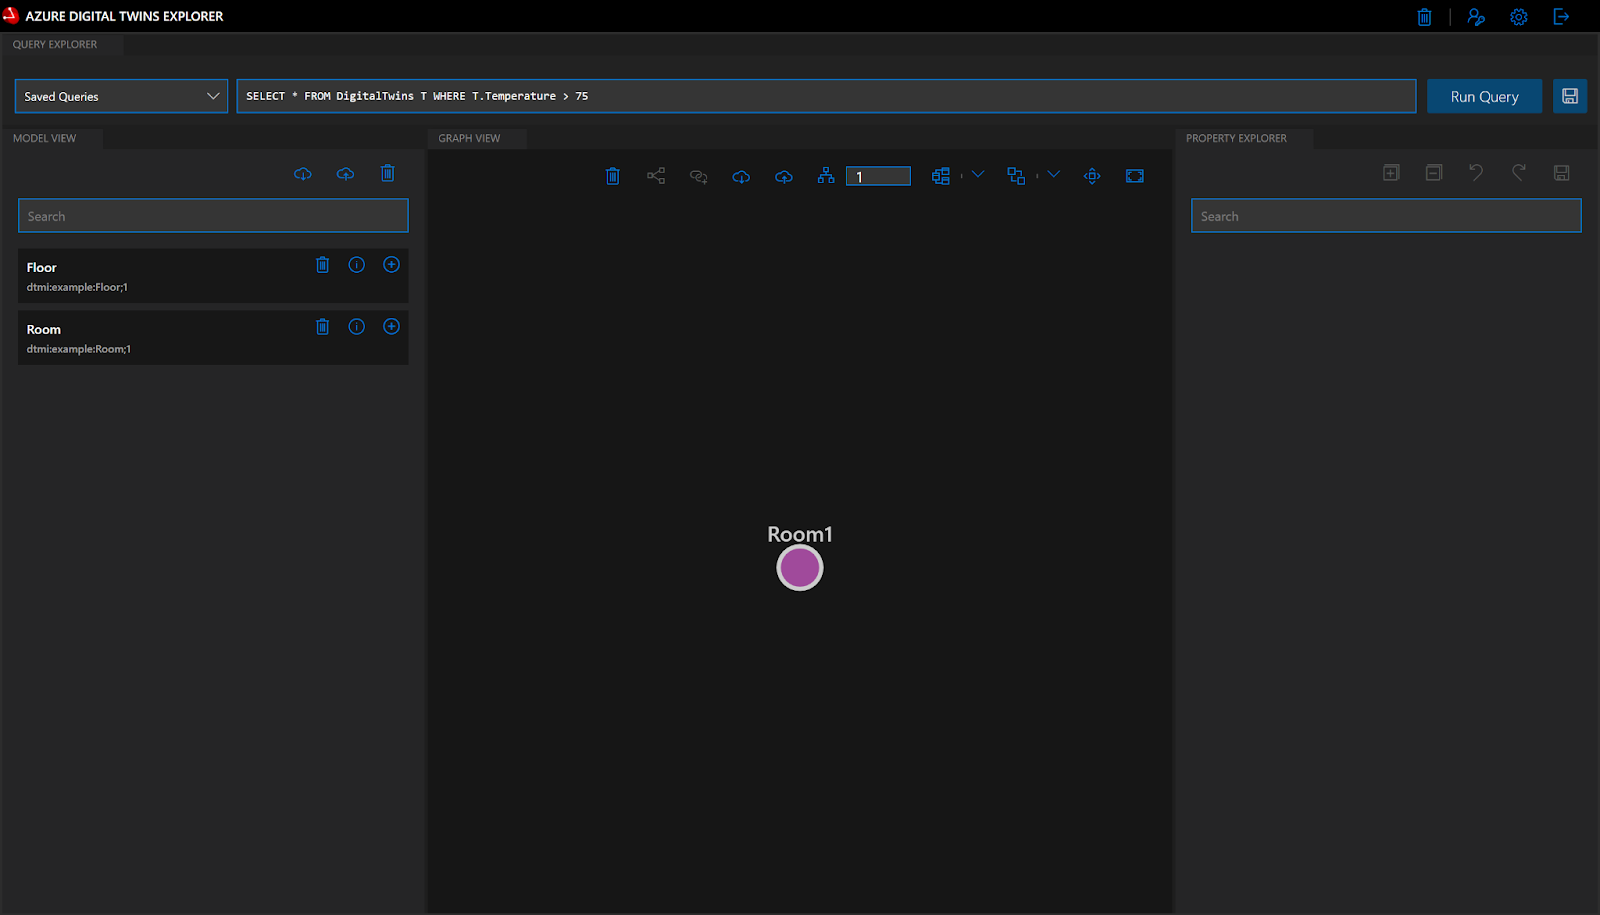
Step 4: View the uploaded graph by selecting Run Query in the GRAPH EXPLORER box.

Explore the Graph
Congratulations! You’ve just got your first Azure Digital Twins graph up and running. From here, you can do several things, such as viewing twin properties, querying the graph, or editing data in the graph.
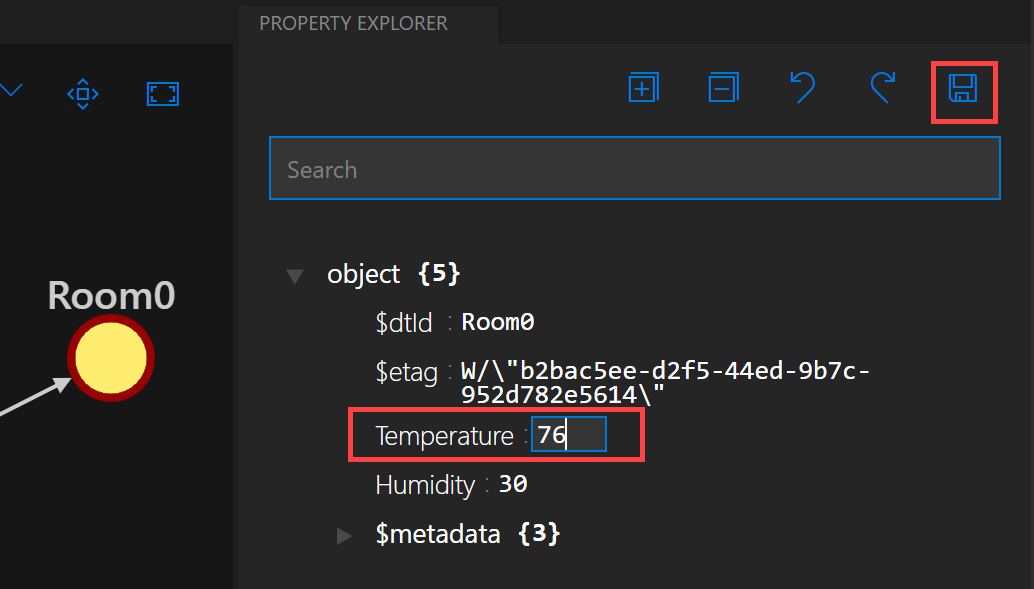
1. Viewing Twin Properties
To view a twin’s properties, you can select it in the PROPERTY EXPLORER box. For example, you will be able to see the properties of Room0, which has a temperature of 70 as shown below.

2. Querying the Graph
A key feature of Azure Digital Twins is the capability to query your twin graph efficiently to answer questions about the environment it represents. In this example, we will query the graph to identify rooms by their properties, such as how many twins in the environment have a temperature exceeding 75.
In the QUERY EXPLORER box, run the following query:
SELECT * FROM DigitalTwins T WHERE T.Temperature > 75In this case, Room1 has a temperature of 80, so only it will show up.
3. Editing Data in the Graph
Naturally, you can also edit the properties of the twins represented in your ADT graph. Let’s raise the temperature of Room0 to 76.
- First, select Room0 in the PROPERTY EXPLORER box.
- Select the existing temperature value to begin making edits.
- Enter 76 and select the Save icon to effect the changes!
And that concludes the getting started tutorial with Azure Digital Twins! While this example has been very simple, I hope it’s given you a taste of how you can add devices at scale while continuing to manage their properties and data in an efficient and effective way! To read more, I strongly encourage you to explore the official documentation.
To learn how to build an end-to-end solution by connecting existing IoT device instances, visit the official tutorial here!
Summary & More Resources
Thanks for joining me in today’s article on Microsoft’s Azure Digital Twins! To summarize, ADT is a great tool for visualising and managing IoT systems, whether you’re just getting off the ground or if you want to get a better hold of your current networks. You’ll also gain access to Microsoft’s suite of Azure products and plug-and-play hardware, so be sure to check it out!
Keen to learn more about IoT? The following articles may interest you:
- Edge AI – What is it and What can it do for Edge IoT?
- What is Industrial IoT? [Case Studies]
- How to Choose Hardware for Edge ML!
- Best Single Board Computers of 2021