Smart Home with Node-RED on OpenWrt
Introduction
This blog will talk about how you can control your smart home appliances using Node-RED running on the OpenWrt System by Seeed. Here I will explain how you can set up everything step-be-step. Also, I will use the reTerminal LCD to view the Node-RED dashboard to visualize the connected devices.
What is OpenWrt?
OpenWrt is an open-source Linux operating system that runs on embedded devices/ routers. It offers more features, performance, and security than a traditional router. It has a filesystem that’s fully writable and includes a package management system. You can make use of these packages to suit your applications in various ways.
By using OpenWrt you can have various features such as:
- Increase overall network performance when multiple devices are connected
- Share files between devices via an external storage drive connected directly to the router
- Increase network security
- Run a BitTorrent client from the router
- Connect a printer directly to the router to create a networked printer
- Limit bandwidth usage of a particular device in the network
- Active queue management
- Real time network monitoring
- Create Dynamic DNS
- Set Up a VPN client or server
What is OpenWrt System by Seeed?
Openwrt System by Seeed is a great way to add some great Luci applications to the latest version of OpenWrt. It provides a stable, flexible, and easy-to-use OpenWrt system for CM4 and x86 based hardware devices.
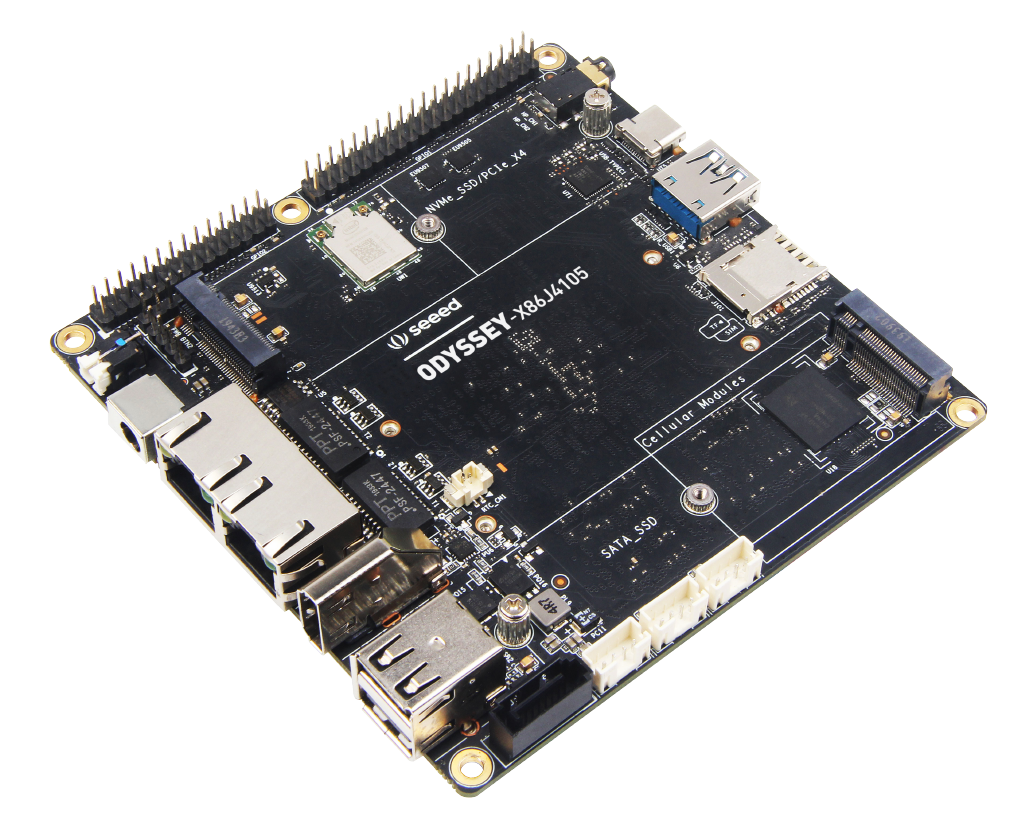
ODYSSEY – X86J4125 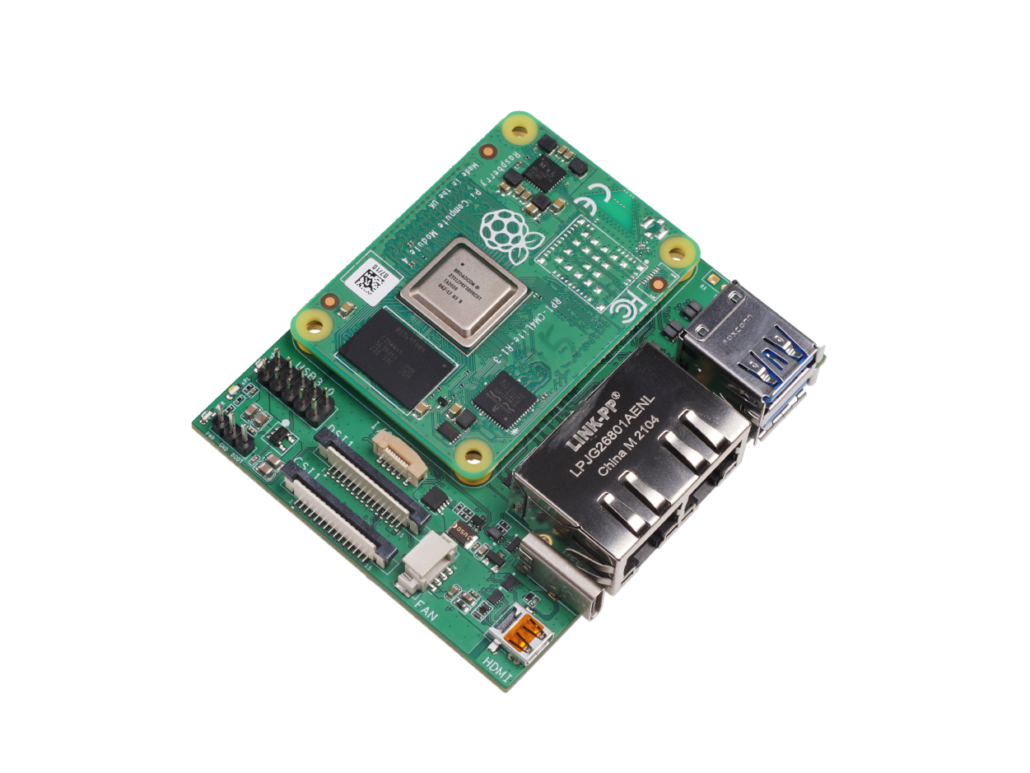
Dual Gigabit Ethernet Carrier Board for RPi CM4
Seeed’s OpenWrt system provides not only basic routing functions but also platform software for HomeLab, AIoT, allowing users to quickly implement different scenarios.
What is Node-RED?
Node-RED is a programming tool for wiring together hardware devices, APIs, and online services in new and interesting ways.
It provides a browser-based editor that makes it easy to wire together flows using the wide range of nodes in the palette that can be deployed to its runtime in a single click.
Node-RED on OpenWrt System by Seeed
Node-RED comes pre-installed on the OpenWrt System by Seeed. So, there is no setup process of Node-RED needed. You just have to open the browser, enter a specific URL in order to access the Node-RED UI!
Now let’s start building our Node-RED application!
Control Smart Lamp with Node-Red on OpenWrt
In this guide, I will control a Xiaomi Yeelight Smart Bulb using Node-RED. However, if you have other smart devices you can control them as well. But some steps will be different for them. First, let’s look at the hardware we will be using
Hardware Needed
- Xiaomi Yeelight Smart Bulb
- ODYSSEY – X86J4125/ CM4 Dual Gigabit Ethernet Carrier Board
Install Xiaomi Yeelight Node and Start Node-RED
In order to control the Xiaomi Smart Lamp using Node-RED, we need to install the Yeelight node. After that, we will start Node-RED.
Step 1: Prepare an ODYSSEY – X86 board or CM4 Dual Gigabit Ethernet Carrier Board with the OpenWrt System by Seeed. Follow this guide for an initial getting started
Step 2: Open a web browser on your PC and type 192.168.2.1 to access the OpenWrt Luci web UI
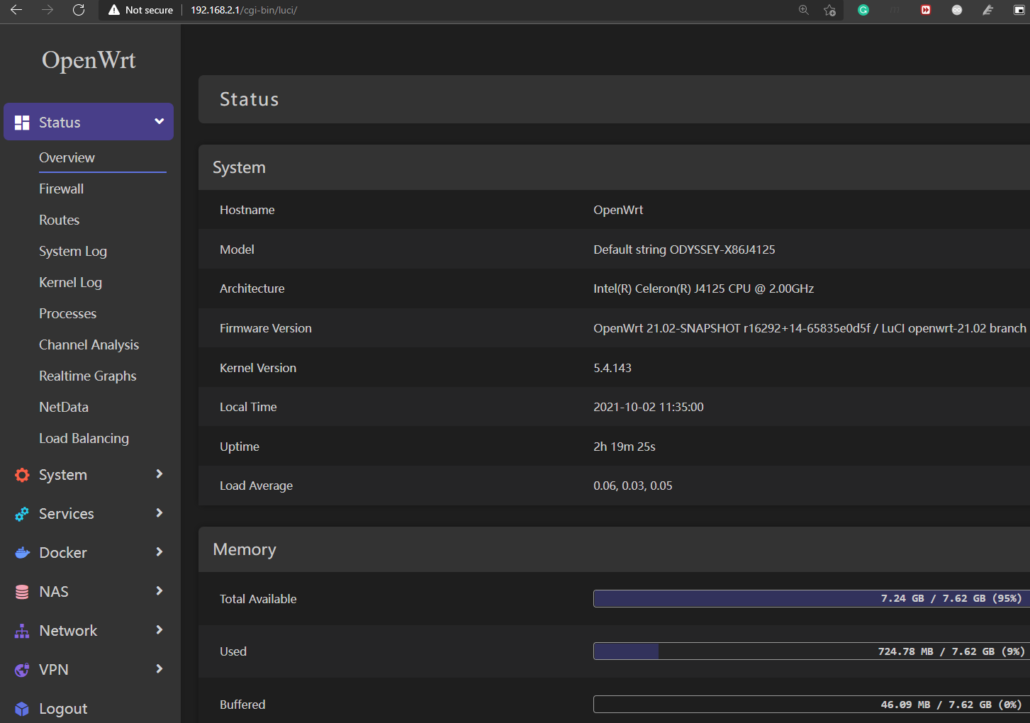
Note: If your OpenWrt router has a different IP address from 192.168.2.1, please replace it with that IP address
Step 3: Navigate to Services > Terminal and login with your credentials
Step 4: Type the following to stop Node-RED
service node-red stopStep 5: Enter the node-red directory
cd /.node-redStep 6: Install the Xiaomi Yeelight Node-RED node
npm install node-red-contrib-yeelightStep 7: Once the installation is finished, start Node-RED again
service node-red startStep 8: Open a web browser and access Node-RED by typing the following
192.168.2.1:1880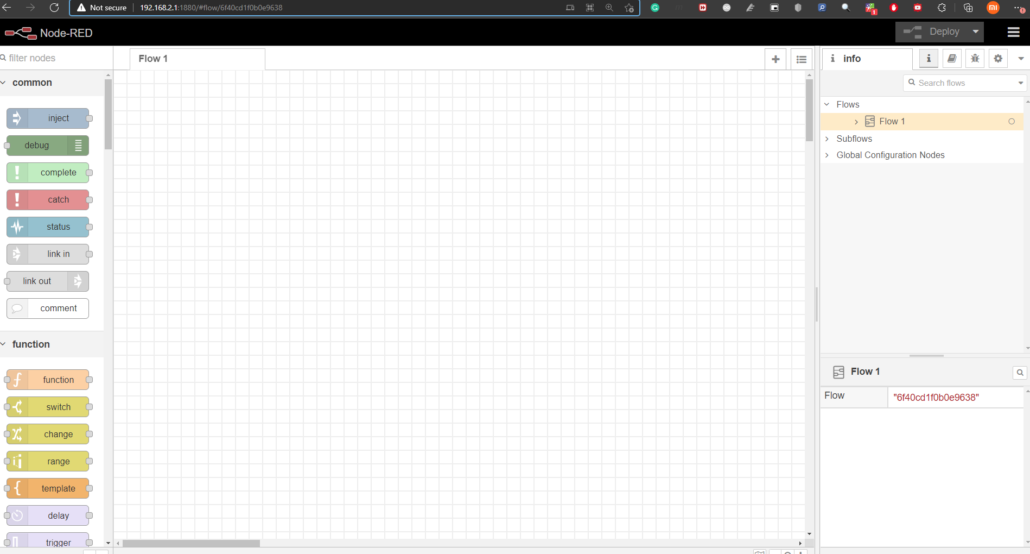
Note: If your OpenWrt router has a different IP address from 192.168.2.1, please replace it with that IP address
Now we will move on to placing different blocks on Node-RED UI to create a flow to control the smart bulb
Create Node-RED Flow – Button Node
Start by creating an ON/OFF button for the bulb
Step 1: On the left side of Node-RED UI, under “dashboard”, drag-and-drop the “button” node to the workspace
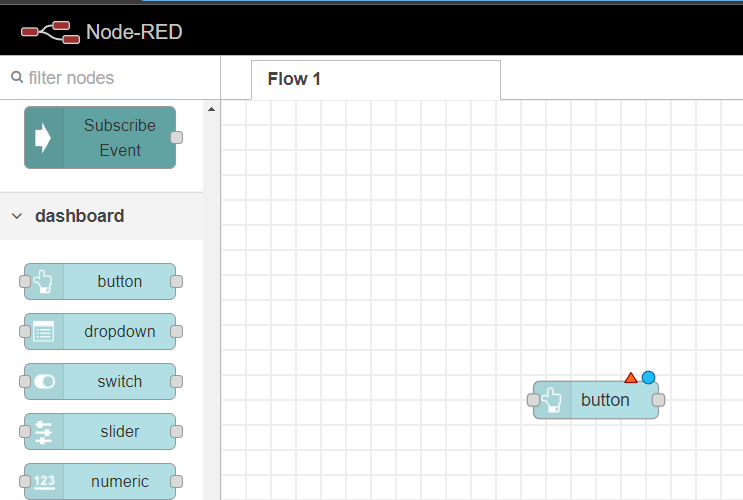
Step 2: Double click on the button node and click on the pencil icon on the right side of Group
Step 3: Type a desired Name for the group
Step 4: Click on the pencil icon on the right side of Tab
Step 5: Type a desired Name for the tab
Step 6: Click Add
Step 7: Click Add again
Step 8: Change the other settings for the button as follows
- Label: ON/ OFF
- When clicked, send: Payload – Boolean
- Name – ON/ OFF
Step 9: On the left side of Node-RED UI, under MiHome, drag-and-drop the yeelight node to the workspace
Step 10: Double click on the yeelight node and click on the pencil icon on the right side of Yeelight config
Step 11: Enter the IP address of Yeelight
Note: You can check this by logging into your router and listing the connected devices
Step 12: Enter 55443 for the Port Number
Step 13: Click Add
Step 14: Under Command, select Toggle
Step 15: Click Done
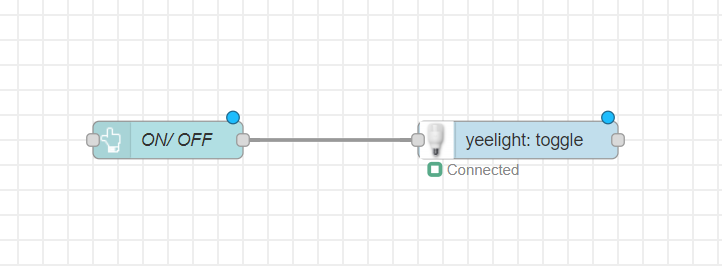
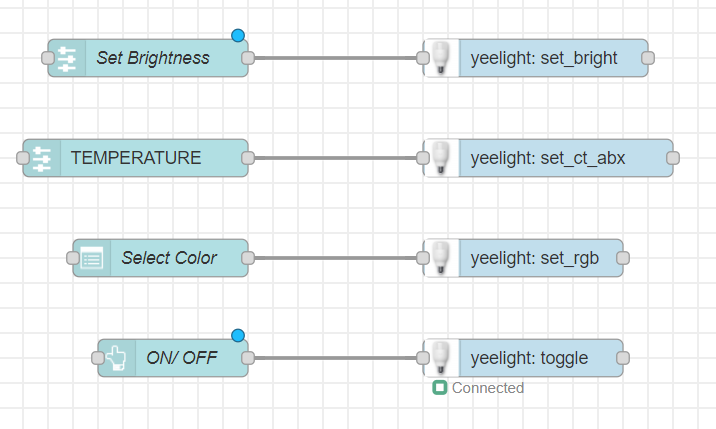
Step 16: Connect the button node to the yeelight toggle node by clicking on the small point to the right side of the button node, drag to draw a line, and connect the line to the small point on the left side of yeelight toggle node
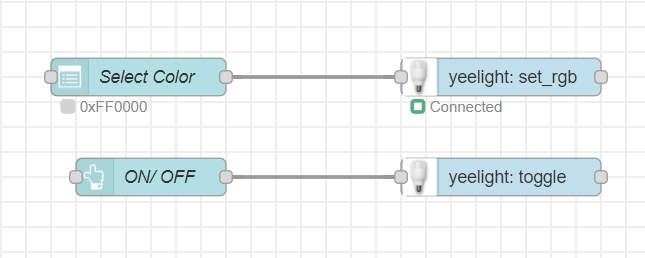
Create Node-RED Flow – Select Color Node
Now let’s create a drop-down menu to select different colors
Step 1: On the left side of Node-RED UI, under dashboard, drag-and-drop the dropdown node to the workspace
Step 2: Double click on the button node and select the Group that we created before
Step 3: Change the other settings as follows
- Label: COLOR
- Placeholder: CHOOSE
- Options:
- String: 0xFF0000 : RED
- String: 0x00FF00 : GREEN
- String: 0x0000FF : BLUE
- String: 0xFFFFFF : WHITE
- String: 0x00FFFF : CYAN
- String: 0xFF00FF : PURPLE
- String: 0xFFFF00 : YELLOW
- Name: Select Color
Step 4: On the left side of Node-RED UI, under MiHome, drag-and-drop the yeelight node to the workspace
Step 5: Double click on the yeelight node and select the Yeelight config that we created before
Step 6: Under Command, select Set RGB
Step 7: Click Done
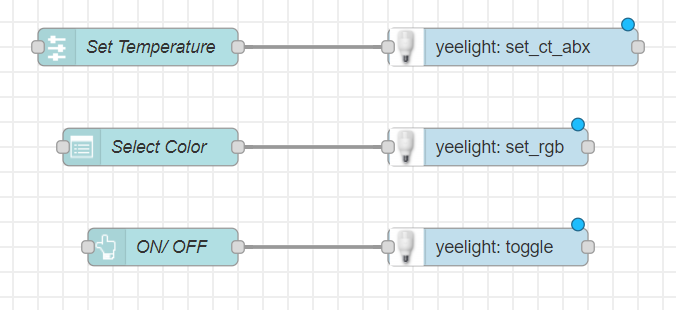
Create Node-RED Flow – Set Color Temperature Node
Next, let’s create a slider to change the color temperature
Step 1: On the left side of Node-RED UI, under dashboard, drag-and-drop the slider node to the workspace
Step 2: Double click on the “slider” node and select the Group that we created before
Step 3: Change the other settings as follows
- Label: TEMPERATURE
- Range: min:1700 max:6500 step:10
- Name: Set Temperature
Step 4: On the left side of Node-RED UI, under MiHome, drag-and-drop the yeelight node to the workspace
Step 5: Double click on the yeelight node and select the Yeelight config that we created before
Step 6: Under Command, select Set Temperature
Step 7: Click Done
Create Node-RED Flow – Set Brightness Node
Next let’s create a slider to change the brightness
Step 1: On the left side of Node-RED UI, under dashboard, drag-and-drop the slider node to the workspace
Step 2: Double click on the slider node and select the Group that we created before
Step 3: Change the other settings as follows
- Label: BRIGHTNESS
- Range: min:1 max:100 step:1
- Name: Set Brightness
Step 4: On the left side of Node-RED UI, under MiHome, drag-and-drop the yeelight node to the workspace
Step 5: Double click on the yeelight node and select the Yeelight config that we created before
Step 6: Under Command, select Set brightness
Step 7: Click Done
Create Node-RED Flow – Color Picker
Next let’s create a color palette to choose different colors
Step 1: On the left side of Node-RED UI, under dashboard, drag-and-drop the colour picker node to the workspace
Step 2: Double click on the colour picker node and select the Group that we created before
Step 3: Change the other settings as follows
- Label: COLOR PALETTE
- If width is 4 or greater:
- Always show picker: ticked
- Always show value field: ticked
- Name: Color Palette
Step 4: On the left side of Node-RED UI, under function, drag-and-drop the function node to the workspace
Step 5: Double click on the “function” node and under “On Message”, Add the following lines
msg.payload = msg.payload.replace(/[#]/g,"0x");
return msg;

Step 6: Click Done
Step 7: On the left side of Node-RED UI, under MiHome, drag-and-drop the yeelight node to the workspace
Step 8: Double click on the yeelight node and select the Yeelight config that we created before
Step 9: Under Command, select Set RGB
Step 10: Click Done
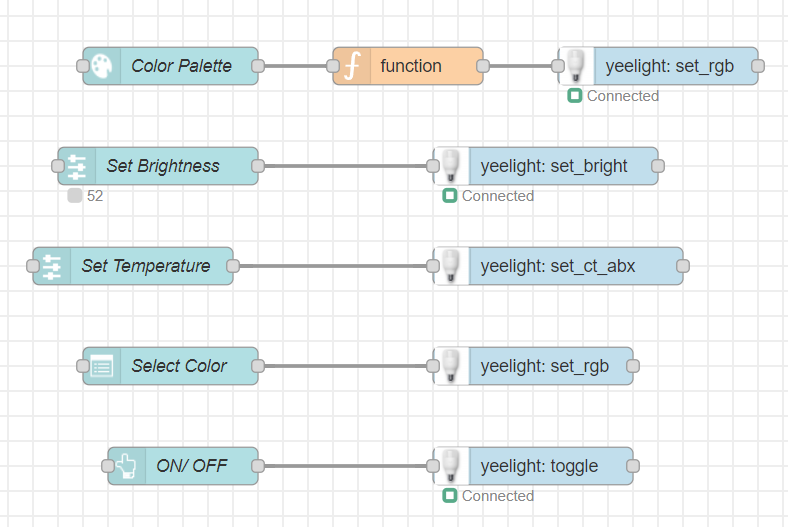
Now we have successfully created the complete diagram.
Node-RED UI Dashboard on PC
Let’s move ahead to display the Node-RED dashboard
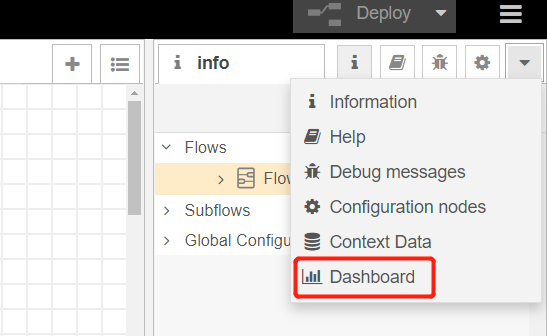
Step 1: Inside the Node-RED interface, click on Dashboard
Note: Change the settings according to your preferene
Step 2: Type the following on any web browser to open the Node-RED dashboard with smart bulb demo
192.168.2.1:1880/ui
Now you can control the Smart Bulb using these controls!
Node-RED UI Dashboard on reTerminal
You can also display the above dashboard on the reTerminal LCD. Let’s walk through the process
Step 1: Follow this guide to get started with the reTerminal for the first time
Step 2: Type the following inside a terminal window of reTerminal
chromium-browser --start-fullscreen http://192.168.2.1:1880/uiNote: Make sure the reTerminal is connected to the OpenWrt router
Now you will be able to control the Smart Bulb using reTerminal as well!
Demo Showcase
Conclusion
I hope this blog was helpful to everyone to understand the basic usage of Node-RED and how it can be used to control a smart bulb. However, it can be extended to control many other smart appliances as well right from Node-RED dashboard!