Wio Terminal Update: How to Integrate with Raspberry Pi and Display the System Data on LCD Screen
Supporting dual-display at resolutions up to 4K, Raspberry Pi is capable of driving almost any kind of screen (Check our post of TOP 21 Popular Raspberry Pi Displays & Screens!). But when it comes to a portable one with easy setup and stylish outlook, the choice seems limited.
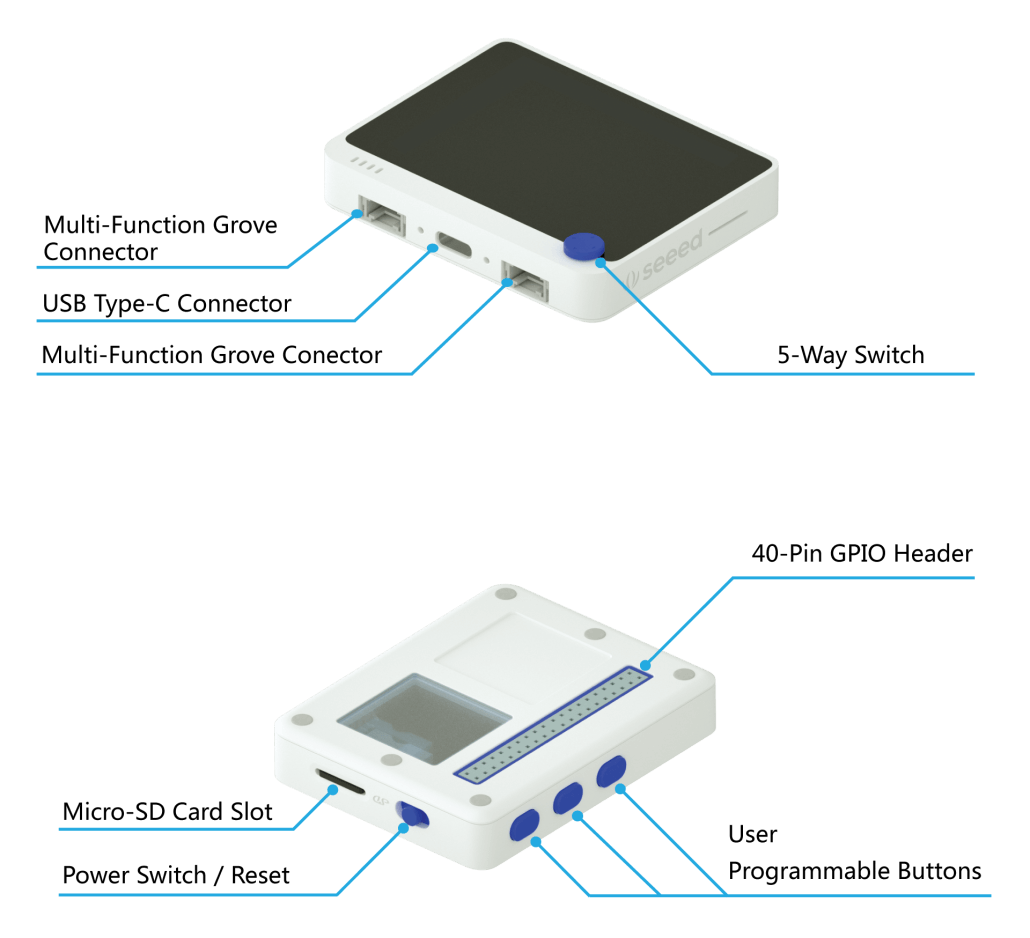
Here we bring you Wio Terminal, an ATSAMD51-based microcontroller compatible with raspberry Pi, equipped with Screen + Development Board + Input/Output Interface + Enclosure. It is integrated with onboard IMU(LIS3DHTR), microphone, light sensor, infrared emitter(IR 940nm) and two multi-functional Grove ports, which allows Wio Terminal to collect and send environmental data to Raspberry Pi for further process and analysis (i.e, machine learning) without hassle setting of hardware or software.
So now you have known its high compatibility with Raspberry Pi, but how does it work?
Wio Terminal can be connected to Raspberry Pi through the 40 pins GPIO header or its USB Type-C connector. Today we will introduce a demo showing how to use Wio Terminal to read and display the system status of Raspberry Pi via USB serial. In this demo, the 40 pin GPIO of Raspberry Pi is not taken and is available for use, which will be more convenient if there are any other Pi hats essential in your Raspberry Pi projects.
We have prepared Python code, Arduino code, and libraries for this demo shown below. For full tutorials and detailed instruction of Wio Terminal, please check our wiki. Also, feel free to submit any technical issues at our forum!
Reading Raspberry Pi’s System Status using Wio Terminal
1. Hardware Requirements
- Raspberry Pi (3B+ used here)
- Wio Terminal
- USB Type-C cable
2. Prepare the Raspberry Pi Host Program
2.1 Python Code
Run the following Python code on Raspberry to send the system information to Wio Terminal via USB Serial.
Note: Please make sure that the Serial port is correct in the Python code, change it according to your device.
import os
import time
import serial

# Settings for reading from Arduino Serial
serialPort= "/dev/ttyACM0" #Change it to your Serial Port, Check in Arudino IDE
baudRate = 115200
ser = serial.Serial(serialPort, baudRate, timeout=0.5)
time.sleep(2)

# Return CPU temperature as a character string
def getCPUtemperature():
    res = os.popen('vcgencmd measure_temp').readline()
    return(res.replace("temp=","").replace("'C\n",""))

# Return RAM information (unit=kb) in a list
# Index 0: total RAM
# Index 1: used RAM
# Index 2: free RAM
def getRAMinfo():
    p = os.popen('free')
    i = 0
    while 1:
        i = i + 1
        line = p.readline()
        if i==2:
            return(line.split()[1:4])

# Return % of CPU used by user as a character string
def getCPUuse():
    return(str(os.popen("top -n1 | awk '/Cpu\(s\):/ {print $2}'").readline().strip()))

# Return information about disk space as a list (unit included)
# Index 0: total disk space
# Index 1: used disk space
# Index 2: remaining disk space
# Index 3: percentage of disk used
def getDiskSpace():
    p = os.popen("df -h /")
    i = 0
    while 1:
        i = i +1
        line = p.readline()
        if i==2:
            return(line.split()[1:5])

def main():
    while True:
        # CPU informatiom
        CPU_temp = getCPUtemperature()
        CPU_usage = getCPUuse()

        # RAM information
        # Output is in kb, here I convert it in Mb for readability
        RAM_stats = getRAMinfo()
        RAM_total = str(round(int(RAM_stats[0]) / 1000,1))
        RAM_used = str(round(int(RAM_stats[1]) / 1000,1))
        RAM_free = str(round(int(RAM_stats[2]) / 1000,1))

        # Disk information
        DISK_stats = getDiskSpace()
        DISK_total = DISK_stats[0]
        DISK_used = DISK_stats[1]
        DISK_perc = DISK_stats[3]

        temp=ser.write(str.encode(CPU_temp+' '+CPU_usage))

        data=ser.write(str.encode(CPU_temp+':'+CPU_usage+':'+RAM_total+':'+RAM_used+':'+RAM_free+':'+DISK_total+':'+DISK_used+':'+DISK_perc))
        ser.flush()
        time.sleep(2)

        print('')
        print('CPU Temperature = '+CPU_temp)
        print('CPU Use = '+CPU_usage)
        print('')
        print('RAM Total = '+str(RAM_total)+' MB')
        print('RAM Used = '+str(RAM_used)+' MB')
        print('RAM Free = '+str(RAM_free)+' MB')
        print('')
        print('DISK Total Space = '+str(DISK_total)+'B')
        print('DISK Used Space = '+str(DISK_used)+'B')
        print('DISK Used Percentage = '+str(DISK_perc))


if __name__ == '__main__':
    try:
        main()
    except KeyboardInterrupt:
        if ser != None:
            ser.close()
2.2 Arduino Code
Step 1. Install Arduino libraries
- Install the LCD screen Library
Seeed_Arduino_LCD, please visit Wio Terminal LCD for more information. - Download the
Free_Fonts.hheader file so that you can use abbreviations for the free fonts included in the LCD library. Please make sure to put this header file in the same location as the Arduino Sketch.
Step 2. Download the Complete Code
Download the complete code here.
3. How to Set Up
- Upload the Arduino Code to Wio Terminal. Once uploaded it should be in a starting screen.
- Connect Wio Terminal to the Raspberry Pi via USB Type-C Cable.
- Run the Python code on Raspberry Pi.
- Now, you should be able to see the Raspberry Pi System info on Wio Terminal’s LCD Screen.
Explore More at Our Github & Forum
Want to know more about Wio Terminal? Our brand-new Forum has been released and is waiting for you to join our discussion! Feel free to post your questions or any technical issue about Wio Terminal at our forum. We can’t wait to hear your voices and welcome all suggestions!
That will be all for today’ update, stay tuned with us and get the latest news about Wio Terminal!
Looking forward to receiving my Wio Terminal and have a try!