Smart Home with Home Assistant on OpenWrt
Introduction
This blog will talk about how you can control your smart home appliances using Home Assistant running on the OpenWrt System by Seeed. Here I will explain how you can set up everything step-be-step. Also, I will use the reTerminal LCD to view the Home Assistant dashboard to visualize the connected devices.
What is OpenWrt?
OpenWrt is an open-source Linux operating system which runs on embedded devices/ routers. It offers more features, performance and security than a traditional router. It has a filesystem that’s fully writable and includes a package management system. You can make use of these packages to suit your applications in various ways.
By using OpenWrt you can have various features such as:
- Increase overall network performance when multiple devices are connected
- Share files between devices via an external storage drive connected directly to the router
- Increase network security
- Run a BitTorrent client from the router
- Connect a printer directly to the router to create a networked printer
- Limit bandwidth usage of a particular device in the network
- Active queue management
- Real time network monitoring
- Create Dynamic DNS
- Set Up a VPN client or server
What is OpenWrt System by Seeed?
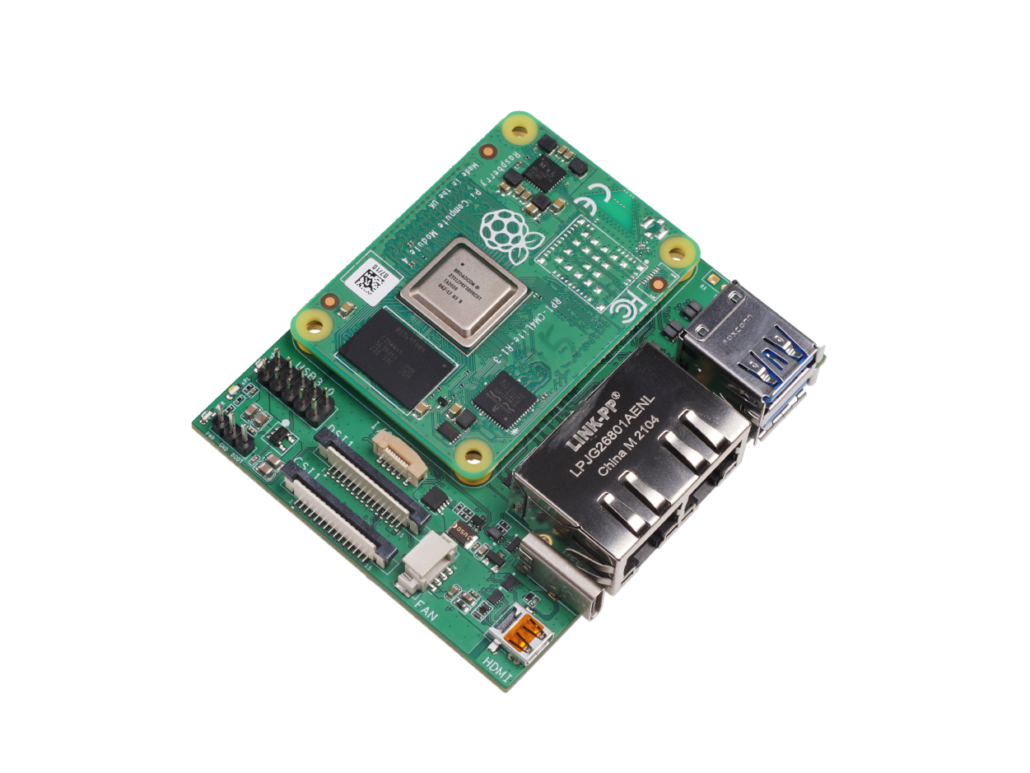
Openwrt System by Seeed is a great way to add some great Luci applications to the latest version of OpenWrt. It provides a stable, flexible, and easy-to-use OpenWrt system for CM4 and x86 based hardware devices.
-
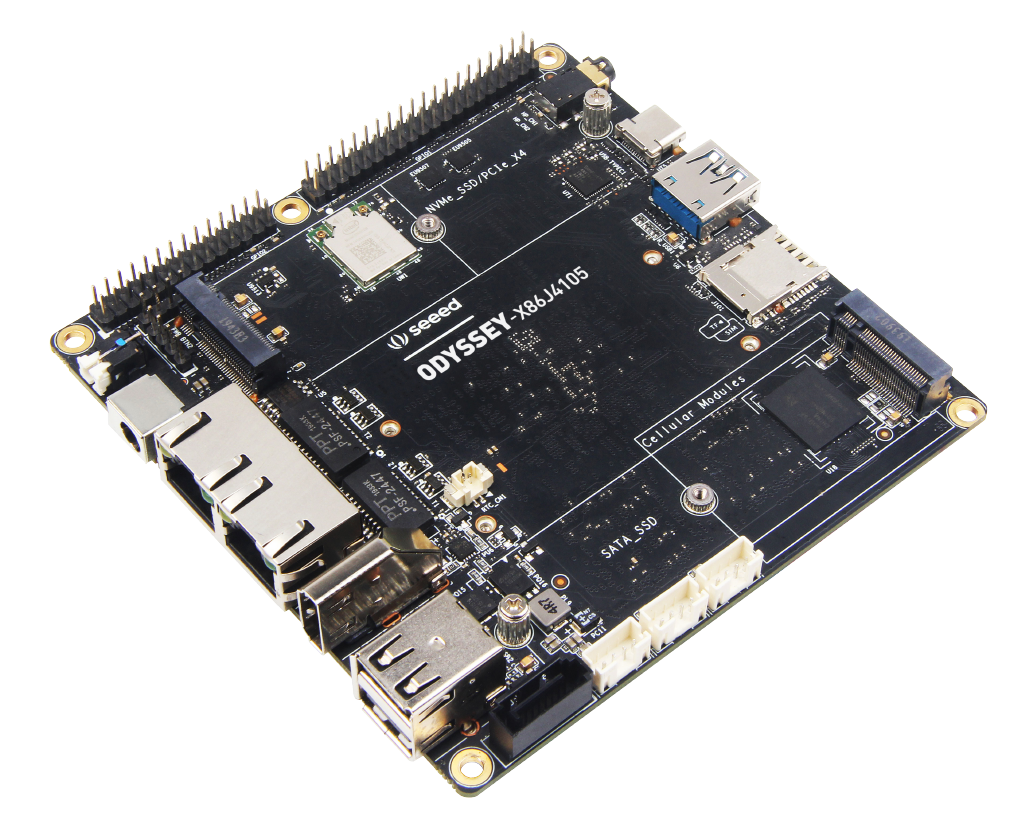
ODYSSEY – X86J4125 -
Dual Gigabit Ethernet Carrier Board for RPi CM4
Seeed’s OpenWrt system provides not only basic routing functions but also platform software for HomeLab, AIoT, allowing users to quickly implement different scenarios.
What is Home Assistant?
Home Assistant is a free and open-source software for home automation that is designed to be the central control system for smart home devices. It can be accessed via a web-based user interface, via companion apps for Android and iOS, or using voice commands via a supported virtual assistant like Google Assistant or Amazon Alexa.
Home assistant enables the local control of smart home devices, offering better security, greater reliability, and more flexibility than many cloud-connected devices.
Home Assistant on OpenWrt System by Seeed
Home Assistant can be installed using various methods on various different hardware. You can compare the installation methods by visiting this table.
In this guide, I will show you how you can install Home Assistant as a Docker container on the OpenWrt System by Seeed!
What is Docker?
Docker is an open platform for developing, shipping, and running applications. Docker provides the ability to package and run an application in a loosely isolated environment called a container. The isolation and security allow you to run many containers simultaneously on a given host. Containers are lightweight and contain everything needed to run the application, so you do not need to rely on what is currently installed on the host. You can easily share containers while you work, and be sure that everyone you share with gets the same container that works in the same way.
So now, let’s start building our Home Assistant application!
Smart Home Dashboard with Home Assistant on OpenWrt
In this guide, I will control Xiaomi Yeelight Smart Bulbs, visualize the statistics of the Host and display current date/ time using Home Assistant. However, if you have other smart devices you can control them as well using Home Assistant. But the setting up process will be a little different for other different smart devices and therefore this guide can be used as a reference. First let’s look at the hardware we will be using
Hardware Needed
- Xiaomi Yeelight Smart Bulbs (or any other smart bulb)
- ODYSSEY – X86/ CM4 Dual Gigabit Ethernet Carrier Board
Install Home Assistant as a Docker Container on OpenWrt
Step 1: Prepare an ODYSSEY – X86 board or the CM4 Dual Gigabit Ethernet Carrier Board with the OpenWrt System by Seeed. Follow this guide for an initial getting started
Step 2: Open a web browser on your PC and type 192.168.2.1 to access the OpenWrt Luci web UI
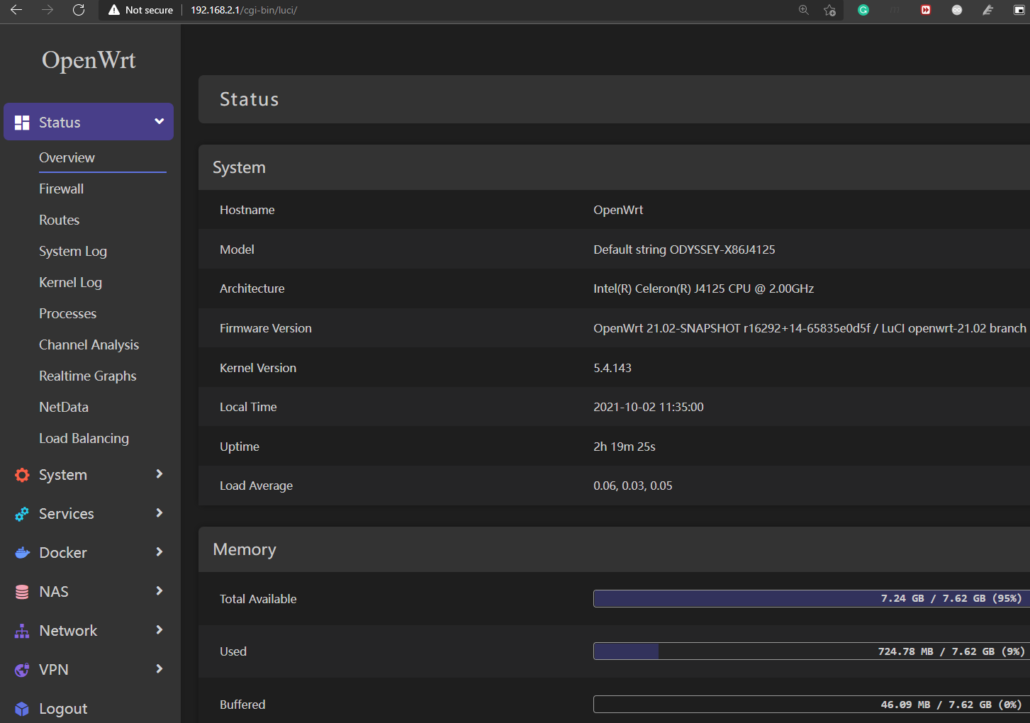
Note: If your OpenWrt router has different IP address from 192.168.2.1, please replace it with your router’s IP address
Step 3: Navigate to Docker > Images and type homeassistant/ home-assistant:stable under “Pull Image”
Step 4: Click “Pull” to download the image
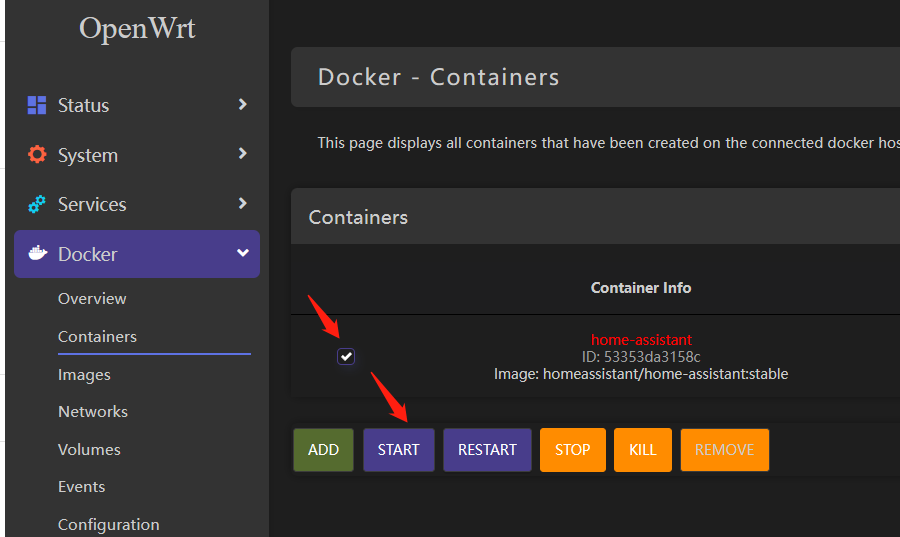
Step 5: Navigate to Docker > Containers and click “Add” to create a new container
Step 6: Fill the columns according to the following:
- Container Name: home-assistant
- Docker Image: homeassistant/home-assistant:stable
- Restart Policy: Unless stopped
- Networks: host | host
- Environmental Variable (-e): TZ= (you can find a list of the TZ names here- https://en.wikipedia.org/wiki/List_of_tz_database_time_zones)
- Bind Mount(-v): /root/hassio:/config
Note: Here we create a new directory (/root/hassio) inside the OpenWrt system and then we link that directory to the /config directory which is present inside the Docker container. In this way, even though we close the container, all our data will remain inside the (/root/hassio) in the OpenWrt System and once we start the container again, the /config directory will sync with (/root/hassio) directory again.
Step 7: Finally click “Submit”
Step 8: Under the “Containers” tab, tick the checkbox beside the container that we created and click “Start” to run the container
Home Assistant Initial Set Up
Now that we have started home assistant, let’s dive into the initial setup
Step 1: Type http://192.168.2.1:8123 to enter the Home Assistant Dashboard
Note: The IP address is according to the IP address of the OpenWrt device
Can’t access homeassistant.local:8123? Take a look at this comprehensive guide to troubleshoot and resolve the issue.
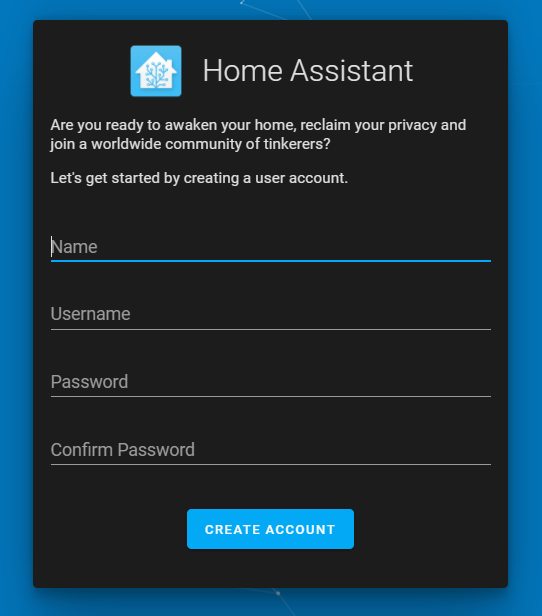
Step 2: Go through the initial set up such as filling out a username, password, setting home location, etc.
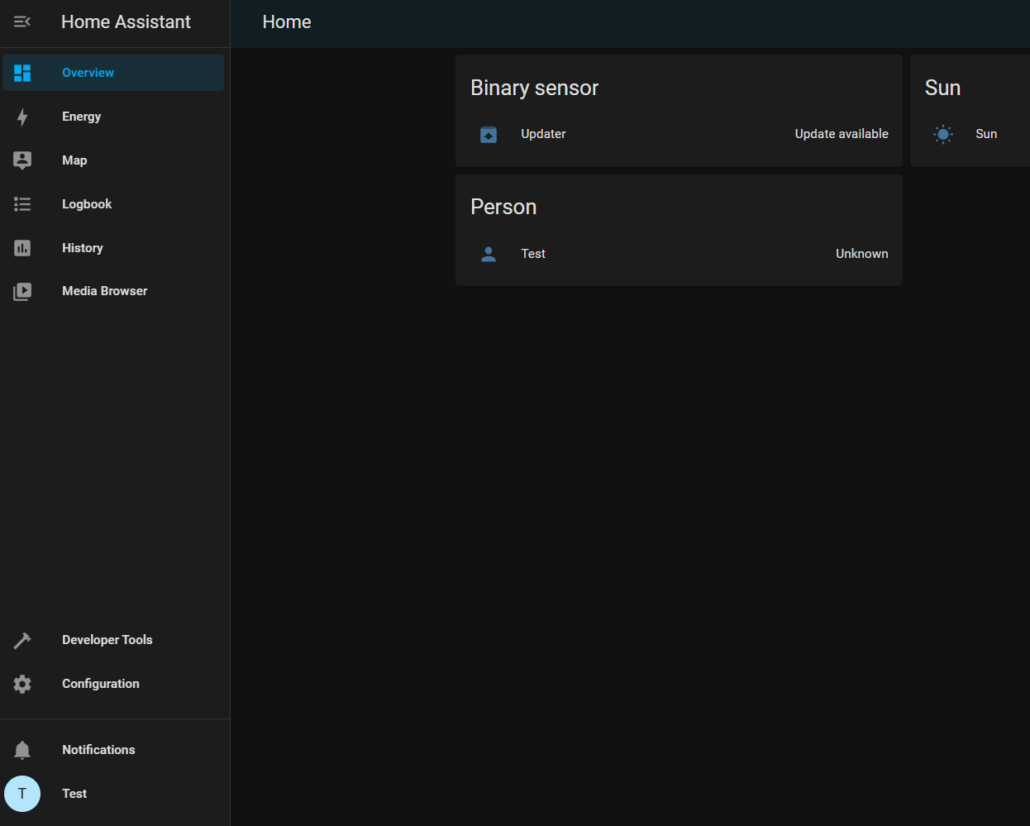
Once you have finished the initial setup, you will be presented with this interface
Add Smart Lamps to the Dashboard
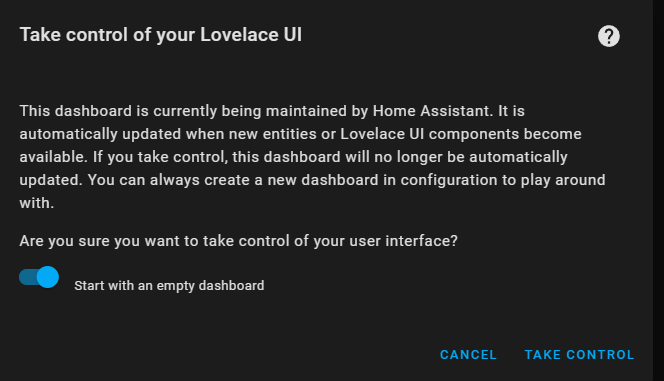
Now let’s add a few smart lamps to this dashboard, so that we can control them. Here I will be using Xiaomi Yeelight Smart Bulbs. If you use other smart bulbs, the set up will be a little different and you can check online resources for setting up the smart bulbs you have. We will start fresh with a blank dashboard
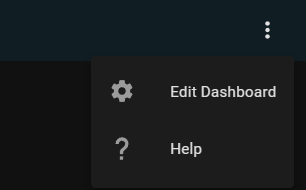
Step 1: Click on the 3 dots on the top right corner and click “Edit Dashboard”
Step 2: Turn on the switch that says, “Start with an empty dashboard” and then click “TAKE CONTROL”
Now let’s add one bulb to start.
Step 3: Turn on the Yeelight Smart bulb
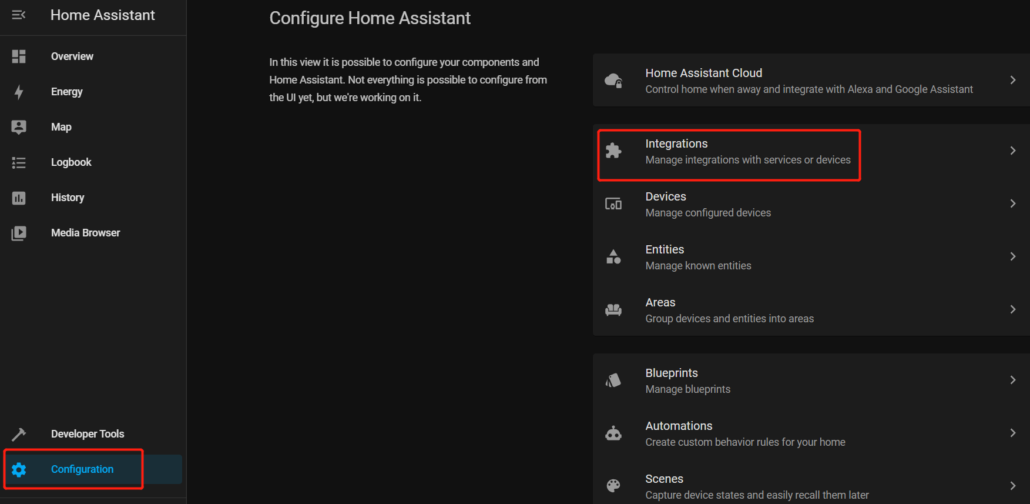
Step 4: Navigate to Configuration > Integrations
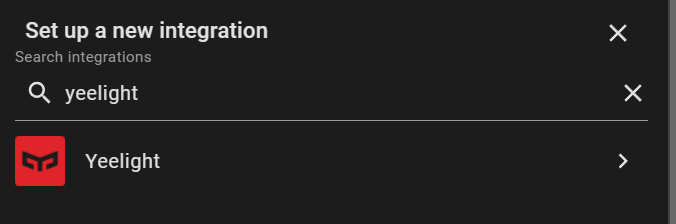
Step 5: Click on “+ ADD INTEGRATION” and type “Yeelight” and click on it
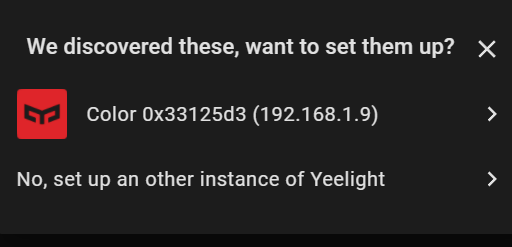
If the device is automatically discovered, you will see the following
If it is not automatically discovered, you will have to add the IP address the device manually. You can find the IP address by logging into your router and checking the connected devices
Step 6: After you add the integration, go back to “Overview”
Step 7: Click on the 3 dots on the top right corner as before and click “Edit Dashboard”
Step 8: Click “+ ADD CARD”
Step 9: Search for Light Card and click on it
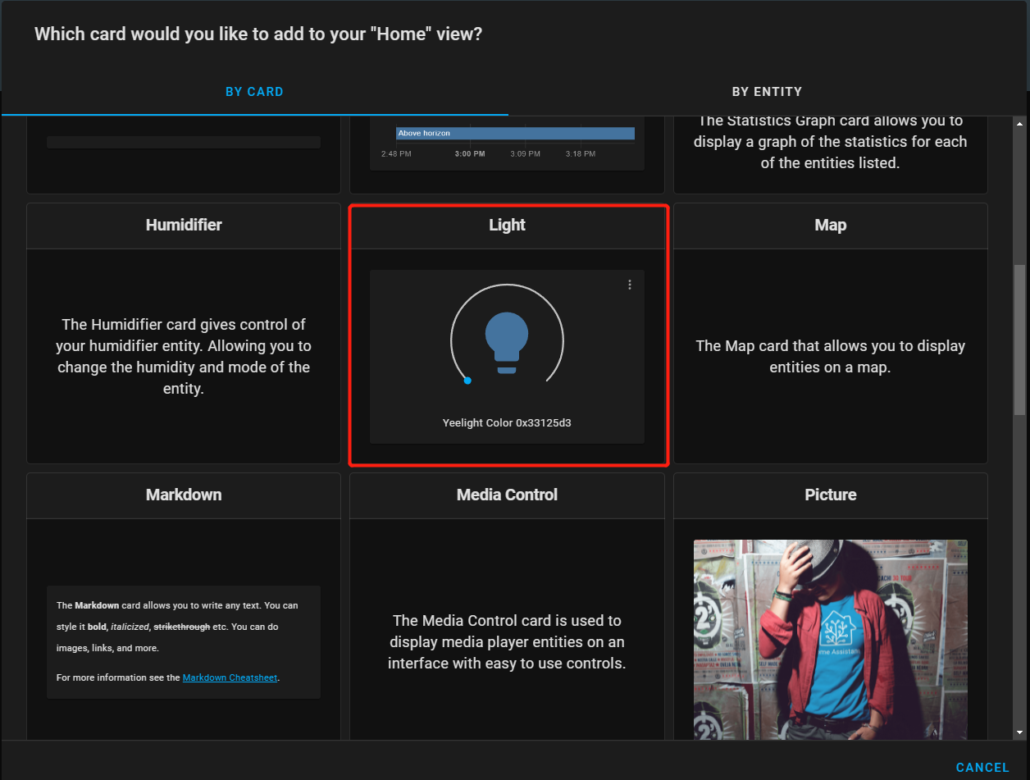
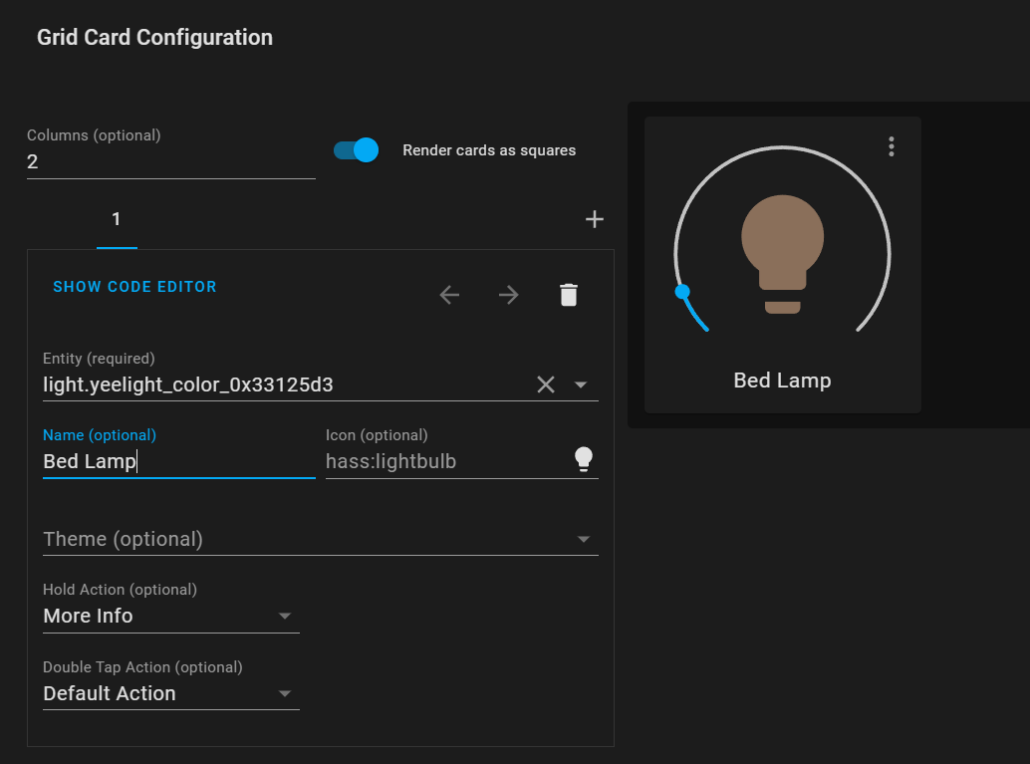
Step 10: Change the name and click Save

You will now see the created Light Card on the Home Assistant Dashboard
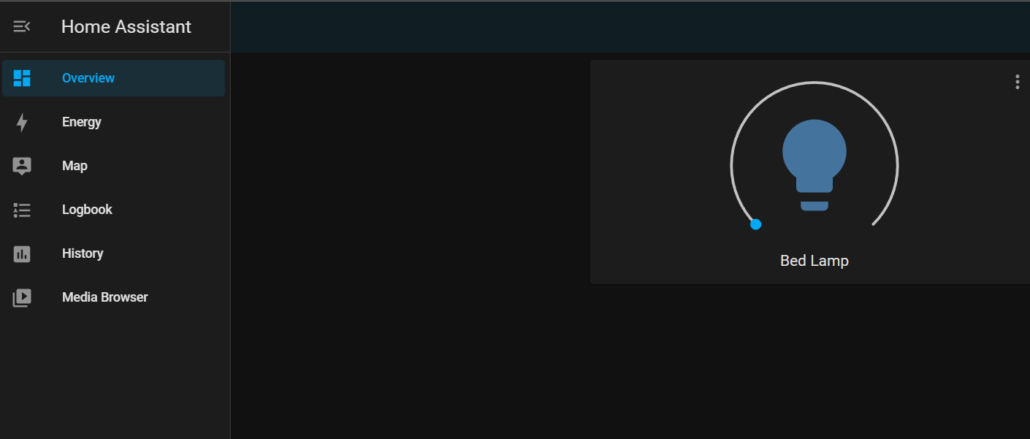
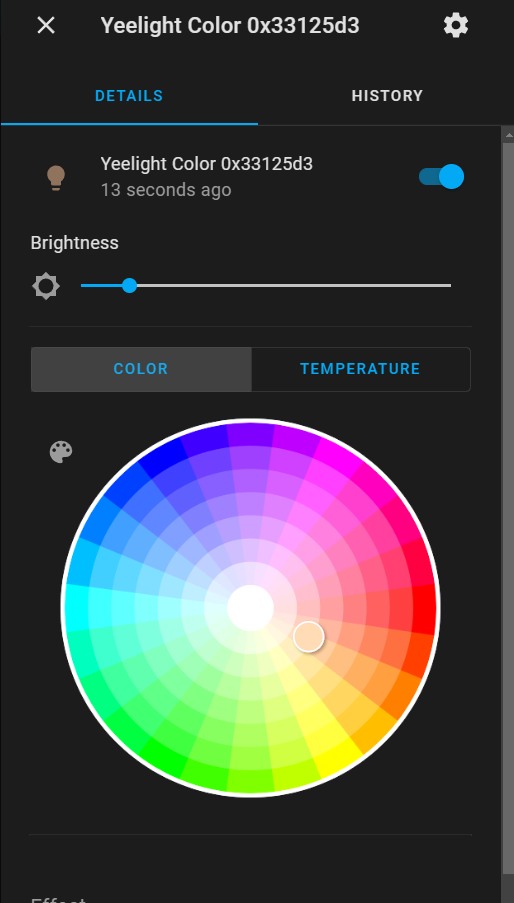
Here you will be able to turn on/ off the lamp by pressing on the lamp icon and also use the slider to control the brightness. You can click on the “3 dots” to change the color and the color temperature as well.
Step 11: Repeat step 5 and step 6 to add more smart bulbs
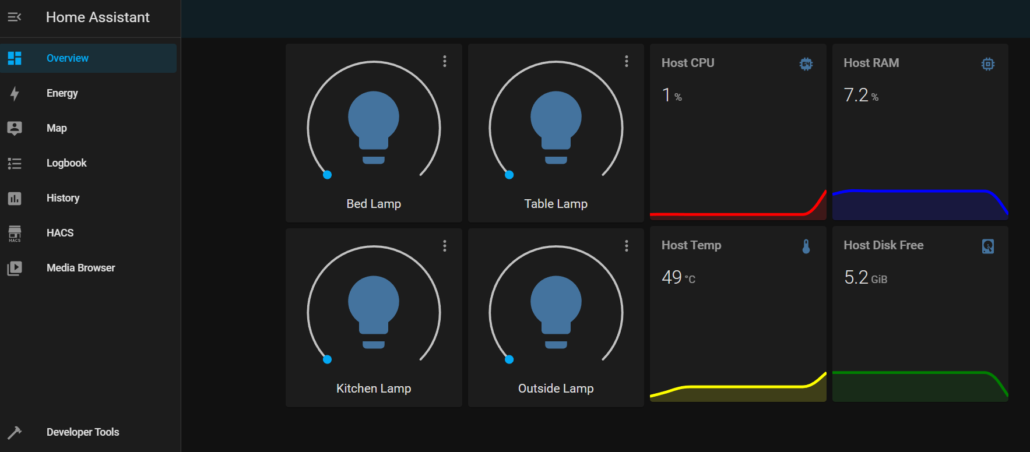
Now let’s add 4 bulbs into the home assistant dashboard
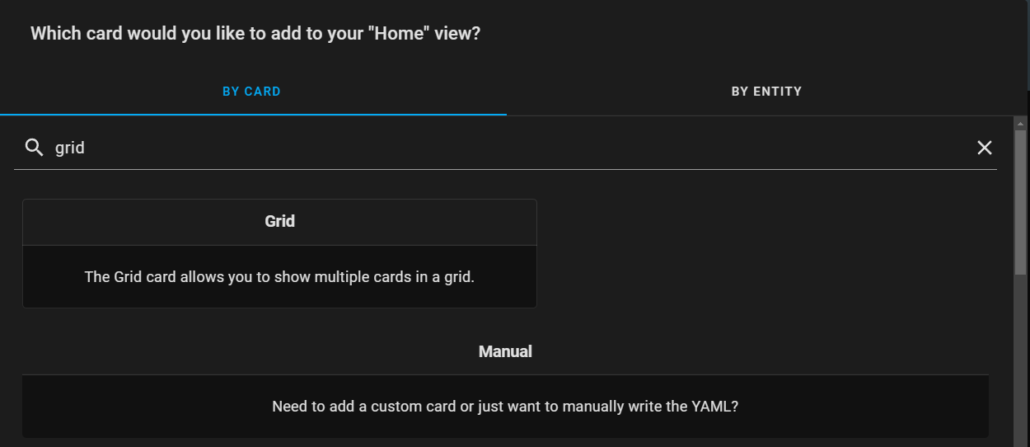
Step 12: Go to the “+ ADD CARD” window and search for “grid”, which is the grid card
Step 13: Set the Columns to “2” and check “Render cards as square”
Step 14: Search for “Light” card and click on it
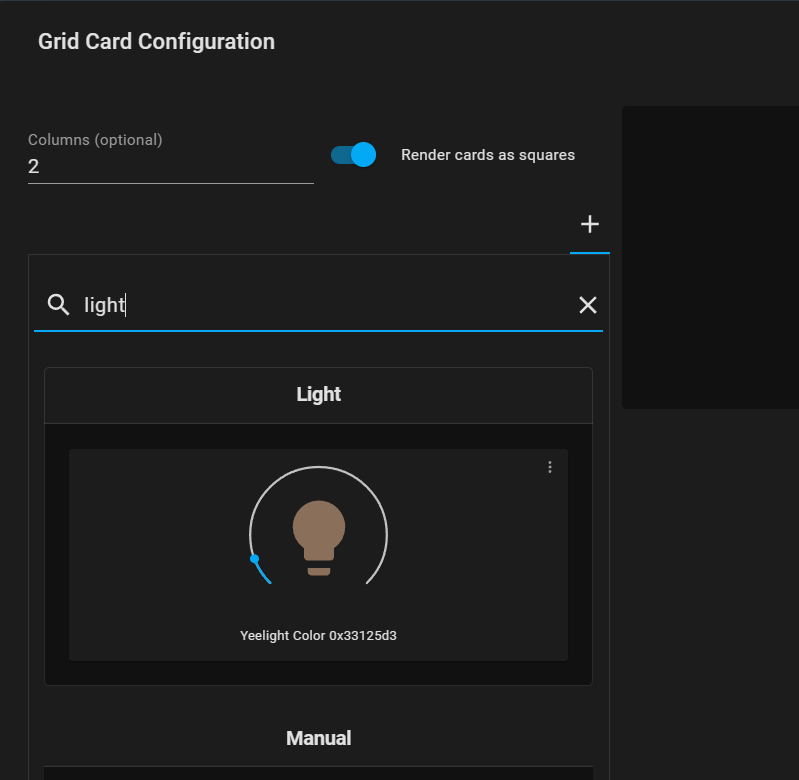
Step 15: Change the Name as before
Step 16: Click on the “+” button and repeat the same for the remaining 3 bulbs
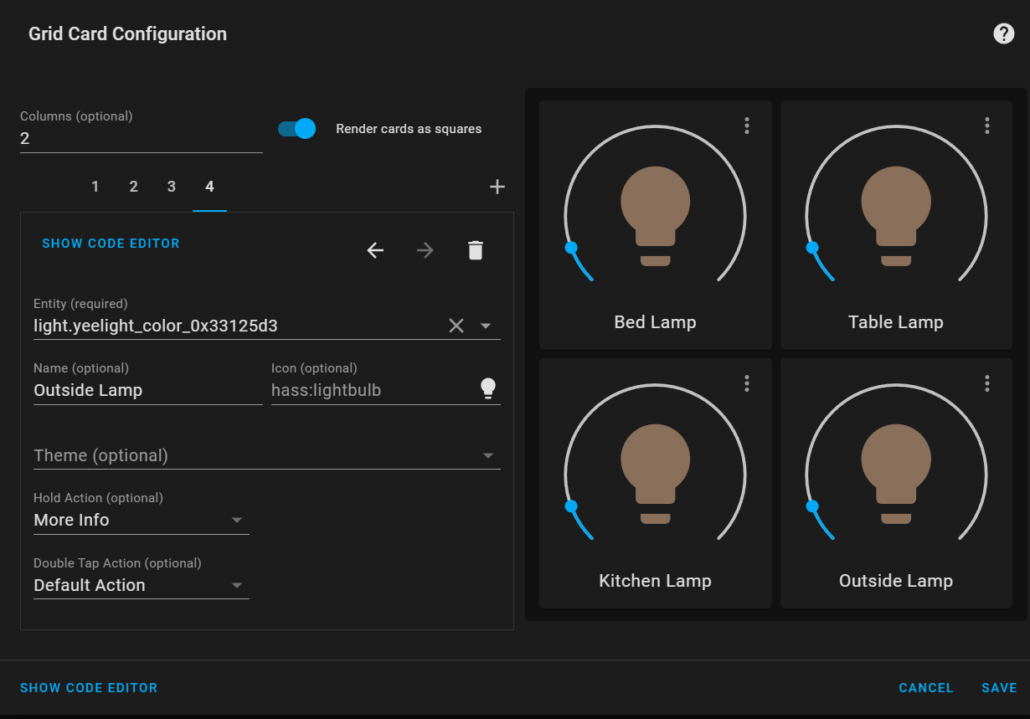
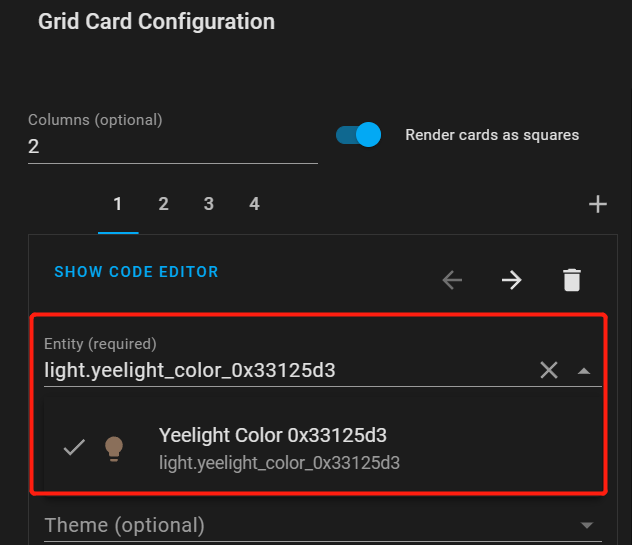
Step 17: Make sure to select the correct bulb from this drop-down list
Step 18: Finally Click Save
Step 19: Delete the light card that we created in the very beginning
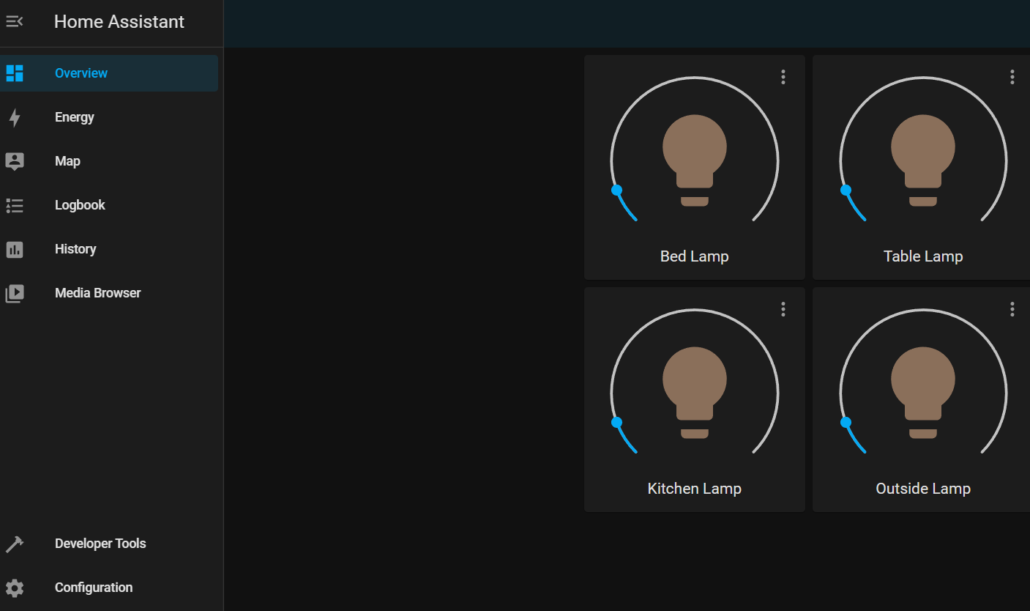
Now the dashboard will look like this, and you can control all 4 lamps easily!
Install HACS (Home Assistant Community Store)
Now we will install HACS which is the Home Assistant Community Store. After installing HACS, we will be able to change the theme, and add custom elements such as much better-looking cards.
Step 1: Go to OpenWrt Luci Web UI
Step 2: Navigate to Docker > Containers
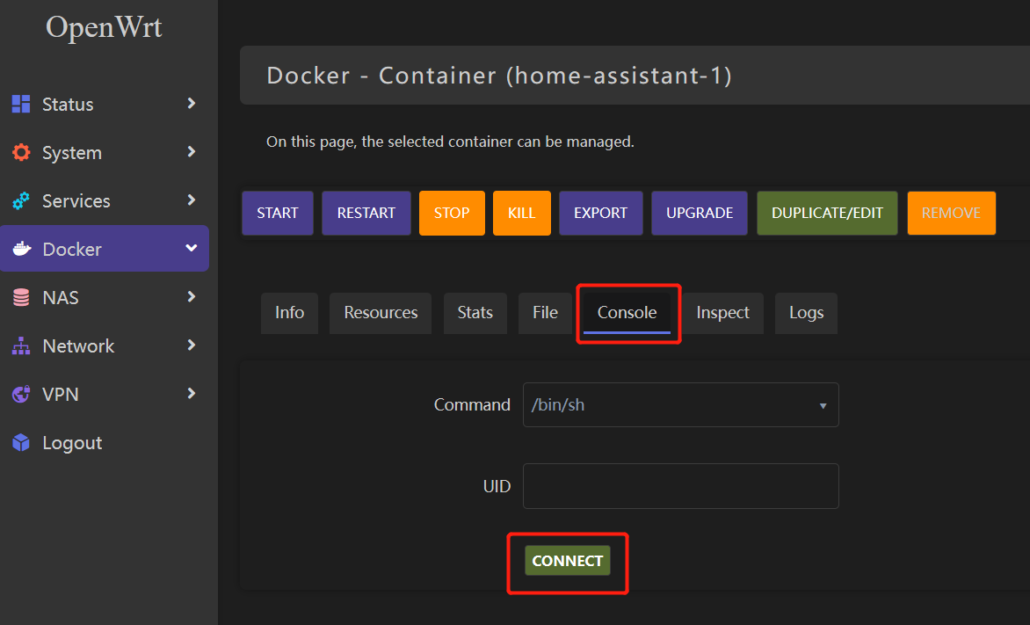
Step 3: Click on the running Home Assistant container
Step 4: Click the Console tab and click CONNECT
Step 5: Execute the following:
wget -O - https://get.hacs.xyz | bash –Step 6: Finally, go back to Docker > Containers, select the container and RESTART it
Step 7: Open Home Assistant dashboard and navigate to Configuration > Integrations
Step 8: Search for “HACS” and install it
Note: You will be prompted to authorize HACS with your GitHub. Please login to your GitHub, authorize HACS and finish the setup
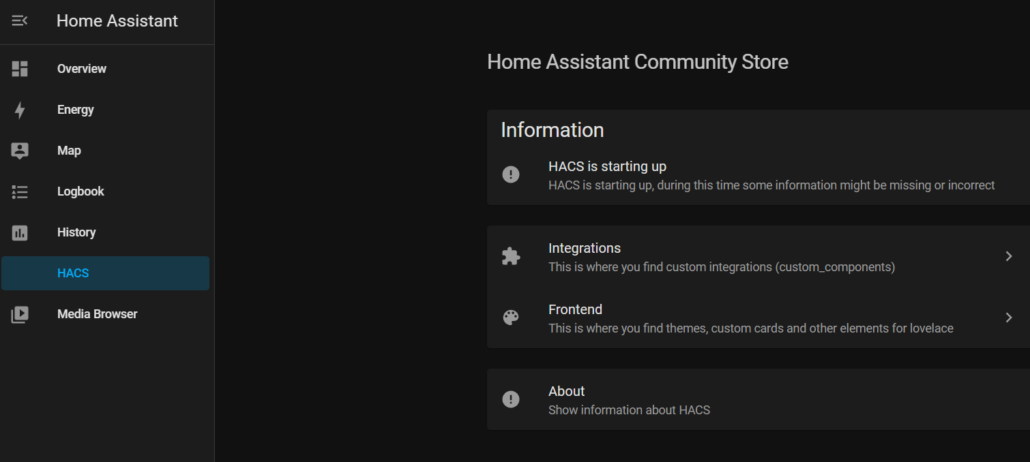
Finally you will see HACS on your Home Assistant sidebar
Add Host statistics to the Dashboard
Now let’s add cards to show different statistics of the host such as CPU usage, RAM usage, CPU Temperature and HDD free space.
Step 1: First of all, we need to edit a file called “configuration.yaml”, so that the hardware usage stats entries will be available for us
Step 2: Go back to OpenWrt Luci web UI
Step 3: Navigate to Service > Terminal and login with your OpenWrt device credentials
Step 4: Navigate to /root/hassio
cd /root/hassioStep 5: Type the following to open the configuration.yaml file
nano configuration.yamlStep 6: Add the following
sensor:
  - platform: systemmonitor
    resources:
      - type: processor_use
      - type: disk_use_percent
        arg: "/"
      - type: disk_free
        arg: "/"
      - type: memory_use_percent
      - type: network_in
        arg: eth0
      - type: throughput_network_in
        arg: eth0
      - type: network_out
        arg: eth0
      - type: throughput_network_out
        arg: eth0
      - type: processor_temperature
      - type: last_boot
Step 7: Press Ctrl+X to exit and finally Press “Y” to save it
Step 8: Go back to Docker > Containers and restart the container
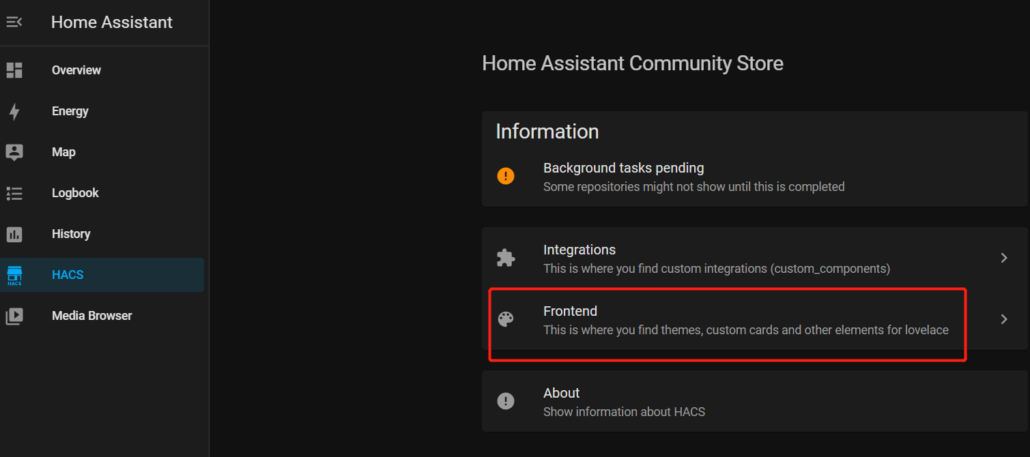
Step 9: Open Home Assistant Dashboard again and go to HACS
Step 10: Click “Frontend”
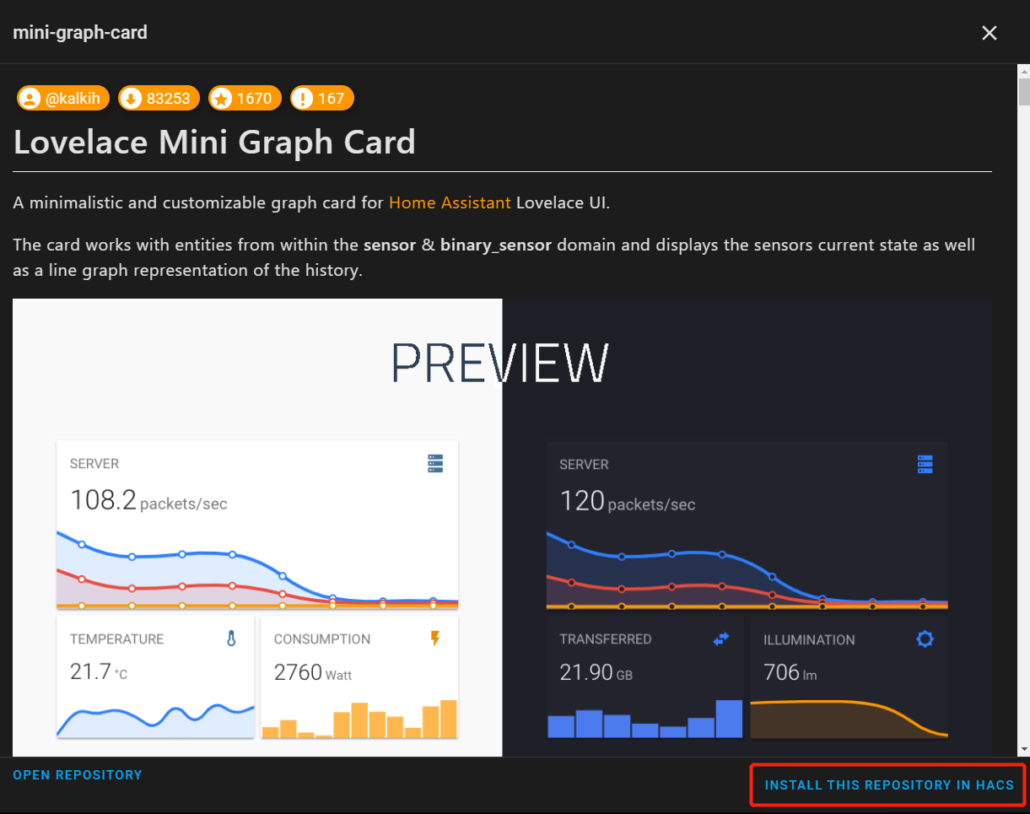
Step 11: Click “+ EXPLORE & ADD REPOSITORIES” and type “mini-graph”
Step 12: Click on the search result, and install it
Step 13: Restart Home Assistant
Step 14: Open the “+ ADD CARD” window within the dashboard
Step 15: Select to manually write the YMAL
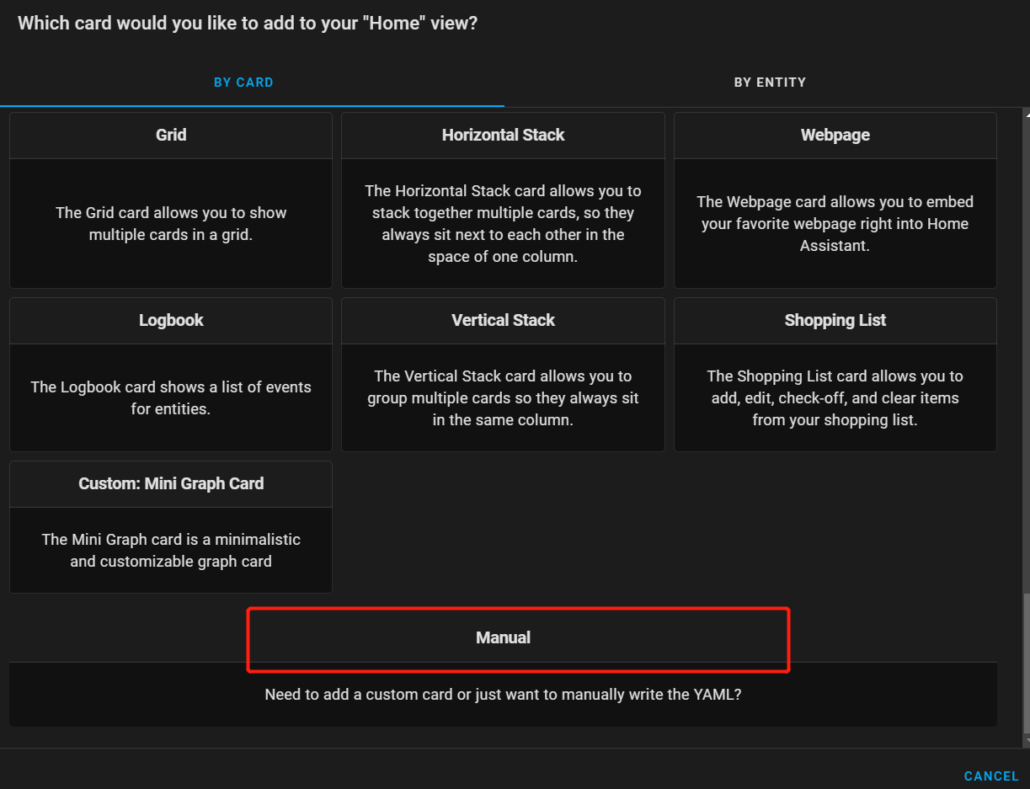
Step 16: Copy and paste the following code inside the code editor
type: grid
cards:
  - type: custom:mini-graph-card
    entities:
      - sensor.processor_use
    line_color: red
    line_width: 8
    font_size: 75
    name: Host CPU
  - type: custom:mini-graph-card
    entities:
      - sensor.memory_use_percent
    line_color: blue
    line_width: 8
    font_size: 75
    name: Host RAM
  - type: custom:mini-graph-card
    entities:
      - sensor.processor_temperature
    line_color: yellow
    line_width: 8
    font_size: 75
    name: Host Temp
  - type: custom:mini-graph-card
    entities:
      - sensor.disk_free
    line_color: green
    line_width: 8
    font_size: 75
    name: Host Disk Free
columns: 2
square: true
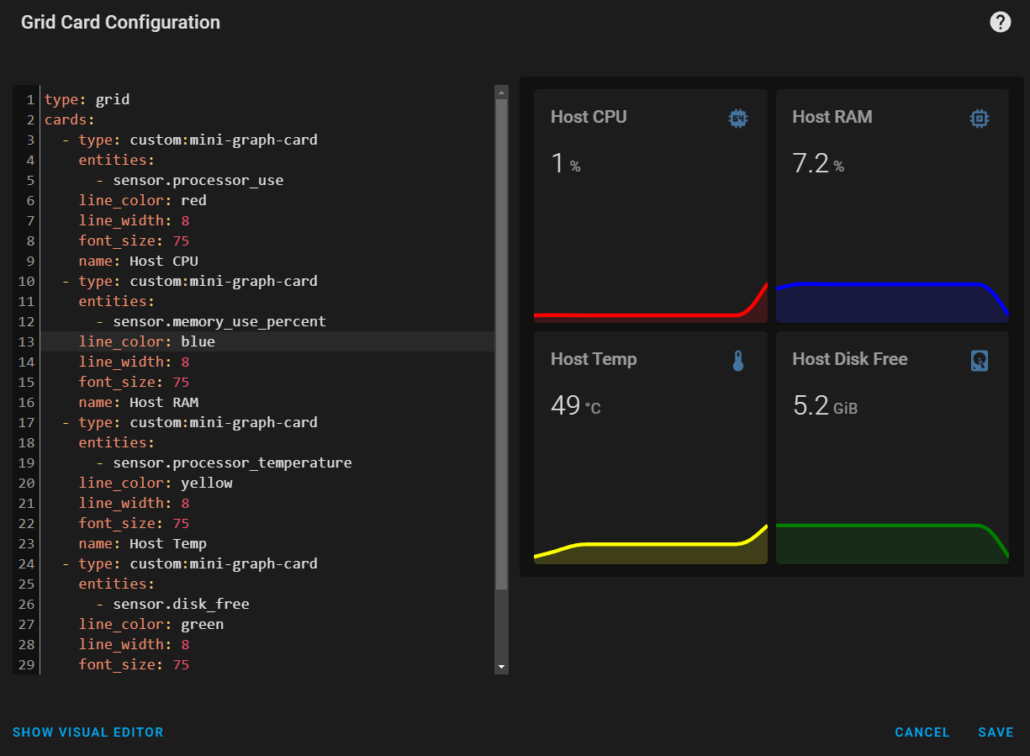
Step 17: Click Save and exit from the config window
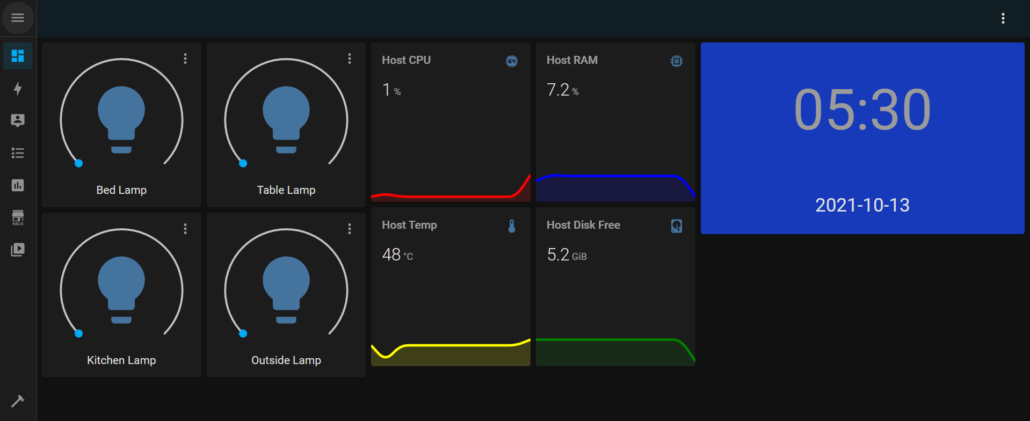
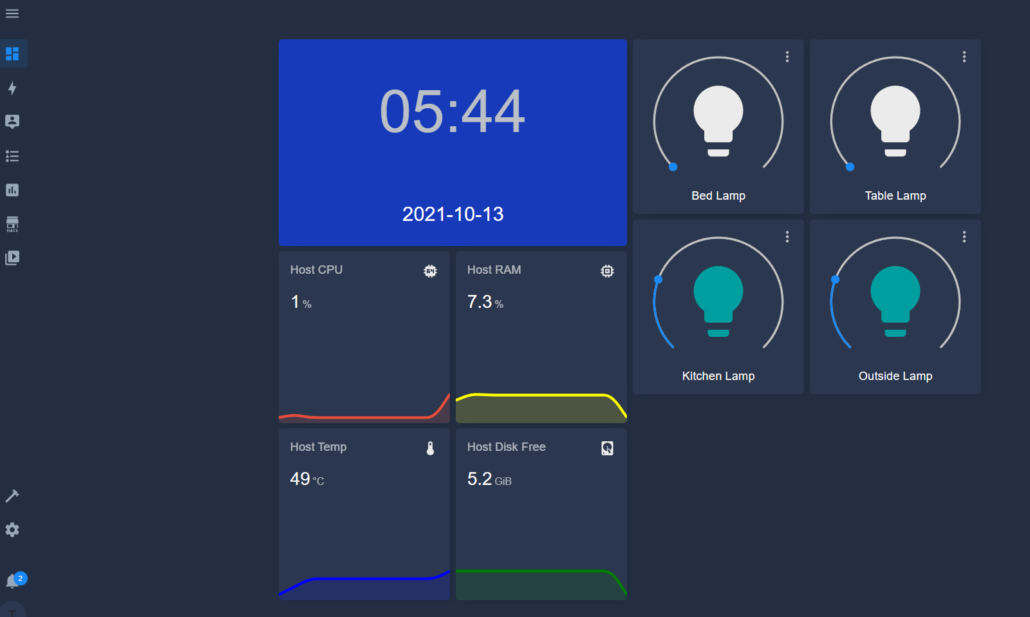
Now our dashboard looks as follows:
Add Date/ Time Card to the Dashboard
Now let’s add a date/ time card to the dashboard
Step 1: Open configuration.yaml inside terminal as before
Step 2: Add the following under “sensor:“ and save the file
  - platform: time_date
    display_options:
      - "time"
      - "date"
      - "date_time"
      - "date_time_utc"
      - "date_time_iso"
      - "time_date"
      - "time_utc"
      - "beat"
Now we need a small background image for the date/ time card. Here I have prepared a blue color image as below

Step 3: Navigate to Services > File Assistant
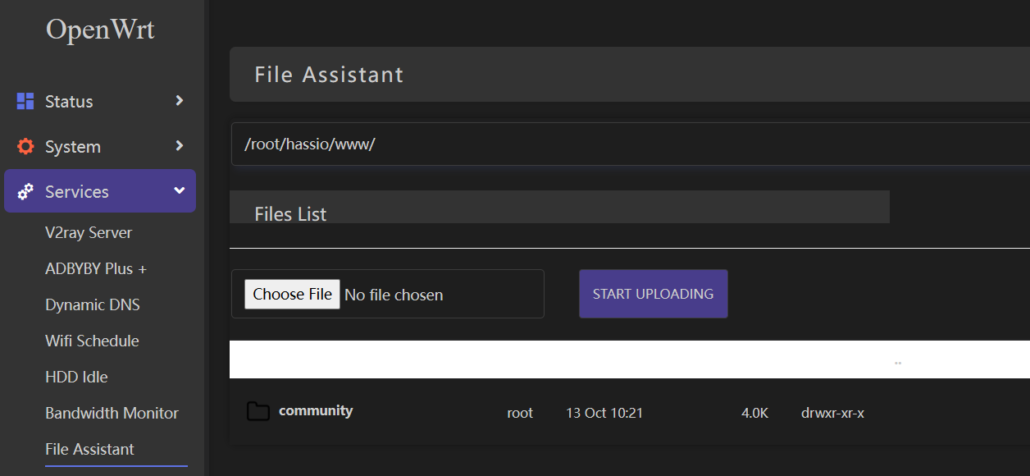
Step 4: Find /root/hassio/www/ and click UPLOAD
Step 5: Find your background image for the date/ time card and upload it
Step 6: Restart the Home Assistant container
Step 7: Go back to Home Assistant dashboard and open the “+ ADD CARD” window
Step 8: Choose to add manual card like before and enter the following
elements:
  - entity: sensor.time
    style:
      color: var(--secondary-text-color)
      font-size: 600%
      left: 50%
      top: 35%
    type: state-label
  - entity: sensor.date
    style:
      color: var(--primary-text-color)
      font-size: 200%
      left: 50%
      top: 85%
    type: state-label
image: /local/blue.jpg
type: picture-elements
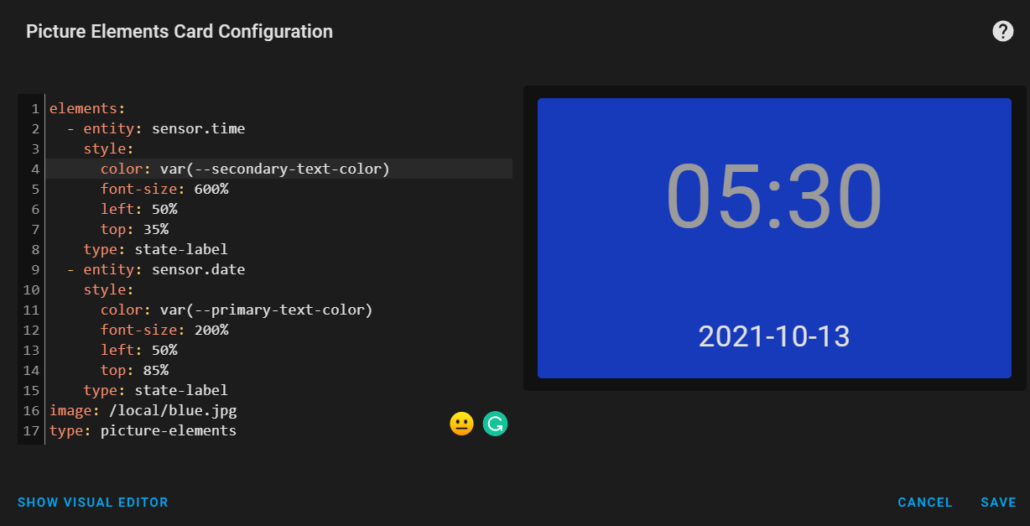
Step 9: Save the card and exit from configuration
So far our Home Assistant Dashboard looks like this
Change Dashboard Theme
Now we will move on to changing the overall theme of our Home Assistant UI
Step 1: Go to HACS > Frontend
Step 2: Click “+ EXPLORE & ADD REPOSITORIES”
Step 3: Check the box “Theme” only and you will find a lot of themes available
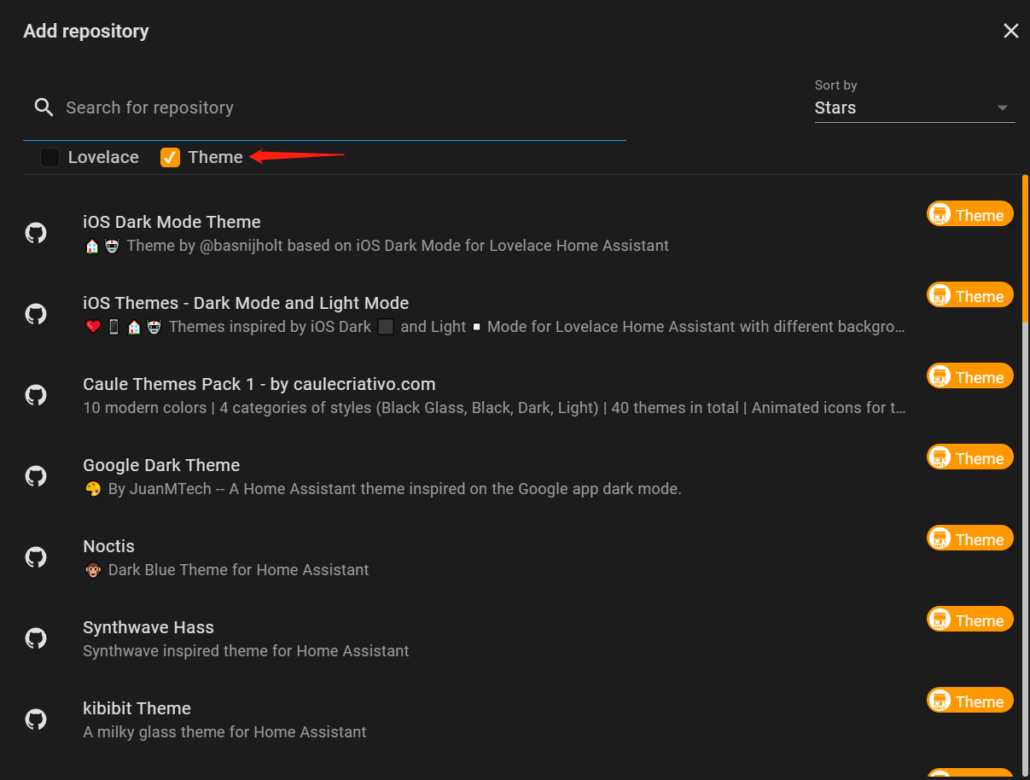
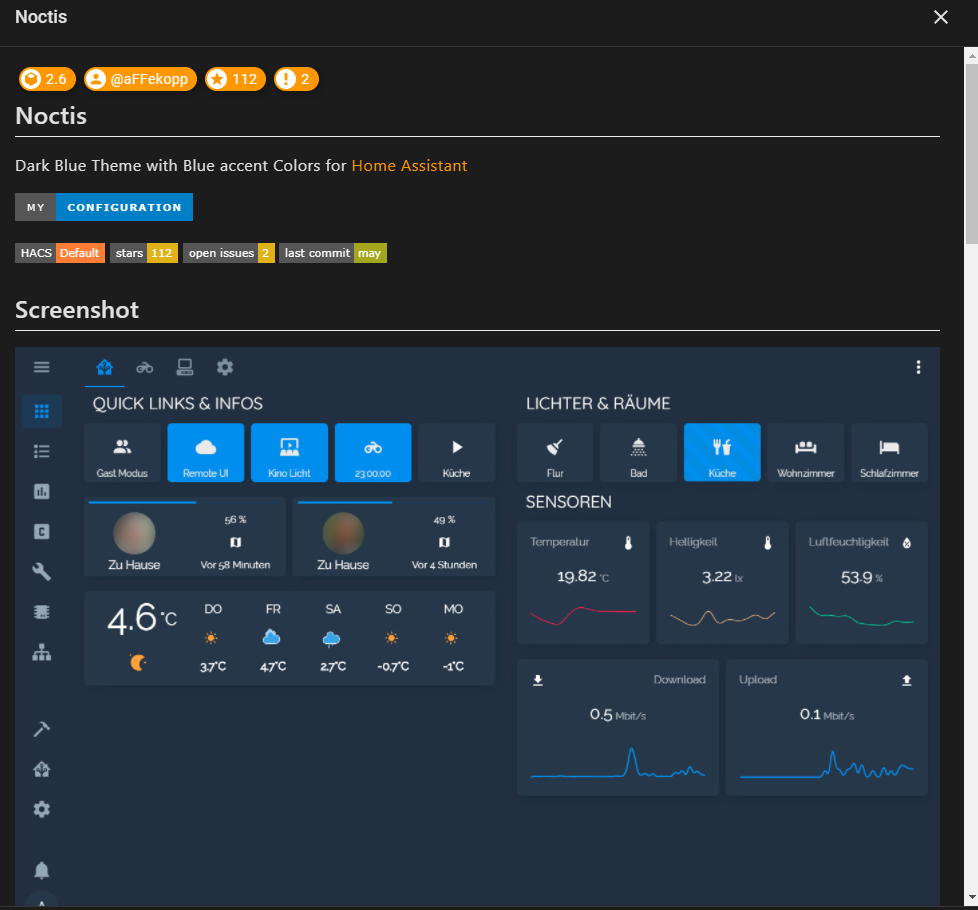
Step 4: You can install your favorite theme from here. Here I will install the “Noctis theme”
Step 5: Open your profile

Step 6: Under “Themes” choose the theme that you installed before
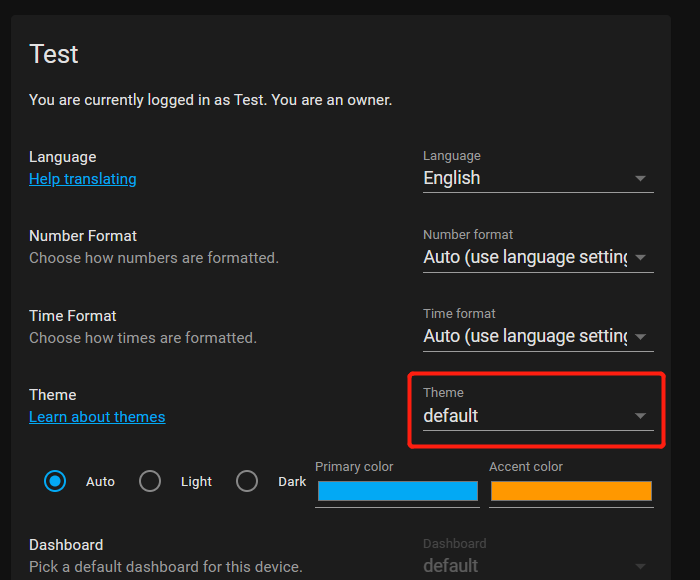
Since I have installed the “Noctis” theme, the final Home Assistant dashboard looks like below
Bonus – Temperature and Humidity Sensor Gauges
I have connected a DHT11 temperature and humidity sensor to an ESP8266 and flashed the ESPHome firmware to the board. After that I have connected ESPHome with my Home Assistant.
Learn more about ESPHome here.
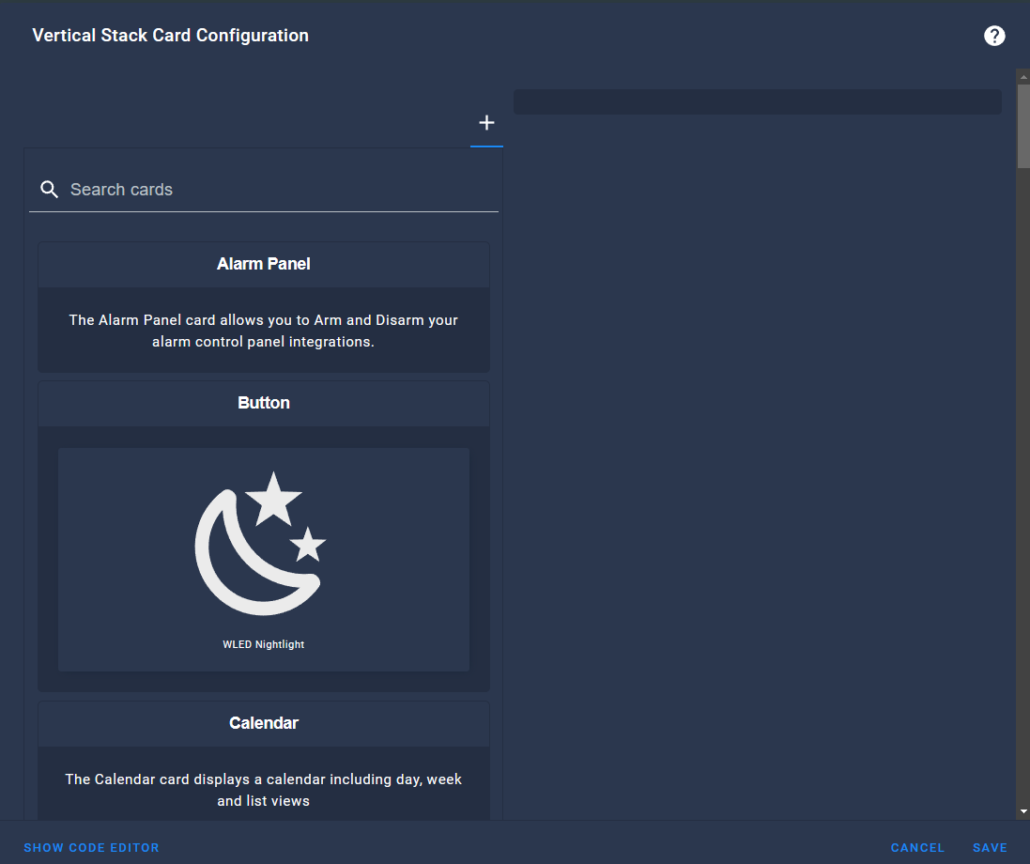
Here I will show you how you can visualize the temperature and humidity sensor data on gauges
Step 1: Open the ADD CARD configuration window
Step 2: Search for “Vertical Stack” and open the card configuration
Step 3: Choose Gauge for the first card and choose the correct Entity for Temperature
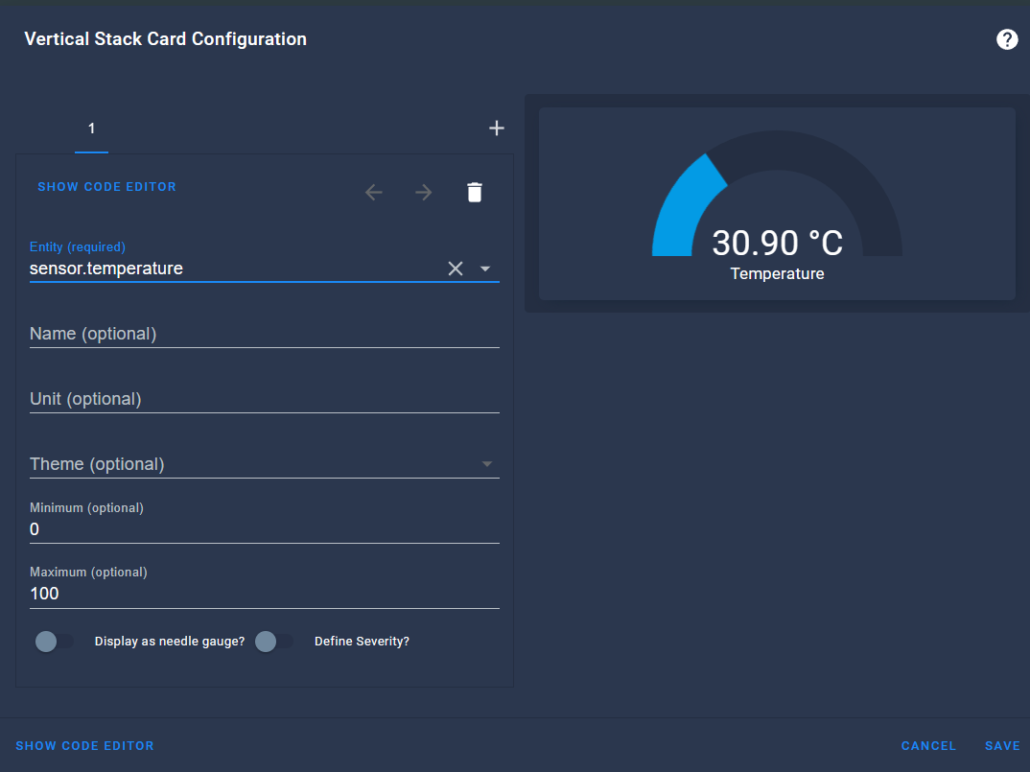
Step 4: Click “+” to add another Gauge card and choose the correct Entity for humidity
Step 5: Open the Code Editor and configure as follows to set colors according to different ranges
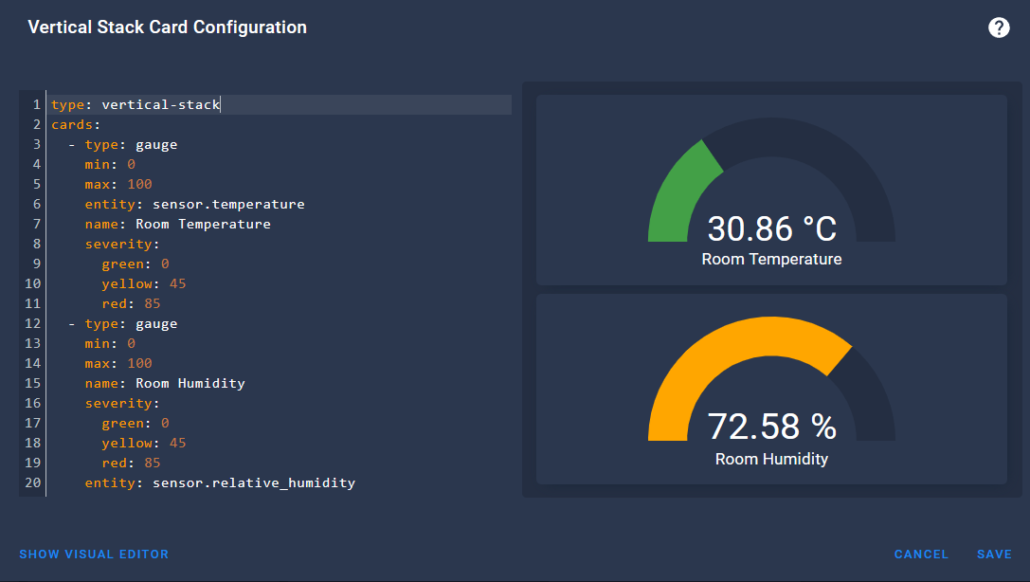
Step 6: Finally click save and exit from configuration window
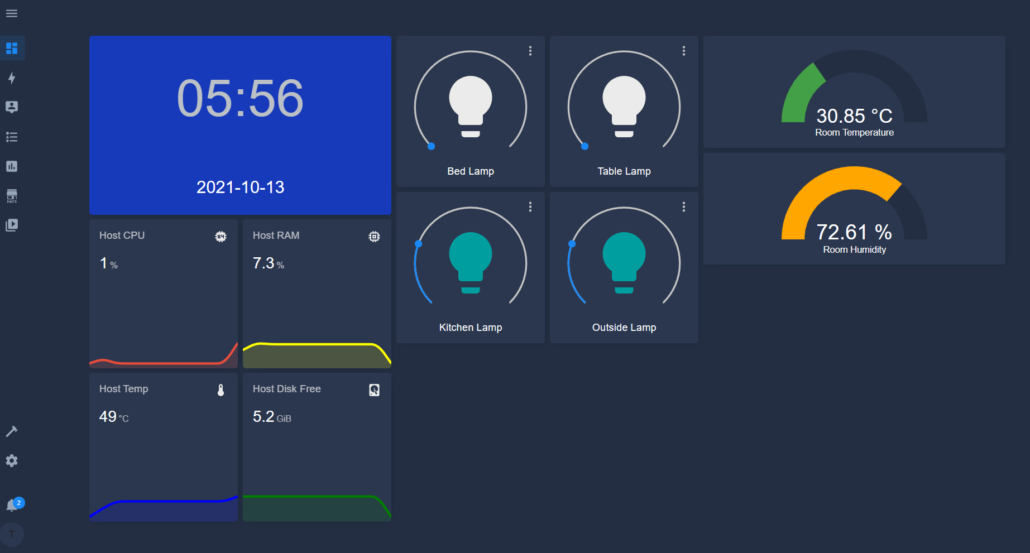
Now our final dashboard looks like below!
Home Assistant Dashboard on reTerminal
You can also display the above dashboard on the reTerminal LCD. Let’s walk through the process
Step 1: Follow this guide to get started with the reTerminal for the first time
Step 2: Type the following inside a terminal window of reTerminal
chromium-browser --start-fullscreen http://192.168.2.1:8123Make sure the reTerminal is connected to the OpenWrt router
Now you will be able to control the Smart Devices using reTerminal as well!
Demo Showcase
Conclusion
I hope this blog was helpful to everyone to understand the basic usage of Home Assistant and how it can be used to control a smart bulbs, view temperature and humidity information, view host statistics and more. However, it can be extended to control many other smart appliances as well right from Home Assistant dashboard!