A Micro FPV RC Car Transformed from a Regular Hot Wheels Model Car powered by XIAO ESP32S3 Sense
Ready to turn your childhood Hot Wheels dreams into reality?
Join Max Imagination on an exhilarating journey as he transforms a regular Hot Wheels car (Porsche 993 GT2) into an Arduino-based micro FPV RC Drift Car! Using tiny, Arduino-compatible wifi-supported XIAO ESP32S3 Sense — the car runs web applications for control and a thrilling First-Person-View video feed. Equipped with a high-speed, brushed DC motor, motor driver, and micro servo for precise steering, get ready for miniature speed, precision, and immersive excitement!
Useful Resources related to this project:
- Circuit diagrams and blueprint for car parts
- Code for web-based RC car controller
- Code for FPV camera
Note: This project is intended for those of you who already have previous experience building, modifying, or controlling RC vehicles and a basic understanding of electronic components and Arduino boards.
Material Preparation:
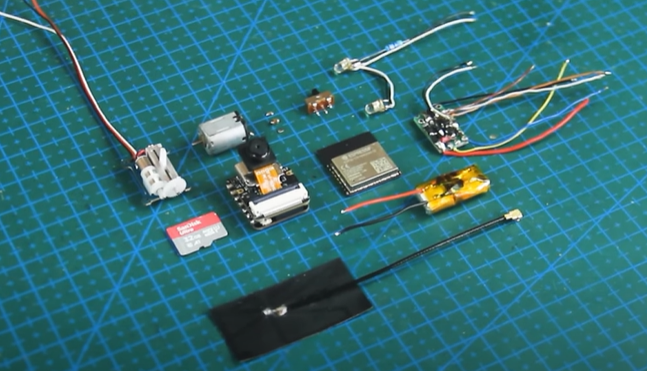
Electronic Parts
XIAO ESP32S3 Sense
Micro SD Card Tool Kit
ESP32-C3 Module (WiFi Receiver)
1.5G Micro servo motor (for steering)
Tiny DC motor (drive motor) taken from 9g servo
50mAh 3.7V LiPo cells for battery pack
SPDT Microswitch (on/off)
White SMD LED (headlights)
SMD NPN Transistor (H-bridge) or (x1) for single-transistor motor driver
SMD 1K Resistor (H-bridge)
SMD Diode (H-bridge)
“104” 100pF ceramic capacitor (H-bridge)
1/4W 47 Ohm resistor for headlights (from the kit
Tools needed in this project: Hot Glue Gun, Multimeter, Flush Cutters, Pliers, Wire Stripper, Utility, Craft Knife, Helping Hands, Soldering Iron, Drill Machine, Rotary Tool with appropriate drill and cutting bits, Tape, Heat Shrink, Tubing, Metal Strips
Step-by-step Tutorial
Step 1: Gather the Required Materials
Before diving into the transformation process, it’s essential to gather all the necessary materials. You will need a Hot Wheels car of your choice, a micro FPV camera, a miniature transmitter, a battery pack, wires, and other electronic components. Ensure that you have everything readily available before proceeding to the next step.
Step 2: Disassemble the Hot Wheels Car
Carefully disassemble your Hot Wheels car using small tools like screwdrivers or pliers. Remove the body and any unnecessary parts to create space for the FPV camera and other electronic components. Take your time during this step to avoid damaging the car.
Step 3: Install the Micro FPV Camera
Now it’s time to install the micro FPV camera. Choose a suitable location on the Hot Wheels car’s chassis, preferably near the front to provide a clear view of the track. Securely attach the camera using adhesive or small screws. Make sure it is positioned in a way that doesn’t obstruct the car’s movement.
Step 4: Connect the Wiring
Take the wires provided with the micro FPV camera and connect them to the transmitter. Ensure that the connections are secure and well-insulated to prevent any short circuits. Follow the manufacturer’s instructions for proper wiring and connections.
Step 5: Install the Battery Pack
Attach the battery pack to the Hot Wheels car. Depending on the size and weight of the battery, you may need to find an appropriate spot to secure it without affecting the car’s balance or performance. Use adhesive or straps to hold the battery pack in place securely.
Step 6: Test and Fine-Tune
Before fully assembling the Hot Wheels car, perform a test run to ensure everything is functioning correctly. Check if the FPV camera provides a clear live feed to your viewing device. Fine-tune the positioning of the camera and adjust any wiring if necessary. Take this opportunity to make any additional modifications or improvements based on your preferences.
Step 7: Reassemble the Hot Wheels Car
Once you are satisfied with the camera’s placement and system functionality, reassemble the Hot Wheels car. Attach the body back onto the chassis, ensuring all parts fit properly. Secure any loose components and double-check all connections.
Step 8: FPV Racing Adventure Begins!
Now that your Hot Wheels car has been transformed into a micro FPV RC car, it’s time to embark on your FPV racing adventure. Put on your FPV goggles or use a compatible viewing device to experience the excitement of racing through the eyes of your miniature RC car. Set up a track or find an open space to test your skills and compete with friends.
More Information
Original Video: https://www.youtube.com/watch?v=nx7Ih79KevE&t=267s
Please feel free to reach out to [email protected] for any inquiries or if you’d like to engage in further project discussions. Your questions and interest are welcomed.
The creation of a tiny object akin to a spider robot that can adhere to any surface and has a tiny proximity sensor that enables the object to move away if someone tries to move it out of place is another intriguing concept involving the Esp32 camera.
😊