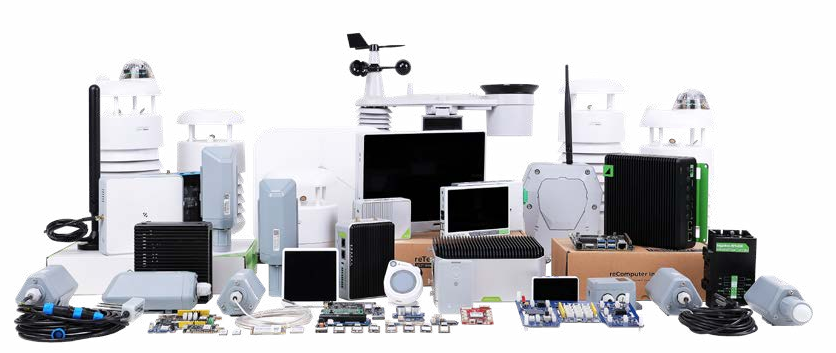
How to Pick the Fiberglass Antenna for Your Meshtastic Solar Node
Introduction
Once you have a SenseCAP Solar Node, you have already solved one of the biggest challenges for Meshtastic deployments: keeping your node always online. The next step is improving how far and how reliably that node can communicate.
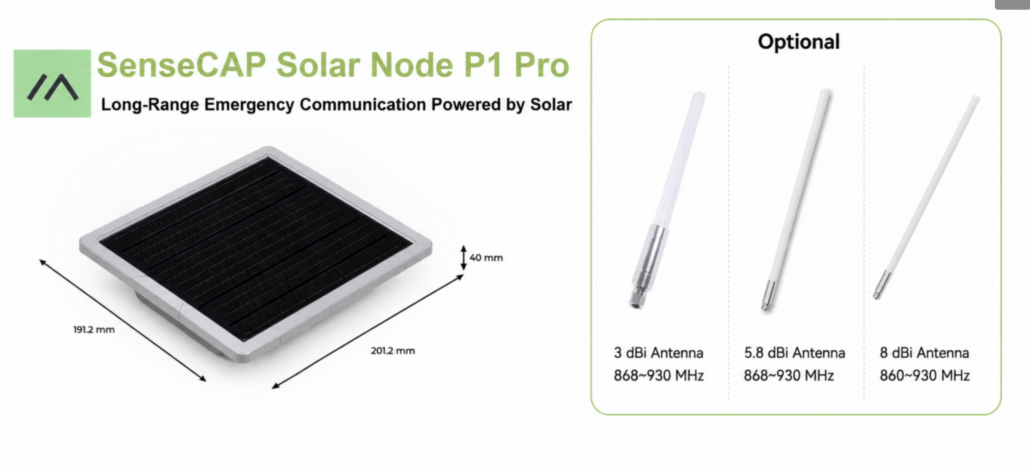
Choosing the right fiberglass antenna, combined with proper installation, can help extend your coverage from short-range neighborhood links to long-distance connections under clear line-of-sight conditions. In this guide, we will walk through three different Seeed fiberglass antenna options with different dBi ratings and explain how to use them to build a stronger Meshtastic backbone for your area.
Why Choose a Fiberglass Antenna?
From the perspective of durability and protection, fiberglass antennas are better suited for long-term outdoor deployment. They are typically designed for extended outdoor service life, with a robust enclosure that protects the internal collinear antenna structure without introducing additional electromagnetic interference.
Because fiberglass antennas are usually installed in higher, more exposed locations, their connection points are often designed with more reliable sealing. This generally gives them better waterproofing and corrosion resistance than standard rod antennas.
Overall, fiberglass antennas offer strong resistance to weather, corrosion, UV exposure, aging, and mechanical impact. They can also maintain stable performance in harsh environments from -30°C to 65°C, making them a strong fit for complex outdoor applications.
How to Choose Between Three Fiberglass Antennas
When choosing a fiberglass antenna for your SenseCAP Solar Node, you should not look only at the dBi number. Antennas with different gain levels, frequency ranges, and physical lengths are designed for different deployment environments.
For a Solar Node, the purpose of choosing the right antenna is simple: to make your always-on solar-powered node not just “online,” but a stable and effective Meshtastic relay.
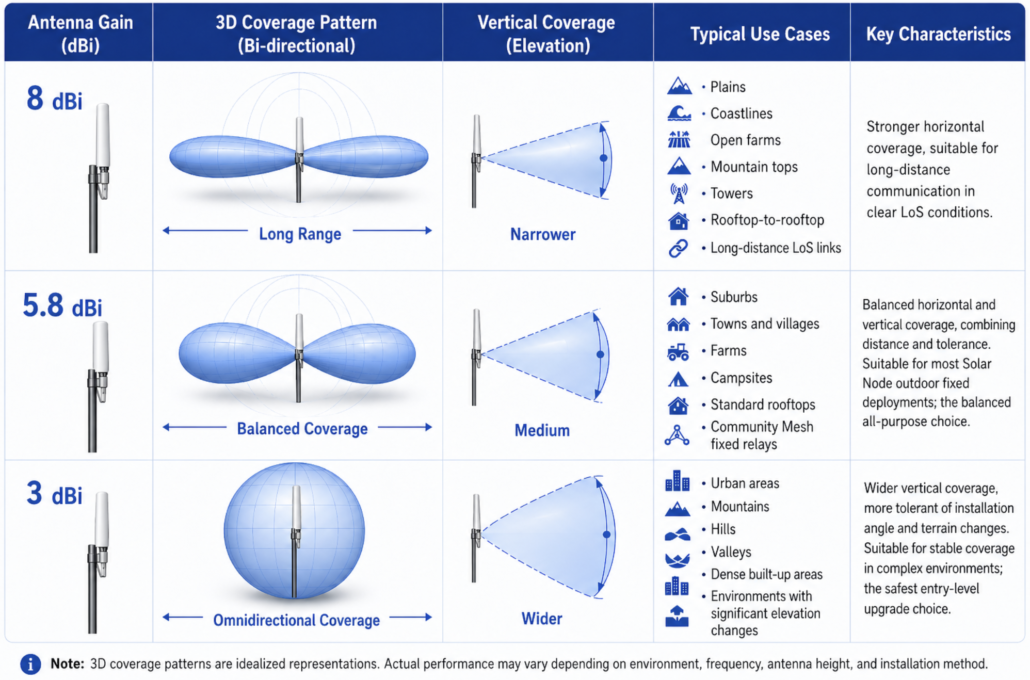
3dBi Fiberglass Antenna: The Most Forgiving Entry-Level Upgrade

The biggest advantage of this antenna is its wide frequency coverage, supporting both US and EU frequency ranges. It also comes with an antenna base, making it convenient to connect directly with the Solar Node.
The 3dBi fiberglass antenna is suitable for complex terrain and environments where node heights are not consistent. Typical examples include urban streets, mountains, hills, valleys, areas between buildings, or locations where the Solar Node cannot be mounted at an ideal height.
Its relatively wider vertical coverage makes it more tolerant of installation angle and height differences between nodes. If nearby nodes are located downstairs, down a slope, in a valley, or if your device is installed on a balcony or roof edge, a 3dBi antenna can often be a safer choice than a higher-gain antenna.
In addition, its 360mm length makes it easier to install and better suited for locations with limited space.
You can think of it as the safest conservative upgrade that is hardest to get wrong.
5.8dBi Fiberglass Antenna: The Balanced Choice for Most Fixed Outdoor Deployments
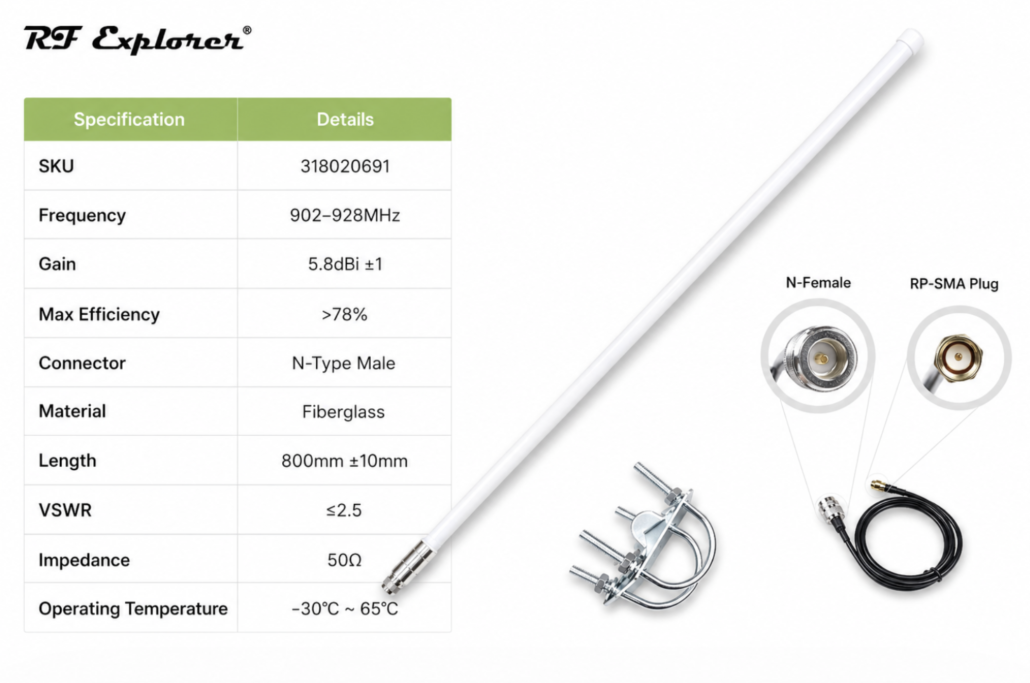
This antenna is designed for the US frequency band. To ensure stable outdoor mounting and better suitability for fixed installation scenarios, it does not come with the same antenna base as the 3dBi version. Instead, it includes the following accessories:
| CFD200 cable 1mt | 1* |
| Mounting Bracket | 1* |
| N Type to RP-SMA cable (compatible with Solar Node) | 1* |
This makes it suitable for most common fixed outdoor deployments, such as suburban rooftops, residential balconies, villages, farms, campsites, and community relay nodes.
If users want their Solar Node to achieve better horizontal coverage without sacrificing too much vertical coverage, the 5.8dBi antenna is a well-balanced option.
You can think of it as the recommended choice for most Solar Node outdoor deployments.
8dBi Fiberglass Antenna: EU & US For Long-Distance Line-of-Sight Deployments
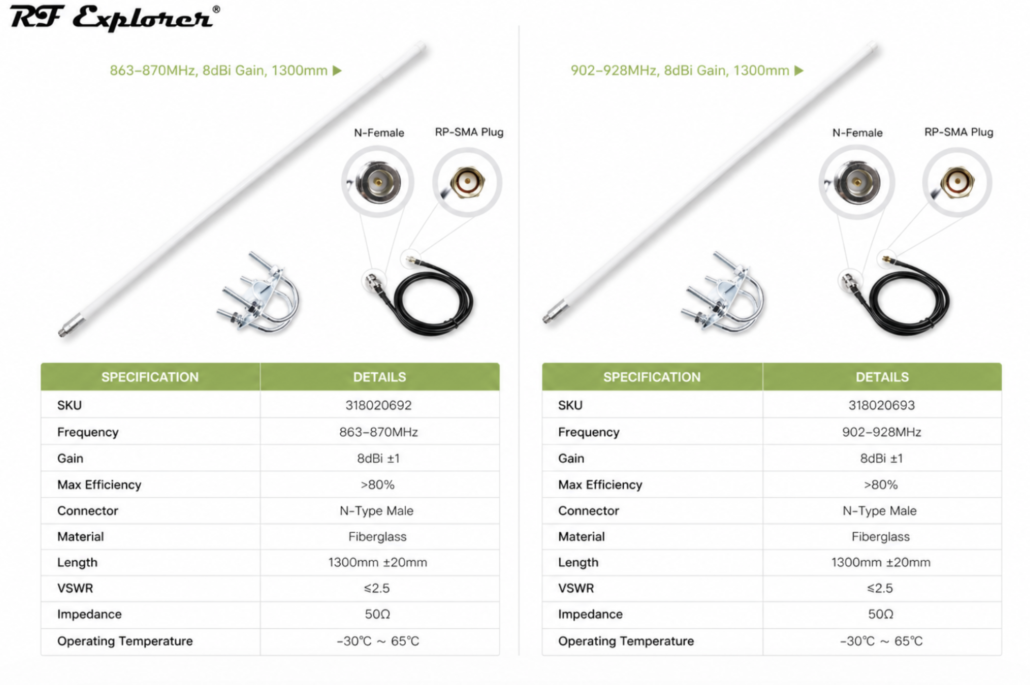
Seeed provides two 8dBi fiberglass antenna versions for different frequency bands. Like the 5.8dBi antenna, each kit includes:
| CFD200 cable 1mt | 1* |
| Mounting Bracket | 1* |
| N Type to RP-SMA cable (compatible with Solar Node) | 1* |
The 8dBi fiberglass antenna is suitable for long-distance, open, and clear line-of-sight fixed deployments, such as:
- Rooftop-to-rooftop links
- Tower-to-tower links
- Hilltop-to-plain deployments
- Farms, ranches, and rural areas
- Coastlines, plains, and open campsites
- Solar Node deployments intended to serve as long-distance relay nodes
This type of antenna works best when nodes are at similar elevations, the path is open, and there are few obstacles. If there are many buildings, trees, hills, or large elevation differences between nodes, an 8dBi antenna may not be the best option.
The key advantage of an 8dBi antenna is stronger horizontal coverage.
Compared with 3dBi and 5.8dBi antennas, an 8dBi antenna concentrates more energy toward the horizon. Under clear line-of-sight conditions, it is better suited for building long-distance LoRa / Meshtastic links.
With a length of 1300mm, it is also better suited for permanent fixed installations, such as pole mounting, rooftop mounting, or tower mounting, rather than temporary deployments.
Summary
Installation Guide
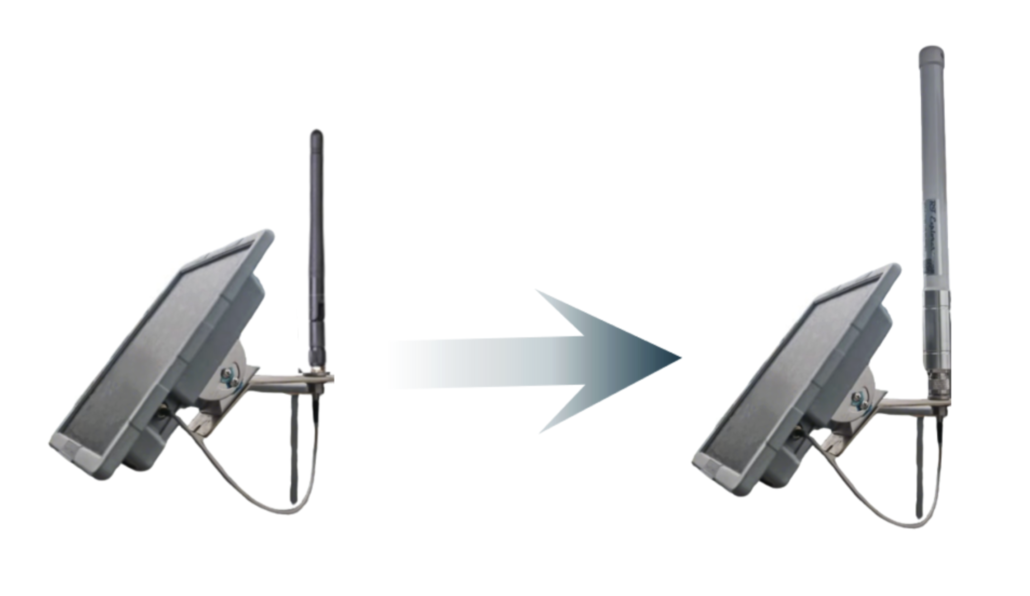
Once you have chosen the right Meshtastic antenna, the next step is installation. This step is critical because it directly affects the stability and performance of your node.
In addition to the U-bolt mounting method for the antenna, the Solar Node itself also supports mounting holes. For antenna connection, it should be used with the appropriate RF adapter cable
You can also refer to the installation tutorial here:
We also recommend the following installation practices:
Solar panel orientation: In the Northern Hemisphere, the solar panel is generally recommended to face south for better sunlight exposure.
Height determines range: Place the node, especially a solar-powered node, as high as practical or near a window if outdoor mounting is limited.
Keep the antenna vertical: The antenna should point vertically upward to achieve the best polarization alignment.
Maintain a clear Fresnel zone: For a reliable RF link, the radio line of sight should be as clear as possible. At least 60% of the first Fresnel zone should remain free from obstacles.

We also recommend using Seeed’s adapter cable or the cable included with the antenna kit, because cable loss is not negligible in real-world RF deployments.
| Comparison Item | seeed LMR-200 | RG58 |
| Impedance | 50Ω | 50Ω |
| Outer Diameter | Approx. 4.95mm / 0.195” | Approx. 4.95mm / 0.195” |
| Positioning | Low-loss RF coaxial cable | General-purpose coaxial cable |
| High-Frequency Loss | Lower | Higher |
| Shielding | Double shielding, around 90dB shielding effectiveness | Usually standard braided shielding; specifications vary |
| Outdoor Use | Commonly uses PE jacket, suitable for outdoor cable assemblies | Many RG58 cables use PVC jackets, more suitable for indoor or short-distance use |
| Flexibility | Slightly stiffer | Usually softer and easier to route |
All of the antenna kits use LMR-200-class cable to help reduce connection loss as much as possible.
For more antenna options and LoRa-compatible accessories, you can also visit our LoRa antenna product category page.
Check SNR in the Meshtastic App
After installation, you can use the Meshtastic App on your phone to check the node’s SNR(Signal-to-Noise Ratio) and see whether the antenna position is suitable.
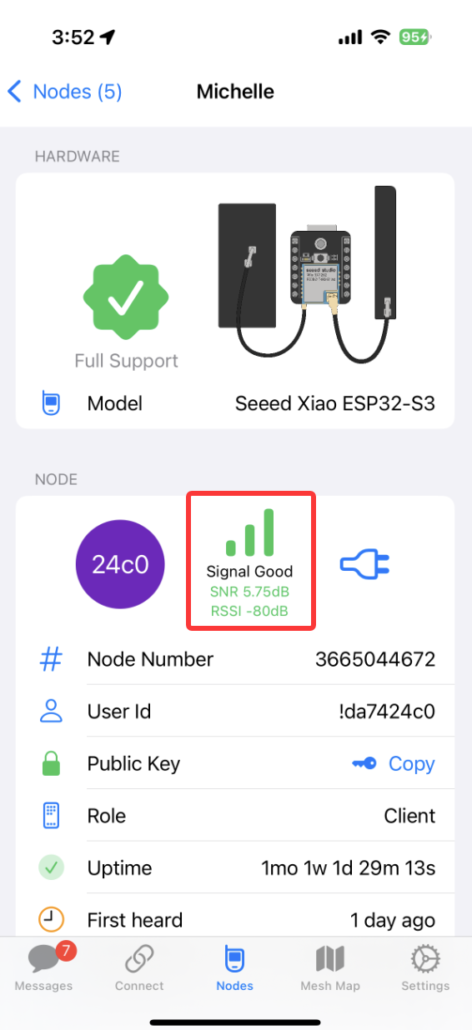
In general, a higher SNR means the signal is clearer relative to background noise, which usually indicates a better link. Instead of relying on one fixed number, compare the SNR before and after each adjustment.
You can try adjusting:
| Adjustment | Purpose |
|---|---|
| Raise the antenna | Reduce obstruction and improve line of sight |
| Keep the antenna vertical | Maintain proper polarization |
| Avoid walls, trees, and metal objects | Reduce blockage and signal reflection |
| Shorten or organize the cable | Reduce cable loss and interference |
After each adjustment, check whether the SNR improves in the app. If the SNR becomes more stable and messages are forwarded more smoothly, the current antenna position is likely a better fit for your fiberglass antenna.
Contact Our Official Team for More Information
Working with an experienced team such as Seeed can shorten the decision cycle and reduce deployment risk. The value goes far beyond product availability. It means getting guidance based on real deployment conditions, from matching antenna characteristics and cable assemblies to choosing mounting hardware and gateway platforms that support your coverage and reliability goals.