Quick Start
Welcome to reTerminal Sticky!
This guide will help you power on, connect, and bind your device, then try AI voice for the first time—all in just a few minutes.
What You Need
Before you begin, make sure you have:
- reTerminal Sticky package × 1
- An available 2.4GHz Wi-Fi network
- An iOS or Android phone with Bluetooth turned on
- The Seeedash App downloaded and installed
If you have not installed the Seeedash App, visit the download page first.
Quick Start Video
Watch the Quick Start video to follow the setup process, or continue reading for complete step-by-step instructions.
Step 1: Unbox and Check
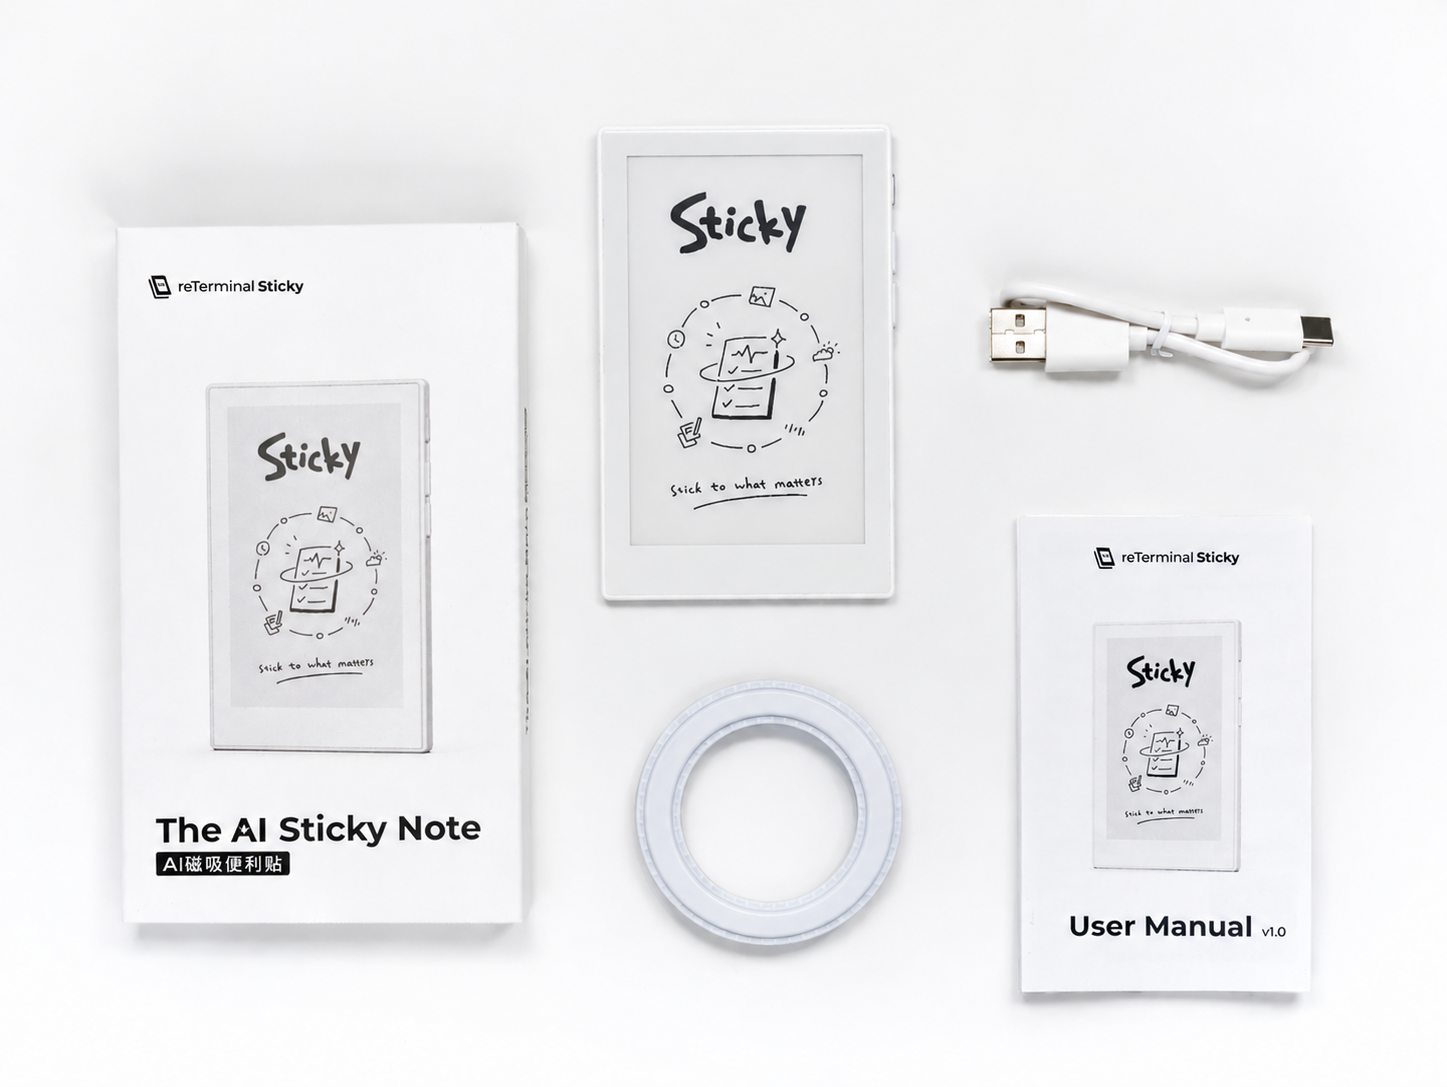
Open the box and make sure all the following items are included:
| Item | Quantity | Description |
|---|---|---|
| reTerminal Sticky | × 1 | Magnetic ePaper display |
| USB-C charging cable | × 1 | Charges the device |
| Adhesive magnetic ring | × 1 | Mounts Sticky on non-metal surfaces |
| Quick Start Guide | × 1 | Printed quick start instructions |
Take a moment to identify the main parts of Sticky.
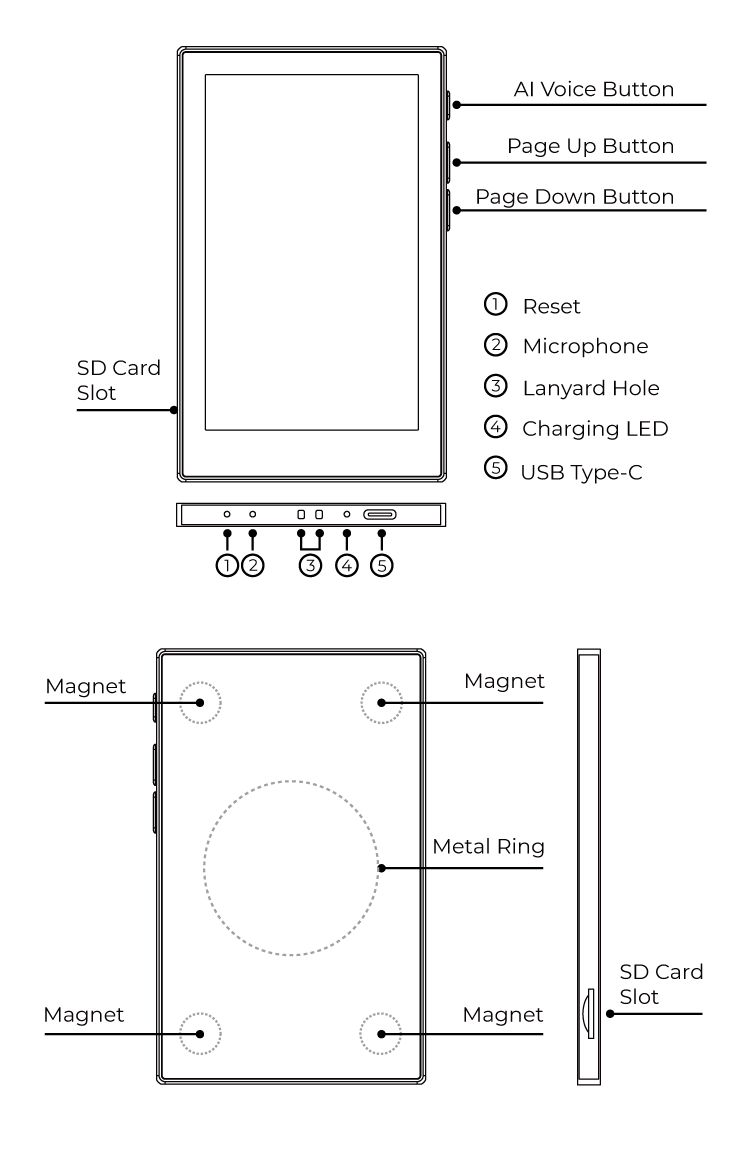
Sticky includes an AI voice button, page buttons, and a touchscreen for interaction. The microSD card slot is on the side, while the USB-C port, charging indicator, and microphone are on the bottom. The built-in magnetic structure on the back lets you attach Sticky to metal surfaces.
Only use the Reset hole if the device is not responding or when instructed by support.
Step 2: Power On and Charge
Sticky usually comes with enough battery power to turn on right away.
Press and hold the AI voice button for about 3 seconds to turn on the device.
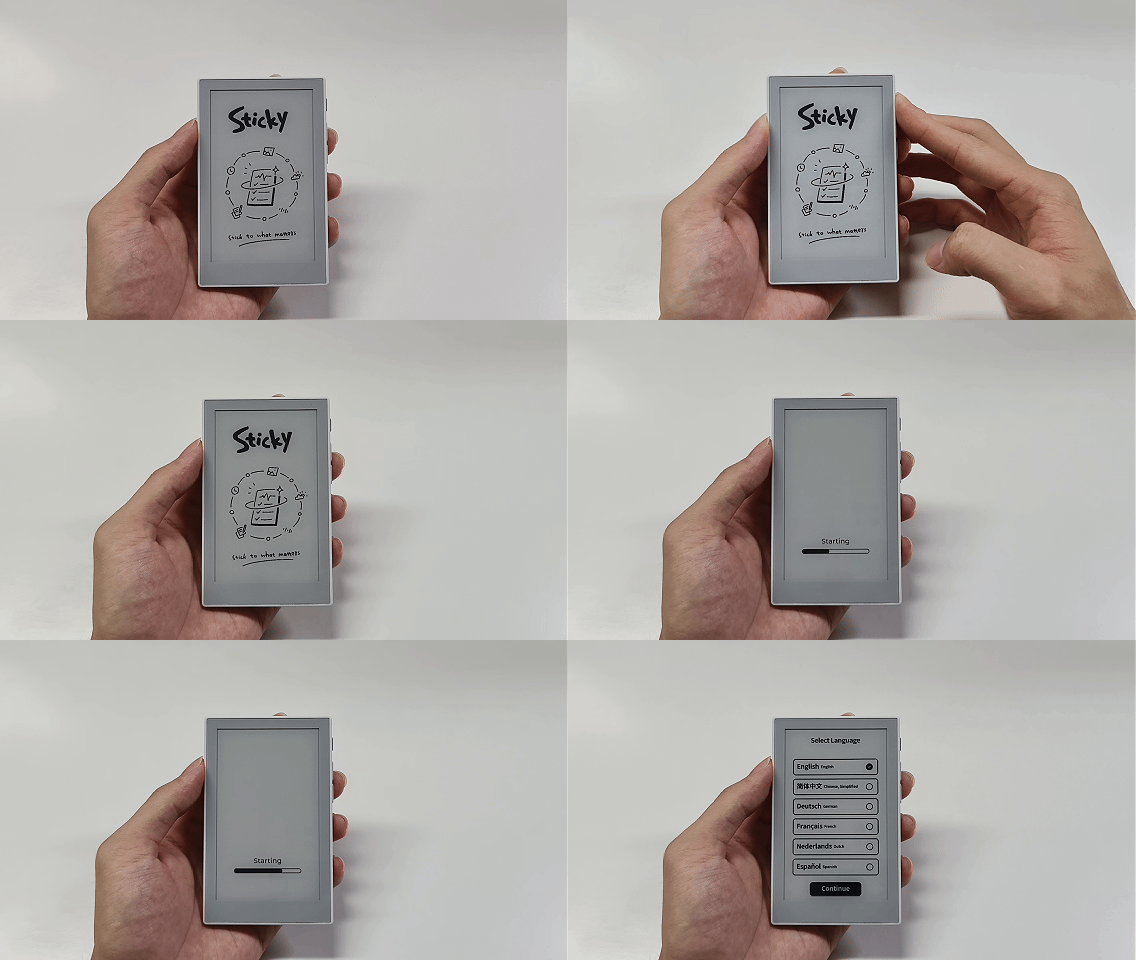
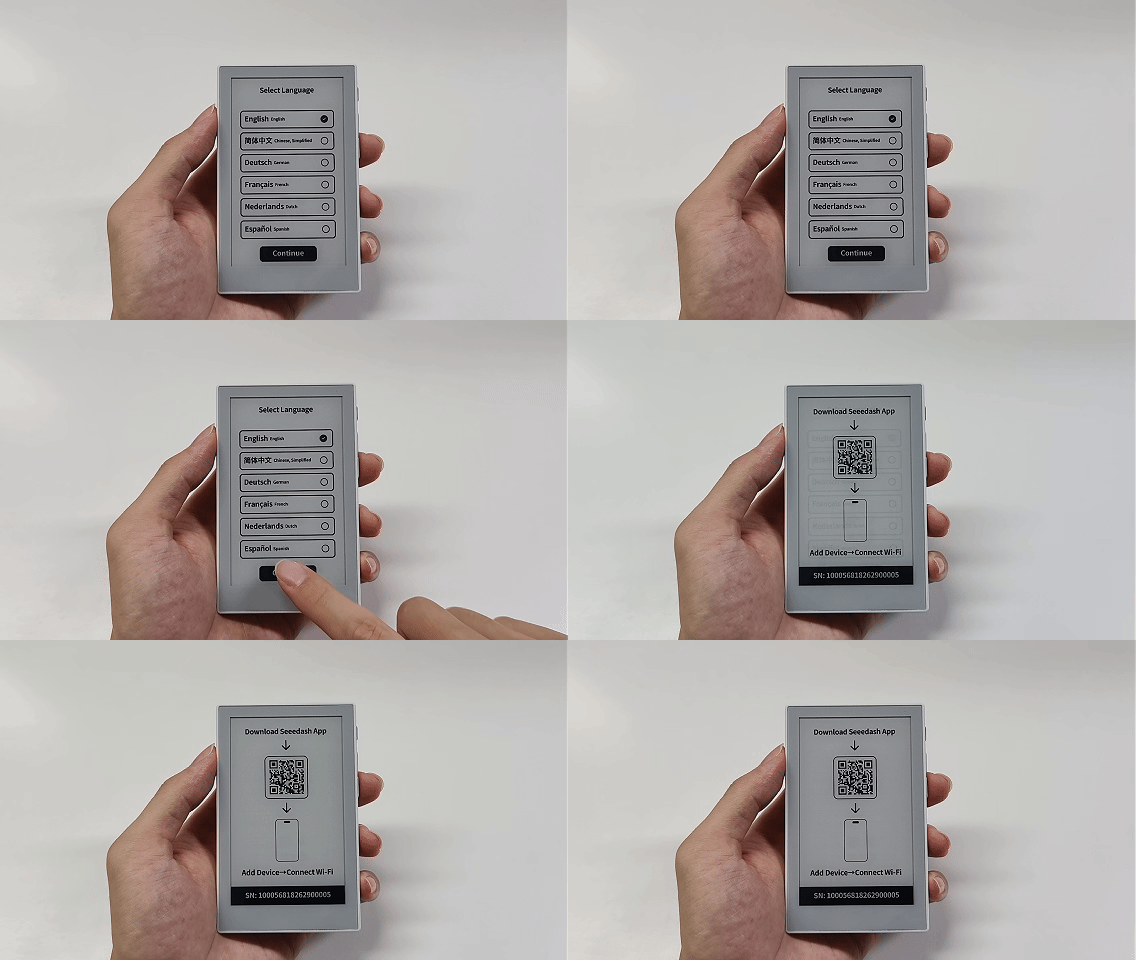
When you turn on Sticky for the first time, choose your language on the device.
Then follow the on-screen pairing guide to add Sticky in the Seeedash App and connect it to Wi-Fi.
If Sticky does not turn on or the battery is low, charge it with the included USB-C cable.
- Connect the USB-C cable to the port on the bottom of the device
- Connect the cable to a USB power adapter
- The indicator is red while charging
- The indicator turns green when fully charged
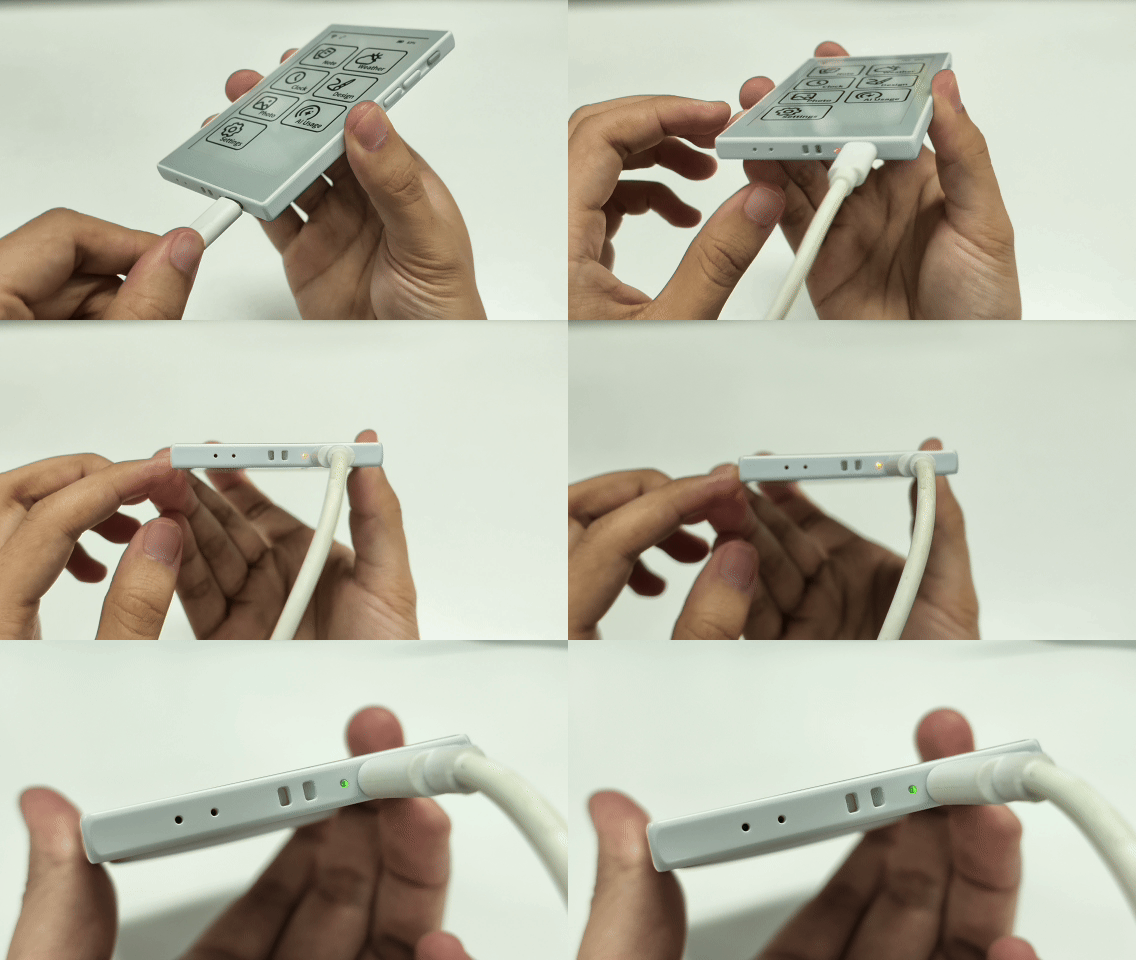
Use a standard 5V USB power adapter.
Step 3: Add the Device and Connect to Wi-Fi
The first time you use Sticky, add it in the Seeedash App to bind the device and configure Wi-Fi.
First, sign in to the Seeedash App. You can use Google, Apple, GitHub, or your email address.
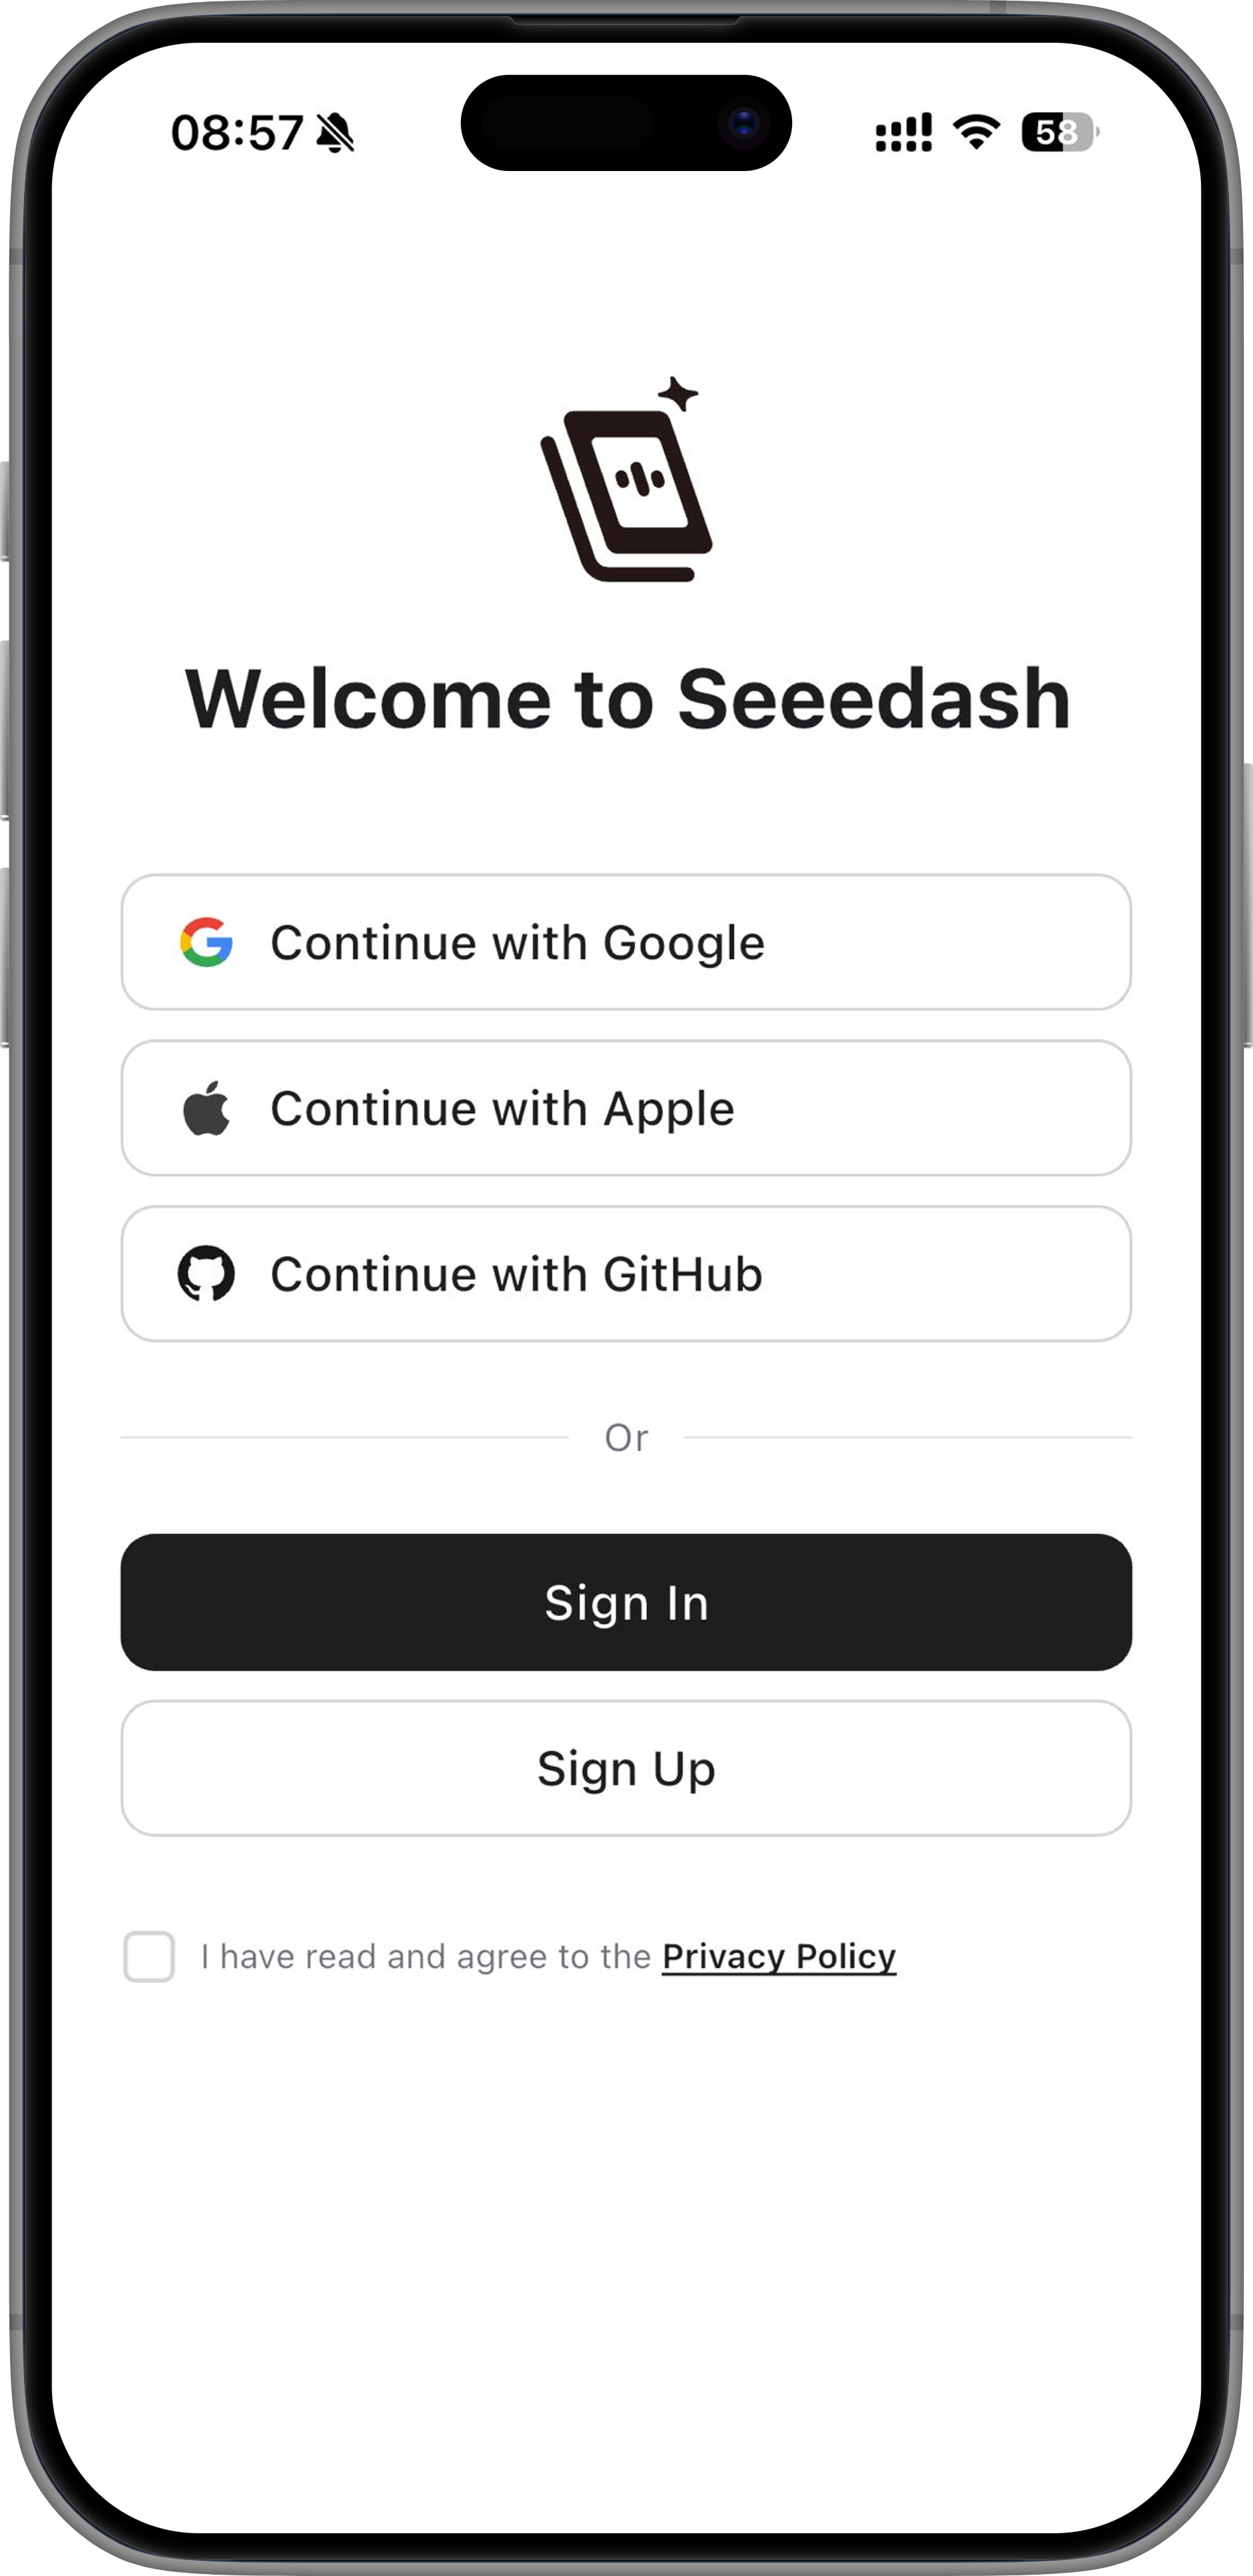
After you sign in, the app automatically opens the main screen.
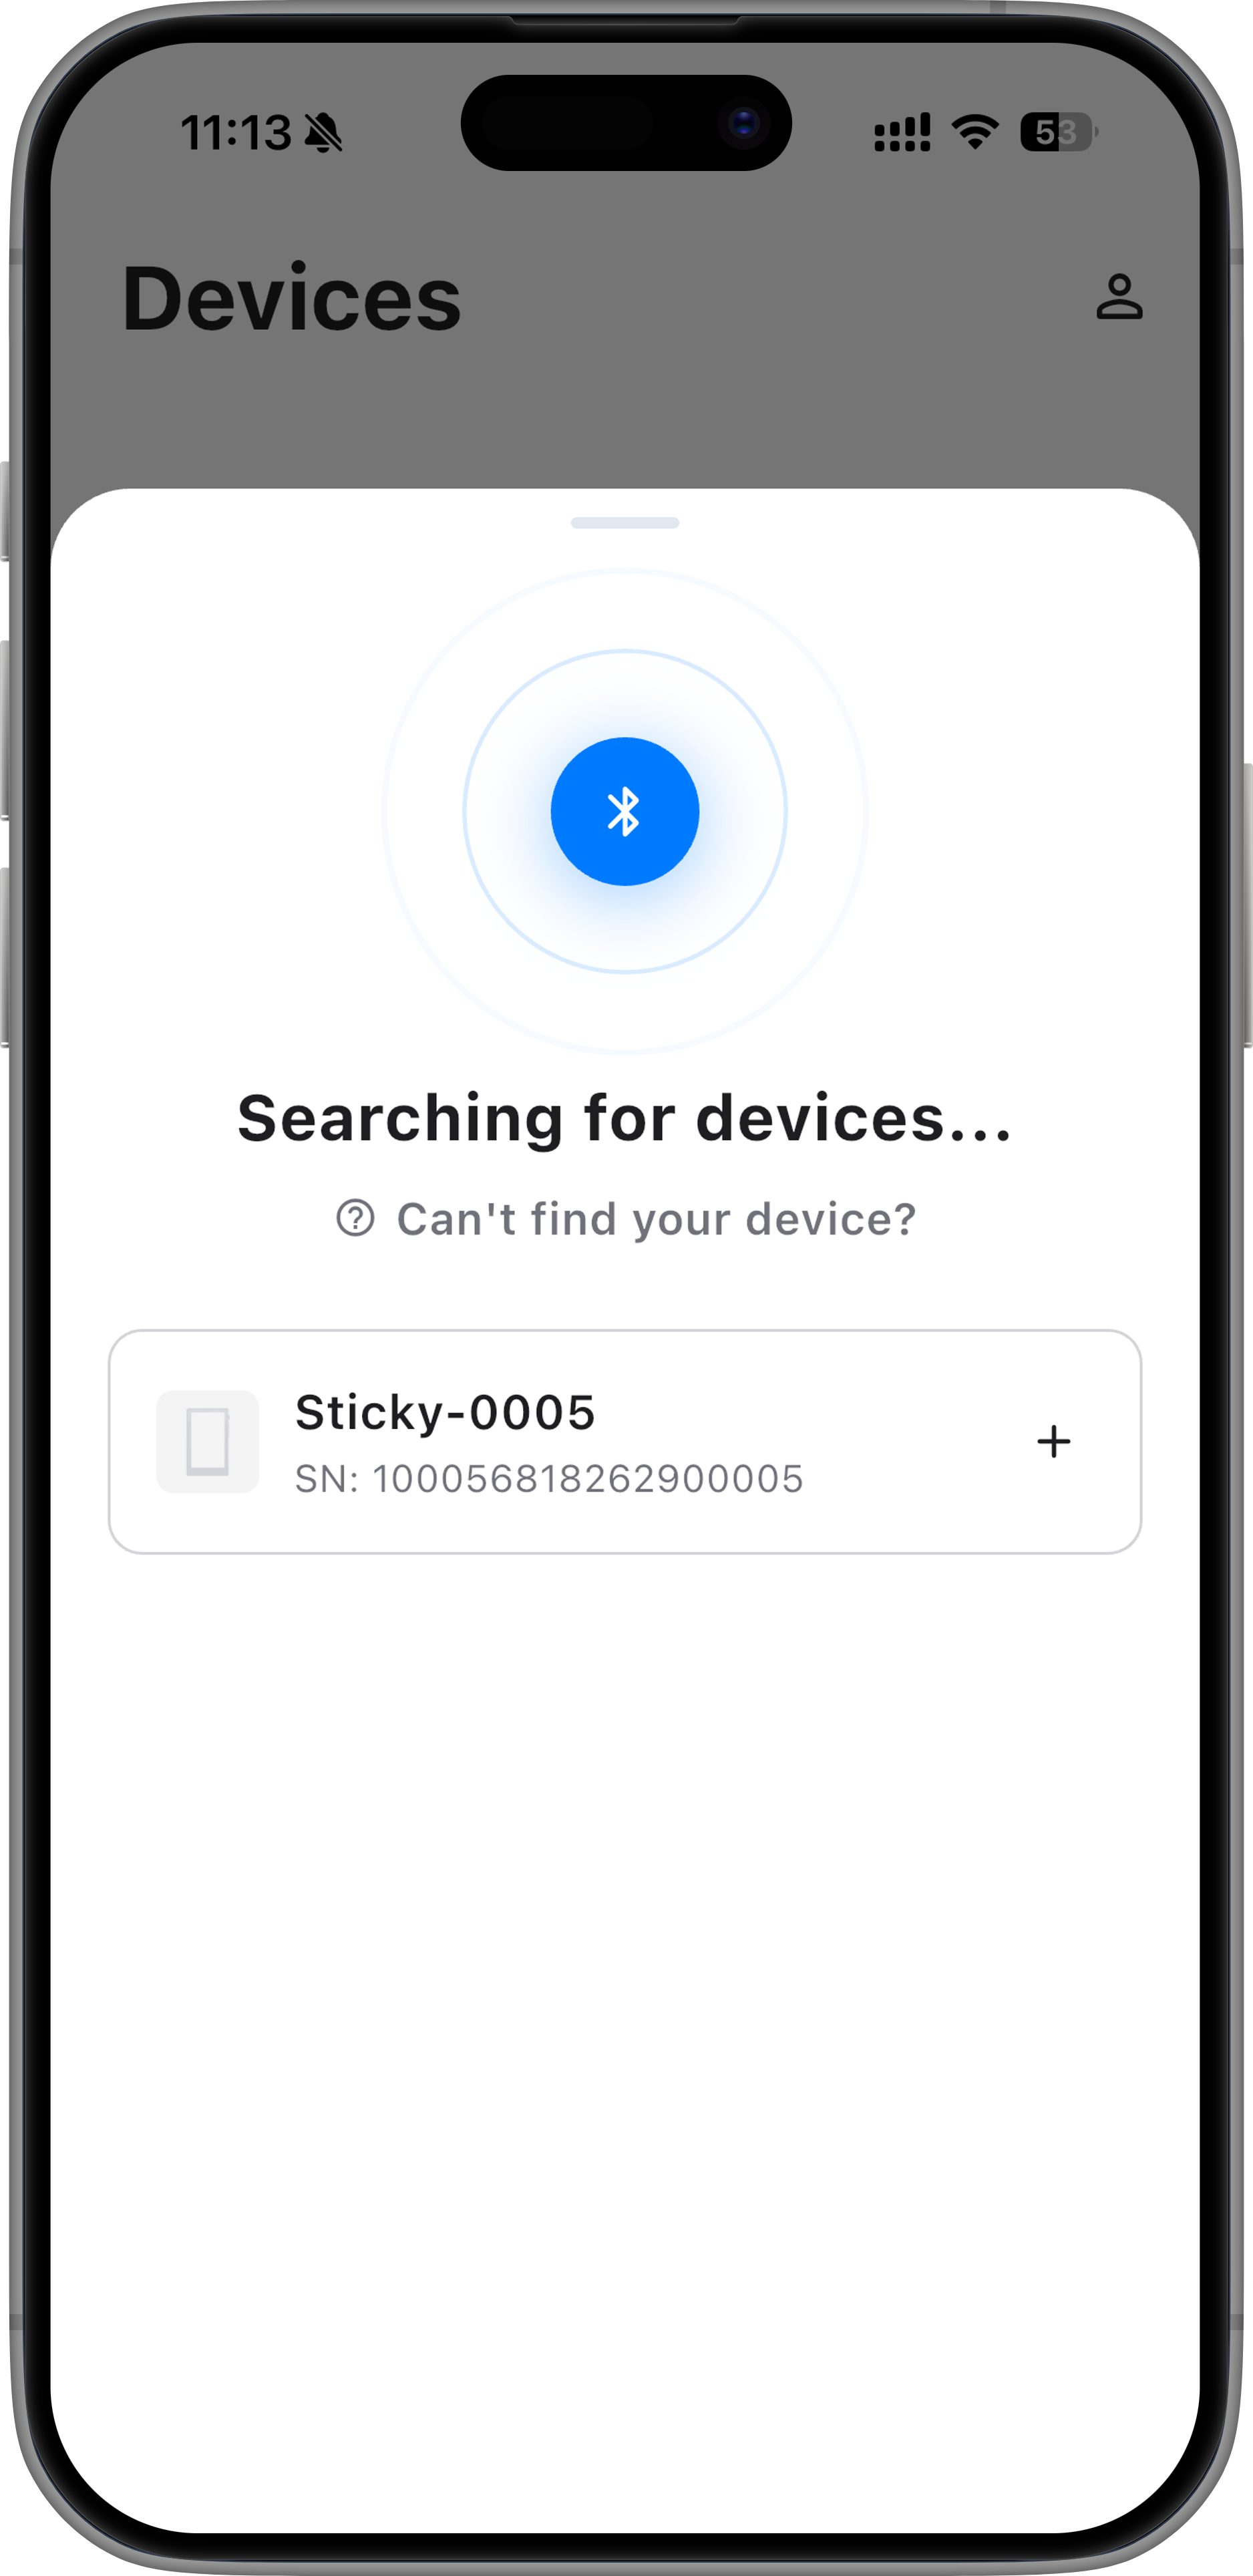
Tap Connect Device. The app searches for nearby Sticky devices over Bluetooth.
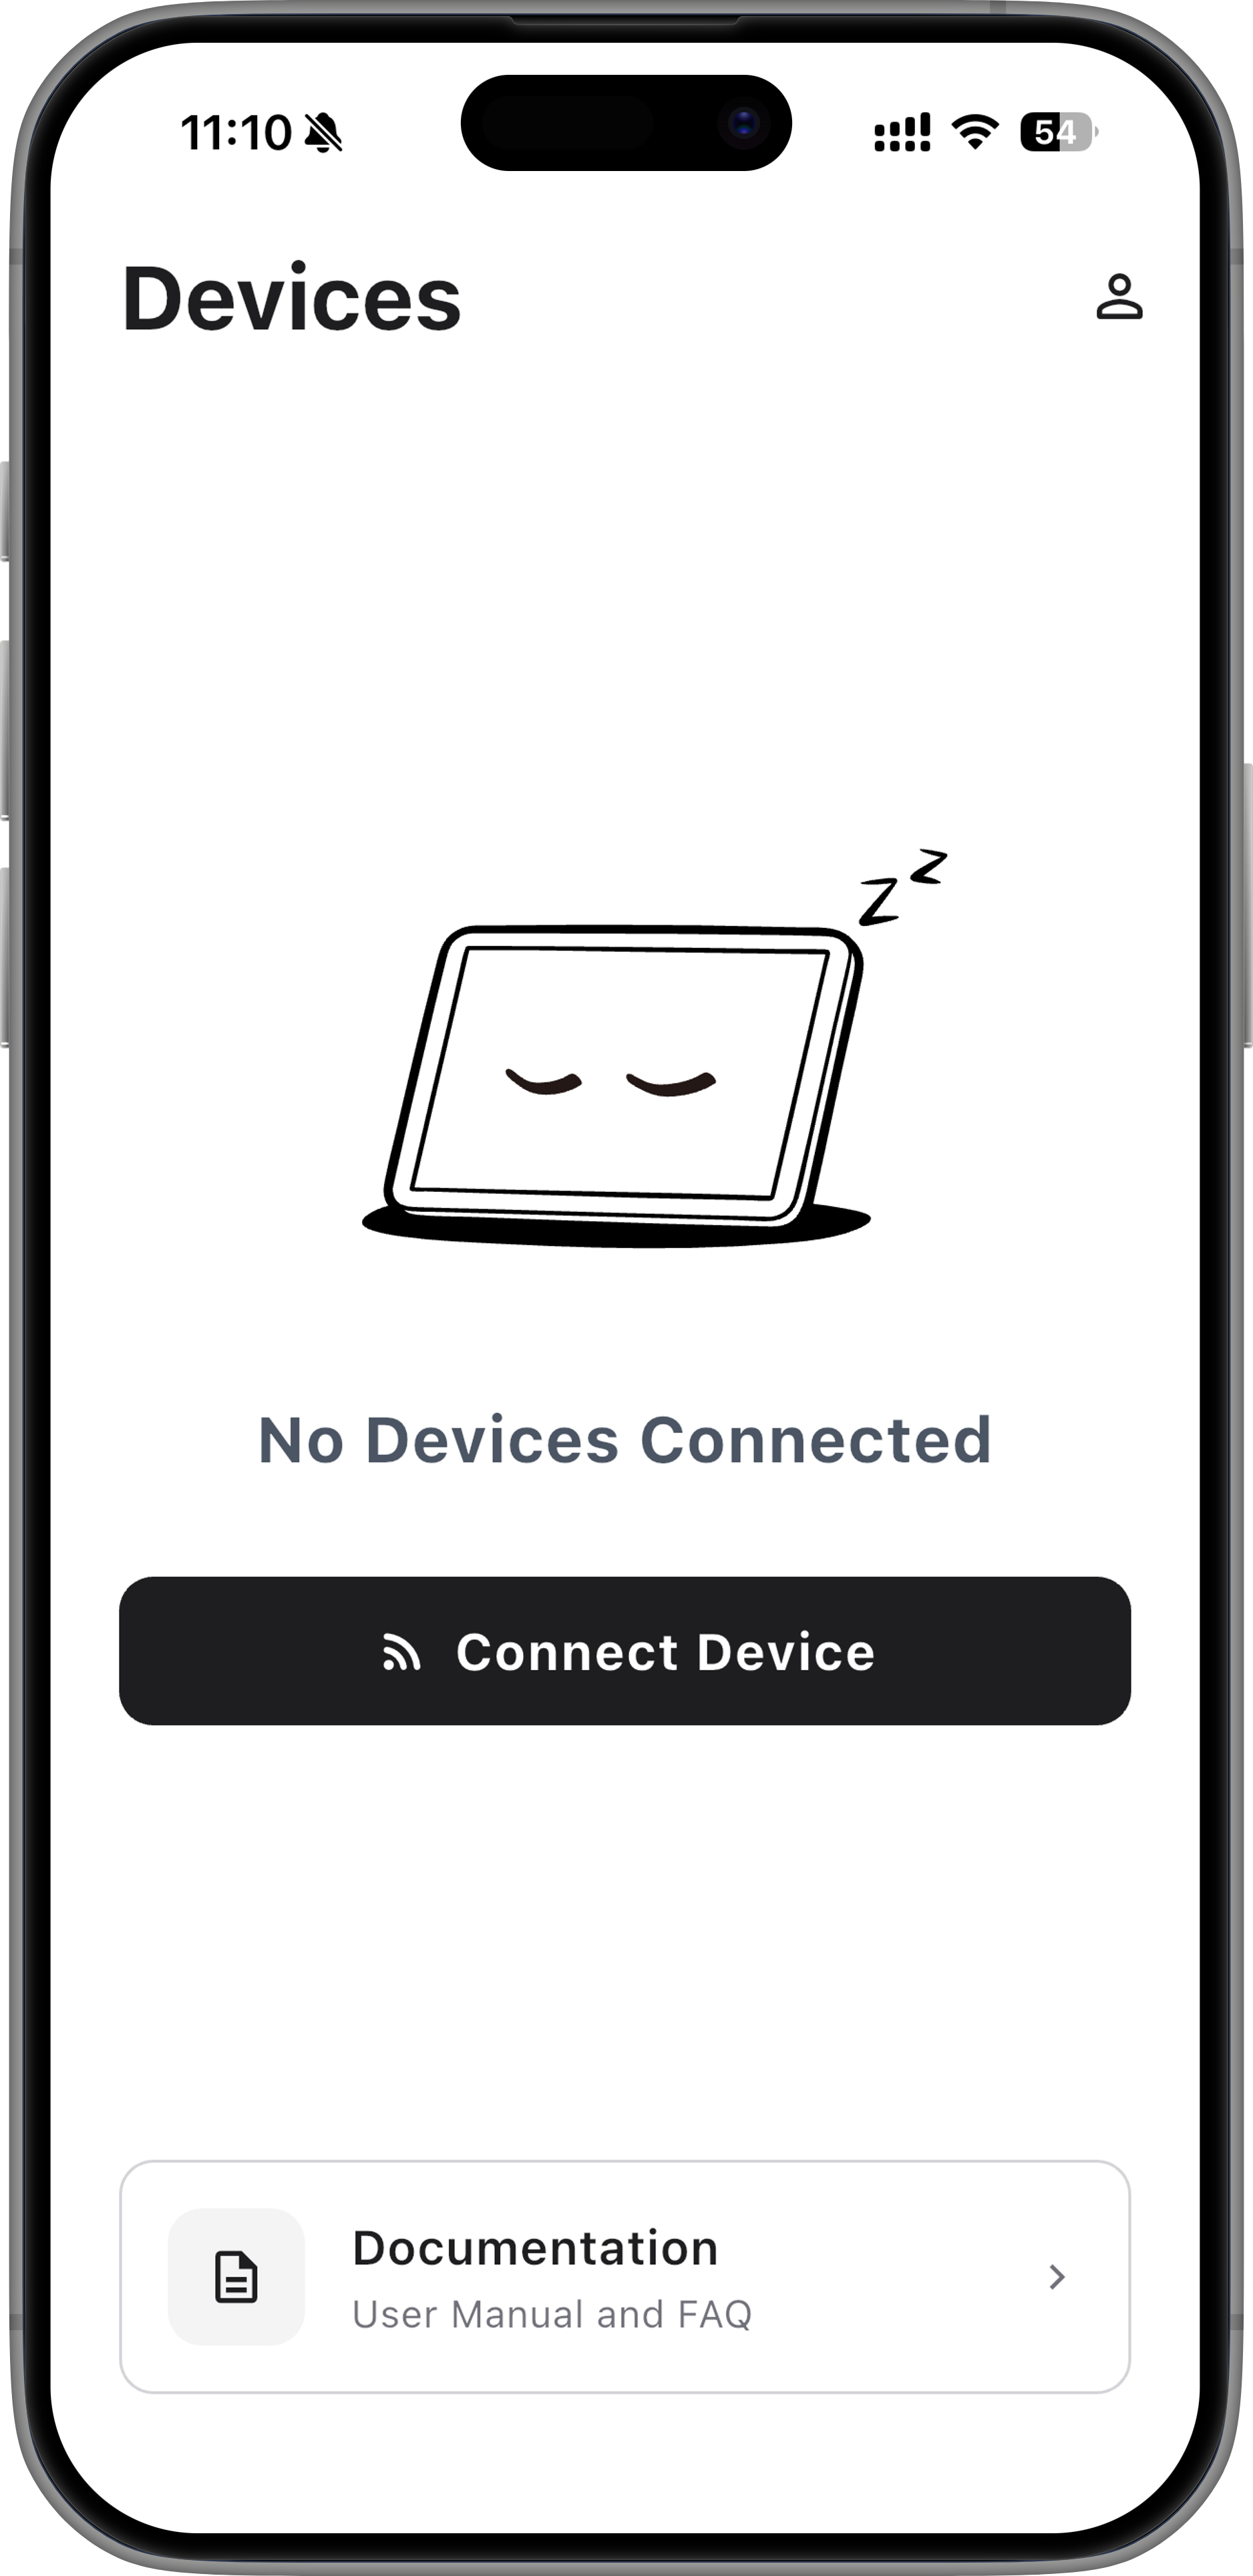
Select your Sticky from the device list. If there are multiple devices nearby, check the SN shown on the Sticky screen and select the matching device.
After Bluetooth pairing is complete, select a 2.4GHz Wi-Fi network, enter the password, and tap Connect.
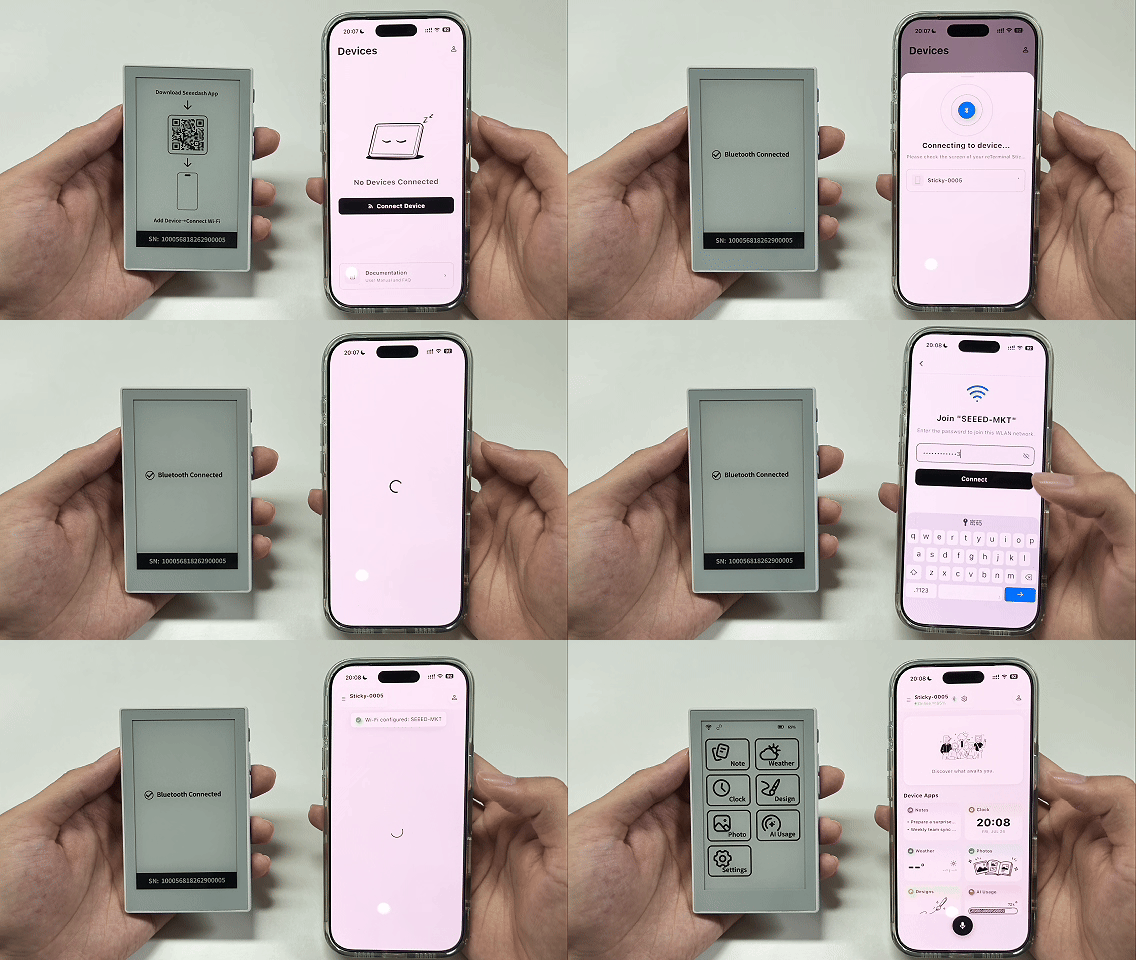
When setup is complete, Sticky opens the Home screen and the device appears in the Seeedash App.
Sticky can then stay online and run independently without keeping your phone connected.
Keep your phone close to Sticky while connecting.
Step 4 (Optional): Update the System
After Sticky connects to Wi-Fi, the Software Update screen appears if a new version is available.
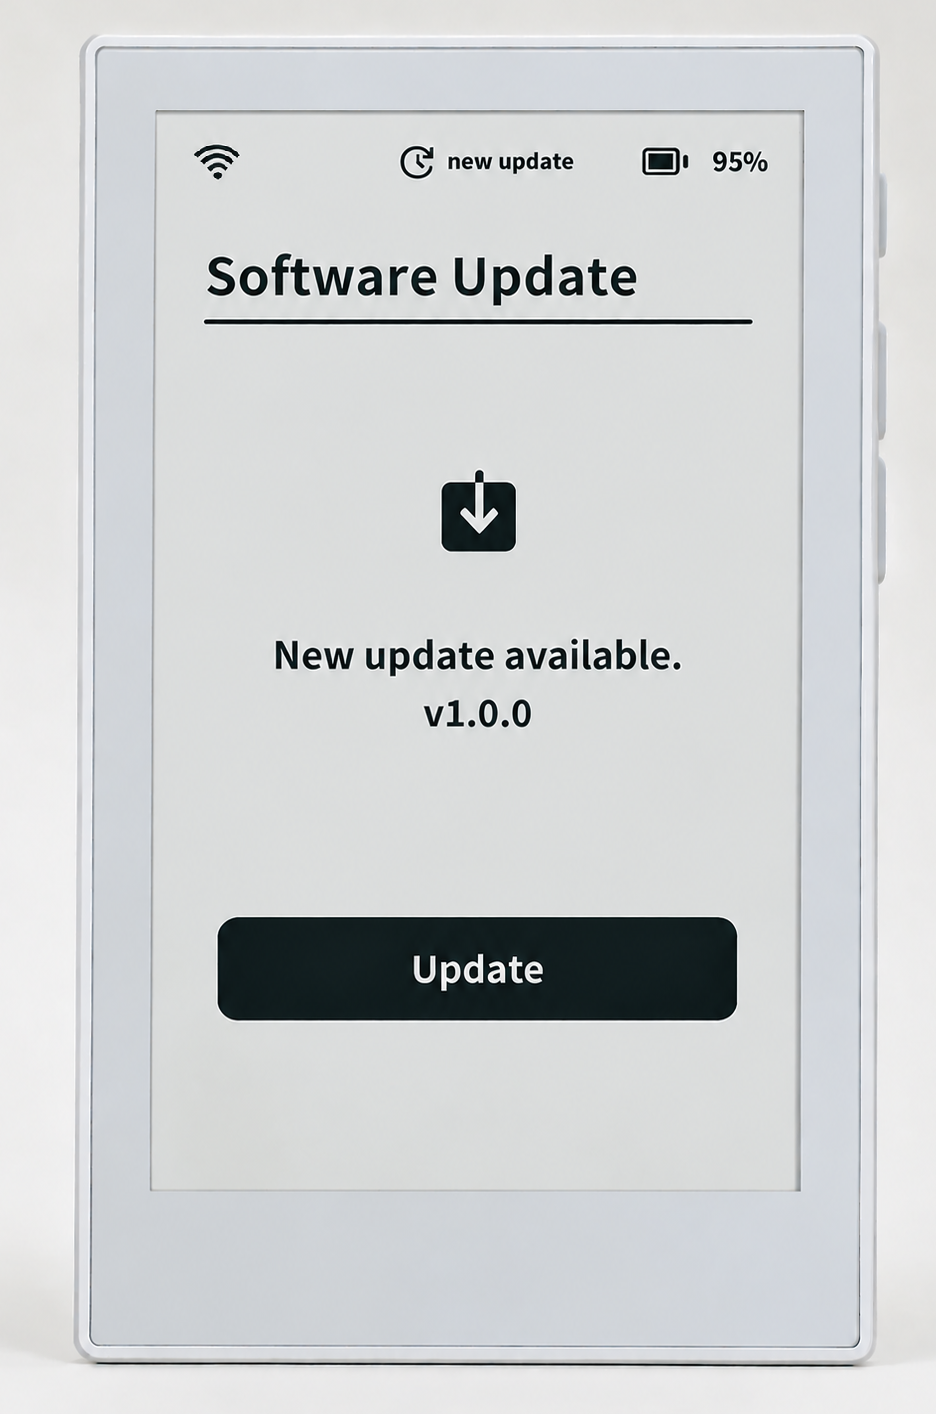
Tap Update and wait for the update to finish.
If you do not update right away, go to Settings > Software Update later and tap Check for updates.
Keep Sticky connected to Wi-Fi and make sure it has enough battery power during the update.
Step 5: Try AI Voice for the First Time
Once Sticky is online, you are ready to try AI voice.
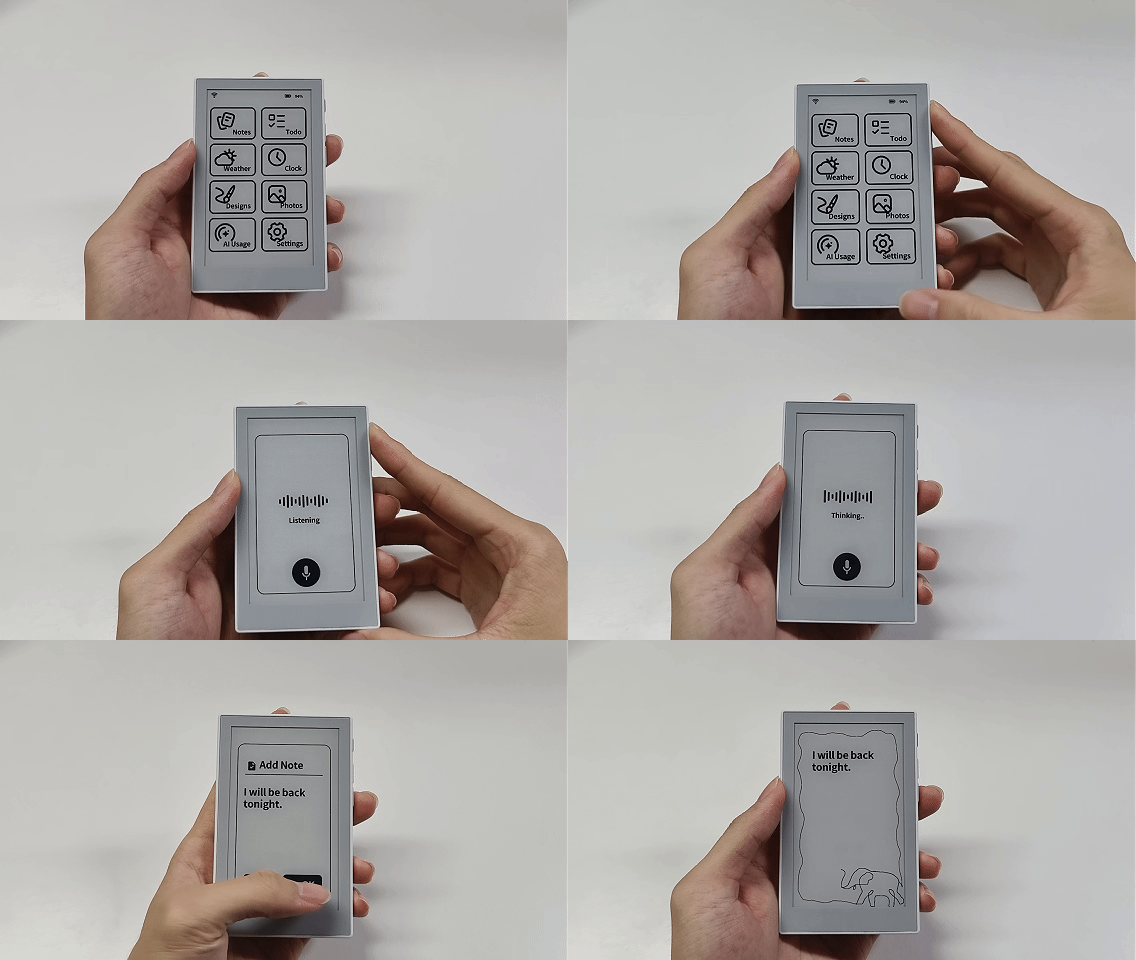
Say what you want to record, and Sticky will create a note and show it on the screen.
Follow these steps:
- Press and hold the AI voice button for about 1 second
- After you hear the prompt, say:
“I will be back tonight.”
- Release the AI voice button
- Wait for Sticky to recognize your voice
Once recognition is complete, Sticky automatically creates the note and displays it on the screen.
Quick Start Complete
You have now completed the initial setup:
- Power on and choose a system language
- Bind the device
- Connect to Wi-Fi
- Check for and install system updates
- Complete your first AI voice input
Sticky is now ready to use, keeping the information you care about clear and visible on the screen.
Explore More with Sticky
After completing Quick Start, you can use Sticky to display Notes, Todo, Weather, Clock, Photos, Designs, AI Usage, and more.
The following sections introduce Sticky’s basic controls and system settings, as well as how to manage the device with the Seeedash App.
Common Touch Controls
Sticky supports touch controls for quickly navigating content.
| Action | Result |
|---|---|
| Tap the screen | Open an app, select content, or confirm an action |
| Swipe left or right in the middle of the screen | Switch pages |
| Swipe inward from the edge of the screen | Go back |
| Swipe up from the bottom of the screen | Return to the Home screen |
Common Button Controls
Use the physical buttons on the side of Sticky to power the device on or off, return to the Home screen, wake the device, start AI voice input, or switch pages.
| Action | Result |
|---|---|
| Press and hold the AI voice button for 3 seconds | Power on |
| Press and hold both page buttons for 1 second | Power off |
| Press the AI voice button once | Return to the Home screen when online |
| Press and hold the AI voice button for 1 second | Start AI voice input |
| Press any button once | Wake the device from sleep |
| Press the previous or next page button once | Switch pages |
Sleep and Wake
After 2 minutes without interaction, Sticky automatically enters sleep mode. On screens with a status bar, a moon icon appears in the upper-left corner.
Press any physical button to wake the device.
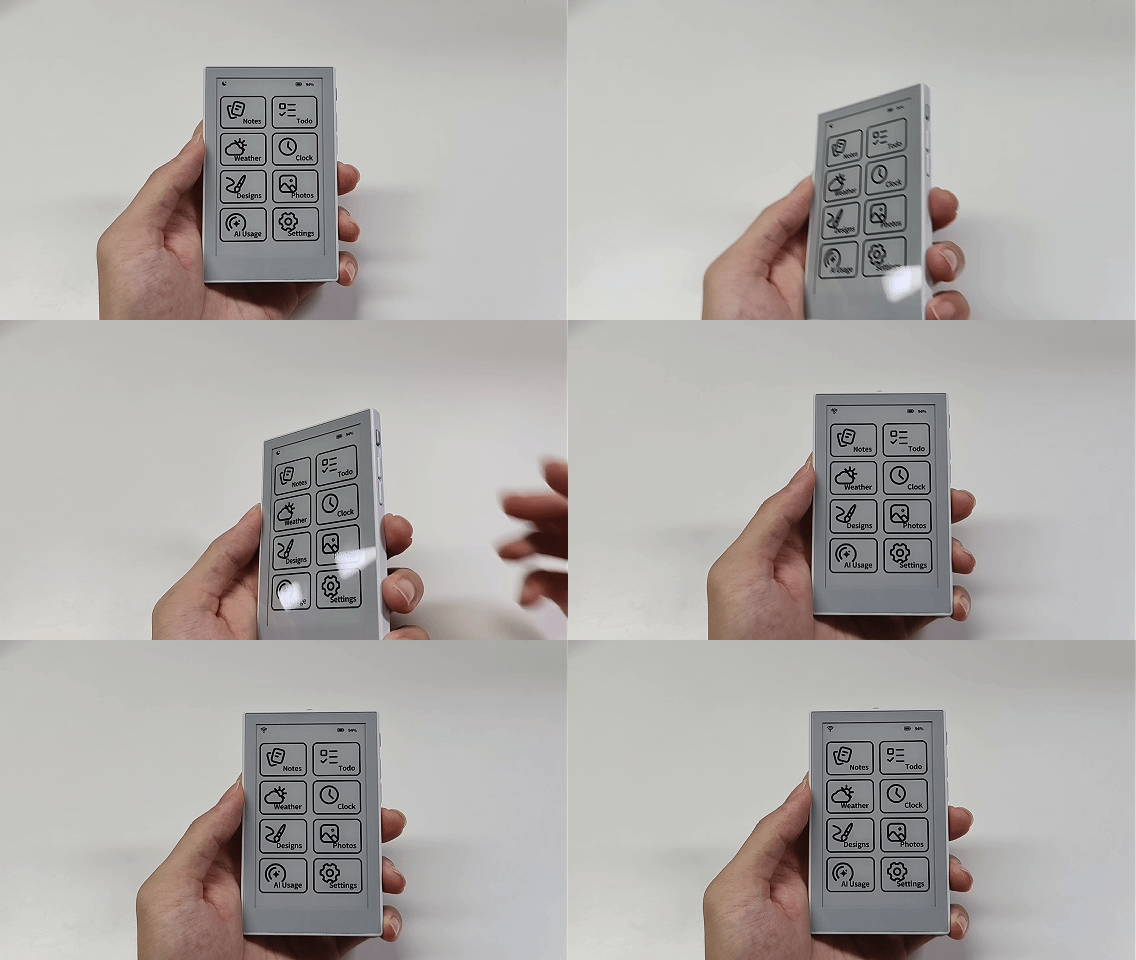
The moon icon does not appear in apps such as Notes and Weather. This is normal.
Apps and Themes
The Home screen shows built-in apps such as Notes, Todo, Weather, and Clock. Tap an icon to open the app.
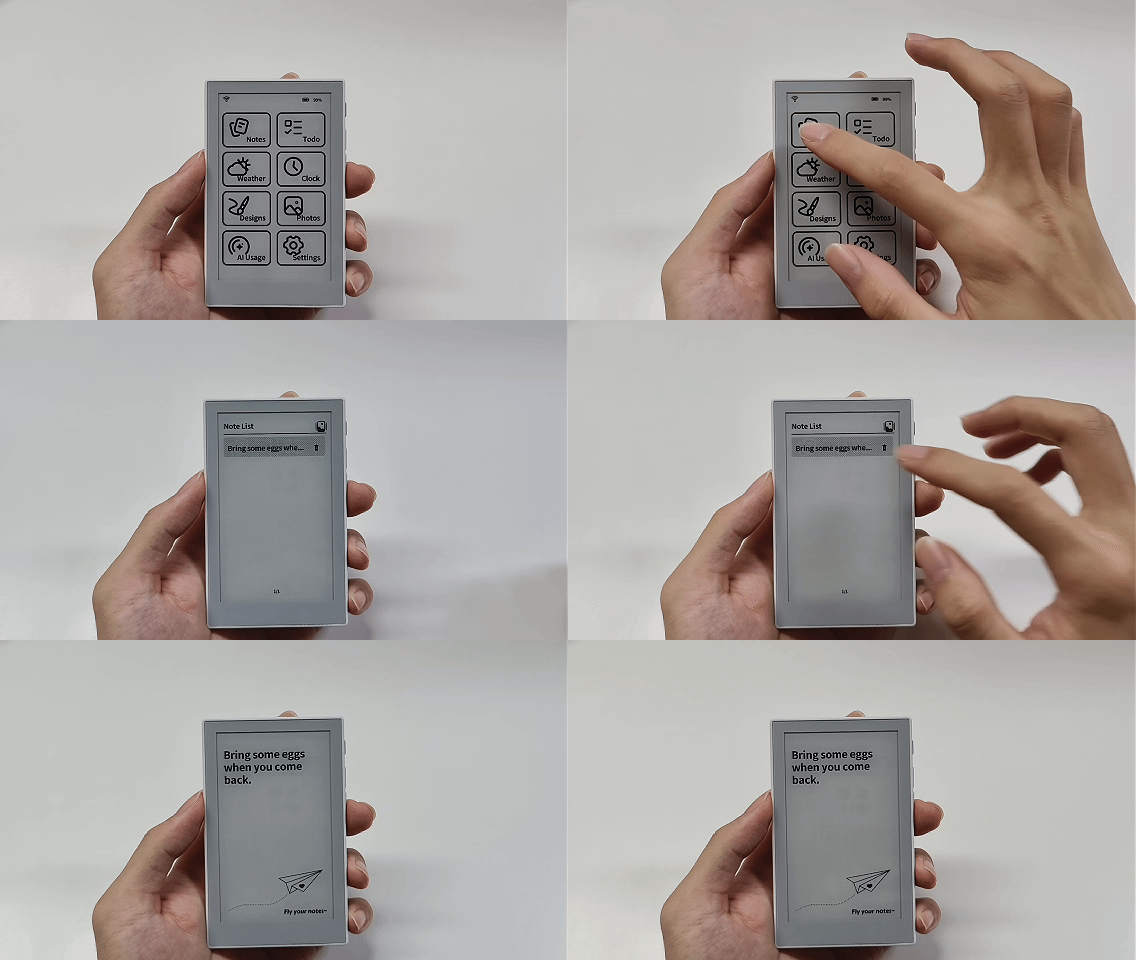
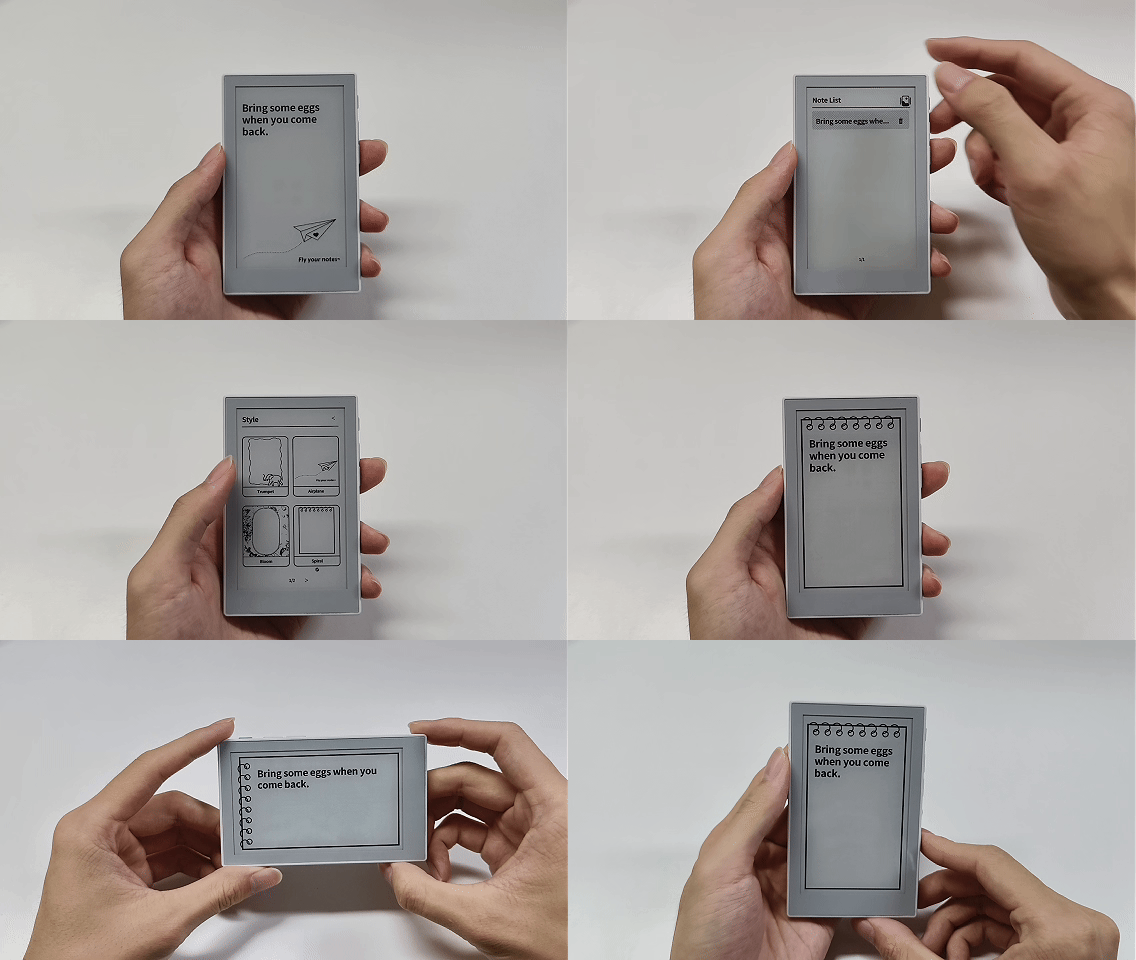
Open Notes and choose a theme you like.
Auto-rotate is on by default. If you rotate Sticky, the content rotates with the device. Clock and Weather also support themes and auto-rotate.
In Photos, you can also set a favorite image as the power-off wallpaper. Open the app, then press and hold an image in the list to set it as the power-off wallpaper.
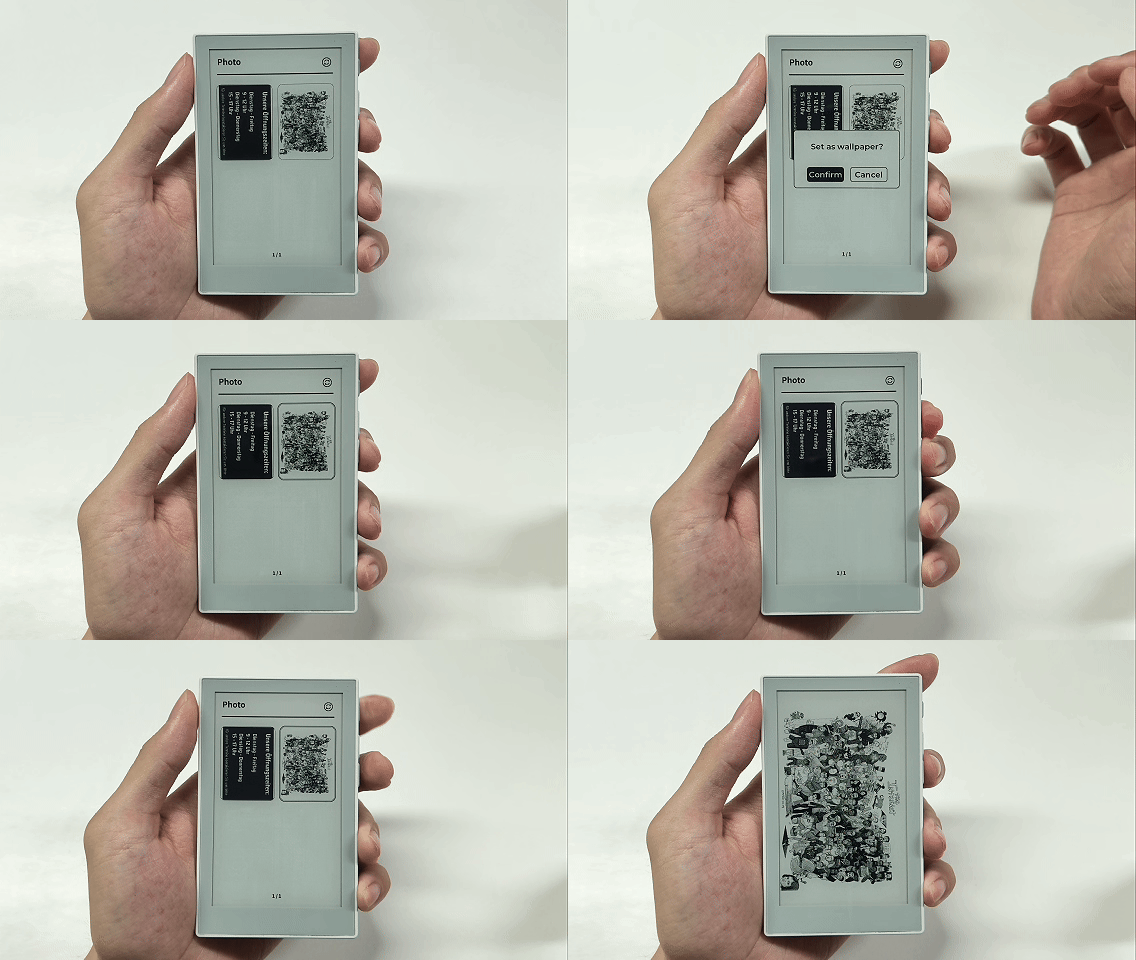
When Sticky is powered off, the screen displays the wallpaper you selected. To restore the default wallpaper, simply delete the image through the Seeedash App.
System Settings
Use Settings to adjust Sticky’s everyday options.
| Setting | What it does |
|---|---|
| Auto-rotate | Turn automatic screen rotation on or off |
| Sound | Turn device sounds on or off |
| Language & Font | Change the system language or user font; currently supports Chinese, English, German, French, Dutch, and Spanish |
| Software Update | Check for and install system updates |
| Reset Device | Clear local device data and return to pairing mode |
| Configuration | View the city, time zone, and refresh interval; set the temperature unit |
| About | View the device name, SN, MAC address, software version, certification information, and SD card information |
Change the city, time zone, or refresh interval in the Seeedash App’s device settings. To unbind Sticky, select Delete Device on the same page. Reset Device on Sticky only clears local data.
Change the User Font
You can add your own fonts to Sticky with a microSD card.
Before you begin, prepare:
- A microSD card and card reader
- A font file in
.ttfor.otfformat - A computer
For better compatibility, we recommend formatting the microSD card as FAT32 or exFAT and using the MBR (Master Boot Record) partition scheme.
1. Export the Font Files
Open the Font Tool and upload the font you want to use.
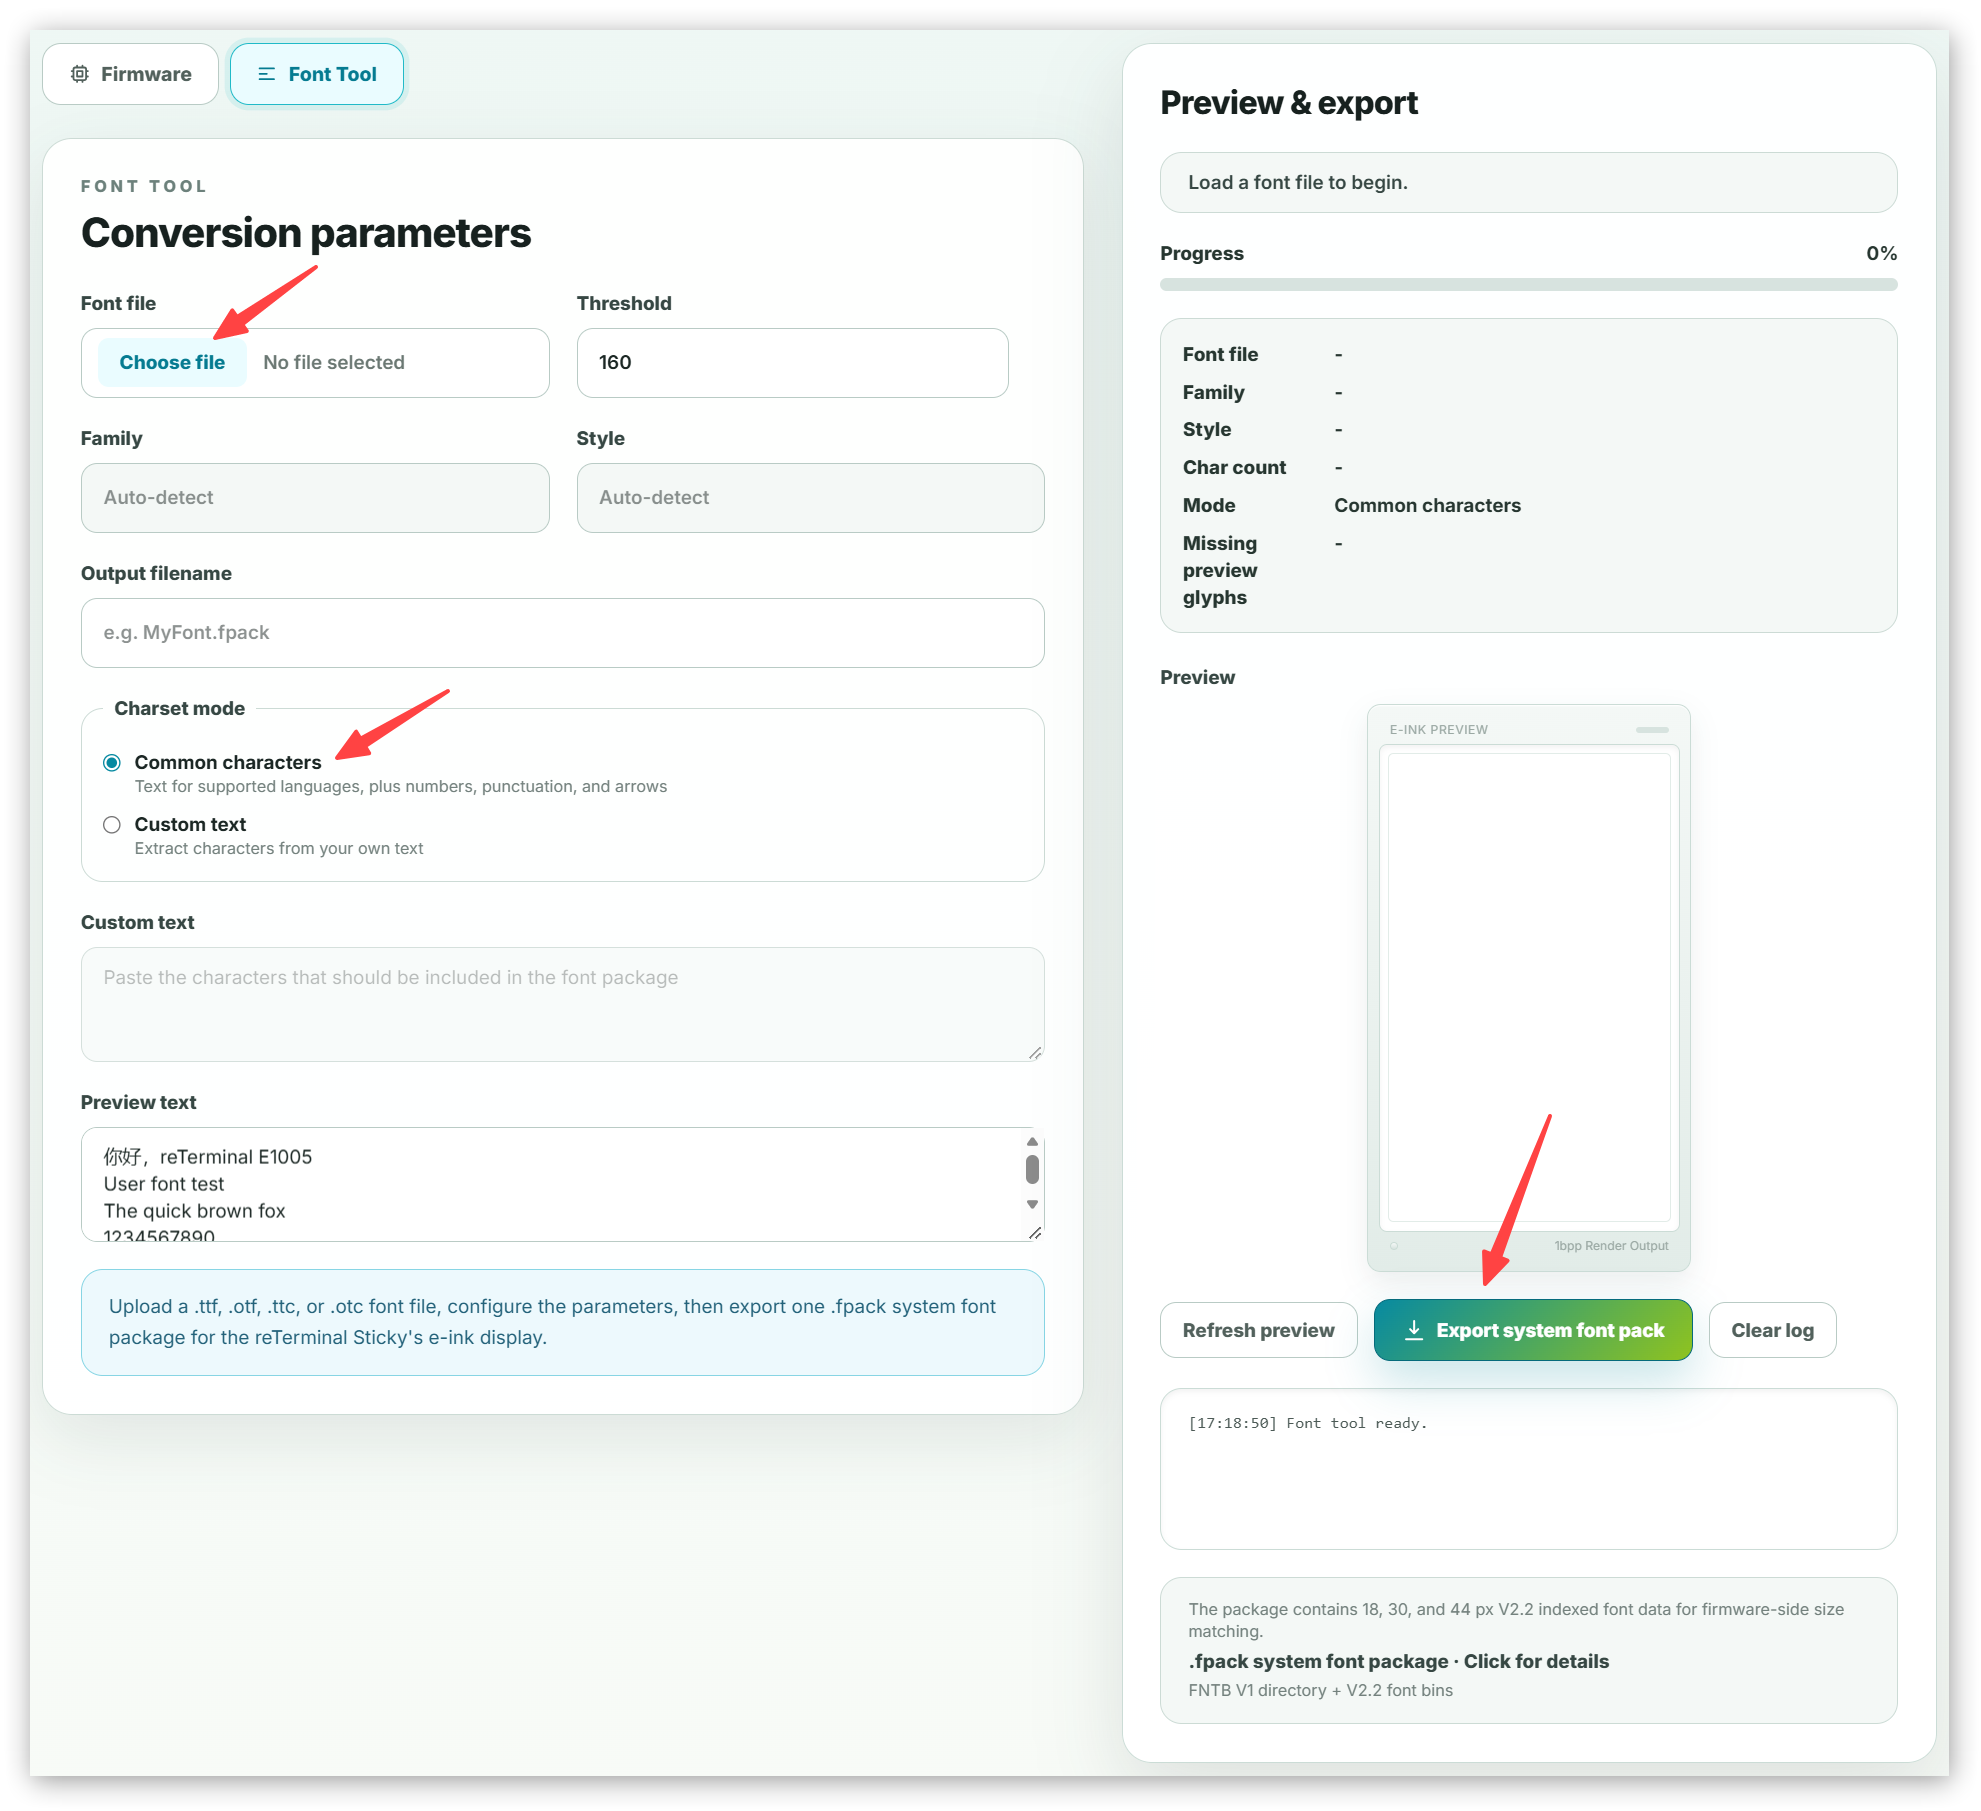
Set Charset Mode to Common characters, then click Export system font pack.
When the download is complete, you will have one .fpack file.
2. Organize the Font Files
Create a folder named fonts in the root directory of the microSD card, then place the .fpack file inside it.
The folder structure should look like this:
fonts/
└── MyFont.fpack
3. Insert the microSD Card
Insert the microSD card into the slot on the side of Sticky.
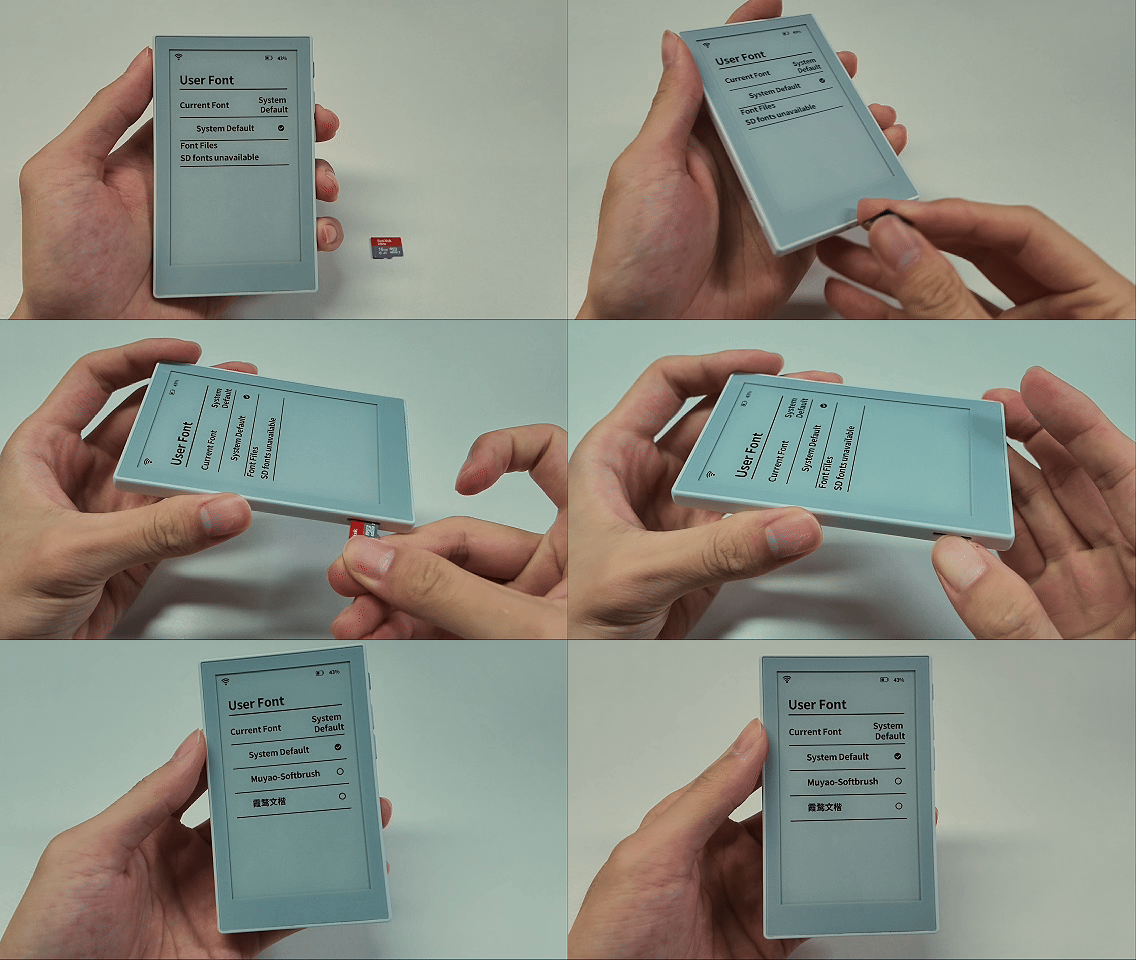
Sticky supports inserting and reading a microSD card while powered on. You do not need to turn it off first.
4. Select the Font
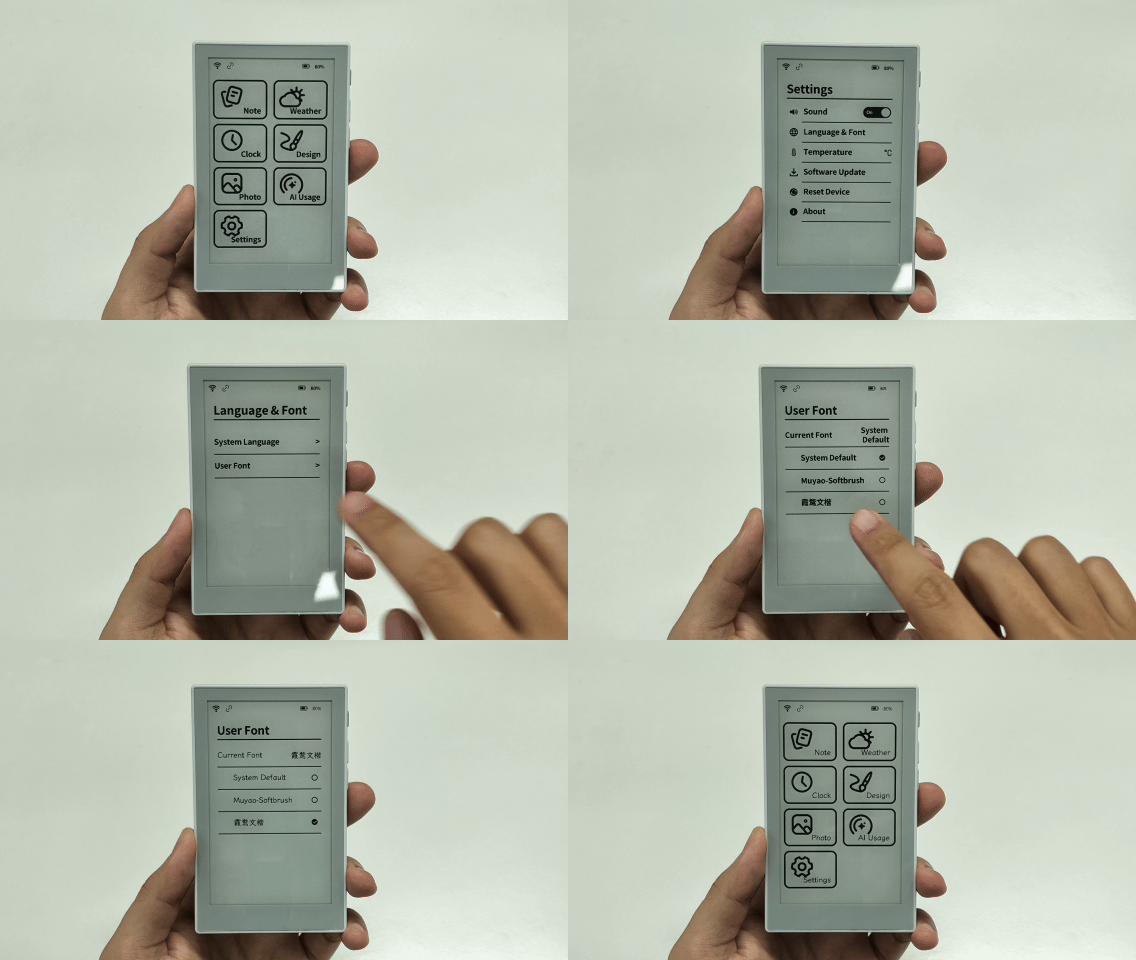
On Sticky, open Settings > Language & Font > User Font.
Select the font you just added to apply it.
Manage Sticky with the Seeedash App
The Seeedash App is the mobile management hub for Sticky. After binding the device, you can use the app to create notes, send app content, check device status, reconfigure Wi-Fi, or add another device.
AI Voice
Press and hold the AI voice button in the Seeedash App, then say what you want to add as a note or a Todo with a reminder time.
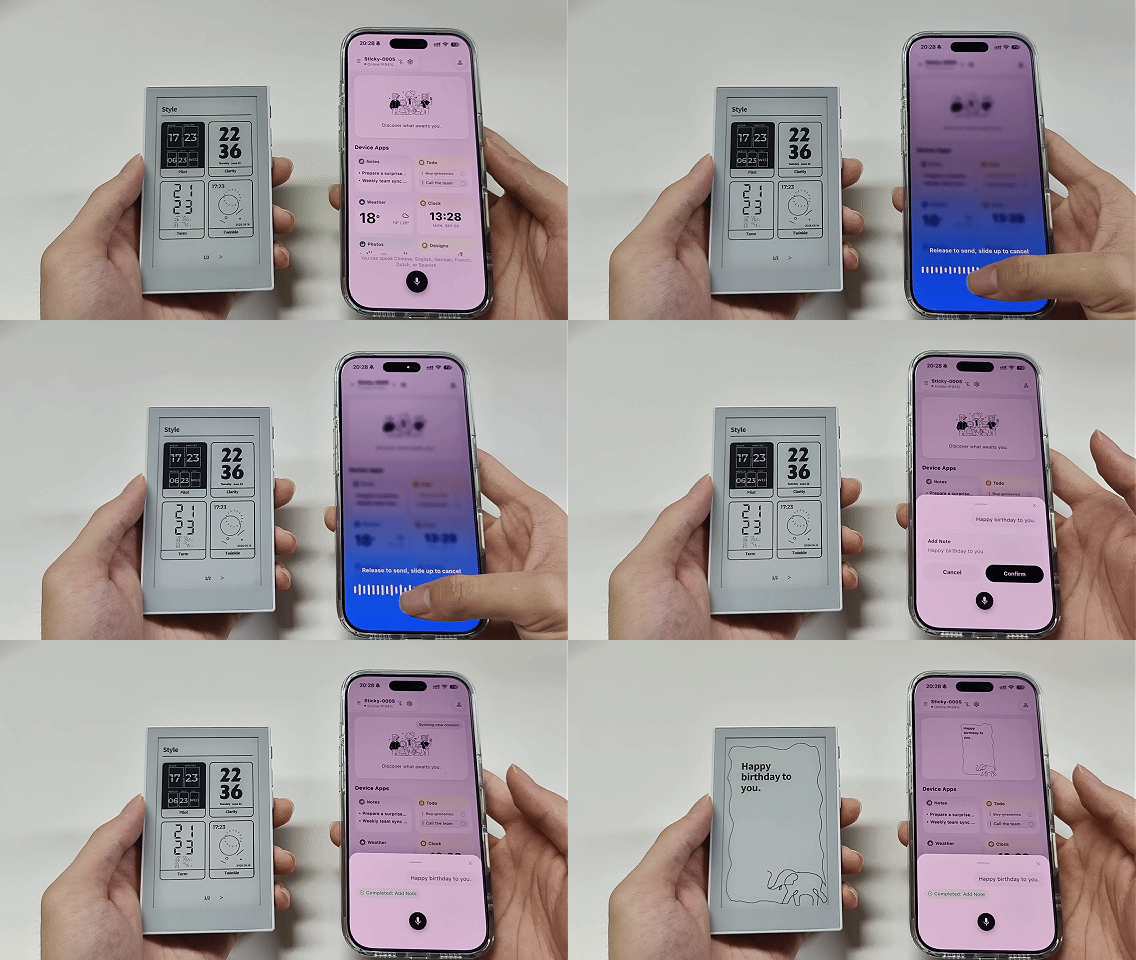
Release the button, confirm the note or Todo as prompted, and send it to Sticky.
Built-in Apps
Use the Seeedash App to view AI Usage, add Todo items, set up Clock and Weather, and send Photos or Designs to Sticky.
1. AI Usage
AI Usage shows your Codex usage on Sticky.
Before you begin, prepare:
- A computer
- Python installed on the computer and signed in to your official Codex account
- A phone with the Seeedash App installed
To use AI Usage, make sure the Wi-Fi network connected to Sticky can access Codex.
Configure AI Usage:
- Create a file named
provision.pyon your computer, copy the following code into it, and save the file.
#!/usr/bin/env python3
"""Print Codex credential #define lines from ~/.codex/auth.json.

Reads ~/.codex/auth.json and emits the ACCOUNT_ID, ACCESS_TOKEN, REFRESH_TOKEN,
and LAST_REFRESH macro lines to paste into src/secrets.h. Credential values are
printed to your terminal only -- nothing is written to disk or sent anywhere.
"""

import json
import os
import sys

def load(path):
    try:
        with open(os.path.expanduser(path), "r") as f:
            return json.load(f)
    except FileNotFoundError:
        print("# WARNING: %s not found -- log in with the CLI first" % path,
              file=sys.stderr)
        return {}
    except (ValueError, OSError) as e:
        print("# WARNING: could not read %s: %s" % (path, e),
              file=sys.stderr)
        return {}

def main():
    codex_doc = load("~/.codex/auth.json")
    codex = codex_doc.get("tokens", {})

    print('#define UM_CODEX_ACCOUNT_ID     "%s"' % codex.get("account_id", ""))
    print('#define UM_CODEX_ACCESS_TOKEN   "%s"' % codex.get("access_token", ""))
    print('#define UM_CODEX_REFRESH_TOKEN  "%s"' % codex.get("refresh_token", ""))
    print('#define UM_CODEX_LAST_REFRESH   "%s"'
          % codex_doc.get("last_refresh", "0"))

if __name__ == "__main__":
    main()
- Open a terminal in the folder containing
provision.py, then run:
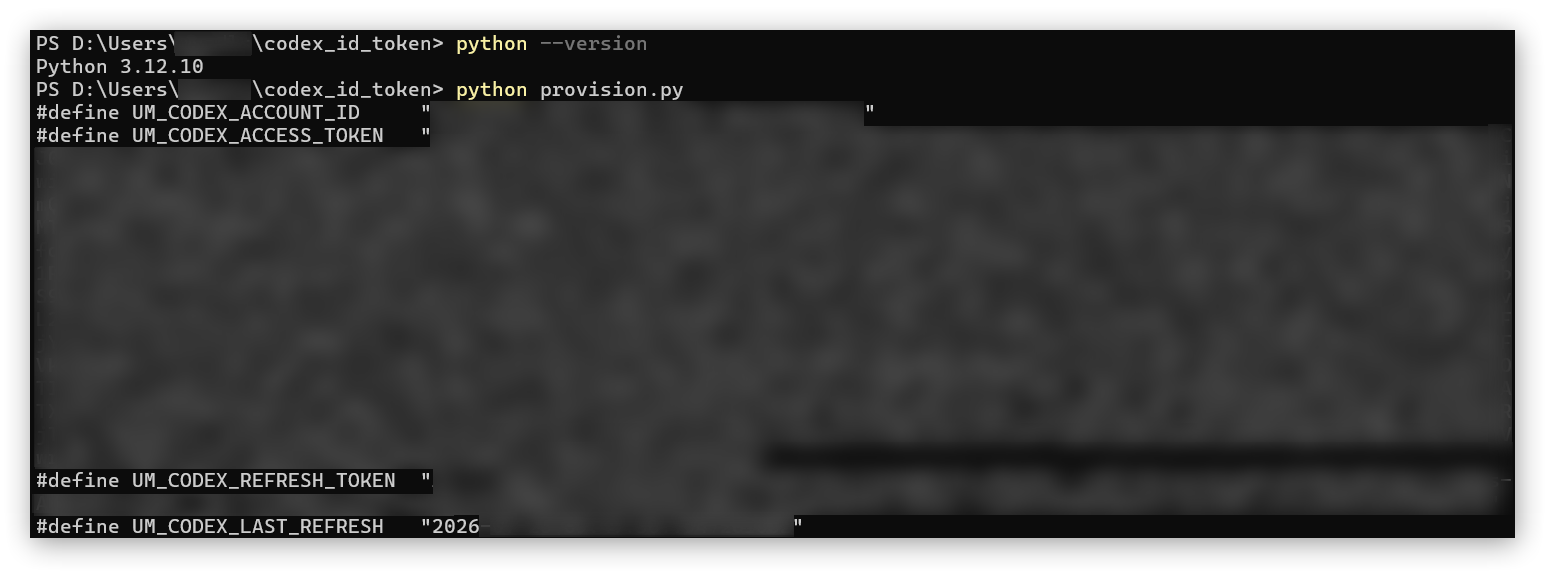
python provision.py
- Record the Account ID, Access Token, and Refresh Token shown in the terminal.
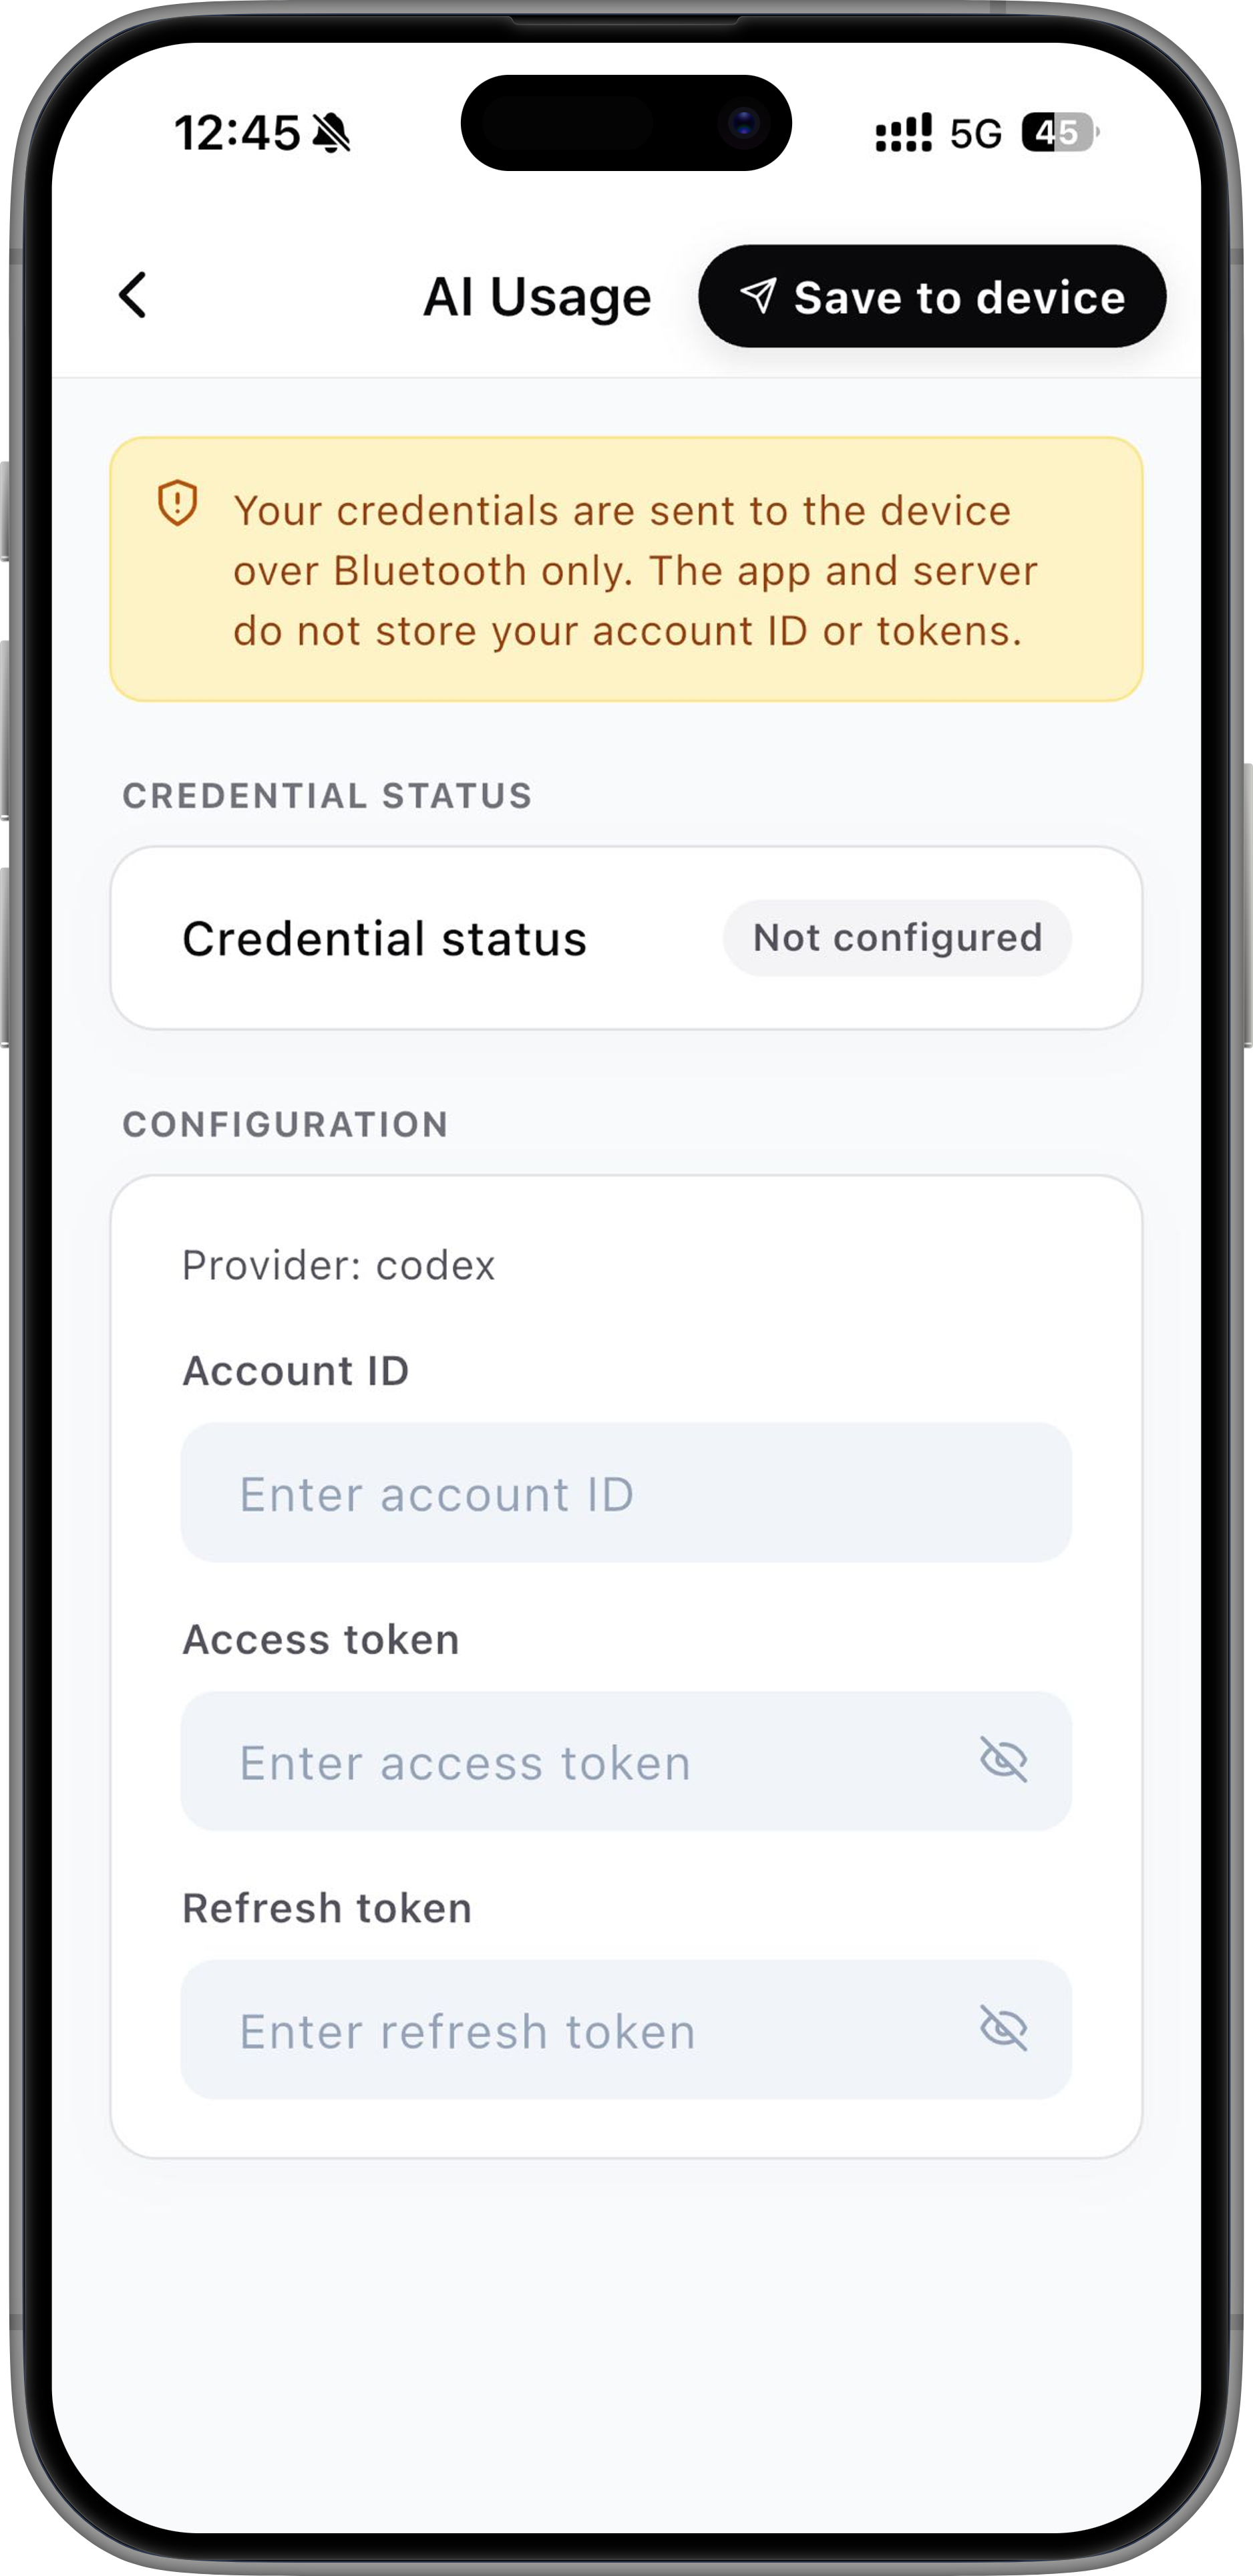
- Turn on Sticky, keep your phone nearby, and open AI Usage in the Seeedash App.
- Wait for the app to connect to Sticky over Bluetooth. Enter the Account ID and tokens, save the settings, and send them to the device.
- Open AI Usage on Sticky and wait for your Codex usage to sync.
Your Access Token, Refresh Token, and Account ID are private account credentials. Do not take screenshots, share them, or send them to anyone.
2. Todo
You can use AI voice on Sticky or in the Seeedash App to add a Todo and set a reminder.
- Press and hold the AI voice button on Sticky.
- Say the task and when you want to be reminded:
“Remind me to buy milk at 6:15 p.m. today.”
- When the Todo page appears, tap OK to add it.
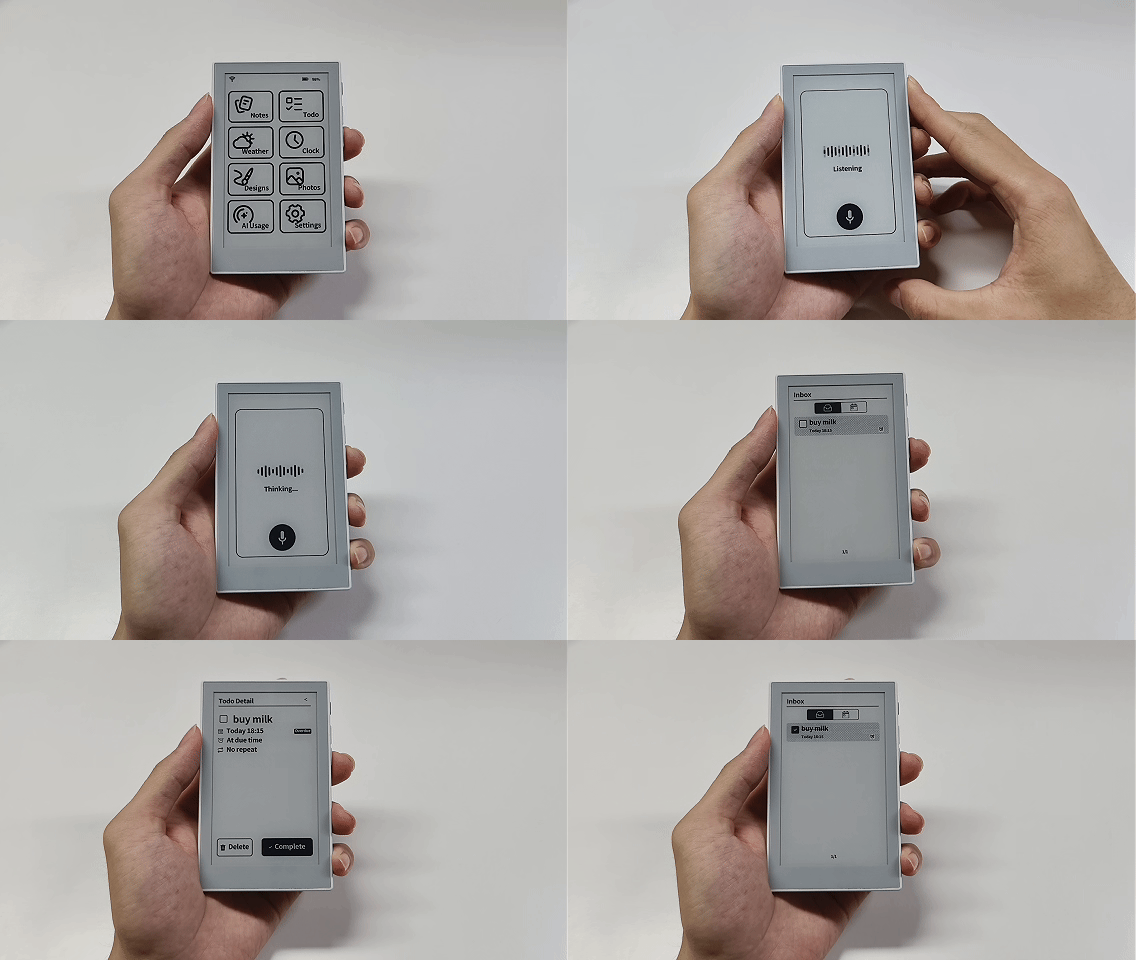
- At the reminder time, Sticky opens a reminder screen where you can complete or delete the task.
If Sticky is asleep when the reminder is due, it wakes automatically. With sound on, it plays a tone; when muted, only the reminder screen appears.
3. Clock and Weather
Before using Clock or Weather, set your city and time zone under Region in the Seeedash App’s Device Settings.
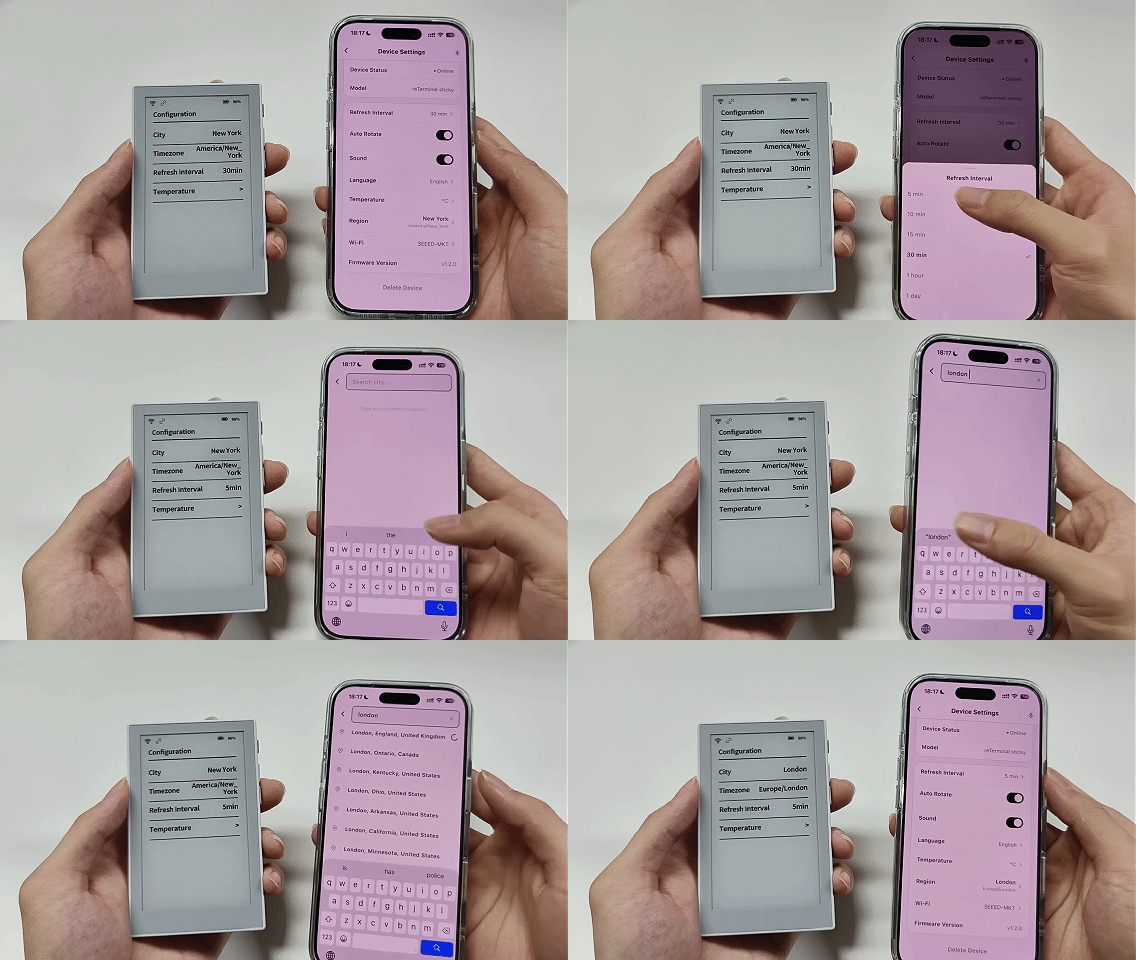
Once set, choose a template in Clock or Weather and send it to Sticky. Here’s how to do it with Clock:
- Open Clock in the Seeedash App.
- Select a clock template.
- Tap Apply in the upper-right corner.
After sending, open Clock on Sticky to view the time.
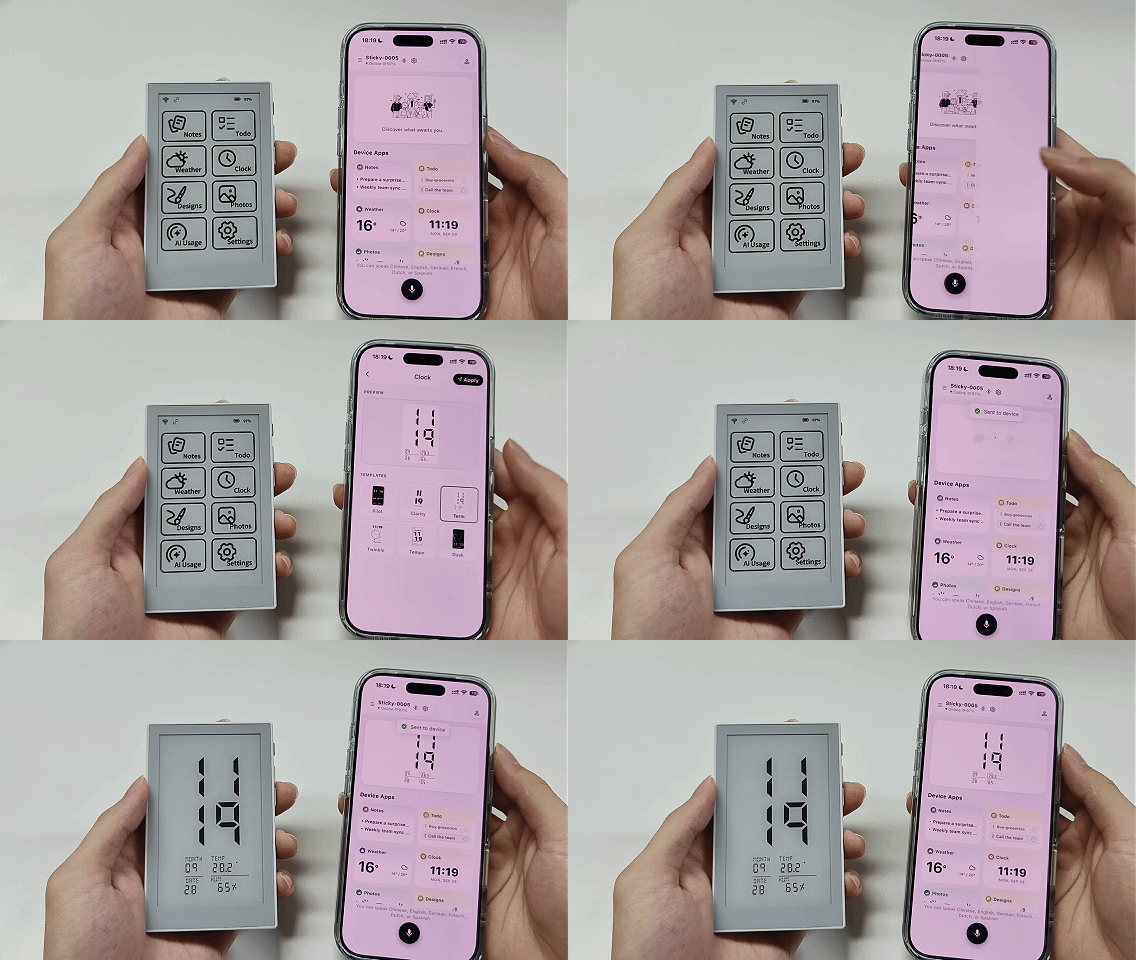
You can switch Clock and Weather templates on Sticky or in the Seeedash App. To change the city or time zone, use Region in the Seeedash App’s Device Settings.
4. Photos and Designs
Photos and Designs display images and canvases from your phone or Seeedash Web. To adjust the slideshow timing, change Refresh Interval in the Seeedash App’s Device Settings.
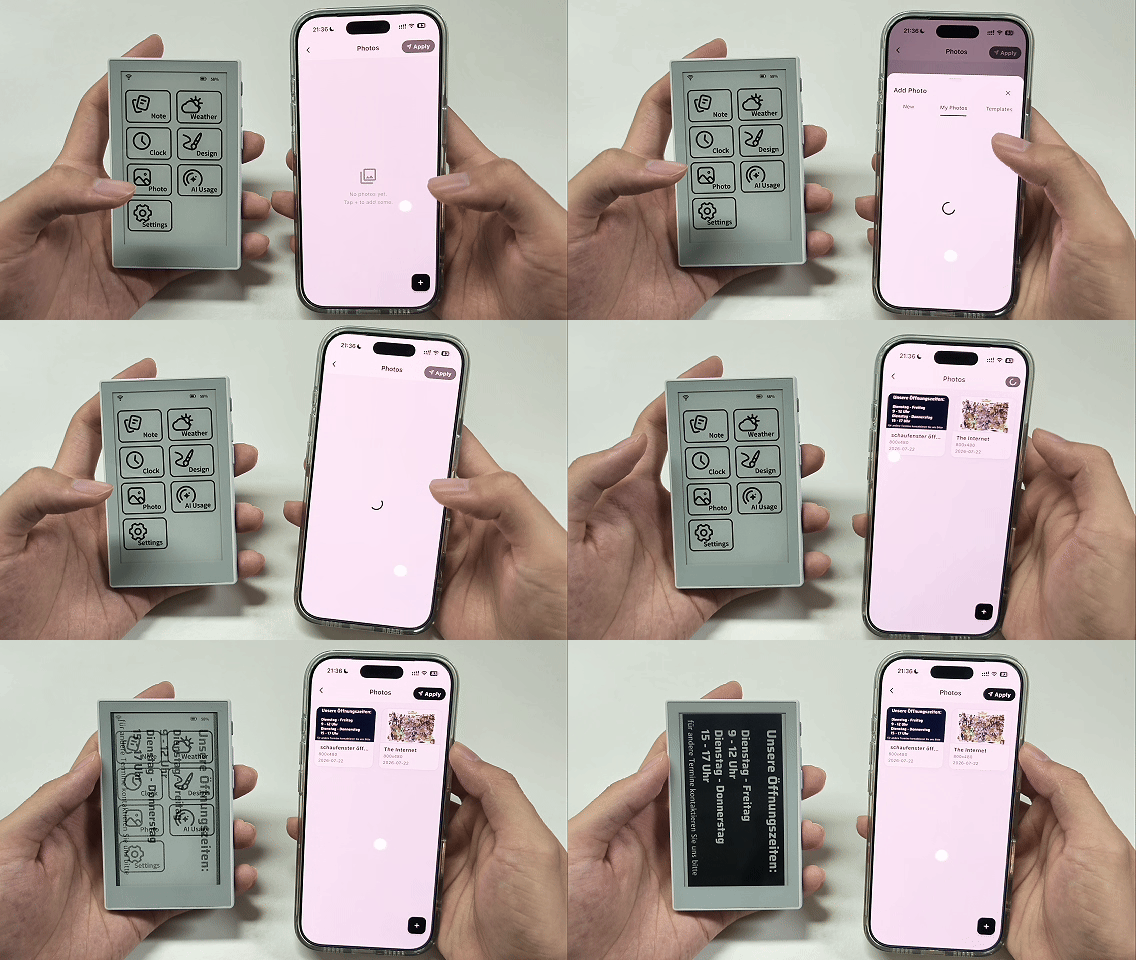
Next, here’s how to send a photo:
- Open Photos in the Seeedash App.
- Tap + in the lower-right corner.
- Select the image you want to add.
- Tap Apply in the upper-right corner.
After sending, open Photos on Sticky to view the image.
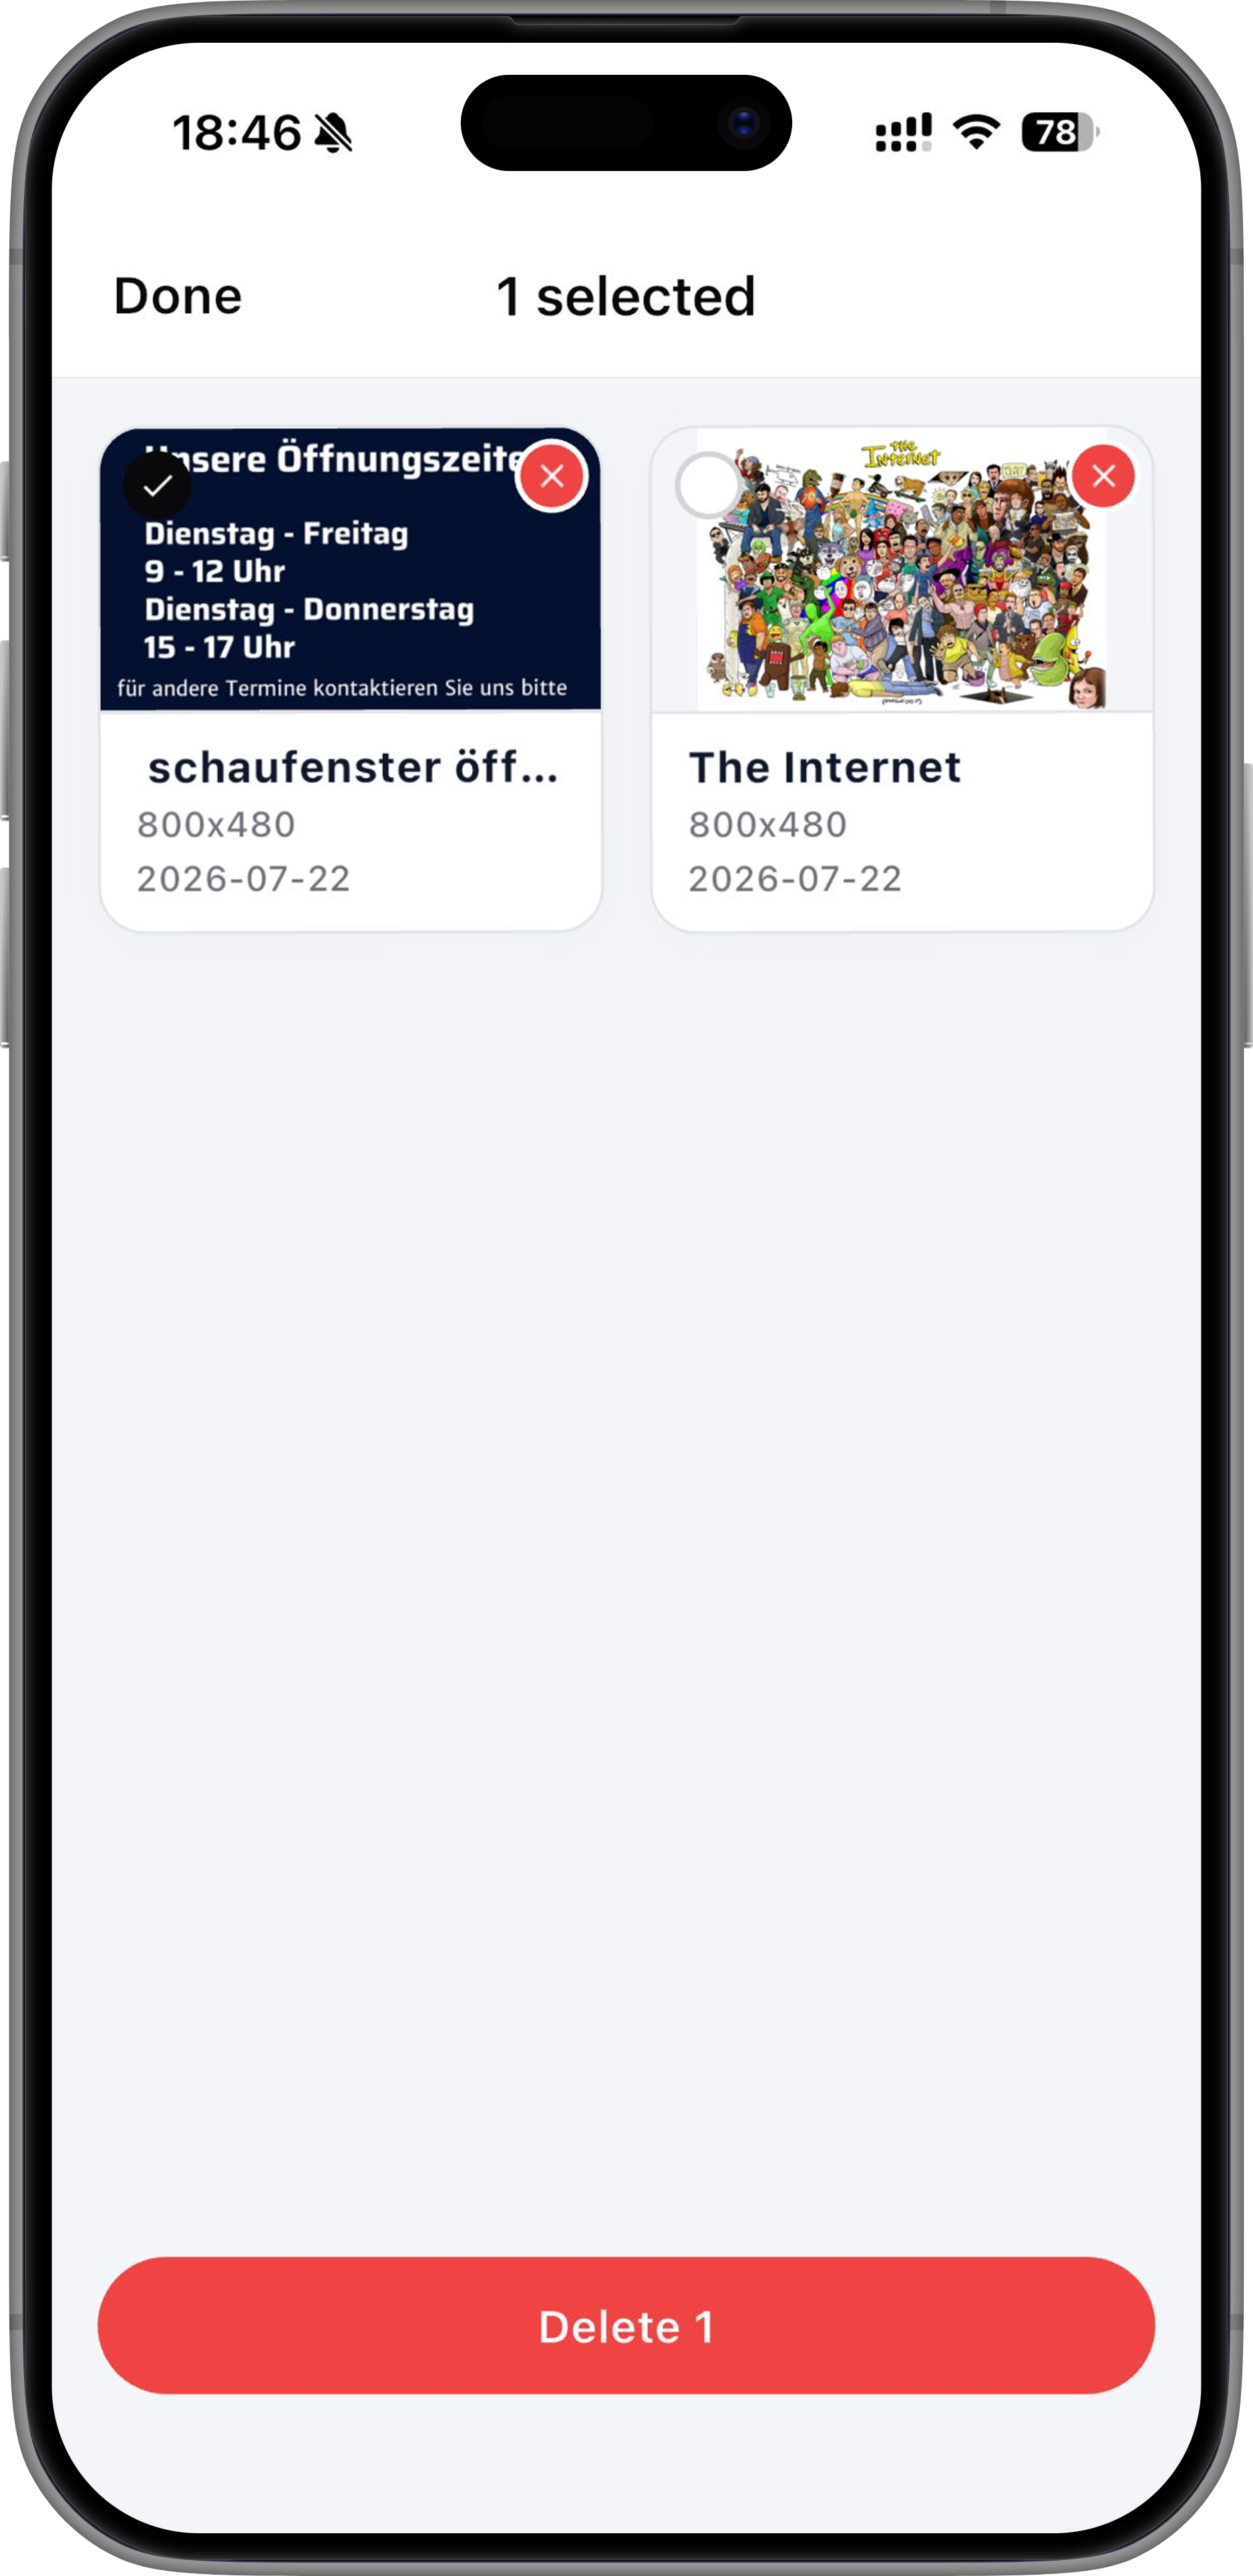
To delete an image, press and hold it in the Seeedash App.
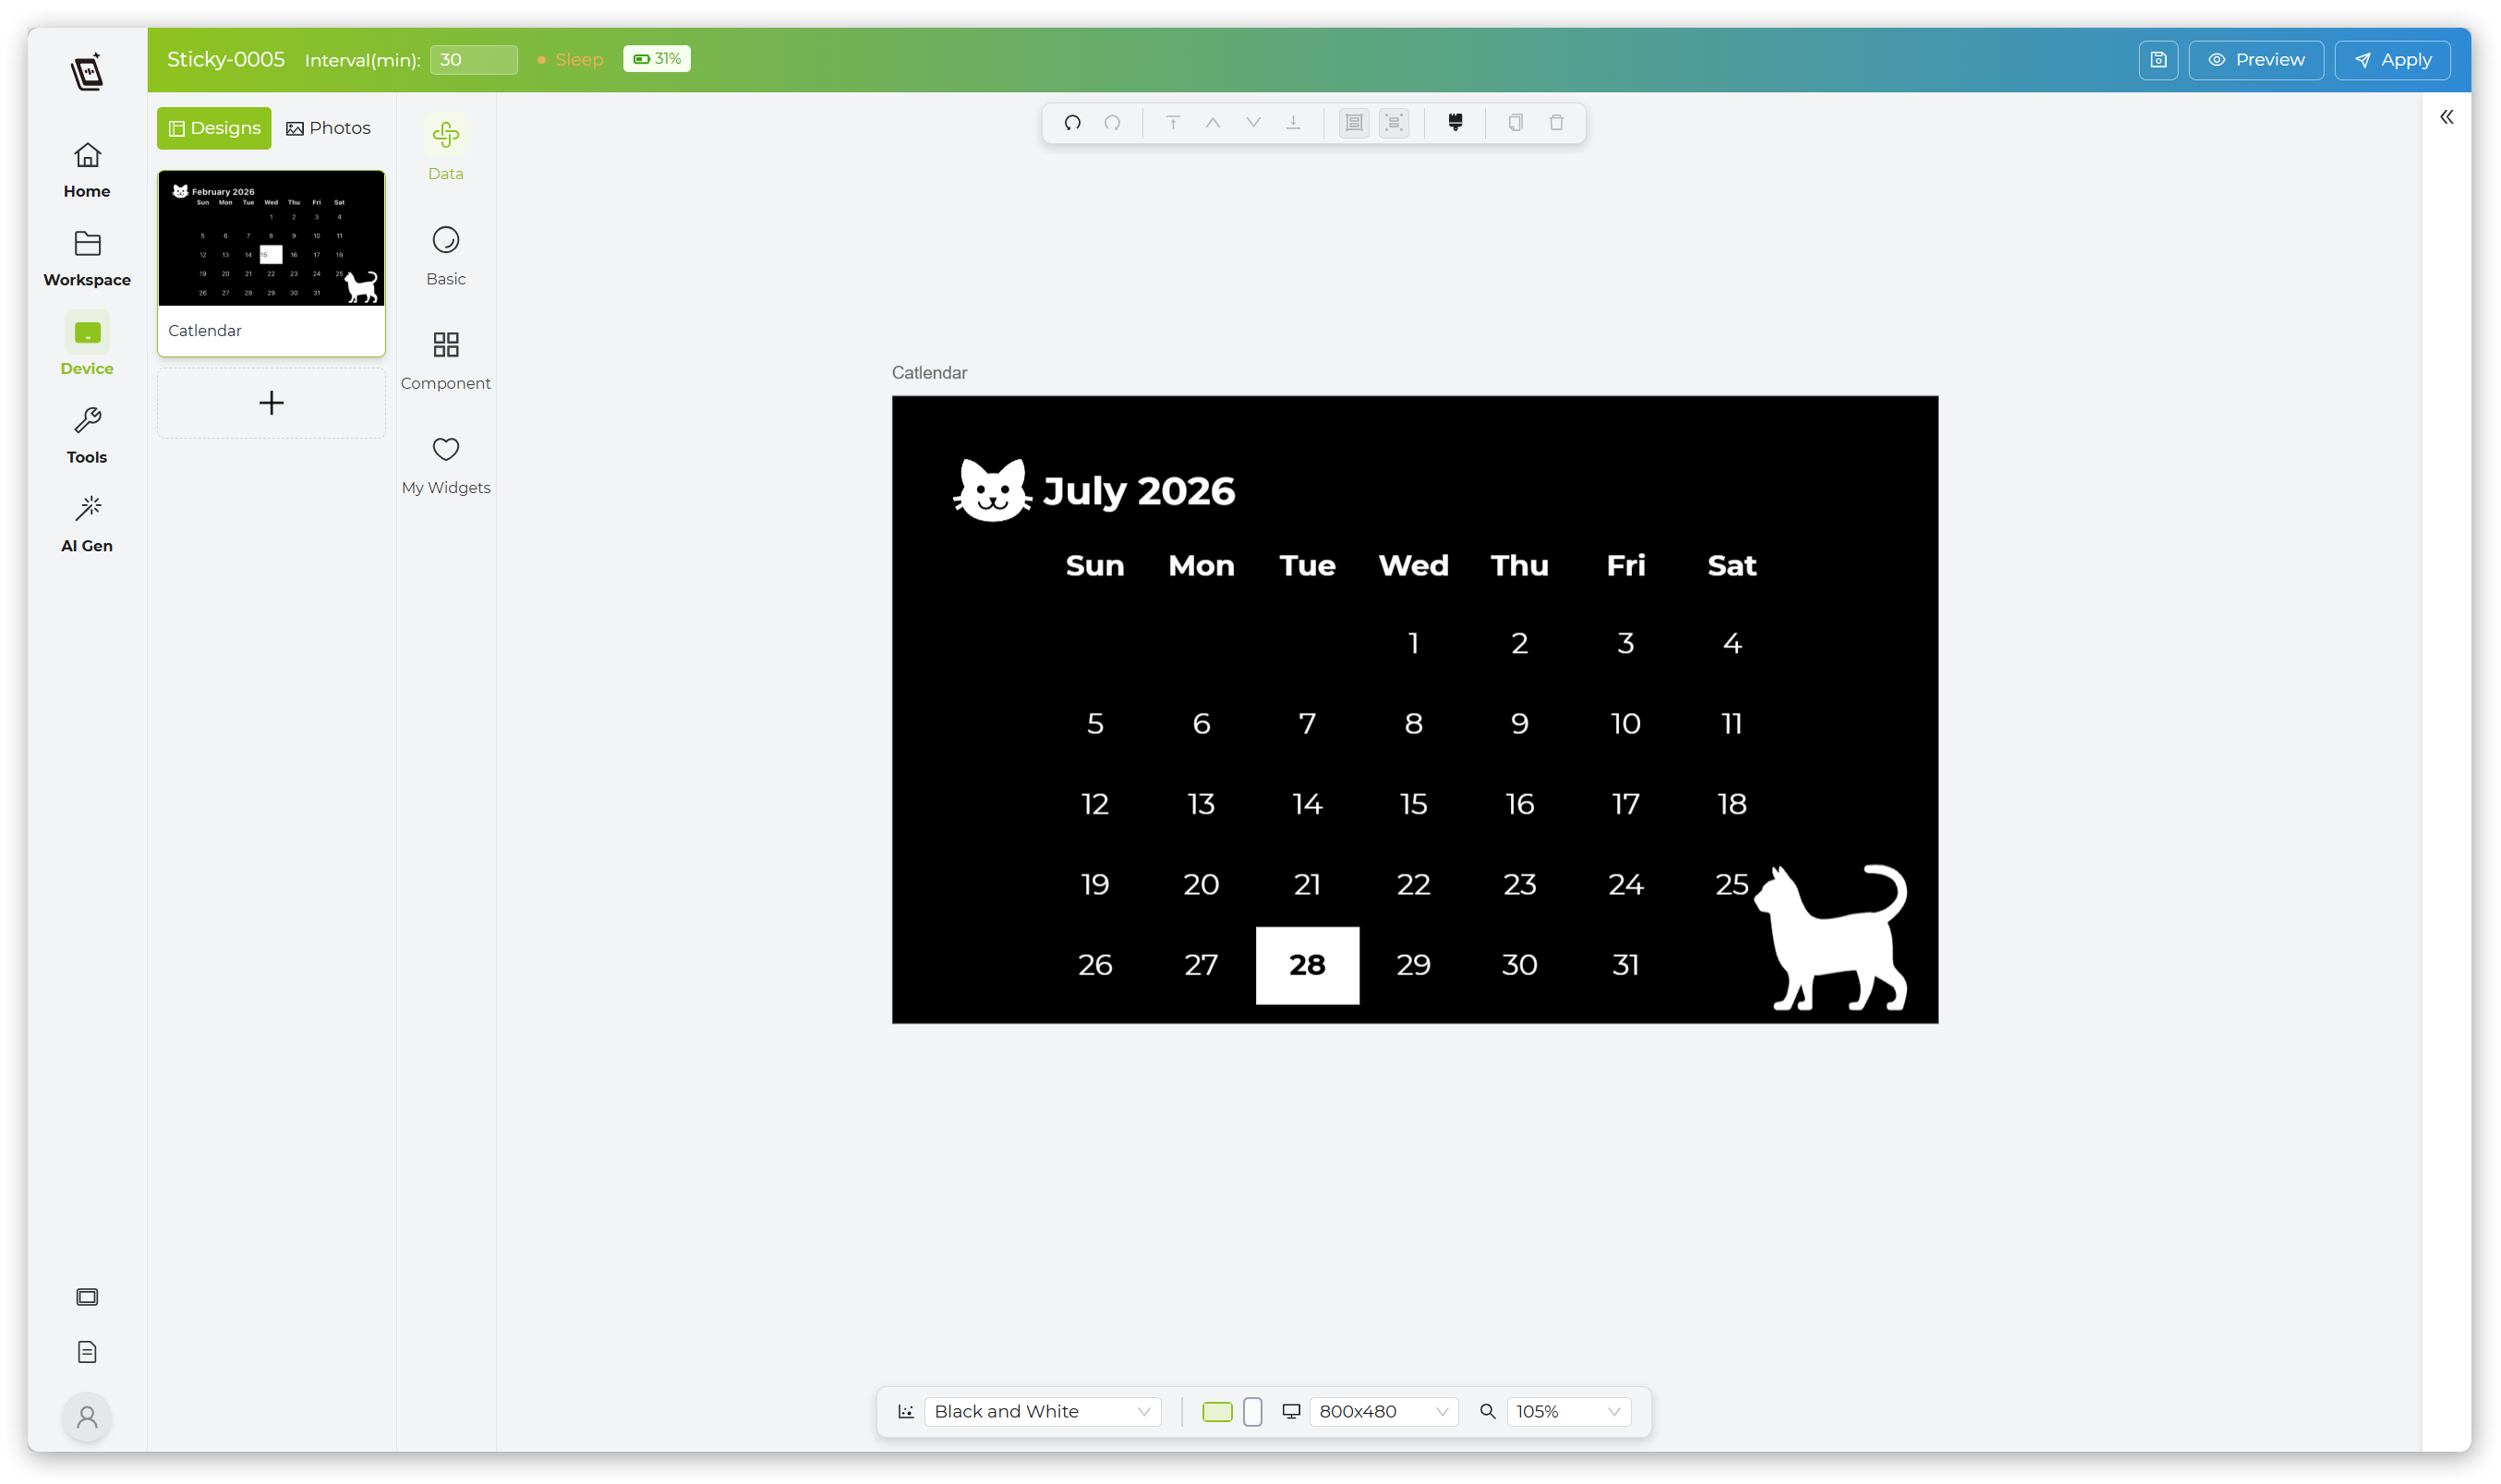
To add text and images or create a richer page, use Seeedash Web. When your design is ready, send the page to Sticky for display.
When Sticky is online, Photos and Designs sync after you send them. If the device is sleeping or powered off, it syncs the latest content the next time it comes online.
Device Settings
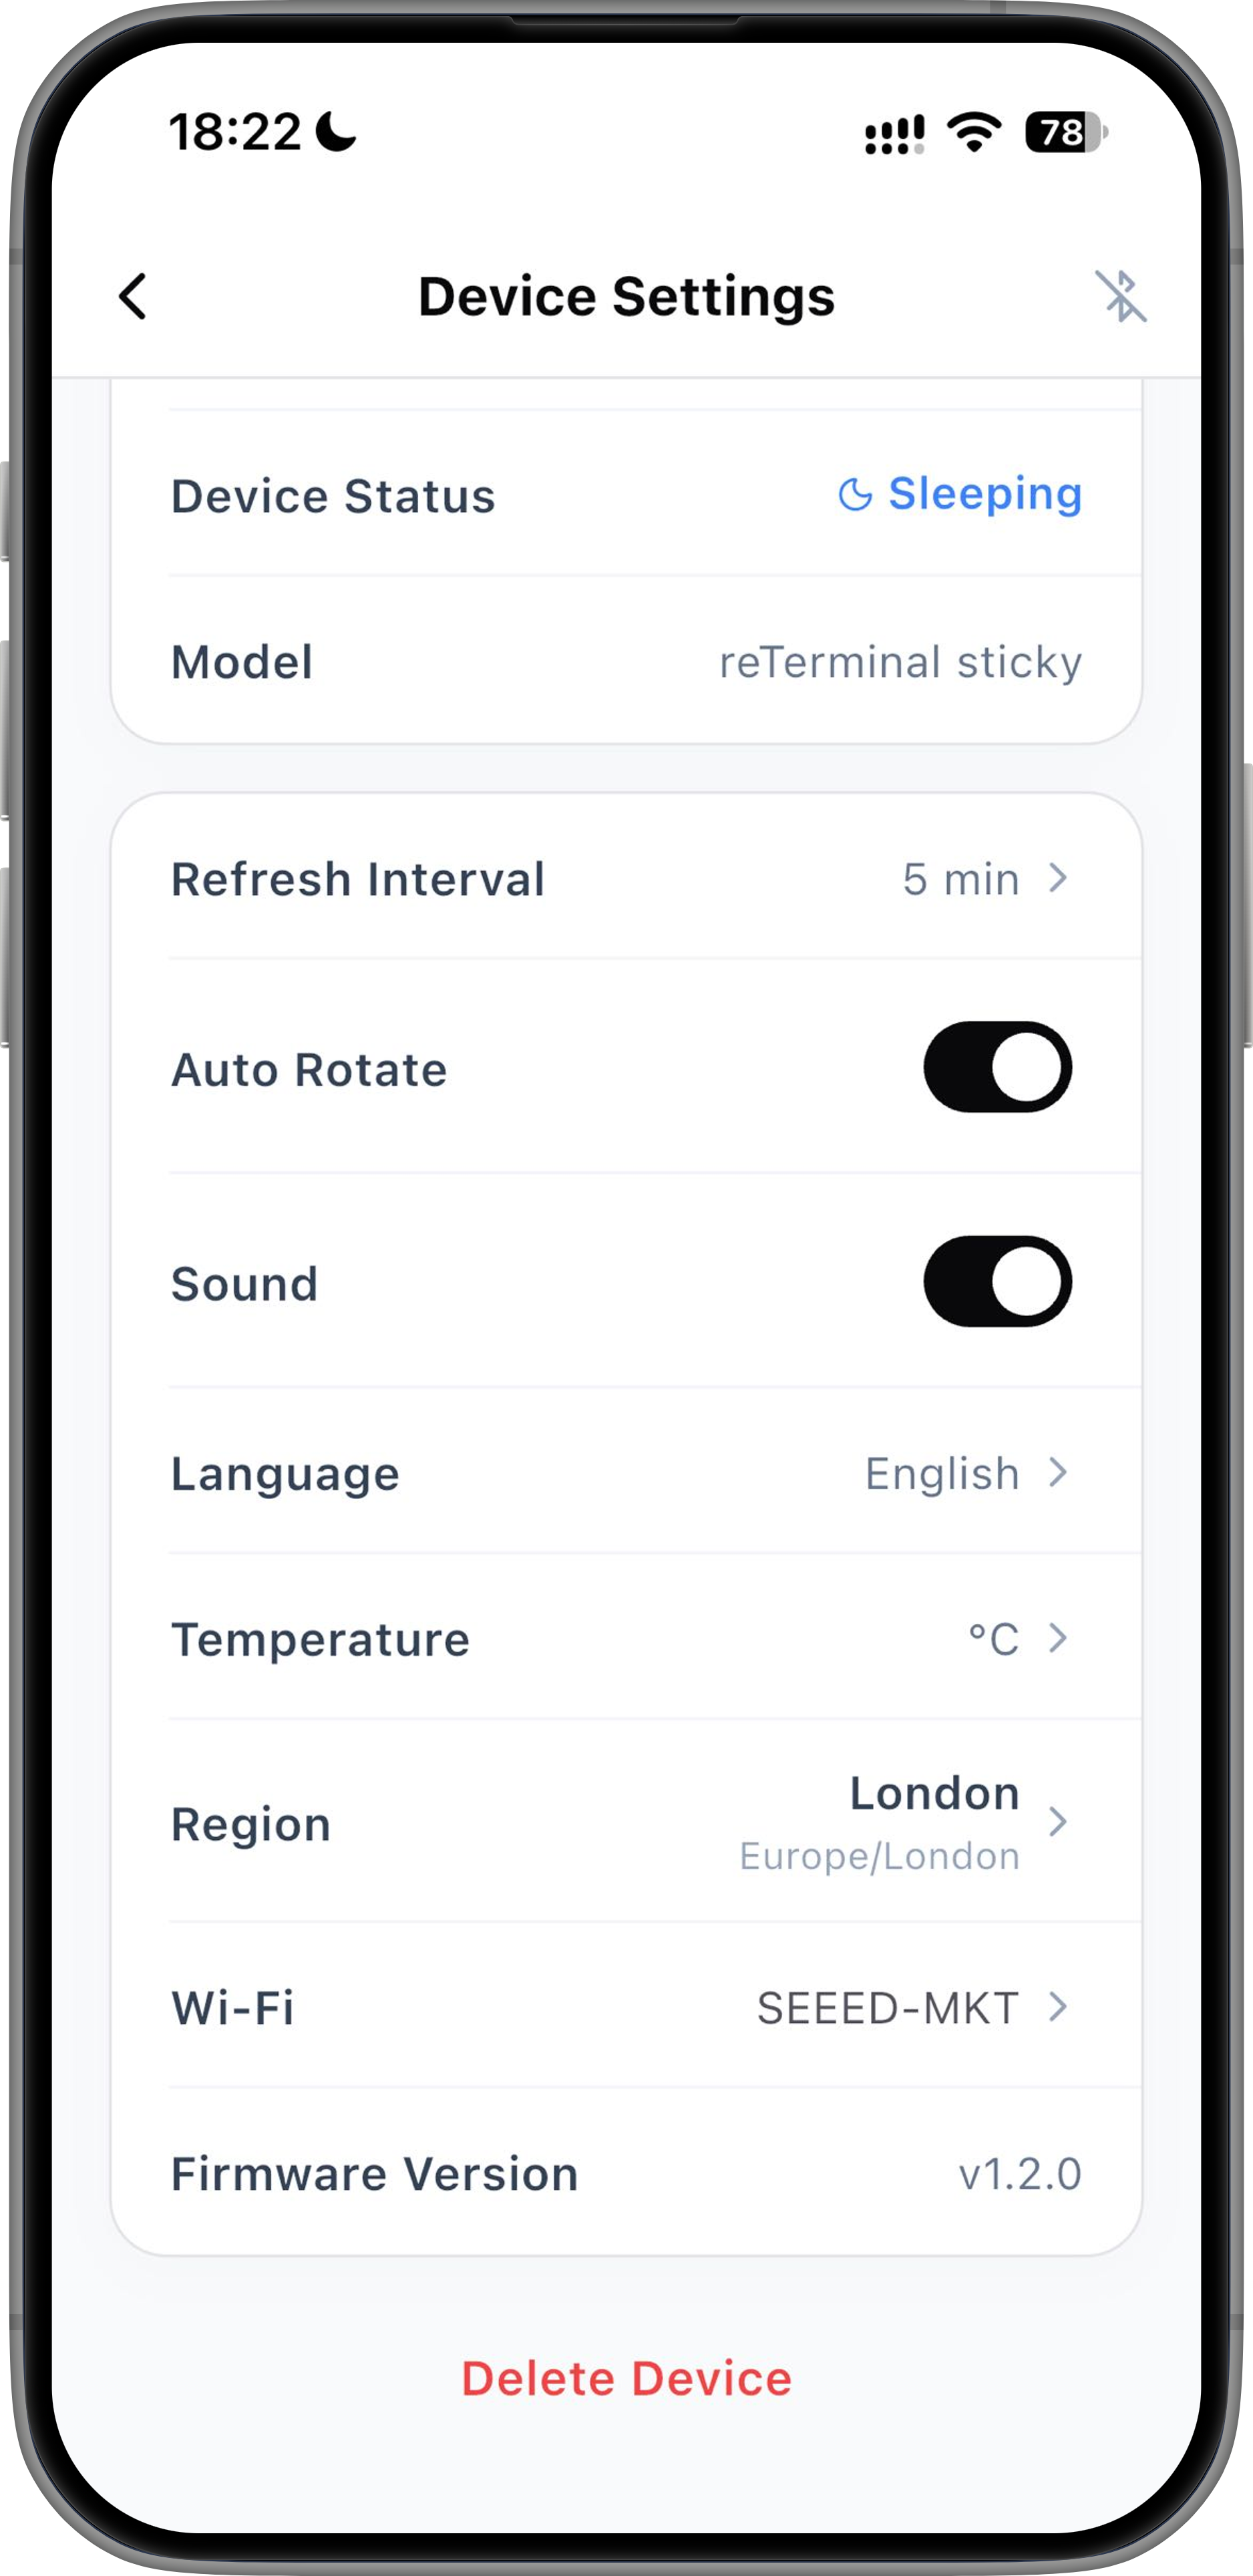
Tap the device settings button in the Seeedash App to open the device details page.
Here, you can view device information such as the device name, serial number, and MAC address. You can also change the city, time zone, and refresh interval, or adjust sound, language, and Wi-Fi settings.
-
If you move Sticky to a new location or need to connect to a different Wi-Fi network, tap Wi-Fi to reconfigure the network without unbinding the device.
-
To unbind the device, tap Delete Device.
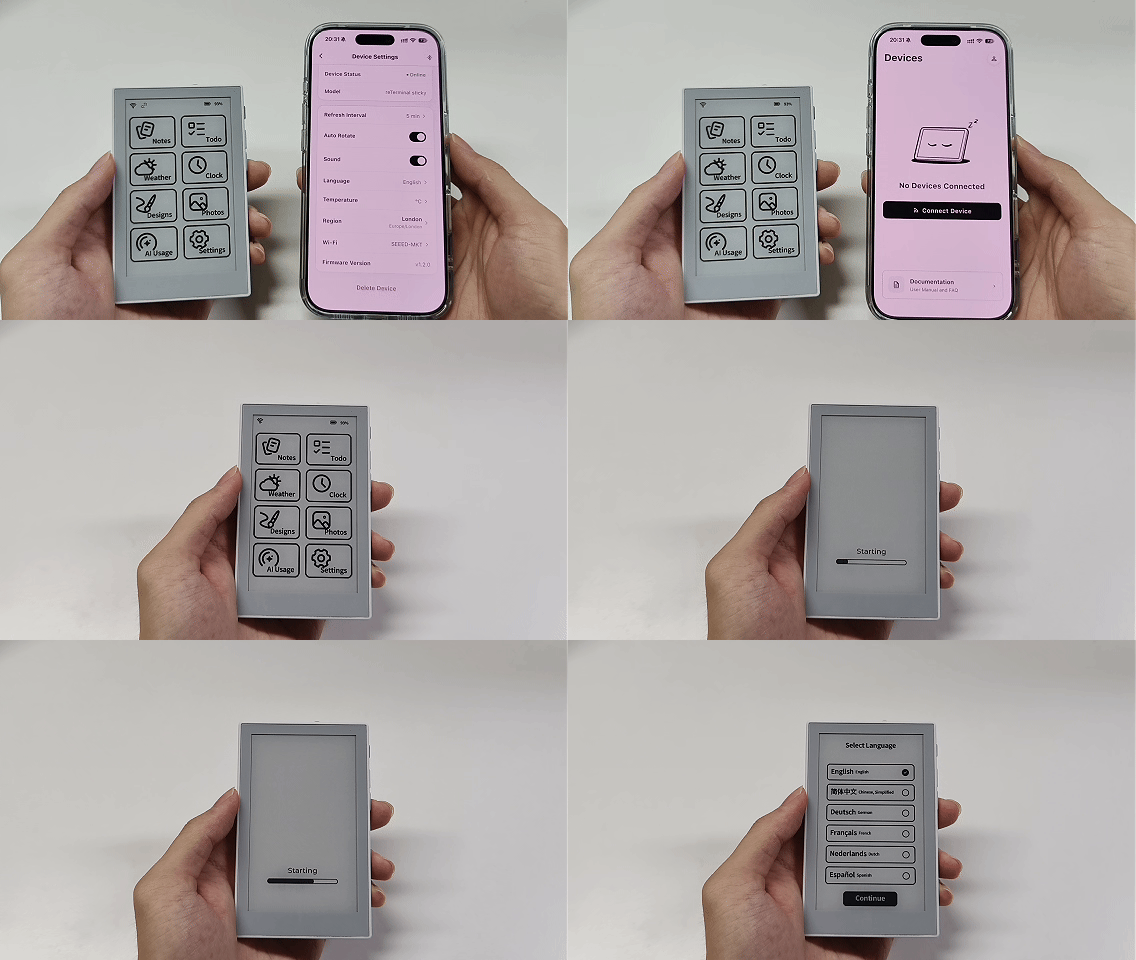
For any remote setting, Sticky must be online and paired with your phone over Bluetooth.
Add a New Device
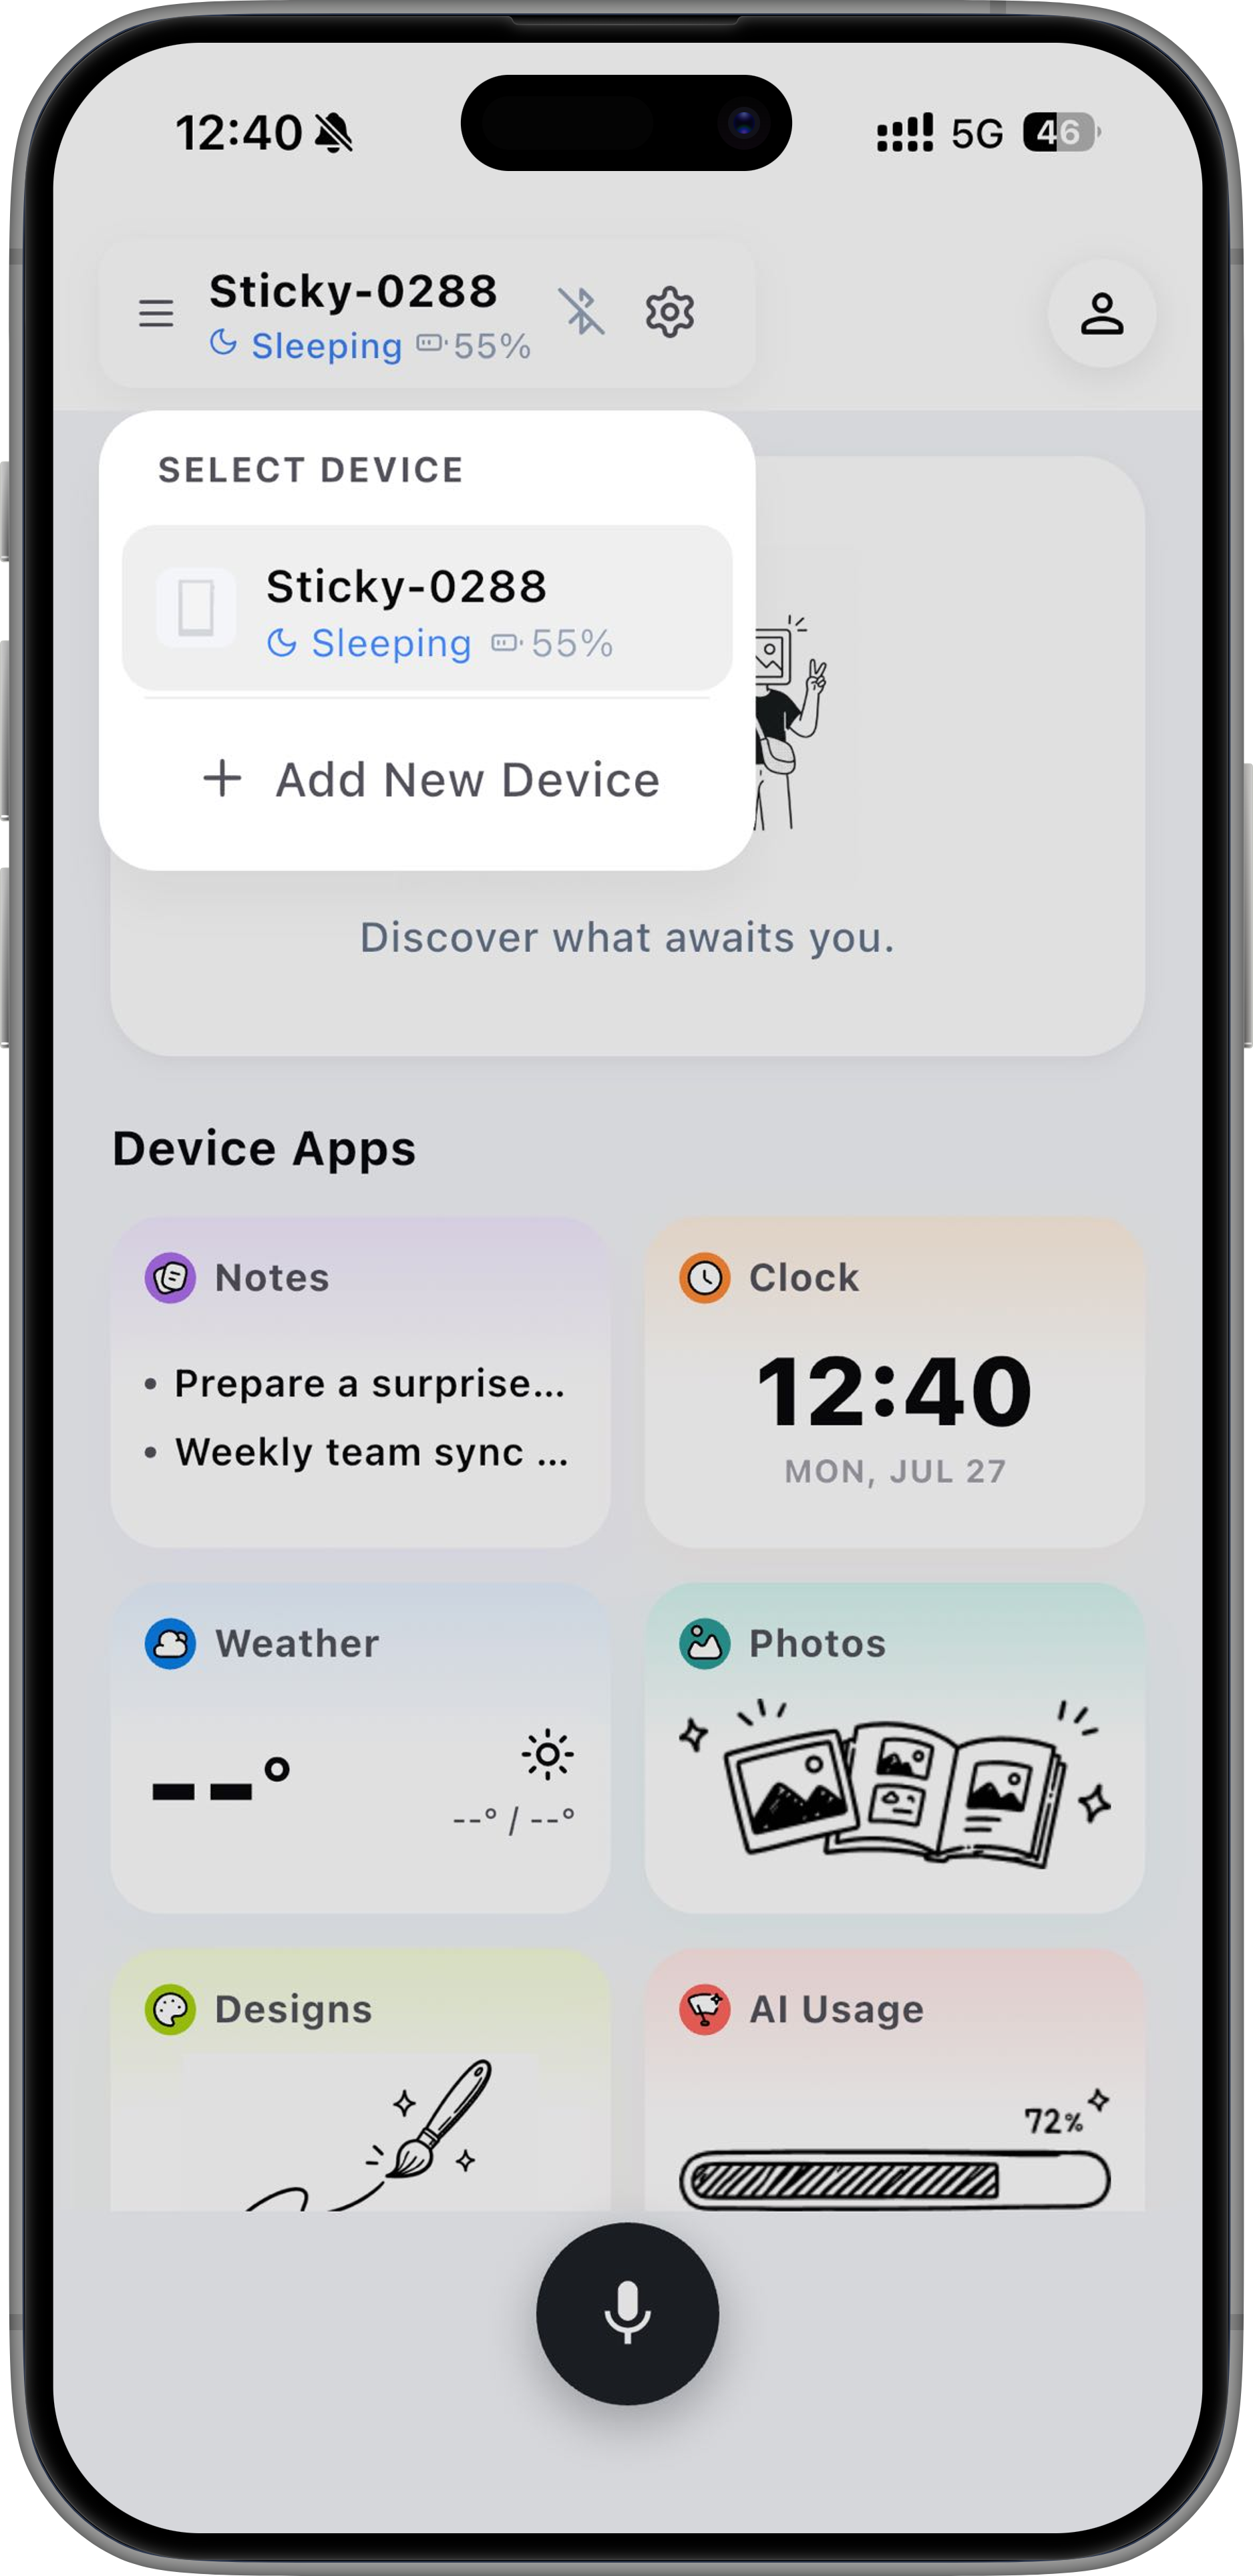
If you have multiple Sticky devices, you can add more in the Seeedash App.
- Open the device list.
- Tap Add Device.
- Keep your phone close to the new Sticky.
- Follow the on-screen instructions to bind the device and configure Wi-Fi.
After adding the device, you can switch between your Sticky devices from the device list.
Mount Sticky
Sticky has a built-in magnetic structure, so it can attach directly to metal surfaces.
For example:
- Refrigerator door
- Metal cabinet
- Pegboard accessories
- Metal stand
To mount Sticky on a non-metal surface, use the included adhesive magnetic ring.
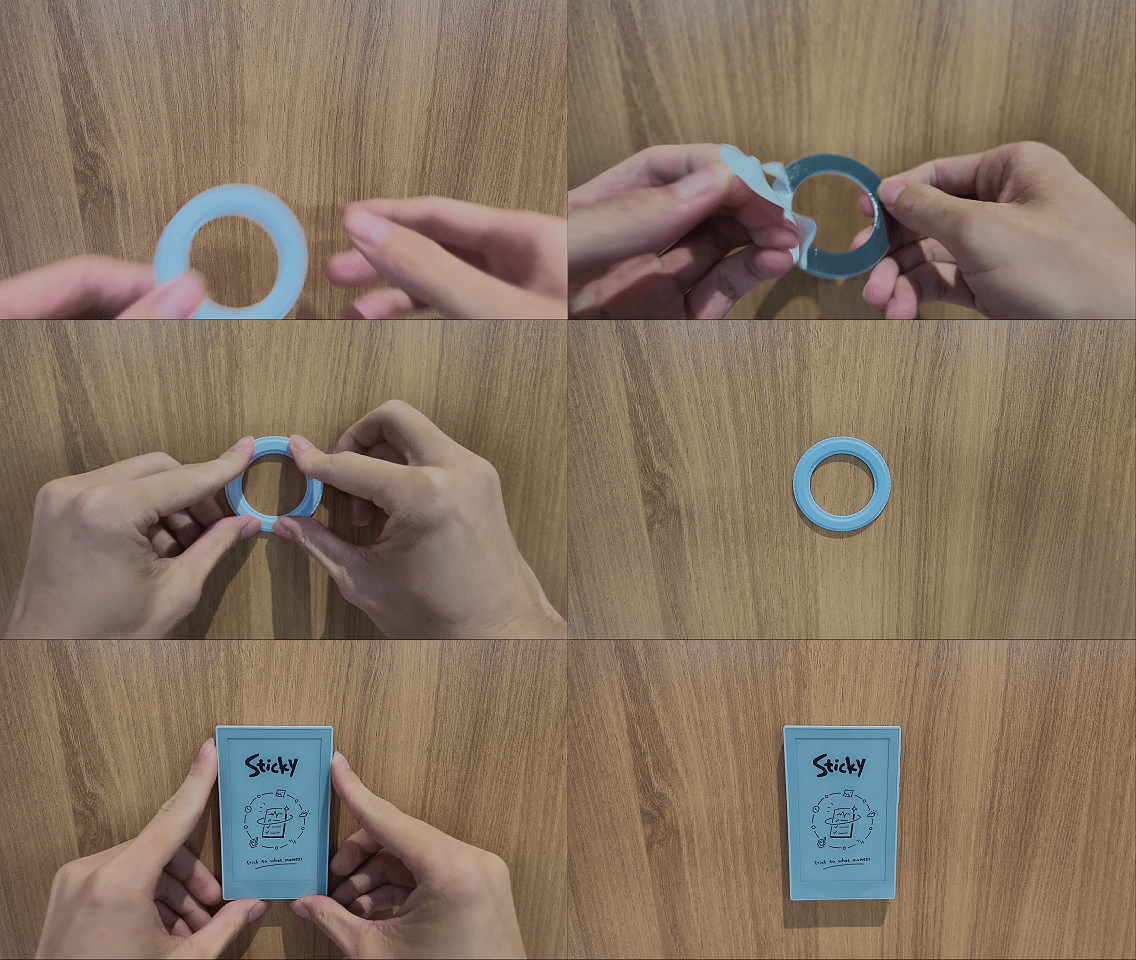
Clean the surface, peel off the protective film, place the magnetic ring where you want it, press it for a few seconds, then attach Sticky.
Install Sticky on a flat, dry surface.
FAQ
What should I do if the device cannot be found?
- Make sure Sticky is powered on
- Make sure Bluetooth is turned on on your phone
- Keep your phone close to Sticky
- Reopen the Seeedash App and try again
Why can’t Sticky connect to Wi-Fi?
- Make sure the current network is 2.4GHz Wi-Fi
- Check that the Wi-Fi password is correct
- Make sure the router and network are working properly