How to use Arduino as a 28BYJ-48 Stepper Motor Controller with a ULN2004 Driver Board
The 28BYJ-48 stepper motor is widely used to control a myriad of common devices we see every day. From blinds, car side mirror tilts and DVD players to security cameras and precise control machines, stepper motors are closer to us than we actually think.
Ironically, not many people actually know how to work with them. And if you are a totally clueless beginner when it comes to electronics, we understand that reading through tons of technical jargon online can be rather daunting and off-putting at times. Hence, we have summarised a guide on how to interface a 28BYJ-48 stepper motor with an Arduino, using a ULN2003 driver board.
(Source: Mschoeffler)
First of all, let’s start with an introduction to the 28BYJ-48 stepper motor and the ULN2003 driver board!
The 28BYJ-48 Stepper Motor
What is the 28BYJ-48 Stepper motor?
The 28BYJ-48 stepper motor is a commonly used stepper motor. which converts electrical pulses into discrete mechanical rotation. When electrical signals are applied, the stepper motor rotates in precise and fixed angle increments known as steps. The motor consists of 4 coils that make a ring around the rotor. These coils are known as the stator, as they are stationary and static. Each coil is rated at +5V, making it easy to control with any microcontroller, such as an Arduino.
The GIF below illustrates how the rotation works.
What is the difference between stepper motors and standard DC motors?
Uncertain about 28BYJ-48 stepper motor being the one for you? Before deciding on which type of motor is more suitable for your project, we will have to first understand some differences between the two motors. Here are some basic differences between the two.
- The rotation of stepper motors is incremental, slow and precise, while DC motors have a fast, continuous motion.
- Stepper motors will generate some noise during operation while DC motors are quiet and relatively vibration-free.
- The response time of the stepper motor is slower than the DC motor.
- Stepper motors can be easily controlled with microprocessors like the Arduino. Compared to DC motors, they are more mechanically simple and easy to design and build. In contrast, DC motors are not so easily controlled with microprocessors
What is the difference between stepper motors and servo motors?
Perhaps you may have heard of the servo motors, another motor similar to the stepper motor. Here’s a brief description of how they’re different.
- Stepper motors can move more accurately and precisely than the servo motor and are much easier to control.
- Stepper motors are more suitable for applications with lower speeds of less than 2000 rpm (revolutions per minute), and servos are best suited for applications with high speeds greater than 2000 rpm.
- Stepper motors operate at lower speeds than servo motors.
- Stepper motors are cheaper than servo motors as they are less mechanically complex.
When would I choose a stepper motor over the other types?
The stepper motor does have its disadvantages as compared to the aforementioned two. However, you should still take stepper motors into consideration for its several critical advantages.
- Precise Positioning – Stepper motors move in precise steps. As such, they do well in applications that require precise positionings, such as 3D printers and camera platforms.
- Precise Speed control – Precise increments in movements enable excellent control of rotational speed for process automation and robotics.
- High Torque at low speeds – Stepper motors are best suited for applications with low speed (less than 2000 rpm) as they have maximum torque at low speeds. In contrast, normal DC motors and servo motors do not have so much torque at low speeds.
- Easy to control – Stepper motors can easily be controlled using a microcontroller like an Arduino. In fact, its ease of use has also been a major reason for its continued usage by stepper motor users.
- Cheap – In applications where stepper motors would suffice, and using one could help you to realize better cost savings.
In addition, the stepper motor also shares some of the same advantages as the other types of motors. For example, similar to DC motors, stepper motors are widely available and come in many different sizes and styles, which means it can accommodate size constraints. This means that you do not have to compromise on the advantages of the other motors when you choose to use a stepper motor.
The ULN2003 Driver Board
What is the ULN2003 Driver Board?
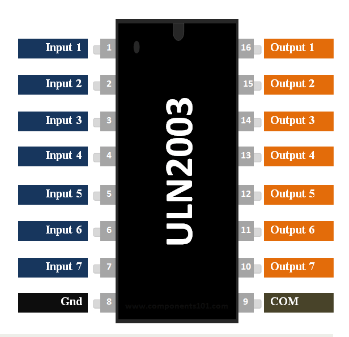
The ULN2003 is one of the most common motor driver ICs that houses an array of 7 Darlington transistor pairs, each capable of driving loads up to 500mA and 50V. A Darlington pair is a pair of transistors, where the second transistor amplifies the output current of the first transistor.
You’ll need the ULN2003 to drive the stepper motor with the Arduino. They are also easily accessible at an affordable price. It’s better to grab one of these rather than breadboarding the IC itself.
As shown in the diagram below, a ULN2003 driver board consists of a ULN2003 soldered onto a board, together with resistors, capacitors, and other bits and bobs that help create the circuit that takes the pulse signals from the controller and converts them into stepper motor motion.
(Source: Component101)
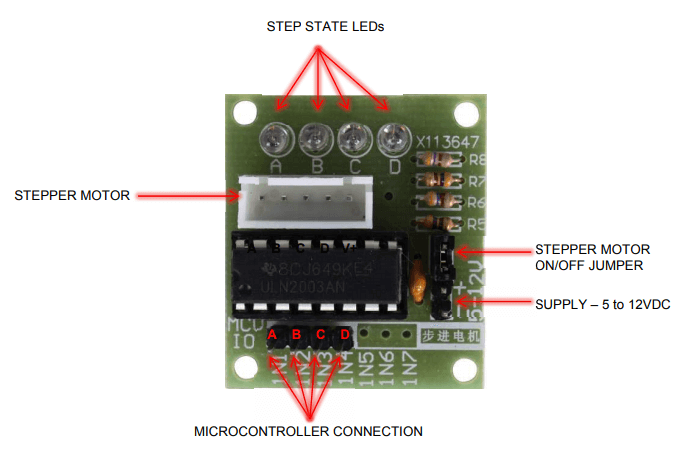
(Source: electronicoaldas)
Why you need the ULN2003?
The 28BYJ-48 stepper motor consumes high current and hence, we will need to use a driver IC like the ULN2003 in order to control the motor with a microcontroller like the Arduino. Known for its high current and high voltage capacity, the ULN2003 gives a higher current gain than a single transistor and enables the low voltage and low current output of a microcontroller to drive a higher current stepper motor.
For example, a stepper motor that needs 9V and 300mA to operate cannot be powered by an Arduino. Hence, we connect this IC to source for enough current and voltage for the motor. If you have to power anything more than 5V and 80mA, the ULN2003 driver board should be used.
I do not recommend powering the stepper motor directly from the Arduino. I will explain more below.
Pin Arrangement
(Source: Geeetech wiki)
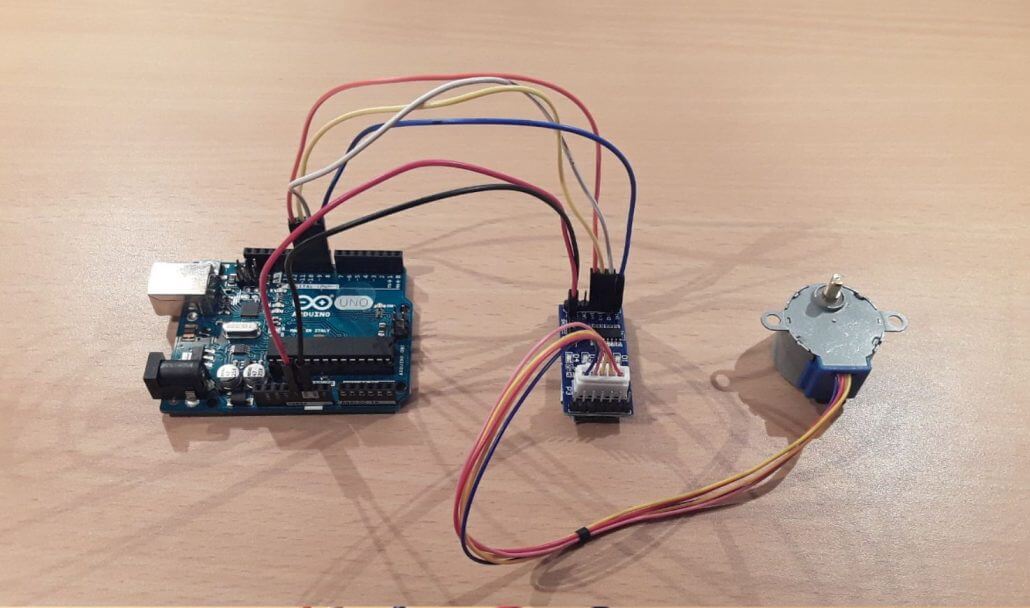
Connecting the 28BYJ-48 stepper motor to the ULN2003 driver board
Usually, the 28BYJ-48 stepper motor comes with a 5-pin connector that will fit to the ULN2003 driver board
Connecting the ULN2003 driver board to the Arduino
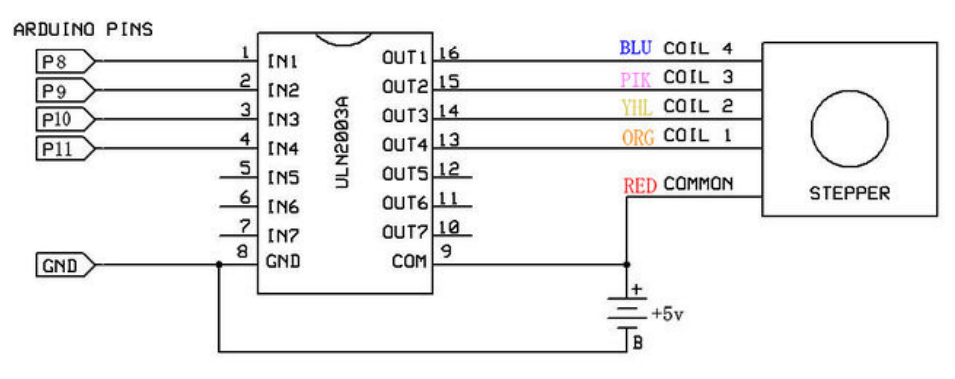
Connect the ULN2003 driver lN1, lN2, lN3, lN4 to the Arduino digital pins 8, 9, 10, and 11 respectively. The driver board has two pins which are labeled GND and VCC, which are two pins for the power supply. The ULN2003 driver board’s GND pin must be connected to the Arduino’s GND pin. Similarly, the driver board’s VCC pin should be connected to the Arduino’s 5V pin.
Important note: By using this setup, we are powering the stepper motor directly from the Arduino. Although this is the simplest way to provide power to the motor, it is not recommended to do so (connecting the driver board VCC pin to the 5V pin of the Arduino).
This is because if the motor draws too much power, your Arduino can potentially be damaged. Do make sure that not more than 300mA is drawn out of your Arduino. If more power is needed, simply connect your driver board to an external voltage supply rather than using the Arduino’s onboard power supply.
But since we are at the initial learning stage of familiarizing ourselves with the setup, we will be powering the motor from the Arduino in this example to keep the connections simple. Once you have familiarized yourself with the connections, be sure to connect your motor to an external power source instead if more power is needed.
Example Code for Connecting the Arduino
The Arduino Integrated Development Environment (IDE), or Arduino software, comes pre-installed with a default stepper library. Hence, there is no need to download the library. On the first line of the code, we will first include the header file of this built-in stepper library.
We define the number of steps that will be made for one revolution. Working out this number might be a little tricky, so here’s how it’s done.
Stepper motors can be driven in different modes and they have a specific gear ratio. Both factors have an influence on the number of steps per revolution. For this example, we shall drive the motor in a mode known as the full step mode, with each step corresponding to a rotation of 11.25 degrees according to the datasheet. That means there are 32 steps per revolution (360/11.25 = 32). In addition, the manufacturer has specified a gear ratio of 64:1 for the 28BYJ-48 stepper motor.
How it works?
To obtain the final number of steps, the gear ratio must be multiplied by the number of steps per revolution, 32. The more accurate value for the gear ratio is actually about 63.68395:
- Therefore, we set the final number of steps to 2038 (32 x 63.68395 = 2037.8864).
- Initialize the stepper. Within the brackets are the parameters. The first parameter is the number of steps. As it was already defined in the previous line, we can write STEPS to represent this number. The other parameters correspond to the Arduino pins that are used to connect the ULN2003 driver board. As stated previously, the pins are 8, 9, 10 and 11.
- The next loop function is where we will write our code to drive the motor. For the first line of the loop, we set the speed of one revolution to one per minute.
- Tell the stepper motor to do 2038 steps. Since one revolution corresponds to 2038 steps as we have calculated previously, that means the motor shaft should move a full revolution within about one minute.
- We set a delay of one second. In the next two lines, we do the same thing again – setting the number of revolutions per minute and commanding the stepper to do a number of steps. However, this time, we set the speed to 6 rounds per minute and move the shaft in the other direction by setting a negative number of steps. This means that the motor will move 6 times faster, and should complete a full revolution in about 10s (60s / 6 = 10s).
Here’s the example code. Upload the following code into your Arduino programme and try it out yourself!
1.	#include <Stepper.h>
2.
3.	#define STEPS 2038 // the number of steps in one revolution of your motor (28BYJ-48)
4.
5.	Stepper stepper(STEPS, 8, 10, 9, 11);
6.
7.	void setup() {
8.	// nothing to do
9.	}
10.
11.	void loop() {
12.	stepper.setSpeed(1); // 1 rpm
13.	stepper.step(2038); // do 2038 steps -- corresponds to one revolution in one minute
14.	delay(1000); // wait for one second
15.	stepper.setSpeed(6); // 6 rpm
16.	stepper.step(-2038); // do 2038 steps in the other direction with faster speed -- corresponds to one revolution in 10 seconds
17.	}
Code by: Michael Schoeffler
Moving Forward
This is merely some simple code to get you started on getting the stepper motor up and running. Starting out in the electronics arena can be pretty daunting and at times can fill you with feelings of doubt and inadequacy, especially when your code doesn’t run.
So start with a few simple codes. After some more practice to build up your confidence, be sure to try out more complex codes so that you can get the motor to do more things. Github, a platform with millions of open-source projects, is a good place to start looking for more example codes to play around with.
Summary
Now that you have gotten a gist of how to operate the 28BYJ-48 stepper motor with the ULN2003 driver board and Arduino, have a browse at the Seeed Bazaar here, where you can find quality stepper motors, driver boards, and Arduino microcontrollers for your next project. Also, check out the stepper motor driver pack that comes with both the 28BYJ-48 stepper motor and a ULN2003 driver board at affordable prices.
So that’s all for this guide! Feel free to leave any questions in the comments section, and we’ll do our best to get back to them.
Thanks for explaining why darlington transistors are needed.
Flip IN2 and IN3 to enable reverse.
Hi Helen.
Thanks for the blog.
I am new to stepper motors.
I built up the same setup like you with the ULN2003 board, and using the Stepper library.
As long as I dont call stepper.step(), the 28BYJ-48 consumes practically no current.
But if I call send(), after the motor stops rotating, the power consumption jumps up to constant 370mA on 5V.
Is this a problem with the Stepper driver?
Thanks,
Ivan
Hello Helen
I am very inexperienced with electronics, I been looking this project and the one part that is missing is how to power the project.
In this project I am guessing for power do I use a USB computer to Arduino?
To power th 28BYJ-48 stepper motor through the ULN2003 driver board, can I use a battery source?
I am not grasping how to Powering projects do you have a guides on it?
Hello Chris
Indeed, you can power the Arduino by connecting the USB port of the Arduino to your laptop or desktop. For more portability, you can also power it using a battery. Try connecting a 9V battery, with the positive terminal to the Vin pin and the negative terminal to the GND pin of the Arduino. Also, you can connect an AC to DC adaptor to the barrel connector of the Arduino.
There is another way of powering the Arduino with the battery using the 5V and GND pins. But, this method is generally avoided because the 5V pin bypasses the voltage regulator that is built into the board. So if your voltage exceeds 5V, your Arduino can potentially be damaged.
Hope this helps! Do tell us if it works out!