Introducing NCC S1 Neural Network Computing Card and comparing with Intel Compute Stick 2
In this blog, we shortly introduced how to use NCC S1 Neural Network Computing Card with Firefly’s development board (both included in The NCC S1 + ROC-RK3399-PC AI kit ) , then gave a brief comparison between NCCS1 and Intel Movidius Myriad Compute Stick 2.
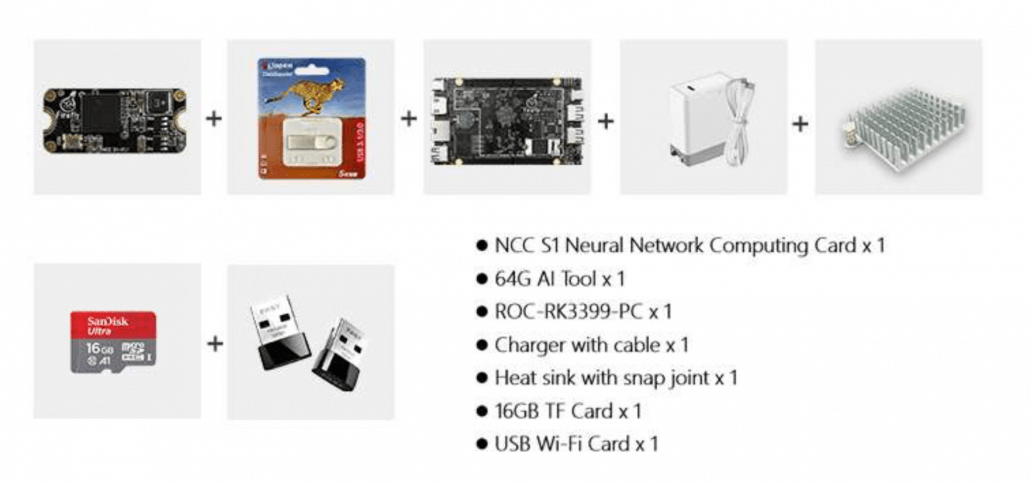
NCCS1 is a serial of NPU (Neural Processing Unit) module that works with Firefly’s development board. The module is equipped with the Lightspeeur 2801S chip launched by GTI (full name is Gyrfalcon Technology Inc.)
ROC-RK3399-PC is a Six-Core 64-Bit High-Performance Main Board. It adopts Rockchip high-performance core configuration, unique multiple power supply mode and unique plate design.
NCC S1 neural network computing card can be equipped with ROC-RK3399-PC.

Install the NCC S1 neural network calculation card into the eMMC slot on the ROC-RK3399-PC mainboard and insert it into the TF card slot of the motherboard. A TF card with firmware written to connect to a display. If there are no errors, you will see the WebcamSamples window appear on the screen after the system is booted.
Use WebcamSamples to open the VideoDemoFastestMP4.mp4 file located in the ncc_demo/Image_demo folder in the user’s main directory, and use the computing card to classify the objects in it. The classification result is displayed in the upper left corner of the window.
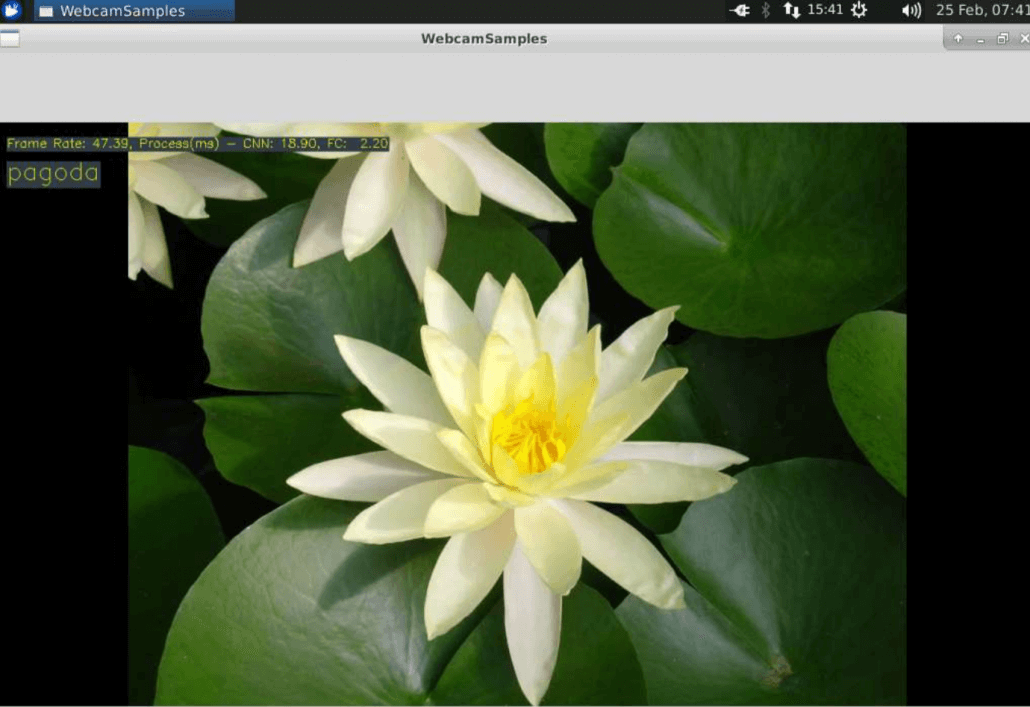
In addition to the classification results, you can also see the recognition frame rate (47.39 frames / s, up to 55 frames / s), CNN average operation time (18.90ms, maximum 15.10ms), FC average operation time (2.20ms, maximum 2.20ms) and more useful information.
Picture classification
The Ubuntu 16.04 firmware of the ROC-RK3399-PC motherboard is included in the AI data USB drive and can also be downloaded from the online data. The firmware contains the compiled environment that has been configured to avoid the hassle of manual configuration. Use a tool such as Etcher to burn it into the TF card, and insert the TF card into the TF card slot of the motherboard to power on the motherboard.
The SDK is also included in the AI data disk. You can upload GTISDK_Linux_aarch64_v3-1-2a.tar.gz from the NCC S1/GTI Linux-SDK folder to the ROC-RK3399-PC motherboard and extract it to the user home directory by tar command
tar zxvf GTISDK_Linux_aarch64_v3-1-2a.tar.gz -C ~/
After complete the extraction, please go to the GTISDK root directory and compile the relevant examples with the make command.
cd ~/GTISDK && make -C Samples/Sample
This will generate the liteSample example in the Bin/Linux/aarch64 folder under the SDK root.
Before running the liteSample example, you need to close the WebcamSamples window to avoid the use of the neural network computing card. You also need to modify the userinput.txt file in the data/Models/gti2801/gnet2_3/cnn_3 folder in the SDK root directory.
Change /dev/sg0 to /dev/mmcblk1 to instruct liteSample to access the NCC S1 neural network compute card from the eMMC interface.
Because you need to access the hardware, you need to use the sudo command to get root privileges and indicate the path to the SDK.
sudo –i
export GTISDKPATH=/home/firefly/GTISDK
cd /home/firefly/GTISDK/Bin/Linux/aarch64/
./liteSample
The SDK contains trained model data. liteSample uses the bridge.bin file in the data/Image_Lite folder of the SDK root directory as input. The original file is bridge.jpg in the same folder, and the classification result is in the Terminal window. The figure below is displayed.
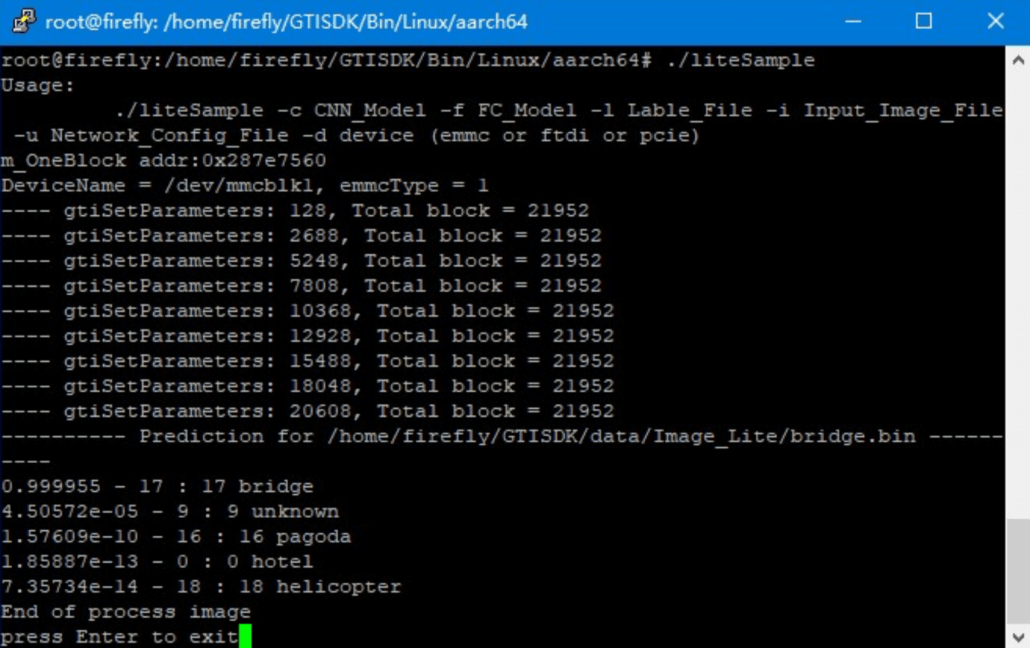
The 0.999955 – 17 : 17 bridge on the 7th line from the bottom indicates that the NCC S1 neural network calculation card classifies the picture as a bridge; you can also use the -i parameter to specify the picture to be classified, and convert the picture to bin format before classifying. A conversion tool is provided in the SDK, located in the Tools/image_tool folder in the SDK root directory. Before using the tool, please install its dependencies:
sudo apt-get install python python-opencv
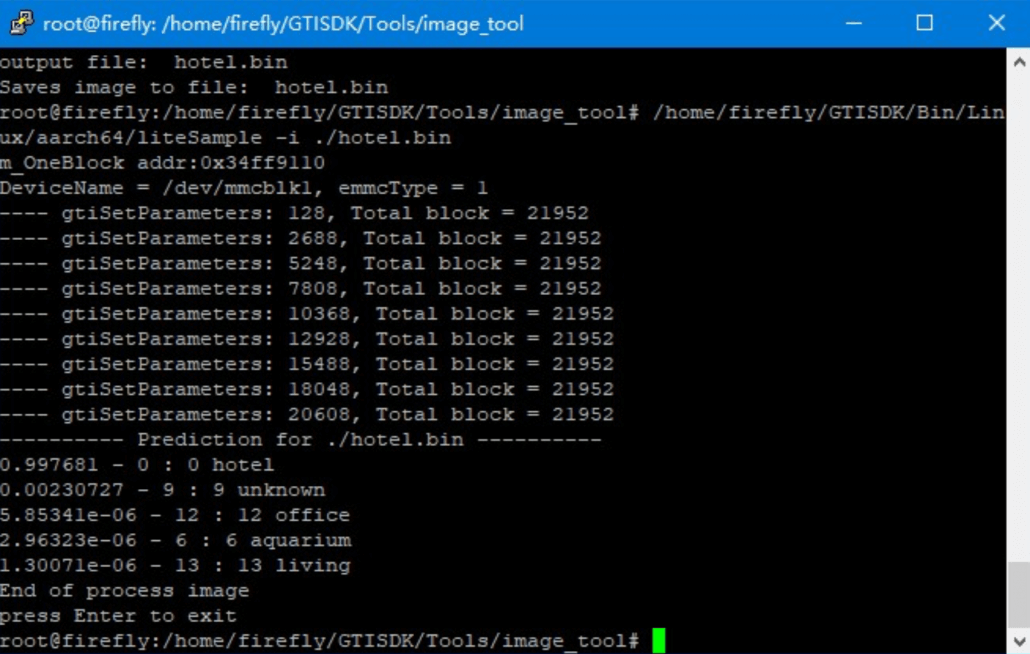
After complete the installation, please go to the image_tool folder. There are two jpg files under the folder. We can use the gtiConvtImage2BGR_plannar tool to convert the hotel.jpg file into hotel.bin and classify it with liteSample.
#Enter the folder where the conversion tool is located
cd /home/firefly/GTISDK/Tools/image_tool/
#Convert hotel.jpg to hotel.bin
python2 gtiConvtImage2BGR_plannar.py hotel.jpg 224 hotel.bin
#Use liteSample to classify hotel.bin
/home/firefly/GTISDK/Bin/Linux/aarch64/liteSample -i ./hotel.bin
You will see the result below:
The liteSample example also allows you to categorize your custom images by repeating the above steps.
Comparison between Intel Compute Stick 2 and NCC S1
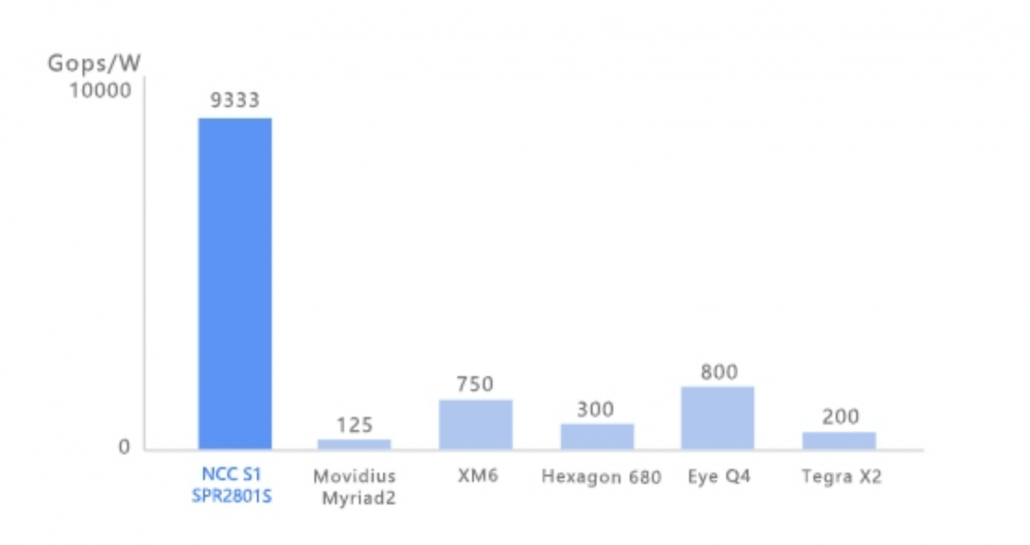
Intel released the second generation of neural computing rods at the artificial intelligence conference last year. The performance is 8 times higher than that of the first generation. The brief comparison with NCC S1 is shown in the following table.
| NCC S1 | Intel NCS 2 | |
|---|---|---|
| Processor | Lightspeeur SPR2801S | Intel® MovidiusTM MyriadTM X Vision Processing Unit |
| Energy Efficiency | 9.33 Tops/W | 1.25 Tops/W |
| Supported frameworks | pyTorch、Caffe | TensorFlow、Caffe |
| Compatible operating system | Ubuntu 16.04 Windows 10 |
Ubuntu 16.04 Windows 10 CentOS 7.4 |
| Size | 27.5 × 12.5 × 3.5mm | 72.5 × 27 × 14mm |