How to build your own weather station with Raspberry Pi
How does BME280 work on thermometers, weather forecasts, and even GPS? How does it connect to other parts to form a complete product for real application? Are you confused by these questions or only have a vague memory even they sound familiar.
Don’t worry ! This article will cover the most common concerns people have about Raspberry Pi and BME280, and make all information relate to each other.
- Introduction to Raspberry Pi and BME280
- How to connect Raspberry Pi and BME280 – Grove Base Hat
- Important elements on BME280 – how is it working, how does it get connected
- Project and application – Ways to build your own weather station
- Comparable products with BME280
- Conclusion
Introduction to Raspberry Pi and BME280
The Raspberry Pi is a range of compact designed by Raspberry Pi Foundation for, which is closer to life, offering convenient to Maker’s manufacture and school teaching.
The ever-present Pi in its latest iteration—Raspberry Pi 4 —as the Pi Foundation continues to improve on an already excellent product.
BME280 is a digital pressure, humidity, and temperature sensor, in which the size is designed to be portable and low current consumption (3.6 ?? only) but with long term stability and high EMC robustness.
BME280 contains a 3.3 V regulator, making it available for 3 to 5 V logic microcontroller. It is designed for both I2C and SPI, which, therefore contains a separate pinout for I2C and SPI.
BME280 is designed to be compatible with Raspberry Pi, which can be programmed in python when connecting them. The BME280 is an upgraded version of BMP180, and BME280 gets dramatic improvements from BMP180. BME280 comes with a smaller footprint, lower power consumption, lower noise measurements, higher resolutions for pressure and temperature, lower RMS noise, newly added SPI bus, more measuring modes, higher measuring rate, and newly added filter against environmental interference.
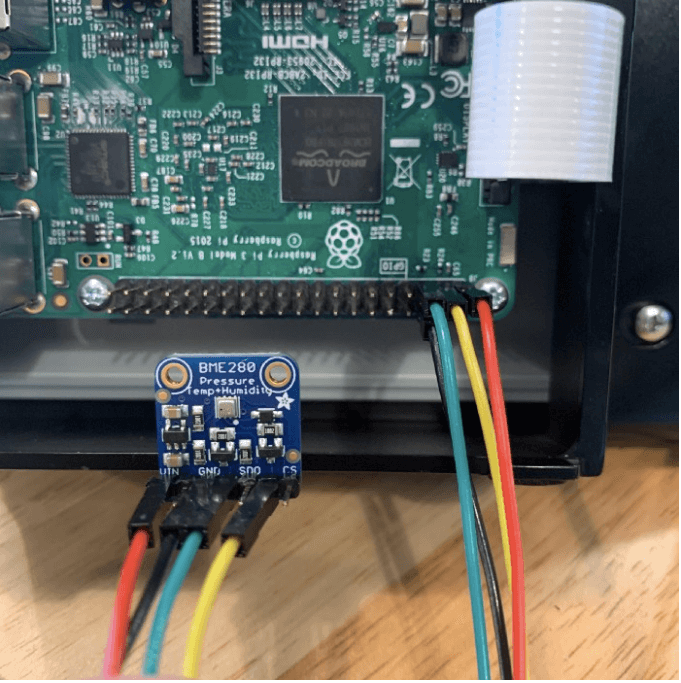
Grove Base Hat for Raspberry Pi and BME280 Connection
BME280 is designed as a companion to Raspberry Pi. SDI pinout of BME280 stands for Serial Data Input and all the requests from the MCU to the sensor goes through this line, and SDO stands for Serial Data Output, which outputs the temp, humidity, barometer data from this sensor and sends to the connected MCU.
You need a grove base hat to connect BME280 with Raspberry Pi so that the data can flow through BME280 and then processed in Raspberry Pi. The Grove Base Hat for Raspberry Pi provides Digital/Analog/I2C/PWM/UART port. With the help of build-in MCU, a 12-bit 8 channel ADC is also available for Raspberry Pi.
Ten important pinout on BME280 – How to get BME280 connected
Now that you are familiar with BME280 and Raspberry PI, but when you see the real BME280, are you confused again? How do I connect BME280 with Raspberry Pi? What is the function of each element on the board? Which part is used to connect I2C and which part is used to connect SPI?
As the figure shows below, the four pinouts on the left are connected to I2C and the pinouts on the right are used to connect SPI. The specific functions of each Pinout are also listed
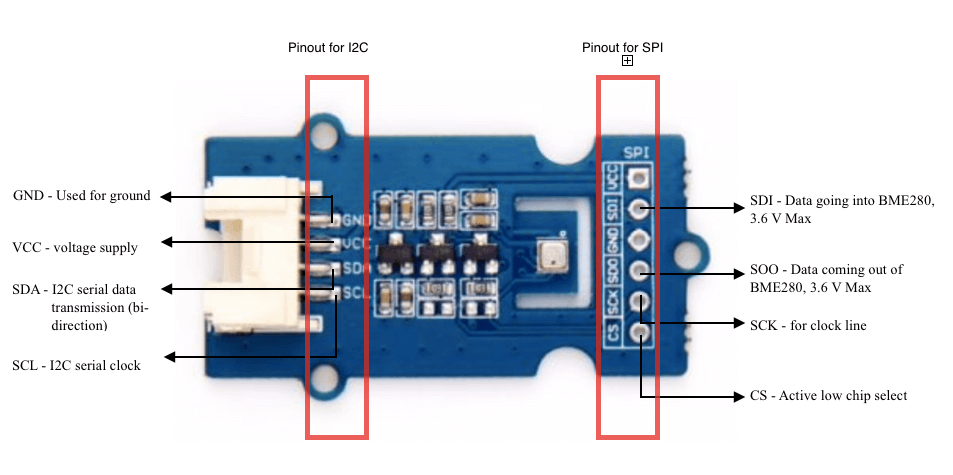
GND – Used for ground
VCC – Voltage Supply
SDA – I2C serial data transmission (bi-direction)
SCL – I2C serial clock
SDI – Data going into BME280, 3.6 V Max
SOO – Data coming out of BME280, 3.6 V Max
SCK – for clock time
CS – Active low chip select
Projects, Applications, and Examples with Raspberry Pi and BME280
How to Build a Raspberry Pi Temperature Monitor
I’m new, and I haven’t learned about Raspberry PI and BME280 in detail. I need specific basic knowledge and detailed guidance. Check this project!
The article briefly introduces the contents of Raspberry Pi, BME280, and also the other two sensors. Then it mainly provides a connection method between the sensor and Raspberry Pi, ready for data and coding.
Weather Station Using Raspberry Pi With BME280 in Python
By Dcube Tech Ventures in Circuits
Don’t you want to set up a weather station of your own? It will report the temperature and humidity, even the pressure, every day for you. Sounds fancy, right? But don’t worry, it’s a very simple process. This blog from Instructable Circuit briefly introduce the procedures to connect Raspberry Pi with BME280, and how the other parts connect to finally measuring data
Equipment preparation
Check these out ! We got all you need!
After you are done with preparation, we can now start to build !
- Connection of the Raspberry Pi and I2C Shield.
- Connection of the Sensor and Raspberry Pi
- Internet Connectivity
- Powering up the Circuit
- Connection to Screen
- Python code
RPi.BME280 0.2.3
ref Python Software Foundation
I know how to program, and I have Raspberry PI and BME280, but how do I connect the two?
This blog from Python Software Foundation describes a project to interface a BME280 digital sensor module (capable of sensing temperature, humidity , and pressure) in Python 2 or 3 using I2C on the Raspberry Pi. BME280 and Raspberry Pi can be acquired for a few pounds from Seeed. The article mentioned the pre-requisites of the project, ensuring that the I2C kernel driver is enabled, adding user to the I2C group, Installing packages, etc.
What’s more for your weather station? (BME280 Related products)
– BMP085 The sensor is soldered onto a PCB with a 3.3V regulator, I2C level shifter, and pull-up resistors on the I2C pins.
– BMP180 The function compatible successor of the BMP085, a new generation of high precision digital pressure sensors for consumer applications. This product can be found on Seeed.
– BMP183 The next-generation of sensors from Bosch, and is the fraternal twin of the BMP180. BMP183 uses SPI instead of I2C.
Conclusion
After reading this article, do you know more about BME280 and Raspberry Pi? Do you feel the fun of practice when making your own Weather Station? The Weather Station project makes a tight connection between Python programming and circuits, which is a complete project, but it is also friendly for newbies since it can be done even if they first learn about it.
There are also many tutorials on Weather Station in the community. Of course, you are recommended to visit seeed’s wiki, as we’ll step by step provide you with a more detailed tutorial.
Hope this article has been helpful and fun for you!