25 Raspberry Pi Pico Project Ideas in 2026!
The Raspberry Pi Pico microcontroller unit (MCU) is the latest addition to the Raspberry Pi family. As the world anticipates this new beginner-friendly MCU, we at Seeed are already thinking of exciting ways that we can have fun with it. Here are 25 existing projects from which we can draw inspiration for our very own Raspberry Pi Pico Projects!
Raspberry Pi Pico Features
Some of you might be wondering what the latest MCU from the Raspberry Pi Foundation has to offer.
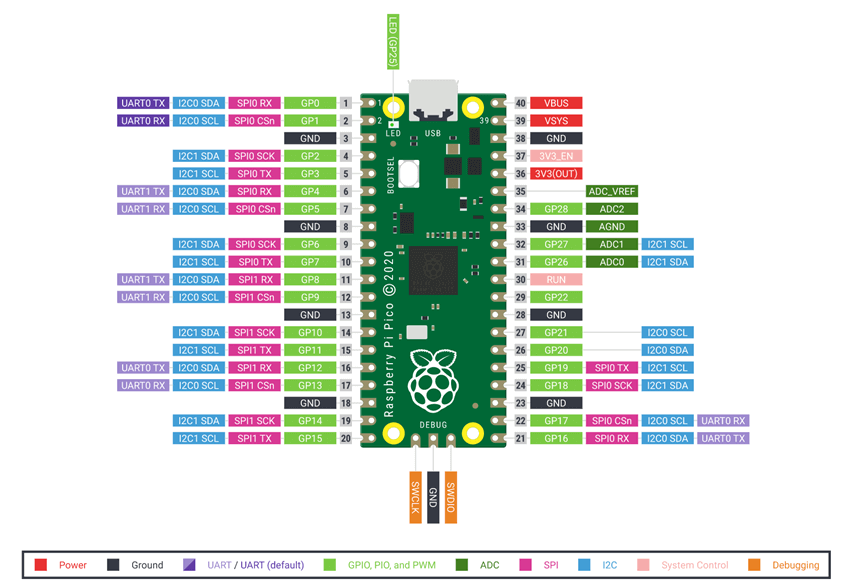
Quite simply, the Pico pretty much has it all! Running on the Raspberry Pi Foundation’s in-house RP2040, it’s a very flexible MCU with plenty of I/O peripherals, including UART, SPI, I2C, ADC, and GPIO.
In addition, the Raspberry Pi Pico’s headline feature, Programmable I/O, allows you to expand the computing possibilities on this tiny MCU by offshoring some processing loads to the 8-state machines on the Pico. To learn more, kindly read our article on Programmable I/O!
Even better, the Raspberry Pi Pico runs MicroPython right out of the box. This means that you can use the beginner-friendly Python language to program it, which makes this the perfect entry point for any beginner!
Arduino has also just released their official port of the Arduino Core to RP2040, which means you will soon be able to leverage the thousands of Arduino libraries and tutorials available!
No matter which of these Raspberry Pi Pico projects you decide to build, the Pico will definitely have you covered!
Wanna extend more possibilities with just Plug and Play? Check out Grove Ecosystem! And Grove Shield for Pi Pico
You’ll notice that each pin on the Raspberry Pi Pico is simply “holes”. You’ll need headers and a breadboard to interface with them or to solder your wires directly onto it. Today, I’d like to tell you that there’s a third and much better option: Grove!
Grove is a standardized and modular prototyping system that allows you to build your electronics projects quickly! With Grove, beginners and experts alike can get started on projects without all the complications of soldering and wiring. You will also be able to rely on our extensive Grove Seeed Wiki, which provides in-depth information and tutorials for each Grove module.
About RP2040
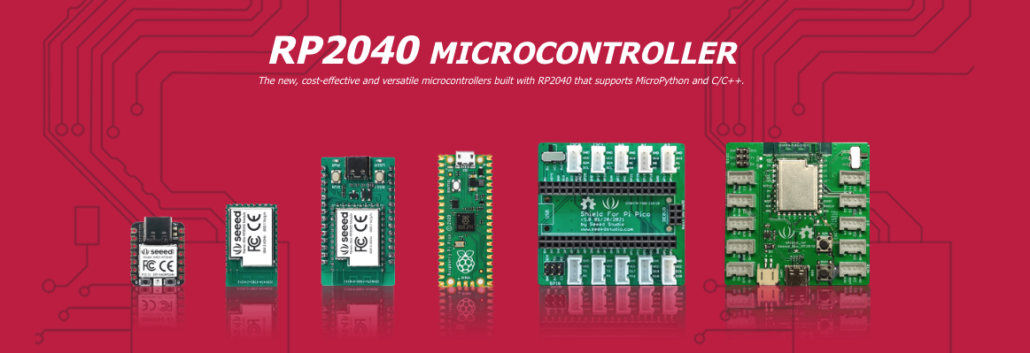
More RP2040 Microcontrollers
Raspberry Pi Pico W: perform everything you need in IoT wireless controlling projects.
- The latest member of RP2040 with Wi-Fi & Bluetooth.
- 30 multi-function GPIO pins on the Pico W, 12C, SPI, UART, 8 programmable I/Os
- Comprehensive C/C++/Micropython SDKs, multiple software examples, and documentation
- Smallest at 20×17.5×3.5 mm with 264KB of SRAM, 2MB of onboard Flash
- Rich Interface: 11 digital pins, 4 analog pins, 11 PWM Pins, 1 I2C interface, 1 UART interface, 1 SPI interface, 1 SWD Bonding pad interface
- Using powerful WiFi chip, supporting 2.4~2.4835 GHz frequency and Ap & Station mode
- Extremely compact size: 18.0x 28.2×1.0mm, 32 pins SMT
- Comprehensive C/C++/MicroPython SDK, software examples, and documentation
- Breadboard friendly
- Using powerful WiFi chip, supporting 2.4~2.4835 GHz frequency and Ap & Station mode
- U-blox® Nina W102: The first and only RP2040 board with native Bluetooth and WiFi connectivity.
- ST LSM6DSOX 6-Axis IMU
- Microchip ATECC608A Cryptographic Co-processor
- Arduino Nano Form Facto
Without further ado, here are our top 25 ideas for Raspberry Pi Pico projects segmented into Geography related, Automation, Enthusiast, and Smart Home Projects– and the Grove modules that can help you build them!
Top 25 Ideas for Raspberry Pi Pico Projects
25. Raspberry Pi Pico temperature sensor, raspberry pi pico Onboard temperature sensor
Because the Raspberry Pi Pico has a temperature sensor in one place, you don’t need to buy an extra temperature sensor, in this video, Electronic Clinic will teach you how to use a Raspberry Pi Pico to set up a temperature sensor! and this project is perfect for Raspberry Pi Pico for beginners!
Here’s what you need :
You can click here to start your own temperature sensor by using Raspberry Pi Pico!
24. Raspberry Pi Pico Keyboard and Gamepad HID with an NES Controller!
Have you ever thought about using a Raspberry Pi Pico Keyboard and Gamepad HID with an NES Controller? Print ‘N Play Youtuber has the idea, and it’s a really fun Raspberry Pi Pico Project!
Here’s what you need:
- Raspberry Pi Pico
- NES Controller
You can check here to build your controller!
23. Automatic Plant-Waterer using Raspberry Pi Pico
You may have forgotten to water your greens, but now you can use a Raspberry Pi Pico to link a soil moisture sensor to help you water your greens automatically, and is very to make this easy Raspberry Pi Pico project!

Veebch uses a Raspberry Pi Pico to help her water she plants
Here’s what you need:
- Raspberry Pi Pico
- Soil-moisture sensor
- Relay switch
- A plug socket for the water pump
- A cheap fish tank water pump
This raspberry pi pico project is perfect for those who are new to Pico for the first time or those who often forget to water their greens, you can check here to start your first Pico project! Here is the video for you to take a look
22. Raspberry Pi Pico W Setup & Debugging
Gain the power of the RP2040 Processor with in-built WiFi for a very reasonable price, along with Hardware Debugging capabilities!
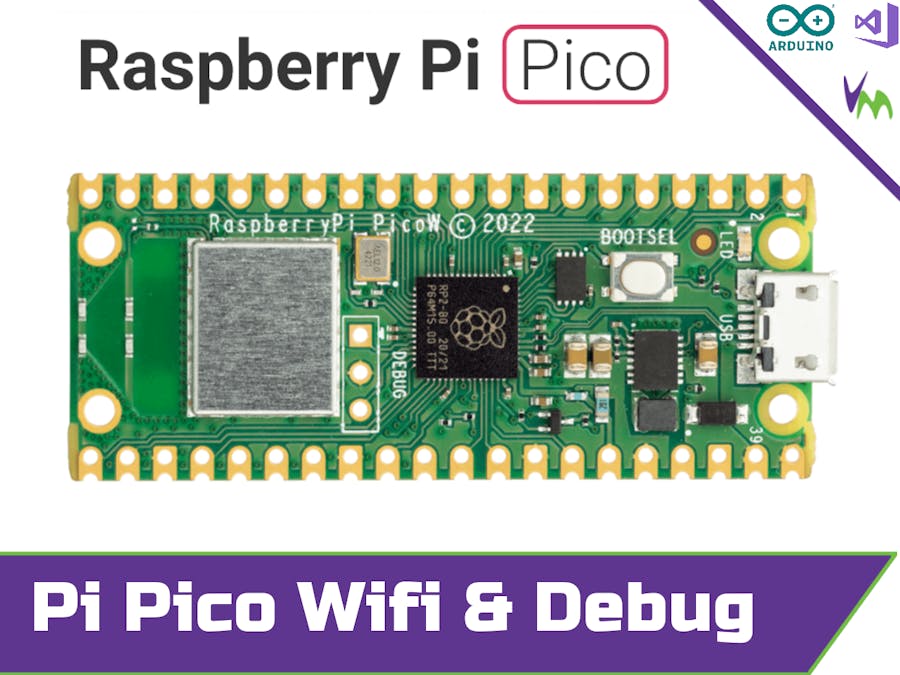
You may not know Raspberry Pi Pico or Pico W, which allows you to connect to your network. In this project Arduinocc, he will teach you how to use Raspberry Pi Pico to connect to your home network. When you connect to the network, you can make some simple project
Here’s what you need:
- Raspberry Pi Pico or Raspberry Pi Pico W
- Female/Female Jumper Wires
- USB-A to Micro-USB Cable
Click here to teach you how to connect your Pico to your home network and start making your own Raspberry Pi Pico.
21. Pico stair lights
Craig made a LED stair light project using a Raspberry Pi Zero. But in the three years since then, many things in the world have changed, most notably when the stair lights stopped working.

Here’s what you need:
- Raspberry Pi Pico
- 30 LED Neopixel strip
- Resistor 10k ohm
- LDR, 5 Mohm
- PIR Sensor, 7 m
You can check here for this awesome Raspberry pi Pico project to make your home more advanced and not cause you to fall over because the stairs have no lights.
20. Temperature Humidity Sensor
Starting with a geography project, build a sensor that can tell the real-time temperature and humidity on an OLED Display screen.
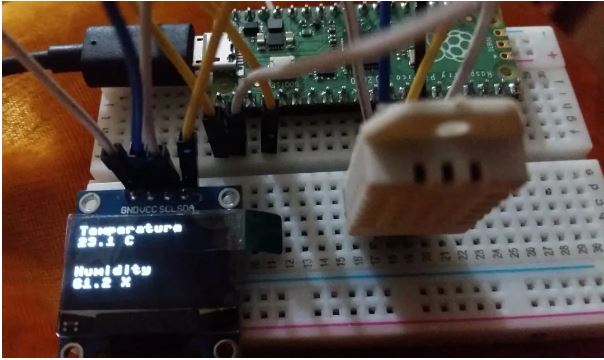
This project uses a DHT11 digital temperature and humidity sensor. It uses a capacitive humidity sensor and a thermistor to measure the surrounding air and spits out a digital signal on the data pin with no analog input pins needed.
Building with Pico & Grove
Recommended Grove Modules: Grove – Temperature & Humidity Sensor (DHT11)
The DHT11 is also available in the Grove format! The single-bus digital signal is output through the built-in ADC, which saves the I/O resources of the control board.
For further documentation and sample codes with the Grove DHT11 sensor, please visit the Seeed Wiki.
19. Weather Station
Go one step further and build your very own weather station that can display temperature, humidity, and pressure sensor readings. Furthermore, access these readings any time on a web server that can be accessed in your local network!
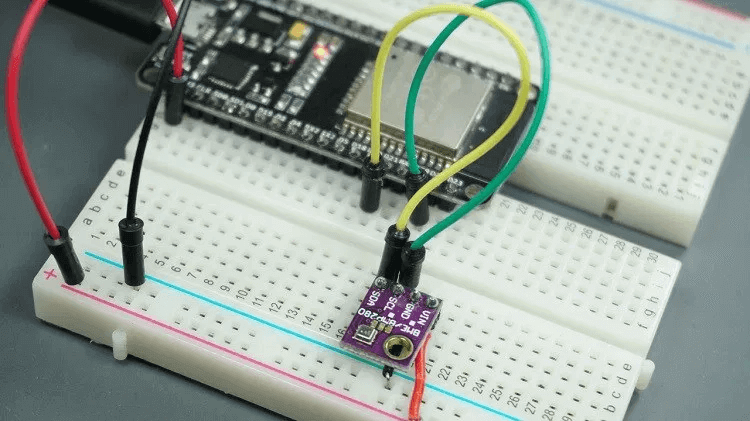
This project uses a BME280 temperature, humidity, and pressure sensor to collect environmental readings with a microcontroller. The data is then uploaded to a locally hosted server for convenient access!
For more information and the project codes, please visit the full tutorial.
Building with Pico & Grove
Recommended Grove Modules: Grove – Temp&Humi&Barometer Sensor (BME280)
The BME280 is also available in the Grove format! We can easily connect it to the Raspberry Pi Pico’s Grove Shield using the I2C connector. Furthermore, the BME280 has its own MicroPython library, which is officially supported on the Raspberry Pi Pico.
For further documentation and sample codes with the Grove BME280 sensor, please visit the Seeed Wiki.
18. Global Positioning System (GPS)
Get your GPS location parameters data such as Latitude, Longitude, Number of Satellites, Current Time, and more from this project!

This project uses a GPS module and Raspberry Pi Pico to obtain GPS parameters and would present the data on an OLED display.
Building with Pico & Grove
Recommended Grove Modules: Grove – GPS Module / Grove – OLED Display
The Grove GPS module is a cost-efficient, field-programmable gadget with a SIM28 module and serial communication configuration. It features 22 tracking / 66 acquisition channels GPS receiver. The sensitivity of tracking and acquisition reaches up to -160dBm, making it an excellent choice for personal navigation projects and location services.
The OLED Display 0.96″ (SSD1315) is a monochrome(white) 128×64 pixels passive display matrix module with Grove I2C Interface.
For more information on the Grove GPS Module, please visit the Seeed Wiki.
17. Line Following Robot
Moving on to the automation projects, building robots isn’t easy, but a line following robot is a great place to start. Once you are done, make your track and watch your robot cruise along for the greatest satisfaction!
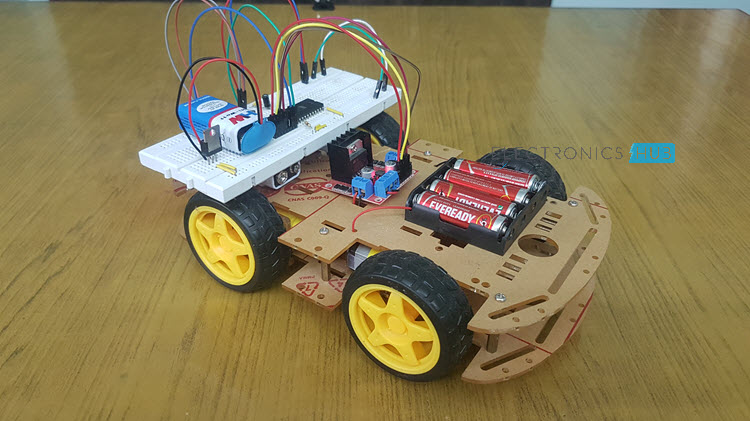
This line following robot is built around two infrared (IR) sensors. Due to the difference in reflectivity of white and black surfaces, the IR sensors can detect when a line is present. This way, we can use our Raspberry Pi Pico to handle the sensor inputs and steer our robot correctly!
Check out this tutorial on Electronics Hub!
Building with Pico & Grove
Recommended Grove Modules: Grove – Infrared Reflective Sensor / Grove – I2C Motor Driver
The Grove Infrared Reflective Sensor uses a digital output, while the Grove Motor Driver uses an I2C connector. Since these are both available on the Grove Shield for the Raspberry Pi Pico, you won’t have trouble taking advantage of the convenient Grove connectors to build this project.
For tutorials and code samples, be sure to visit the Seeed Wiki for these grove modules: Grove Infrared Reflective Sensor / Grove I2C Motor Driver
16. Automated Model Railroad
Another automation project you may be interested in is model railroading, a reduced-scale rail transport system!
You can learn how to make one for yourself at home with the Tutorial by KushagraK7.
List of hardware needed:
- Raspberry Pi Pico
- L298N Motor Driver
- Sensored Track
Building with Pico & Grove
Recommended Grove Modules: Grove – I2C Motor Driver
This Motor Driver uses the L298 chip. Also, there is an ATmega8L chip on board to enable the I2C connection, and it is perfectly compatible with Arduino.
It is a dual-channel motor driver to connect with the step motor, which means you can control two motors simultaneously. The Arduino Library of this board is available on Github.
Visit the Seeed Wiki pages: Grove – I2C Motor Driver
15. Interfacing 16×2 LCD Display
Moving on to the enthusiast projects, the first one we will look at is a simple 16×2 LCD Display project. There are many uses for this, and it can be implemented in many projects, even in this article!
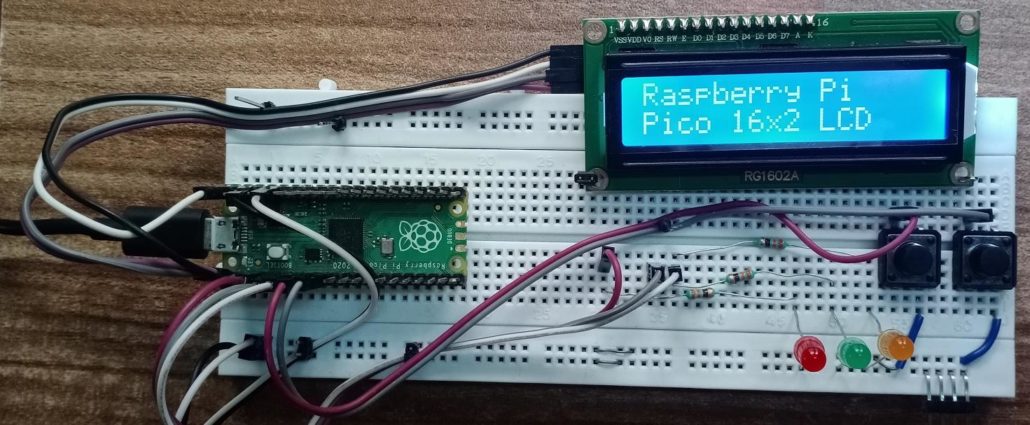
An LCD is an electronic display module that uses liquid crystal technology to produce a visible image, for example, to display the system status, menu navigation, or configuring system parameters. The project is based on an HD44780 Driver mounted on the LCD module’s backside. The LEDs are used for visual indication, and Push Buttons are used for handling user input.
Building with Pico & Grove
Recommended Grove Modules: Grove – 16×2 LCD RGB Backlight / Grove – LED Pack / Grove – Button
The Grove RGB Backlight is a full-color backlight LCD Display with high contrast and ease of use, making it a perfect I2C LCD Display for Raspberry Pi. You can set any RGB color as the backlight! Furthermore, you can also display your DIY images, such as a heart or smiley face. You can check here to make your image array, just release your creativity and imagination.
The LED Pack includes 4 kinds of different colors of LED which are red, green, blue, and white.
The Grove Button is a momentary push button. It contains one independent “momentary on/off” button. “Momentary” means that the button rebounds on its own after it is released. The button outputs a HIGH signal when pressed and LOW when released.
Visit the Seeed Wiki pages: Grove – 16×2 LCD RGB Backlight
14. Wake Word Identifier
A wake word is a unique phrase meant to activate a device once spoken by a user — for example, the famous “Hey Siri” or “OK Google”.
We can see from the video that once a “Yes” is said and detected, the LED lights up. While once a “No” is said and detected, the LED would turn off. It is a straightforward project requiring only a Raspberry Pi Pico and Microphone Amplifier.
Building with Pico & Grove
Recommended Grove Modules: Grove – Sound Sensor
The Grove Sound Sensor module works similarly to the Microphone Amplifier mentioned above in the project. It is a simple microphone compatible with Raspberry Pi. It can detect whether there’s sound surrounding and output the sound strength of the environment. This module can easily integrate with logic modules on the input side of Grove circuits, and its output is analog. Its tiny size and high performance make it perfect for your Raspberry Pi audio detection and interactive project.
Visit the Seeed Wiki pages: Grove – Sound Sensor
13. Wood Burning Plotter
For woodwork and electronics enthusiasts, you will find a thrill in creating a cool CNC plotter that can draw and burn wood. It is all possible thanks to a small but powerful Raspberry Pi Pico microcontroller.
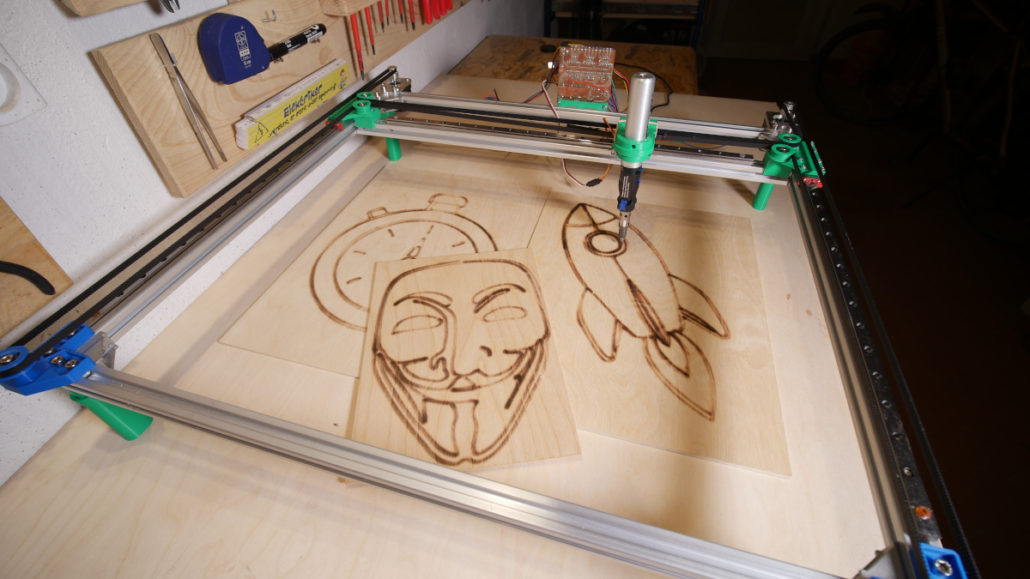
This project is a little more tedious, requiring a 3D printer and CNC machine outside electronic hardware. The electronic hardware needed is Motors, Stepper Drivers, Raspberry Pi Pico, and Micro Servo. But it will be gratifying once you see your end product!
Building with Pico & Grove
Recommended Grove Modules: Grove – I2C Motor Driver (TB6612FNG)
This Motor Driver can drive 2 DC motors up to 12V/1.2A or drive 1 stepper motor up to 12V/1.2A. This diver board is based on TB6612FNG, a driver IC for DC motor and a stepper motor with output transistor in LD MOS structure with low ON-resistor. Two input signals, IN1 & IN2, can choose one of four modes: CW, CCW, short brake, and stop mode.
Visit the Seeed Wiki pages: Grove – I2C Motor Driver (TB6612FNG)
12. Mini Drone
You can easily make a mini drone project with a Raspberry Pi Pico board. Watch the following video to see how simple it can be!
Here are the components for making a drone with a Pico board:
- Drone Body Frame
- 8520 micro coreless motor
- 55mm propellers
- Lipo battery
- A2SHB MOSFET
- MPU 6050 Accelerometer
- RX-2A receiver
- Flight Controller Section
Building with Pico & Grove
Recommended Grove Modules: Grove – MOSFET / Grove – 6 Axis Accelerometer
The Grove MOSFET lets you control higher voltage projects with low voltage on the microcontroller. Its switching frequency can reach up to 5MHz, much faster than a standard mechanical relay. There are 2 screw terminals on the board — one for the outer power source and the other for the device you want to control.
The Grove Accelerometer is a 6-degree of freedom high-performance Inertial Measurement Unit (IMU). This sensor is based on BOSCH BMI088, a high-performance IMU with high vibration suppression. It combines a 16-bit triaxial gyroscope and a 16-bit triaxial accelerometer. Typical uses are drone and robotics applications in demanding environments.
Visit the Seeed Wiki pages: Grove – MOSFET / Grove – 6 Axis Accelerometer
11. Digital Oscilloscope
An oscilloscope is an instrument that graphically displays electrical signals and shows how these signals change over time. Engineers commonly use it to measure electrical phenomena and quickly test, verify, and debug their circuit designs.
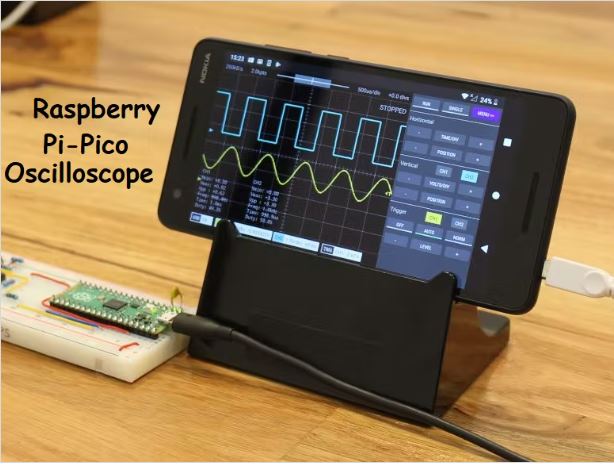
This project runs on mobile and uses Raspberry Pi Pico, Resistors, and Breadboard. The signal from Pico goes to mobile through USB to get a decent waveform.
Building with Pico & Grove
Recommended Grove Modules: Grove – Breadboard
The Grove Breadboard is 35x47x8.5mm in size, with metal strips underneath the board and connects to the holes on the top of the board.
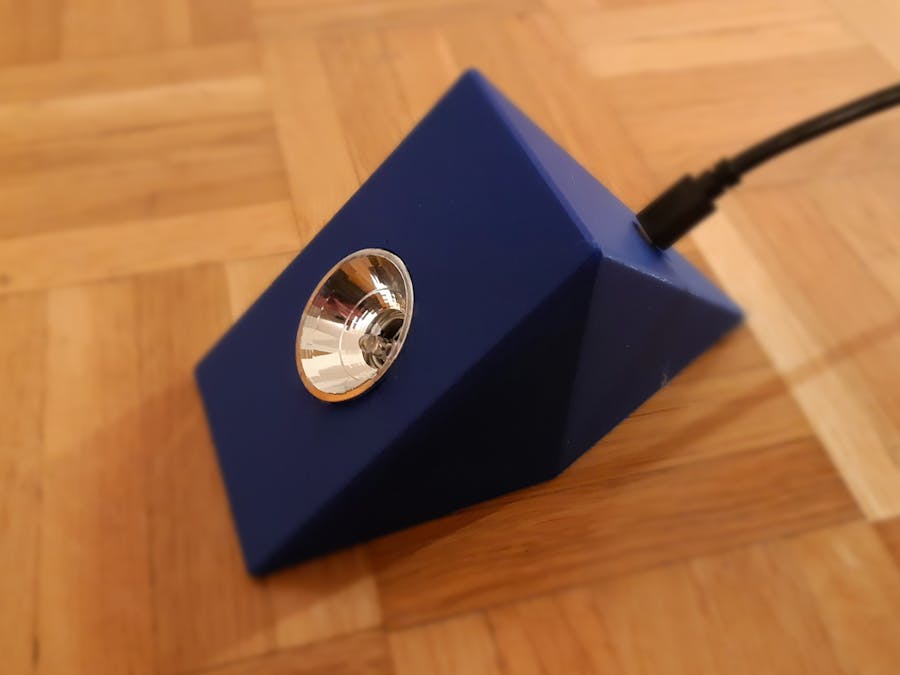
10. Adjustable Studio Light
Ever needed a small adjustable studio light for low-light or colored shadows photography? PicoLight is the answer to all your troubles!

This project consists of 2 PCBs and a white acrylic panel sandwiched together. One of the PCBs is a 4×4 Neopixel Matrix with a Raspberry Pi Pico on the back and a rotary encoder with push-button. The encoder is used to adjust colors and intensity. The other PCB is a LiPo battery shield which includes a charging circuit and a power switch.
Building with Pico & Grove
Recommended Grove Modules: Grove – Encoder / The Lipo Rider Plus
The Grove Encoder is an incremental rotary encoder. It encodes the rotation signal from the axis and outputs the signal by electronic pulse.
The Lipo Rider Plus from Seeed is not only a fast charger but also a strong power boost, it supports up to 5V/2A charging current, boosts output integration, and output up to 5V/2.4A can also output 3.3V /250mA.
Visit the Seeed Wiki pages: Grove – Encoder
9. Joke Telephone
Go back to the times before smartphones and enjoy dialing an old school push button telephone!
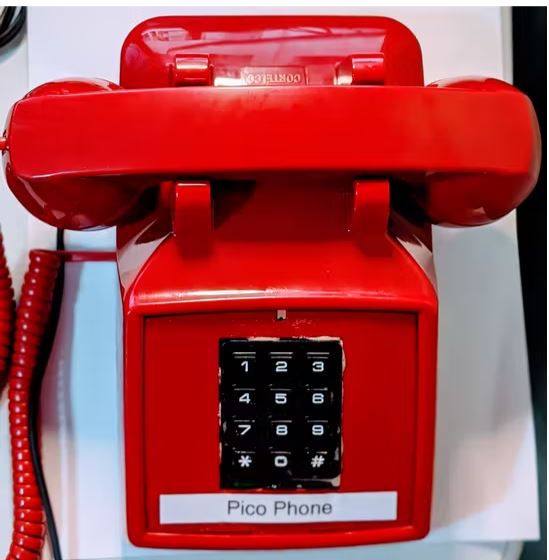
This project requires a Raspberry Pi Pico, Notecard, and a QWIIC Keypad (Numbers, *, and #). And after you dial any phone number, it will text you a joke!
Building with Pico & Grove
Recommended Grove Modules: Grove – 12 Channel Capacity Touch Keypad
This Touch Keypad is built around the ATtiny1616, an AVR® 8-bit processor running up to 16 MHz. With this module, you can easily create an Arduino password keypad or a DIY phone keypad. It is an easy-to-use module that requires very little code, no soldering, just plug and play!
Visit the Seeed Wiki pages: Grove – 12 Channel Capacity Touch Keypad
8. Pong Arcade Game
Go back to the 1970s and play the classic Pong game using gesture control!
This project is easy and fun to do! It requires these materials:
- 1 x Raspberry Pi Pico
- 2 x 940nm IR phototransistors
- 2 x 940nm IR LEDs
- 1 x VGA breakout adapter
- 3 x 100 ohm resistors
- 3 x 387 ohm resistors
- 2 x 10 ohm resistors
- 2 x 10K ohm resistors
- 2 x Breadboards
- Small disc mirrors
Building with Pico & Grove
Recommended Grove Modules: Grove – Light Sensor v1.2 – LS06-S Phototransistor / Grove – Breadboard
The Grove Light Sensor v1.2 is an analog module that can output various electrical signals converted to different ranges. It integrates an LS06-S photoresistor, a high-sensitive and reliable photodiode, to detect light intensity in the environment.
The Grove Breadboard is 35x47x8.5mm in size, with metal strips underneath the board and connects to the holes on the top of the board.
Visit the Seeed Wiki pages: Grove – Light Sensor v1.2
7. Burglar Alarm
Moving onto smart home applications further strengthens the security features of your house by having a burglar alarm to detect intruders.
Using a passive infrared (PIR) sensor, this project will detect foreign movement near your home’s entry points so that you will be notified of any suspicious activity.
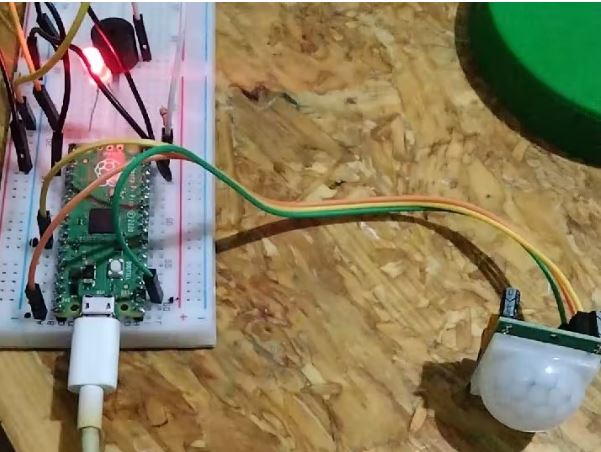
A PIR is capable of detecting motion. When it does, the signal will be sent to our Raspberry Pi Pico – which will then trigger the buzzer to go off! You can add many functionalities to this burglar sensor, including mobile alerts with a WiFi module or bright LEDs to scare your intruder off!
Building with Pico & Grove
Recommended Grove Modules: Grove – Mini PIR motion sensor / Grove – Piezo Buzzer/Active Buzzer
The Grove Mini PIR motion sensor is a compact, low power consumption and cost effective PIR sensor which is suitable for applications with relatively less detection distance requirement.
The Grove Buzzer is a simple yet enjoyable twig to use. It can output noise at a volume over 85 dB and is integrated with Grove interface, which makes it easy to connect and experiment by just plug & play. It is a perfect add-on for all kinds of Arduino projects and human-machine interfaces.
You can also read more about each module at their Seeed Wiki pages: Grove Mini PIR motion sensor / Grove Piezo Buzzer/Active Buzzer
6. Liquid Level Monitoring System
Always forgetting to turn off a bucket before it overflows? Try this project, an automated liquid level monitoring system that will solve any water wastage issue you have!
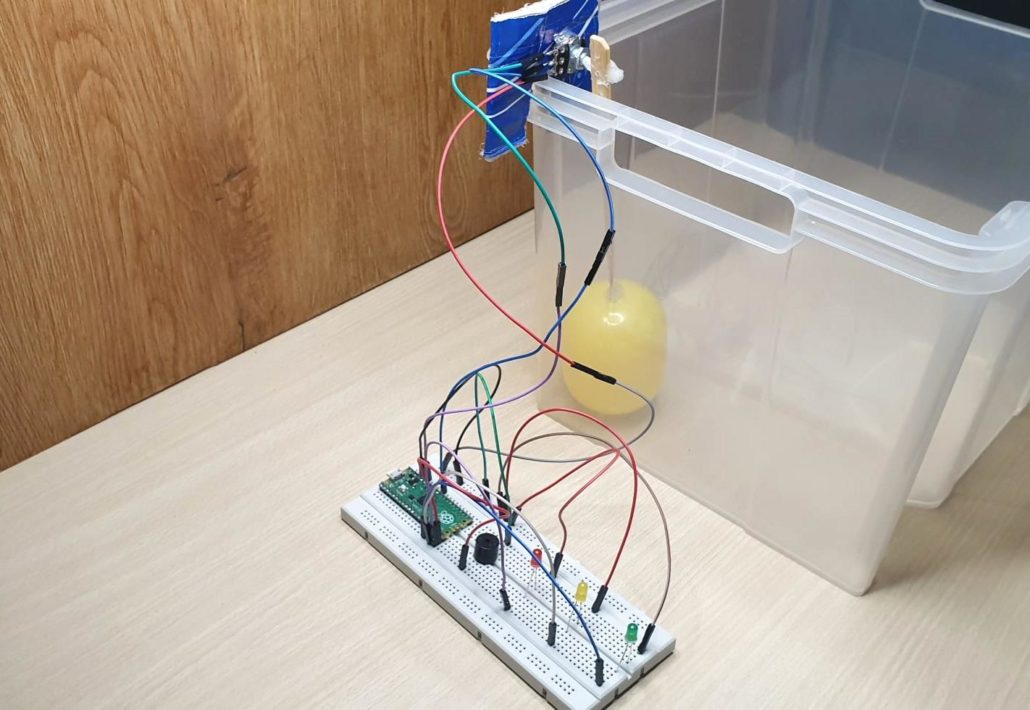
This project uses a Raspberry Pi Pico, Potentiometer, Breadboard, Jumper Cables, colored LEDs, Buzzer, and a floatable object. The floatable object would gauge the water level, and once it hits a different water level, different lights would light up to indicate the level.
Building with Pico & Grove
Recommended Grove Modules: Grove – Slide Potentiometer / Grove – Breadboard
The Slide Potentiometer is a linear variable resistor with a total resistance of 10k. When you move the lever from one side to the other, its output voltage will range between 0 V to the VCC you apply. Three of four Grove pins are connected to VCC, GND, and the ADC IN on the slide, while the remaining pin is connected to a green indicator LED. The indicator LED can visually display the change on the potentiometer.
The Breadboard is 35x47x8.5mm in size, with metal strips underneath the board and connects to the holes on the top of the board.
Visit the Seeed Wiki pages: Grove – Slide Potentiometer
5. Bathroom Ventilation
Does your bathroom occasionally get too humid, or is the fan running unnecessarily too long?
Bathroom ventilation is essential due to the extra humidity in this room. Taking showers, flushing the toilet, and washing your hands all add moisture to the air in your bathroom. Ventilation removes the trapped moisture, which provides several benefits.
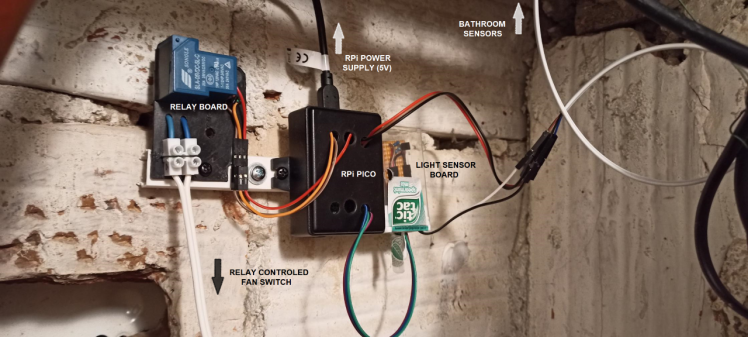
This project uses a DHT11 sensor, similar to the temperature and humidity sensor in the first example. It automates the switching of the fan and its running time to prevent all the problems mentioned above.
Building with Pico & Grove
Recommended Grove Modules: Grove – Temperature & Humidity Sensor (DHT11)
The DHT11 is also available in the Grove format! The single-bus digital signal is output through the built-in ADC, which saves the I/O resources of the control board.
For further documentation and sample codes with the Grove DHT11 sensor, please visit the Seeed Wiki.
4. Motion Sensing Automatic Fan
You don’t control this fan with a remote or a switch. You turn this fan on by waving your hand!
It doesn’t come with a switch or a button. This fan uses a motion-sensing technology to power itself. The sensors can detect any motion in the vicinity and turn them on! With 100 degrees of rotation, this oscillating fan can make a great desk accessory to keep you cool and comfortable working on your desk!
Check this project out on hackster.io.
Building with Pico & Grove
Recommended Grove Modules: Grove – Mini Fan v1.1 / Grove – Mini PIR Motion Sensor
This project was created by one of our Seeed’s maker using entirely Grove modules! With Grove plug-and-play capability, you can also pick up additional module to add to the functionality of the fan such as a Grove – Temperature Sensor for it to auto turn-on during higher temperatures!
3. Light Alarm Clock
This alarm clock will gently wake you up with light instead of sound.
An alarm clock need not be the noisy sound you loathe every morning. Anything that can wake you up can be your alarm clock. The creative mind of teig on hackster.io uses this piece of fact to create an alarm clock that ‘rings’ with light every morning to wake you out of bed gently! It is simple yet effective!
Building with Pico & Grove
Recommended Grove Module: Grove – RGB LED Ring (20 – WS2813 Mini)
This RGB LED Ring consist of 20 chainable and programmable WS2813 mini LEDs that is sure to lit up bright enough to wake you up! Being an RGB light, you can also customise it to light up with your favourite colour.
2. Multi-Functional Digital Clock
Get your own tiny and portable multi-functional digital clock powered by Raspberry Pi Pico!
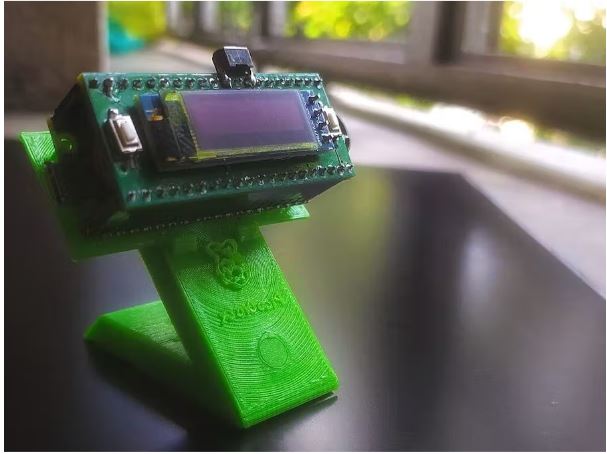
This project uses Seeed Studio DS3231, a high-accuracy real-time clock, with Raspberry Pi Pico and a Graphic OLED. It is powered by a Li-Ion battery and has a buzzer for an alarm to ring when needed. It has several modes other than telling the time and date, such as Stop Watch and Timer Clock.
Building with Pico & Grove
Recommended Grove Module: Grove – OLED Display
The Grove – OLED Display 0.96″ (SSD1315) is a monochrome(white) 128×64 pixels passive display matrix module with Grove I2C Interface.
1. Home Ambient Lighting
Have you ever wanted to change your room’s mood by changing the light’s color? This project will allow you to do so by using Bluetooth!
The list of components used for this project are:
- Raspberry Pi Pico
- RGB LED Strip
- Tip122 Darligton Transistors
- 16-channel 12-bit PWM driver
- HC-05 Bluetooth module
- 12V amp power supply
- 1k ohm resistors
- Breadboard
Building with Pico & Grove
Recommended Grove Modules: Grove – RGB LED Strip / Grove – Breadboard
The RGB LED Strip is Grove Compatible – you can just plug your LED Strip to Seeedunio or Arduino+BaseShild via Grove Cable, no soldering, no complicated wiring. It is also waterproof!
The Grove Breadboard is 35x47x8.5mm in size, with metal strips underneath the board and connects to the holes on the top of the board.
Get Started with the Raspberry Pi Pico with Grove Starter Kit for Raspberry Pi Pico!
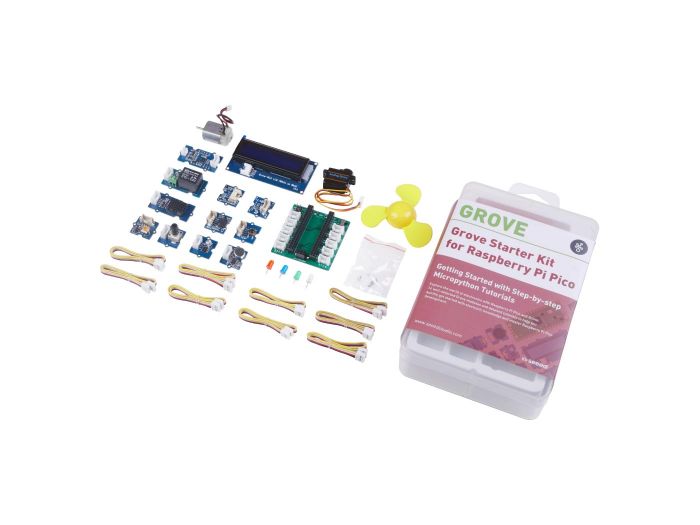
Here at Seed, we have a Grove Starter Kit designed for the Raspberry Pi Pico! It comes with 5 sensors, 5 actuators, 2 LEDs, 1 LCD display, and 1 Grove shield, making it easy to get started with the Raspberry Pi Pico. Find out more at Seeed’s online store.
Summary
We hope you enjoyed our top 20 Raspberry Pi Pico projects to do in 2022. You’ll find that most of these projects can be modified to add as many (or as few) functions as you would like. That’s the beauty of making!
What will you make with your Pico?
To see our other articles on the Raspberry Pi Pico, please visit:
- Raspberry Pi Pico, the first microcontroller released by Raspberry Pi Foundation, based on the new RP2040 MCU
- Programmable I/O with Raspberry Pi Pico
Preorder your Raspberry Pi Pico with Seeed!
The Raspberry Pi Pico is available on the Seeed online store, along with its Grove shield. Order your Raspberry Pi Pico now!