Touch sensors: What it is, How it works, Arduino Guide
Touch sensor has been common nowadays for displays and IoT projects with Arduino. They can be found in lamps, touch screens of smartphones, and other wide arrays of applications as well. However, do you understand the working principle of a touch sensor and how to use it alongside your Arduino?
Well, in this touch sensor guide, I’ll be covering the following to help you better understand Arduino and touch sensor by covering:
- What is a touch sensor
- How does a touch sensor work
- Touch sensor applications
- Types of touch sensor
- List of touch sensor recommendations
- How to use touch sensor with Arduino
As this guide may be exhaustive, simply press CTRL + F on your keyboard to search for what you’re looking for!
What is a touch sensor?

A touch sensor is an electronic sensor used in detecting and recording physical touch. Also known as tactile sensors, it’s a small, simple, low-cost sensor made to replace old mechanical switches we seen in the past.
How does touch sensor work?
Working principle
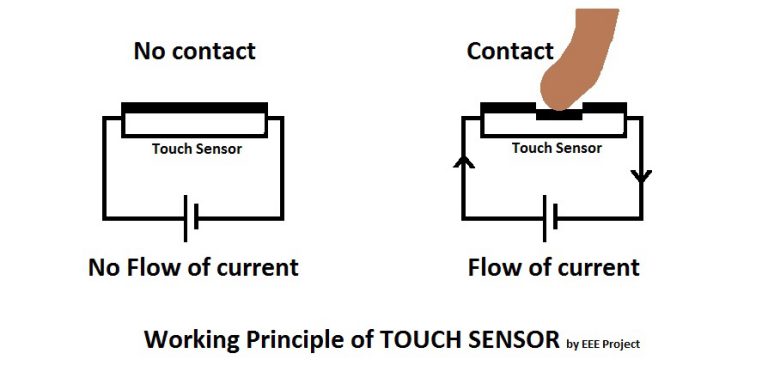
A touch sensor works like a switch, where when there’s contact, touch, or pressure on the surface of a touch sensor, it opens up an electrical circuit and allows currents to flow through it.
What is touch sensor used for? Key Applications
As mentioned in my introduction, a touch sensor is used for a wide array of applications, with those being:
- Touch sensor in robotics; a touch sensor is commonly used in robots, enabling basic movement and the ability to detect touch in its surroundings (E.g. When the robot runs into something, the touch sensor can have it to stop moving)
- Smartphones, automotive, industrial applications
- Touch sensor faucet in kitchens; allowing for control of running water without having to physically turn the knob
- Most other applications that require pressure/distance measurement
Types of touch sensor
The above explanations of how a touch sensor work and its applications apply to a generic sensor, where there are still different type of touch sensor that works uniquely and is more applicable for certain applications. Hence, I’ll be introducing the two main touch sensor types with its working principle/usages!
*Note: The following types of touch sensors can be referenced as touch technology too; used on touch screens to enable your device to interpret and deliver your commands.
Capacitive touch sensor

Commonly associated with MicroChip at42qt1010, a Capacitive touch sensor measures touch based on electrical disturbance from a change in capacitance. It consists of an electrode film on top of the glass panel that’s conductively coated with a printed circuit pattern around the outer viewing area.
How capacitive touch sensor work:
- The user applies touch on the glass panel
- The printed circuit panel around the outer viewing area of the glass panel creates an electrical charge across the surface
- It results in a decrease in capacitance and allows the system to determine the touchpoint
- Multiple touchpoints can be detected as well, allowing for touch pinch and spread
Capacitive touch sensor applications:
- Portable devices such as smartphones and tablets (iPhones, iPad, etc.)
- Home applications such as touch lamps
- Automotives
- Industrial
Advantages of a capacitive touch sensor:
- Doesn’t require pressure to be applied since
it’s built on the glass itself, hence making force insignificant to sensing requirements - Support for multi-touch
- High responsiveness
Disadvantages of a capacitive touch sensor:
- Vulnerable to abrasion
- Reliability concerns when used in harsh environments
- Doesn’t work with gloves or stylus
Resistive touch sensor
Resistive touch sensor measures touch through responding to the pressure applied to their surface. It consists of two conductive layers and a non-conductive separator. Unlike the capacitive touch sensors, it’s not multi-touch compatible.
How resistive touch sensor work:
- The user applies pressure against the surface
- The outside conductive layer is then pressed against the inner layer, resulting in voltage changes
- The voltage changes are then compared to the starting voltage, allowing for the point at which the touch took place to be calculated
Resistive touch sensor applications:
- Musical instruments, touchpads, etc.
- Older music players, game consoles, etc.
- Office equipment
Advantages of a resistive touch sensor:
- Cost-effective and durable to be used in harsh environments
- Able to be used with stylus and gloves
- Less complex
- Low power consumption
Disadvantages of a resistive touch sensor:
- The inability for multi-touch technology unlike the capacitive touch sensors
- Dependent on pressure, require more pressure to be applied for sensing to take place
Capacitive vs Resistive touch sensor
Based on what I’ve covered above, here’s the summarised comparative table between the two main types of touch sensors; Capacitive and Resistive touch sensor!
| Capacitive touch sensor | Resistive touch sensor | |
|---|---|---|
| How it measures | Electrical disturbance from a change in capacitance | Amount of pressure applied to the surface |
| Multi touch | Multi touch capable | Not multi touch capable |
| Pressure Requirement | Does not require pressure to be applied | Require and relies on pressure to be applied |
| Compatibility with gloves/stylus | Doesn’t work with gloves or stylus | Work with gloves or stylus |
| Applications | Portable devices; smartphones and tablets Home applications Automotives and industrial usages |
Musical instruments, touchpads, etc. Older music players, game consoles Office equipment |
Others: Infrared and surface acoustic wave (SAW) touch sensor
Though the following two touch sensors are less talked about, it’s still applicable as touch screen technology. Hence, here’s a brief summary of both!
Infrared touch sensor
Infrared touch sensor measures touch through whether the emitting LED beam is broken or changed when an object makes contact with it. Commonly used in kiosks or gaming applications, infrared touch sensors are long-lasting and insensitive to pressure (similar to capacitive touch sensor)
Surface acoustic wave (SAW) touch sensor
As its name suggests, the SAW touch sensor measures the disturbance of ultrasonic waves sent across the surface of a glass layer. It consists of Piezoelectric crystals attached to the glass layer on the LCD display, making such sensing possible.
Which touch sensors to buy? Recommended list at Seeed
Now that we’ve understood most about touch sensors, here are the various types to consider! Ranging from MPR121 to AT42QT1070, we’ve options for beginners and avid tinkerers! All available at Seeed and Grove compatible!
Grove compatible?
Grove system is Seeed very own initiative, mainly aimed at helping users like yourself to easily use different modules, sensors, and more through our plug and play system!
- We currently already hold more than 200 Grove modules, including other sensor types for you to choose from!
Don’t believe how easy pairing is made possible with Grove? Below shows a general touch sensor vs one of our Grove – Touch Sensors:

MPR121 breakout board assembly 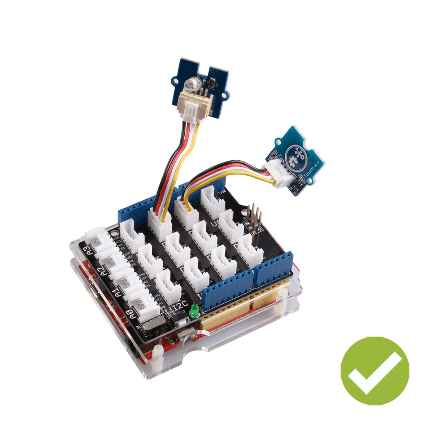
Grove touch sensor assembly
Like how simple and less messy it is?
All you need is a Grove Base Shield alongside your Arduino and you’re good to go!
- We’ll talk more about the touch sensor pairing guide later on
Now let’s move on to our recommendations!
1) Grove – Touch Sensor: Low cost, perfect for beginners
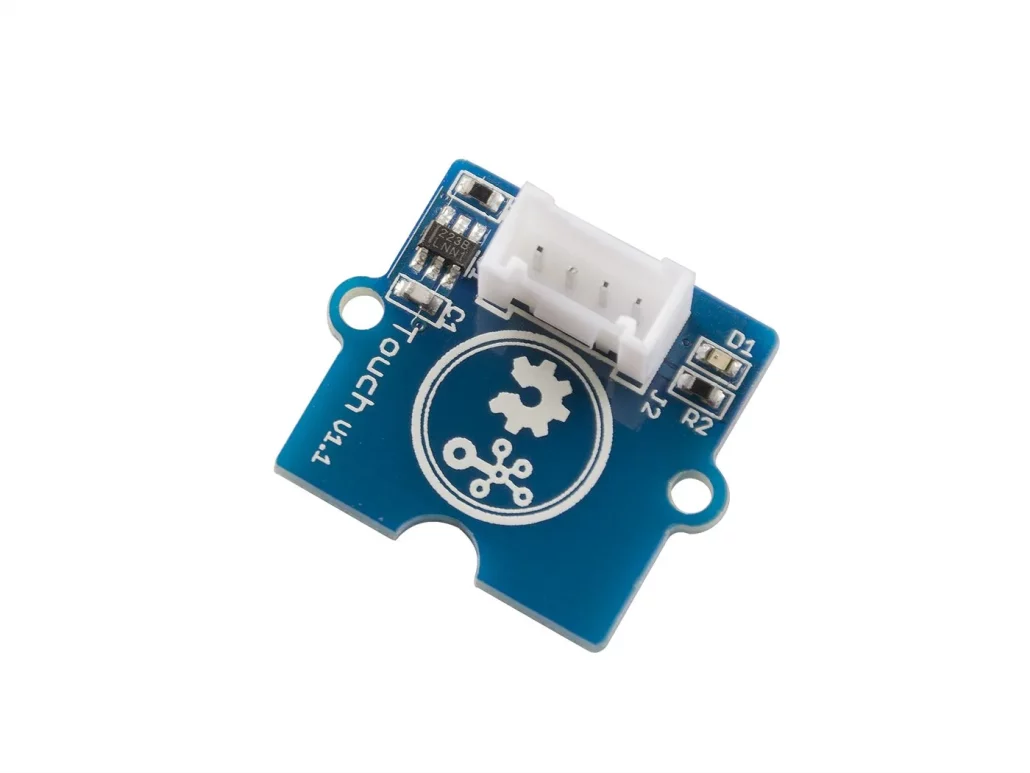
Need a simple, fast, and compact touch sensor to easily help you get started with your first touch sensing project? This is the one for you!
Based on the TTP223 touch detecter IC, it’s a capacitance touch sensor, integrating the same technology used on the iPhone!
Waterproof, fast response time, and low power consumption, it can be used as an inconspicuous button, tradition button key replacement, and as a waterproofed electric product!
Here are its features:
- Grove compatible interface
- 2.0-5.5V DC supply
- response time max about 60mS at fast mode, 220mS at low power mode @VDD=3V
- Low power consumption
- 2.0cm x 2.0cm twig module
- Power indicator led
Interested to find out more on the Grove – Touch Sensor?
- We’ve provided an Arduino guide, projects and more available on our product page here!
2) MPR121 option: Grove – 12 Key Capacitive I2C Touch Sensor V2
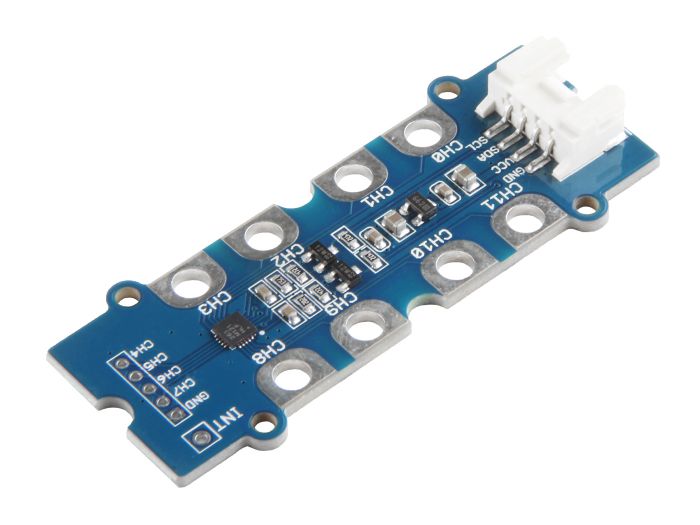
Need a touch sensor not only capable of capacitance and touch sensing but proximity sensing as well? This MPR121 based sensor does the job!
The Grove – 12 Key Capacitive I2C Touch Sensor contains 12 completely independent electrodes with build-in autoconfiguration, alongside our Grove port which allows you to detect all 12 electrodes signals with only that!
- Multiple Grove – 12 Key Capacitive I2C Touch Sensor (MPR121) can be used in a single system as well, allowing you to build a touch system with 3 times the number of electrodes! Yes, 36 electrodes!
Here are its features:
- Internal 10-bit ADC
- Integrated independent autocalibration for each electrode input
- Completely independent electrodes with built-in autoconfiguration
- I2C interface, with IRQ Interrupt output to advise electrode status changes
- Hardware configurable I2C address
- 12 electrodes/capacitance sensing inputs in which 8 are multifunctional for LED driving and GPIO
- Autoconfiguration of charge current and charge time for each electrode input
- Separate touch and release trip thresholds for each electrode, providing hysteresis and electrode independence
Interested to find out more on the Grove – 12 Key Capacitive I2C Touch Sensor V2?
- We’ve provided an Arduino guide, projects and more available on our product page here!
3) MPR121 touch sensor with feeler: Grove – I2C Touch Sensor
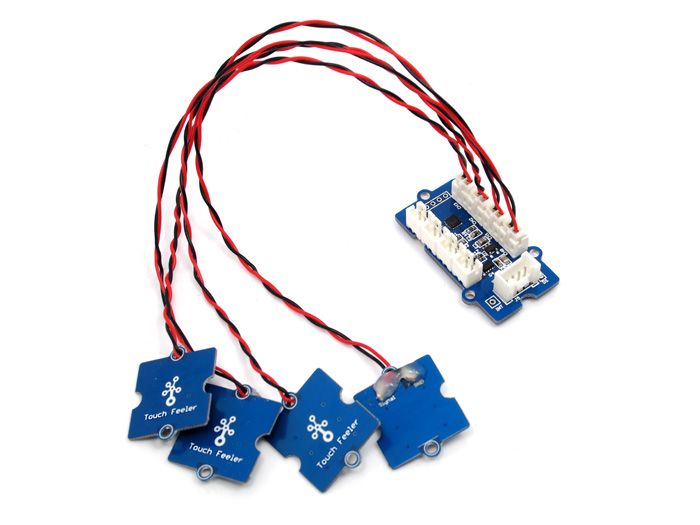
We’ve covered an MPR121 standalone module in the previous recommendation, but do you need one that comes with touch sensor feelers can allow you to feel your finger touch or proximity for touch controlling?
This sensor does just that! It includes a Touch Sensor controller and 4 finger feelers. One can insert the connectors of feelers into the base of the Sensor controller, and start sensing the touch.
Interested to find out more on the Grove – I2C Touch Sensor?
- We’ve provided an Arduino guide, library and more available on our product page here!
4) High-performance touch sensor: Grove-Q Touch Sensor
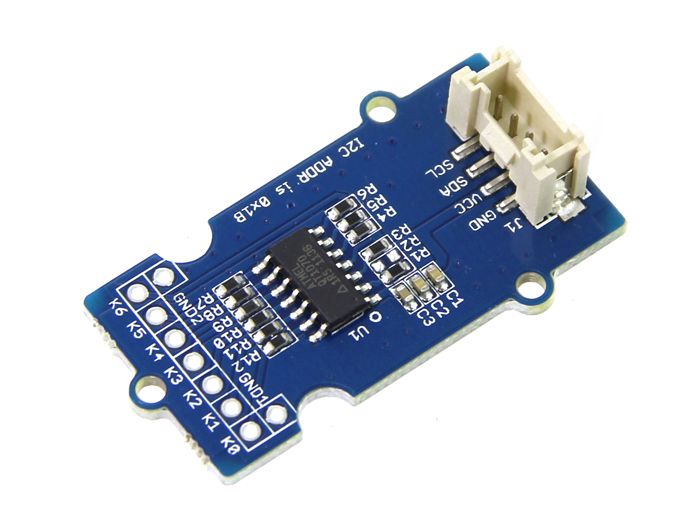
Based on the Atmel AT42QT1070, this touch sensor delivers high touch sensing performance with low external noise due to burst modulation in a spread-spectrum fashion!
External sampling capacitors are not added as well with the QT1070 using a dual pulse method of acquisition. This allows for touch sensing with only a single pin!
Here are its specifications:
- Operating Voltage: 3 ~ 5.5V
- Operating Current @3.3V: 1mA
- Touch Keys: 7 Keys ; key0 ,key1 ,key2 are on the Grove PCB bottom side
- Communicating Protocol: I2C
- I2C Address: 0x1B
Interested to find out more on the Grove – Q Touch Sensor?
- We’ve provided an Arduino guide, library and more available on our product page here!
5) Slider touch sensor:
Grove – Capacitive Touch Slider Sensor (CY8C4014LQI)
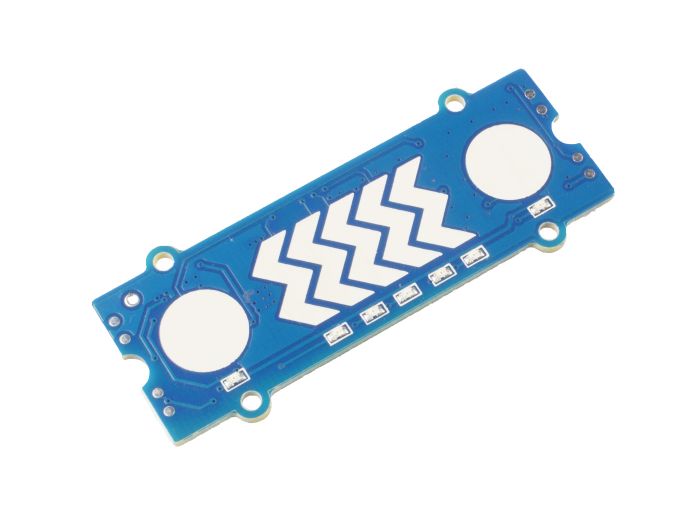
Ending of the list of touch sensor recommendations is this fun and unique option that’s applicable for game controller applications!
Unlike the other 4 recommendations above, the Grove – Capacitive Touch Slider Sensor contains a 5-segment slider, with each touchpad having a corresponding LED to indicate touch status.
Here are its features:
- 32-bit MCU Subsystem
- 2 Buttons and a 5-segment slider
- 16-MHz ARM Cortex-M0 CPU
- Up to 16KB of flash with Read Accelerator
- Up to 2KB of SRAM
- Automatic hardware tuning (SmartSense™) over a sensor range of 5 pF to 45 pF
- I2C interface
Interested to find out more on the Grove – Capacitive Touch Slider Sensor (CY8C4014LQI)?
- We’ve provided an Arduino guide, library and more available on our product page here!
Arduino touch sensor guide
To end today’s guide to touch sensors, I’ll be providing a tutorial on how to pair a touch sensor with Arduino!
- The following tutorial uses the 2nd touch sensor on my list; The MPR121 based Grove – 12 Key Capacitive I2C Touch Sensor V2
Here’s what you need:
Seeeduino V4.2 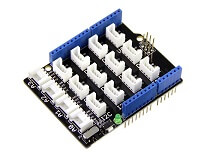
Grove – Base Shield 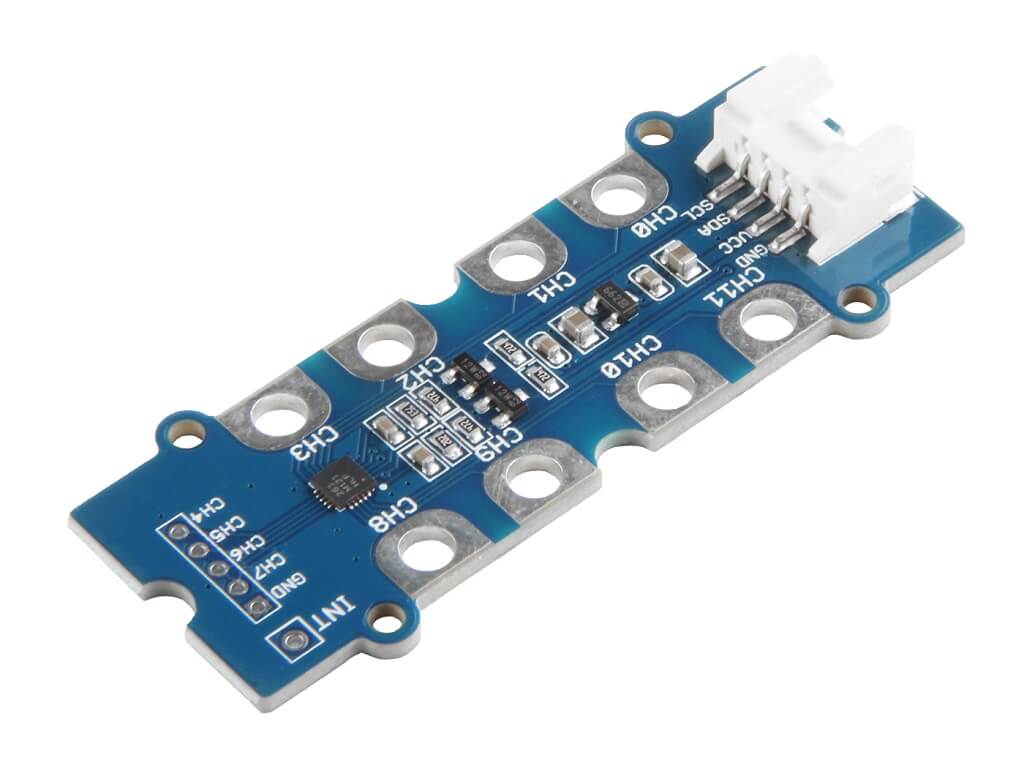
Grove – 12 Key Capacitive I2C Touch Sensor V2
- Seeeduino is Seeed’s very own version of Arduino, build with benefits over the regular version
Hardware configurations:
- Step 1: Connect the Grove – 12 Key Capacitive I2C Touch Sensor V2 (MPR121) to the I2C port of the Base Shield
- You can directly connect the module to Seeeduino as well
- Step 2: Plug Grove – Base Shield into Seeeduino
- Step 3: Connect Seeeduino to PC via a USB cable
It should look something like this after the above steps:

Software configurations:
- Step 1: Download the Grove touch sensor MPR121 Library from Github
- Step 2: Refer to How to install library to install library for Arduino
- Step 3: Restart the Arduino IDE. Open the example, you can open it by copying the following code into a new sketch in Arduino IDE
#include "Seeed_MPR121_driver.h"

Mpr121 mpr121;

u16 touch_status_flag[CHANNEL_NUM]={0};
void setup()
{
  s32 ret=0;
  Serial.begin(115200);
  if(mpr121.begin()<0)
  {
    Serial.println("Can't detect device!!!!");
  }
  else
  {
    Serial.println("mpr121 init OK!");
  }
  delay(100);
}
void loop()
{
  u16 result=0;
  u16 filtered_data_buf[CHANNEL_NUM]={0};
  u8 baseline_buf[CHANNEL_NUM]={0};

  result=mpr121.check_status_register();

  mpr121.get_filtered_reg_data(&result,filtered_data_buf);

  for(int i=0;i<CHANNEL_NUM;i++)
  {
    if(result&(1<<i))                             /*key i is pressed!!*/
    {
      if(0==touch_status_flag[i])
      {
        touch_status_flag[i]=1;
        Serial.print("key ");
        Serial.print(i);
        Serial.println("pressed");
      }
    }
    else
    {
      if(1==touch_status_flag[i])
      {
        touch_status_flag[i]=0;
        Serial.print("key ");
        Serial.print(i);
        Serial.println("release");
      }
    }
  }
  delay(50);
}- Step 4: Upload the demo. If you do not know how to upload the code, please check How to upload code.
- Step 5. Open the Serial Monitor of Arduino IDE by click Tool-> Serial Monitor. Or tap the Ctrl+Shift+M key at the same time. Set the baud rate to 115200.
You should get the result if everything goes well. When you touch the CH0 ~ CH11 pads, it will trigger key ?pressed and key ?release
mpr121 inmpr121 init OK!
key 11pressed
key 11release
key 10pressed
key 10release
key 0pressed
key 0release
key 2pressed
key 2release
*Note: The above tutorial is for Arduino interfacing. There’s a touch sensor raspberry pi guide on our wiki page as well!
Summary
That’s all for today on touch sensors. I hope with today’s blog, you get a deeper understanding of what it is, how it works, and what it takes to build one with an Arduino!
To help you easily get started, do consider the list of touch sensor I’ve recommended:
- Suitable for beginners and low-cost:
- MPR121 touch sensor options:
- Grove – 12 Key Capacitive I2C Touch Sensor V2
- With touch feelers: Grove – I2C Touch Sensor
- Higher performance requirements:
- Slider touch sensor: