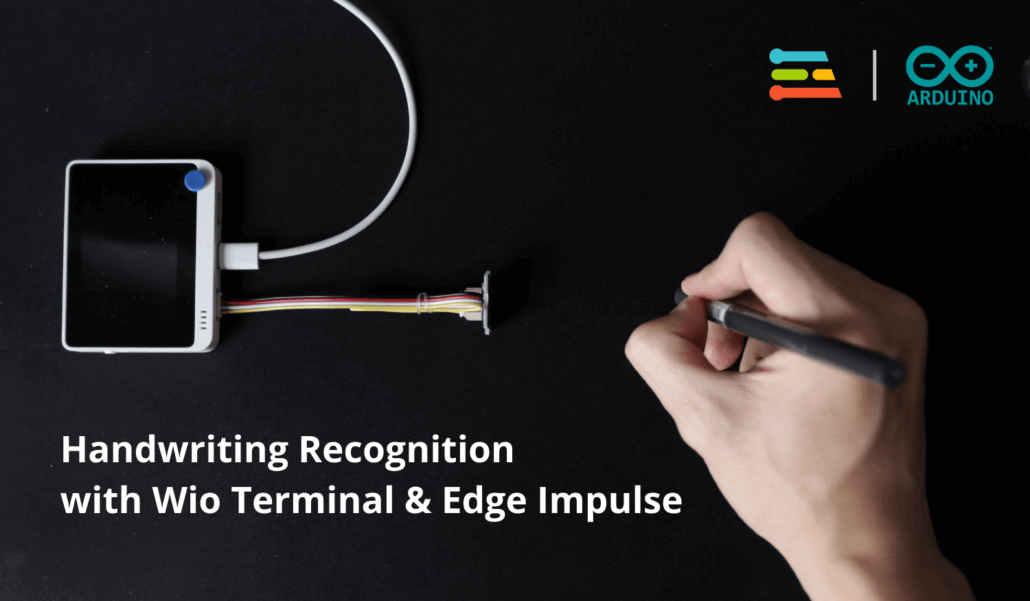
Build Handwriting Recognition with Wio Terminal & Edge Impulse
In today’s tutorial, I’ll show you how you can build a machine learning based handwriting recognition device with the Wio Terminal and Edge Impulse. Follow this detailed guide to learn how a single time of flight sensor can allow you to recognise handwriting gestures and translate them to text!
In this comprehensive tutorial, we will cover:
- Key Concepts: Time-of-Flight Sensors, Machine Learning & TinyML
- Setting up the development environment
- How to Perform Data Collection with Edge Impulse
- Designing, Training, Evaluating & Deploying the Machine Learning model with Edge Impulse
- Implementing Live Inferences on the Wio Terminal with Arduino
- Potential Improvements to this Project
Project Overview: Handwriting Recognition
Handwriting recognition has consistently been a popular field of development since digitalisation began to occur on a global scale. One common use case that you might be familiar with is the conversion of handwritten text into computer readable formats through optical character recognition, or OCR.
In addition to camera based systems, there are many other ways to achieve handwriting recognition, such as with the touchscreens on our mobile phones and tablets, or movement based tracking with inertial measurement units (IMUs). However, the project that we will be covering today will be far simpler than that – we will use nothing but a single time of flight sensor to recognise handwriting gestures.
Let’s first have a look at a video demonstration of the project in action.
Brief on TinyML and Edge Impulse
Machine learning is a method of data analysis. It builds on the idea that systems can automatically learn from data with the help of algorithms to identify patterns and make decisions. Image recognition, stock market prediction and speech to text natural language processing are only some of the applications that have been enabled by machine learning.

TinyML, short for Tiny Machine Learning, is a subset of machine learning that employs optimisation techniques to reduce the computational space and power required by machine learning models. Specifically, it aims to bring ML applications to compact, power-efficient, and most importantly affordable devices like microcontroller units.

For today’s project, we will be using Edge Impulse. Edge Impulse is a platform that makes it easy to build machine learning models for the edge by providing infrastructure all the way from data collection and processing to model training and finally deployment.
For this project, we will need to create an Edge Impulse account, which is free for personal use. Sign up here.
Time of Flight & Handwriting Recognition
Firstly, time of flight or ToF is a method for measuring distance, or ranging. In ToF sensors, a signal is first emitted from the sensor to the environment. When the signal hits an obstacle or object, it will be reflected and returned to the sensor. The sensor measures the time it takes for the signal to return and uses it to calculate the distance travelled by the wave, hence “time of flight”.

But how does this enable handwriting recognition? The concept behind today’s project is actually relatively simple. We will place the ToF sensor at the side of our “drawing board”, and perform our handwriting gestures within the sensor’s line of sight. As our gesture is being performed, our hand will move and cause changes to the distance values read by the sensor.

Because each letter we write will follow the same movements in general, we expect the series of distances recorded by the sensor during the gestures to follow certain abstract patterns. Yes, identifying handwriting from an array of values is no easy task for the human eye, but it is certainly not beyond the capabilities of machine learning!
Project Materials
Before we proceed any further, the items below are recommended if you would like to follow along with this tutorial.
You can use any kind of ranging sensor for this project, such as the Grove Ultrasonic Ranger or the Grove TF Mini LiDAR Sensor, which are actually officially supported for data collection with Edge Impulse. Nonetheless, I am using the VL53L0X sensor as it is what I have on hand.
Set Up Wio Terminal & Computer
To get started, we first have to set up our Wio Terminal and the development environment on our computer.
- If this is your first time working with the Wio Terminal, it is highly recommended to first visit the Getting Started guide on the Seeed Wiki.
- Next, install the VL53L0X Grove Ranging Sensor Library by downloading the repository as a ZIP and installing via Arduino IDE. Detailed instructions can be found here.
- Finally, set up your Wio Terminal and computer for use with Edge Impulse by following the instructions at this link.
Setting Up the Data Collection
As with any machine learning project, our first step is to acquire some form of data. In today’s project, we are going to create our own dataset by recording our sensor values while performing our gestures. Fortunately, it’s fairly simple to do this with Edge Impulse!
Uploading the Data to Edge Impulse
Edge impulse allows you to upload data from a variety of sources, including your own datasets and even using your mobile phone. For uploading data from the Wio Terminal, there are two key ways.
If you are using one of the aforementioned Edge Impulse supported Grove Ultrasonic Ranger or Grove TF Mini LiDAR Sensor, you can directly use the edge-impulse-daemon command in your terminal to collect and upload data conveniently. You can refer to this Edge Impulse alcohol distinguishing project on the Seeed Wiki for detailed instructions.
Otherwise, for other unsupported sensors, we will have to pass the data that we want to collect data with data forwarder instead!
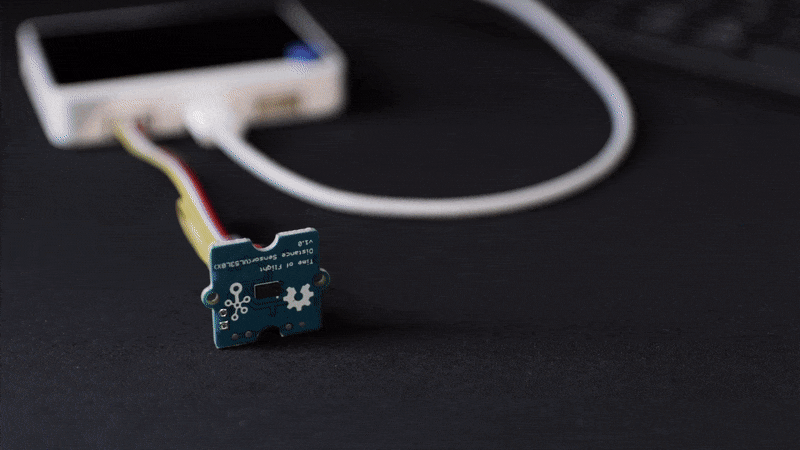
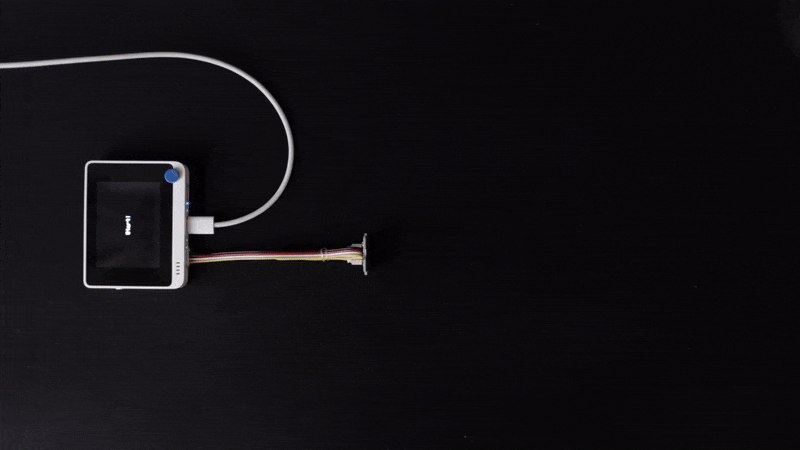
Step 1: Connect TOF Sensor to Wio Terminal
Simply plug your Grove VL53L0X ToF sensor into the I2C Grove port of the Wio Terminal as shown below.

Step 2: Upload Arduino Sketch to Deliver Sensor Readings to Serial
The Edge Impulse data forwarder uses serial communication to obtain and record our sensor readings. In order to feed the readings in, we will first need to flash an Arduino sketch that will output the values we want to the serial interface.
At this point, you can download the files for the project from this Github repository.
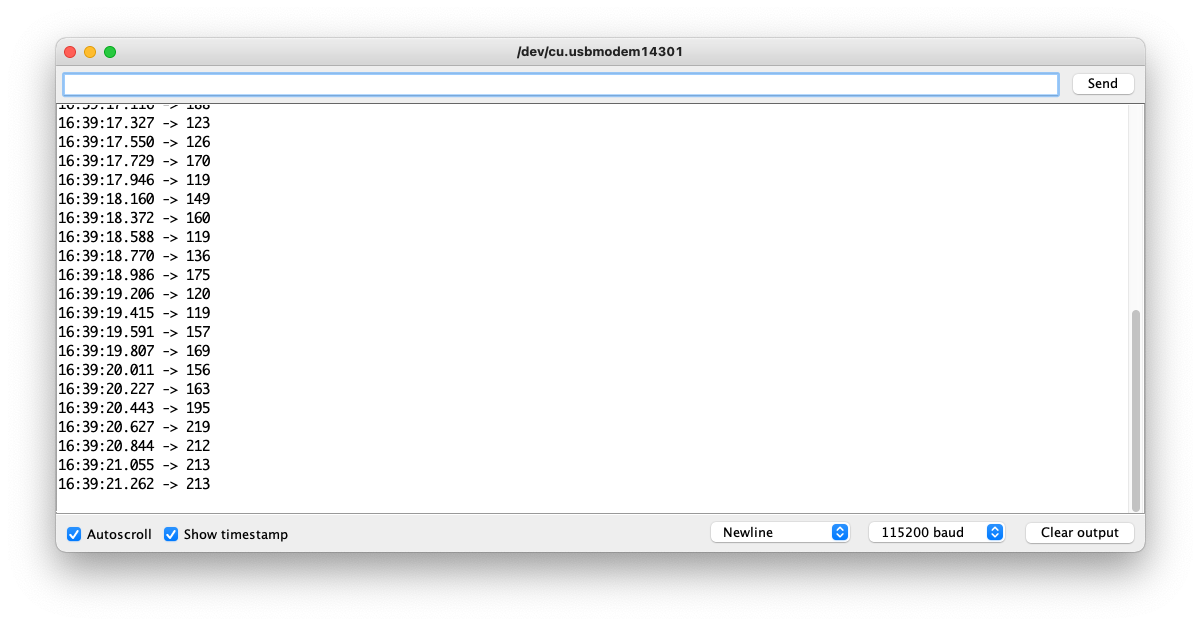
Inside the ToF_DataForwarder folder, open ToF_DataForwarder.ino and flash this to your Wio Terminal. Alternatively, you can also create your own data forwarding sketch from one of the examples available under Files > Examples > Grove VL53L0X Library. The data forwarder sketch I’ve provided is based on the high accuracy ranging example, and transmits data at a frequency of 5Hz to the serial monitor.

After flashing, you’ll want to verify that your sensor values are transmitting correctly. Open the serial monitor in the Arduino IDE and you should see a stream of distance values appearing, like below.
If you want more information on the data forwarder, visit here.
Step 3: Run the Edge Impulse Data Forwarder
Next, close the serial monitor and open your terminal or command line on your computer. To start the Edge Impulse data forwarder, run:
edge-impulse-data-forwarderYou will be prompted to enter your Edge Impulse account details, and your Wio Terminal should then be connected to the Edge Impulse Web UI in a few moments! To check this, visit your Edge Impulse project and check under your devices tab. You should see something similar to what is shown below.

Data Acquisition
Now, we’re ready to build our dataset! Head over to the Data acquisition tab on the side panel and you should be greeted with the following screen, albeit with no data shown.

Recording Parameters
On the right side, make sure your Wio Terminal and its ToF sensor are selected in the “Device” and “Sensor” fields. Set “Frequency” to the output frequency of your data forwarder sketch, then enter the “Label” as the letter you are going to draw.
Finally, let’s talk a bit about duration. Initially, I wanted to record longer snippets of repetitive motion, then split it up into different samples with Edge Impulse’s “Split Sample” function. However, the process of identifying snippets is somewhat automatically done, which resulted in me only yielding 2 to 3 samples for a minute of recording despite having performed the gesture 20 times.

In the end, I recorded samples of 10 seconds to use without splitting, where I performed the gesture repeatedly within the window. However, you can definitely choose to record one gesture for each recording, which is the more straightforward approach.
In fact, I actually recommend this over what I did, since movements between drawing the letters can add noise to the sample and dilute our learning features. But because my model ends up performing decently anyway (spoiler alert!), I didn’t come back to change this.
Once you’re ready, click on the “Start Sampling” button. When the recording starts, you’ll see a live countdown of how long you have left.
How much data is needed?
For a proof of concept project, I’ve only trained a total of 4 classes, ‘A’, ‘B’, ‘C’ in capital letters, as well as a Null class. If you’re recording 10 second snippets like me, you’ll want at least 10 data samples for each class for training, then 3 more samples each for testing. If you’re recording individual snippets, that translates to about 30 and 10 per class for training and testing respectively.
Impulse Design
Once you’re satisfied with the data that you collected, we can move on to Impulse Design to begin working towards our machine learning model. Here we have several columns that can get rather confusing, but I’ll do my best to explain the essentials for this project.

Add an Input Block
In the left most column, select “Time series data”, since we are working with distance values recorded over a period of time. You’ll notice two parameters that can be adjusted, “Window Size” and “Window Increase”.
In layman terms, the way Edge Impulse handles data is that it will scan through your sample with a window that moves across. Window Size changes the size of that window, and Window Increase is the size of the step that will be taken when the window shifts rightwards. Each window in each step is going to be a data feature on its own.

These values can heavily affect the performance of your model later on, so be sure to come back to adjust this if you aren’t seeing desirable performance.
Add a Processing Block / Add a Learning Block
Edge Impulse offers quite a number of processing methods, but I used the very simple flatten for this project. If you are planning on adding more classes later, it might be a good choice for you to work with raw data without preprocessing. This is because our data is time-series based, which means that the desired training features would already be available in our raw data. Using preprocessing with flatten can reduce the distinction between our classes, which will result in poorer performance when more classes are introduced.
For learning, we don’t really have much choice but to go with the Neural Network classifier. When you’re done, check your output features and click on “Save Impulse”.
Data Processing
Now, move onto “Flatten” in your project sidebar. You’ll be greeted with some feature processing options such as scaling, as well as the choice of generated features from average, minimum, maximum, root mean squares, etc. This is where our raw data will be converted into features that are probably going to be more useful for our model to identify the handwritten gesture. You can select all of them for now.

After clicking on save parameters, you will be brought to the next page. Click on “Generate Features” and let the program do its thing. A 3D graph will be shown on the right for you to explore the generated features of each class and how they related to one another.

To help your model learn better, you want to find the features that distinguish your classes from each other cleanly and clearly. In my case, I found that standard deviation, skewness and kurtosis gave decent separation between each of the classes, so I ended up only using these three features in my final model to save on computational power.
While it can be tempting to simply move on from here and begin training our model, it’s really worth taking some time to revisit your data if none of the features give good distinctions between classes. In my case, I had to re-record several samples to fix those that had simply too much noise to be useful for model training.
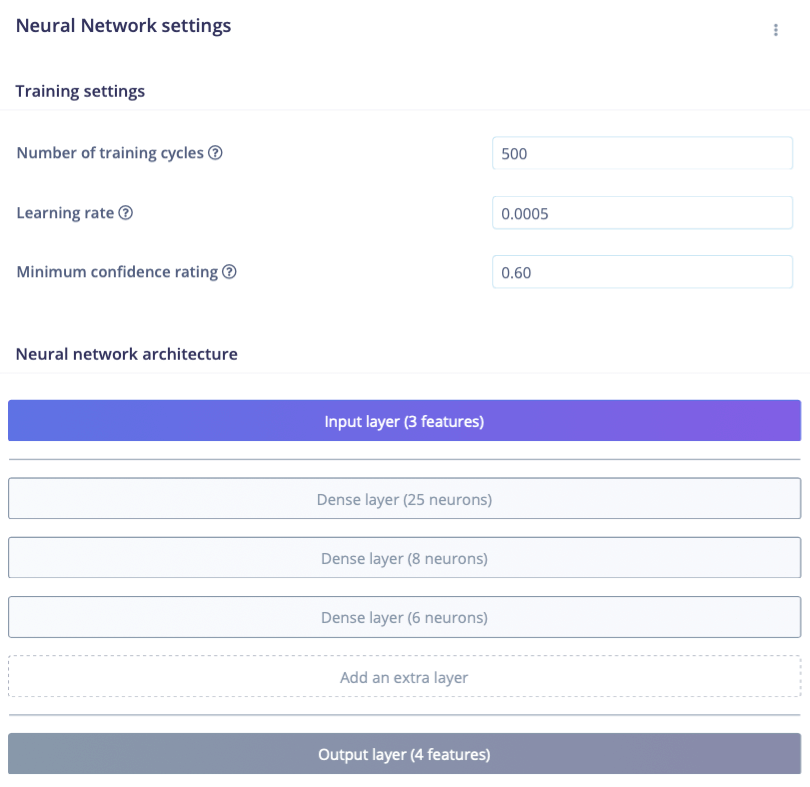
Model Training
Finally, it’s time to train our neural network! Boost the number of training cycles to 500 (you can reduce this later), and leave the learning rate and confidence rating as is for now. You can exercise a lot of liberty when it comes to the structure of your NN classifier. I’d suggest you play around with this and see what gets the best results!
The architecture of the model I used is shown below.
Once your model is done training, you should see some metrics on the training performance. Ideally, you want this to be at least above 90%. This is also a good chance to see what classes the model is struggling with. For example, before I re-recorded my training data, I was getting a lot of misclassifications between class A and B, which gave me clues on how to improve my data collection process.

Testing the Model
You can test the model by heading over to the “Live classification” page. There, you can simply upload samples like we did in the data acquisition stage, and the model will produce a classification result for verification. You should also test your model on the test data that you recorded earlier in the “Model testing” page. You can move on if you’re satisfied with its performance, or head back to an earlier step for improvements.
Note: You can use “Versioning” to save the current state of your project. That should give you room to comfortably make changes. Don’t be afraid to explore!

Deploying the Model
Congratulations on making it this far! Head over to the “Deployment” page to finally begin exporting our model for use on our Wio Terminal. First, select Arduino library.

Then, select the “Quantized (int8)” model and click build. Quantisation is one TinyML technique that converts floating point numbers (those with decimals) to integers that require less memory and processing power to perform calculations with. This optimisation typically comes with a small loss in accuracy, but large improvements in latency and a reduction in computational requirement.

Edge Impulse will then begin building the Arduino Library, which will be downloaded to your computer as a ZIP when complete. Install this ZIP file with your Arduino IDE.

Arduino Implementation
Naturally, to deploy to our Wio Terminal with Arduino, we will need an Arduino sketch. Fortunately, the library you just installed comes with several examples that we can easily modify for our purpose. Navigate to Files > Examples > <Library Name> and select the static_buffer example.

Once it opens up, save the sketch in a location of your choice. Then, we will need to make the following changes to the Arduino code.
1. Add Includes & Declarations
Firstly, add the following code to the top of the sketch so that we can get input data from our ToF sensor.
#include <wio_terminal_handwriting_recogniser_inference.h>
#include <wio_terminal_handwriting_recogniser_inference.h>
#include "Seeed_vl53l0x.h"
Seeed_vl53l0x VL53L0X;

#ifdef ARDUINO_SAMD_VARIANT_COMPLIANCE
    #define SERIAL SerialUSB
#else
    #define SERIAL Serial
#endif
Then, modify the features array declaration by removing const and the array contents as follows. In my case, I am using 25 as my model expects an input of 25 features (distance values). This will probably be different for you if you have chosen a different window size or step on Edge Impulse.
static float features[25];If you are unsure of how many input features are required, you can declare a random integer first, and watch the serial monitor output. The program will throw an error message and tell you the dimensions that it expects.
2. Replace setup() Function
Replace the setup() function entirely with the following code.
void setup() {
    Serial.begin(115200);

    VL53L0X_Error Status = VL53L0X_ERROR_NONE;
    Status = VL53L0X.VL53L0X_common_init();
    if (VL53L0X_ERROR_NONE != Status) {
        SERIAL.println("start vl53l0x mesurement failed!");
        VL53L0X.print_pal_error(Status);
        while (1);
    }

    VL53L0X.VL53L0X_high_accuracy_ranging_init();

    if (VL53L0X_ERROR_NONE != Status) {
        SERIAL.println("start vl53l0x mesurement failed!");
        VL53L0X.print_pal_error(Status);
        while (1);
    }

    Serial.println("Edge Impulse Inferencing Demo");
}
3. Modify loop() Function
Finally, add the following code to the top of your loop() function. Please take note that the maximum value of i defined in the for loop must be updated to match the length of your feature array as well.
Serial.print("Perform gesture in 3... ");
delay(1000);
Serial.print("2... ");
delay(1000);
Serial.print("1... ");
delay(1000);
Serial.print("Start! ...");

for (int i = 0; i<25; i++) {
    VL53L0X_RangingMeasurementData_t RangingMeasurementData;
    VL53L0X_Error Status = VL53L0X_ERROR_NONE;

    memset(&RangingMeasurementData, 0, sizeof(VL53L0X_RangingMeasurementData_t));
    Status = VL53L0X.PerformSingleRangingMeasurement(&RangingMeasurementData);
    if (VL53L0X_ERROR_NONE == Status) {
        if (RangingMeasurementData.RangeMilliMeter >= 2000) {
            //SERIAL.println("out of range!!");
            SERIAL.println(-50);
        } else {
            // SERIAL.print("Measured distance:");
            features[i] = RangingMeasurementData.RangeMilliMeter;
            // SERIAL.println(" mm");
        }
    } else {
        SERIAL.print("mesurement failed !! Status code =");
        SERIAL.println(Status);
    }
    delay(200);
}
Serial.println("End!");
Now, you can open the Serial monitor and test your model with live inferences on your Wio Terminal. The code will prompt you to start performing the gesture with a countdown, then perform the inference and display the results.
For example, this is the output when I drew an A… followed by some other movements that the model seemed to think was a C.

Incorporating the LCD Display
The next step is to turn this into a true handwriting recognition device by incorporating the display prompts onto the Wio Terminal’s built in LCD screen! You can follow along with the instructions in this section or simply refer to the Test_EIModel_TFT.ino file that should have been downloaded with the rest of this project’s code.
First, we include the TFT library and declare an instance. The TFT library for the Wio Terminal should already be installed in your computer if you’ve performed Step 1 of the “Set Up Wio Terminal & Computer” section in this tutorial.
#include "TFT_eSPI.h"
TFT_eSPI tft;
Then, we include an initialisation in our setup() function, define some parameters and include a simple splash screen on startup.
tft.begin();
tft.fillScreen(TFT_BLACK);
tft.setRotation(3);
tft.setTextDatum(MC_DATUM);
tft.setTextPadding(320);
tft.drawString("Wio Terminal Handwriting Recogniser!", 160, 120);
delay(1000);
tft.setTextSize(2);
tft.fillScreen(TFT_BLACK);
The modifications to our loop() function essentially involve changing all of our Serial.print() functions into tft.drawString() calls, so that the prompts will be displayed on our screen instead of through the serial monitor. For example:
tft.fillScreen(TFT_BLACK);
tft.drawString(F("Perform gesture in 3"), 160, 120);
delay(1000);
tft.drawString(F("Perform gesture in 3 2"), 160, 120);
delay(1000);
tft.drawString(F("Perform gesture in 3 2 1"), 160, 120);
delay(1000);
tft.drawString(F("Start!"), 160, 120);
Now, instead of providing all the confidence values for all the possible outputs, we only want the values for the prediction with the highest possibility to be shown. Navigate down your code until you find the part that says “human-readable predictions”. Then, modify your code to match the code below.
// human-readable predictions
String output = "Null";
float confidence = 0;

for (size_t ix = 0; ix < EI_CLASSIFIER_LABEL_COUNT; ix++) {
    if (result.classification[ix].value > confidence) {
        ei_printf("    %s: %.5f\n", result.classification[ix].label, result.classification[ix].value);
        output = result.classification[ix].label;
        confidence = result.classification[ix].value;
    }
}

tft.drawString(output + ", " + confidence, 160, 120);
The Final Product
That’s it! Now, we have a neural network built with Edge Impulse running on our Wio Terminal to give us on-the-fly recognition of handwriting gestures! Let’s take a look again at the final product in operation.
Future Improvements for the Project
No doubt, this project is merely a proof of concept and has a long way to go before it’s a viable product. Still, it’s impressive to see what can be done with just a single ToF sensor and machine learning! Here are some ways that this project can definitely be improved further.
1. Train the Model with More Data
If you’ve made it to this step of the tutorial, you would know that even training just 3 classes (excluding Null) already takes quite a bit of gesturing. The unfortunate truth is that machine learning is all about data. In general, the more samples we give our model to train on, the better it will eventually perform.
It’s also important to introduce variations in our training data by changing the starting position of our gestures to be nearer or further away from the ToF sensor, gesturing with different speeds or even different handwriting styles. This will allow our model to be more robust and learn to recognise handwritten letters even if they’re done in a variety of manners.
2. Use a ToF Sensor with Higher Performance
One major pain point I faced was the resolution of the data produced from the ToF sensor. Because I began facing errors at higher sample rates, I ended up with only 5 readings per second, which is suboptimal.
Because of this, I was also limited to drawing big letters so that the motion features could be sufficiently captured in my samples. With a faster and more precise ToF sensor, it should in principle be possible to extract sufficient features even with normal-sized handwriting.
3. Use More or Other Sensors
While it’s impressive to get this far with a single ToF sensor, it’s also rather impractical to expect much more from it. If we were to train a model to recognise all 26 letters, there wouldn’t be enough features to differentiate between at least a few of them. With a second ToF sensor, we’d be able to take measurements for an additional axis, which will provide a much better distinction between different letters.
ToF sensors in particular also have a rather tight “field of view”, which makes it really easy to perform gestures in blind spots, resulting in incorrect classifications. Perhaps other types of ranging sensors or even passive infrared (PIR) sensors may be more suitable for this application instead!
Summary & Some Closing Thoughts
I hope you’ve enjoyed today’s tutorial on building a machine learning powered handwriting recognition device with your Wio Terminal! It’s really exciting to think about the new possibilities that are enabled by machine learning – and now it’s even more accessible thanks to platforms like Edge Impulse.
Edge Impulse does assume that you have some knowledge of data analysis and machine learning, and as a result can be confusing for some. However, it is undoubtedly one of the most user-friendly experiences that I’ve had the opportunity to use in my limited expertise with ML. I strongly encourage anyone interested in getting started with TinyML or even machine learning in general to play around with it!
Once again, you can find the project code at this Github repository. My Arduino library ZIP file generated from Edge Impulse is also available here if you want a straightforward way to try this project.
For more TinyML projects with the Wio Terminal, please visit:
- Learn TinyML using Wio Terminal and Arduino IDE #1 Intro
- Learn TinyML using Wio Terminal and Arduino IDE #2 Audio Scene Recognition and Mobile Notifications
- Build a TinyML Smart Weather Station with Wio Terminal
For other Wio Terminal projects, please visit:
- Wio Terminal: Arduino Customisable Timer (with Code!)
- Wio Terminal: Arduino Smart Doorbell (with Code!)
- Build an MQTT Intercom with Wio Terminal (with Code!)