Mobile Robot Full-stack Development In Practice Ⅰ: Build the Robot Brain First — Jetson, ROS 2, and the Development Foundation
If this is your first time coming across the series, Mobile Robot Full-stack Development In Practice is an open-source, hands-on course built around a simple idea: instead of learning robotics as a collection of isolated algorithms, learn how the pieces connect into a real system.
The course starts from the computing platform and gradually moves into perception, sensor fusion, SLAM, autonomous navigation, semantic understanding, manipulation, and deployment. The goal is not just to run a few impressive demos. It is to understand how sensors, edge AI, robotics middleware, control software, and physical hardware come together in one robot.
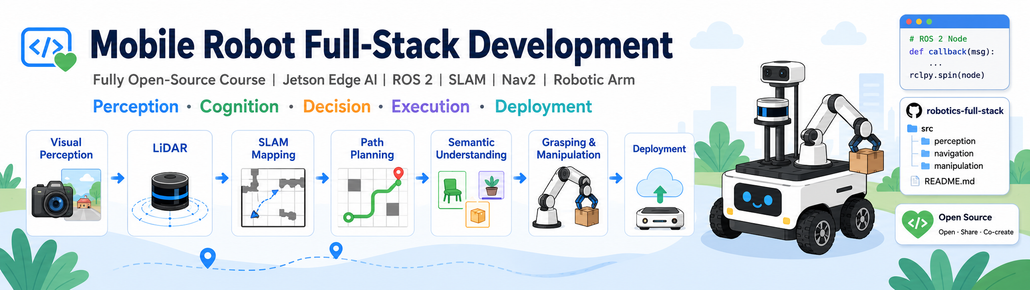
If you have not seen the full course overview yet, start there first to understand the overall learning path. All open-source documentation, code, and future updates are also available on GitHub.
👉 Mobile Robot Full-Stack Development GitHub
👉 M01 — Platform and Development Environment
When you actually put a mobile robot on the bench, the first problem is rarely, “Which model should I train?” A more basic set of questions comes first. Where does camera data enter the system? Can the GPU actually be used? How do LiDAR, IMU, and motor controllers connect to the computer? How does a development PC communicate with the robot? And how do multiple software components keep running together without turning the whole robot into one giant, fragile script?
If that foundation is missing, even a strong vision model, navigation stack, or embodied AI policy can remain nothing more than an isolated demo.
So this first article focuses on something less flashy, but much more fundamental:
How do you turn an edge AI computer into a reliable, extensible robotics development platform?
The reference setup used here is a reComputer Robotics J5011 powered by NVIDIA Jetson AGX Orin 32GB, running L4T 36.4.4 / JetPack 6.2.1, together with an Ubuntu 22.04.5 LTS host PC for development and validation.
A Robot Computer Is More Than a PC with a GPU
When people compare robot computers, AI performance is often the first number they notice. The J5011 uses Jetson AGX Orin 32GB, while the J5012 uses the 64GB module, reaching up to 200 TOPS and 275 TOPS respectively.
But TOPS alone does not explain why a robotics computer is different from a desktop workstation.
A desktop PC mainly needs to run software. A robot computer has to do that and connect software to the physical world.
A mobile robot may be receiving images from multiple cameras while a LiDAR streams point clouds, an IMU updates motion estimates, and the chassis controller waits for velocity commands. At the same time, perception, localization, planning, and control processes may all be running concurrently.
These are not sequential jobs where one program finishes before the next starts. They are continuous data streams and control loops that need to coexist.
That means a practical robotics platform needs both compute and connectivity.
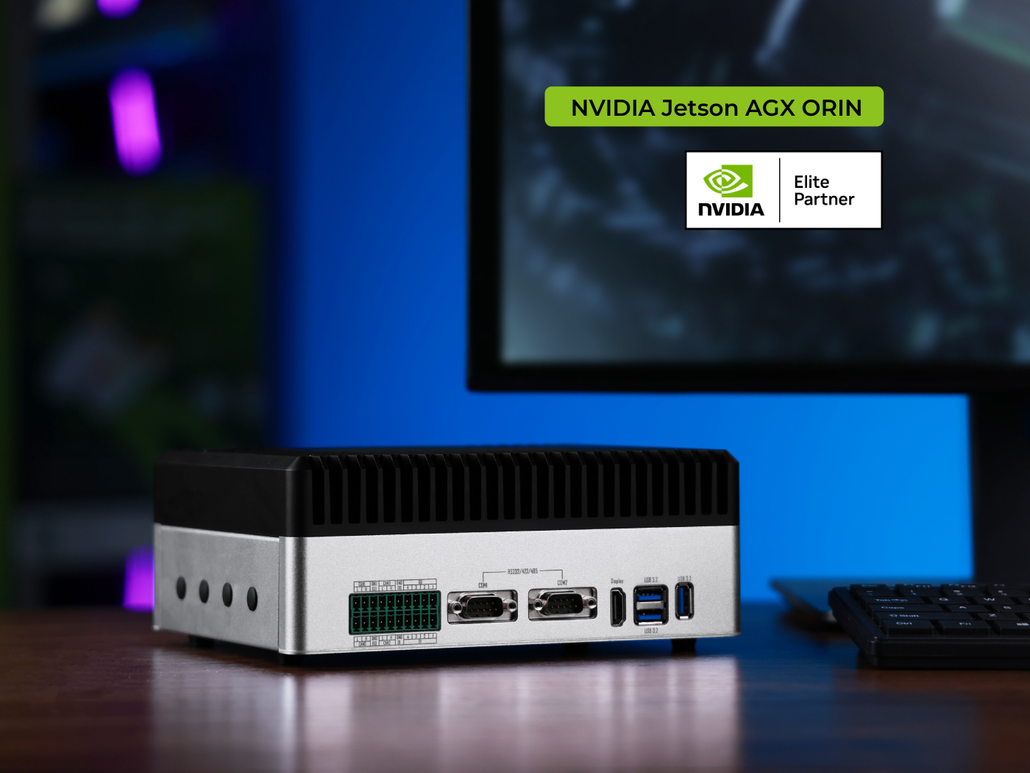
The reComputer Robotics J501 provides multiple Ethernet interfaces, USB, four CAN-FD channels, UART, RS-232/422/485, M.2 expansion, and GMSL2 camera connectivity. In a specification table, these are simply interfaces. In a robot, they map directly to LiDARs, cameras, motor controllers, IMUs, GNSS modules, storage, and network links.
This is why it is more useful to think of the J501 as an information hub for the robot: sensor data enters through physical interfaces, algorithms run on the compute platform, and control commands leave through another set of physical interfaces.
Product family:
reComputer Robotics J501 Series
J501 hardware guide:
https://wiki.seeedstudio.com/ai_robotics_recomputer_j501_robotics_getting_started/
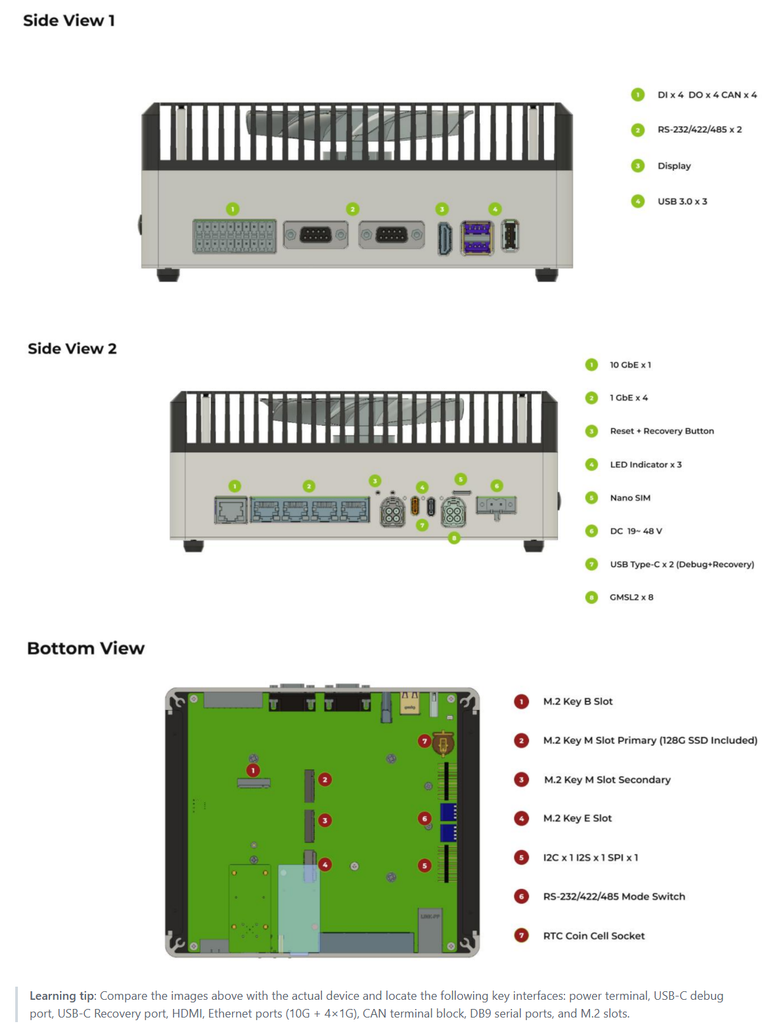
Start by Asking: Can Linux Actually See the Hardware?
Before debugging ROS 2 or Python, verify that the operating system can see the hardware you expect to use.
The first set of tools is not exotic. It is standard Linux:
# USB devices
lsusb

# Network and CAN interfaces
ip link show

# PCIe devices
lspci

# I2C / SPI / UART
ls /dev/i2c-*
ls /dev/spidev*
ls /dev/ttyTHS*

# Storage devices
lsblk
This may look basic, but it reflects one of the most important debugging habits in robotics:
Verify the physical and operating-system layer before debugging the application layer.
If a camera disappears, a CAN interface is down, or a serial port never appears under /dev, reinstalling ROS 2 will not solve the problem.
On the reference platform, can0 and can1 use the native Tegra mttcan controller, while can2 and can3 are provided through external MCP251XFD controllers over SPI. Multiple I²C, SPI, and UART device paths are also available for IMUs, GNSS receivers, actuators, and other peripherals.
This is the first systems-level lesson worth keeping:
Every ROS topic, model input, or control command eventually has to map back to real hardware.
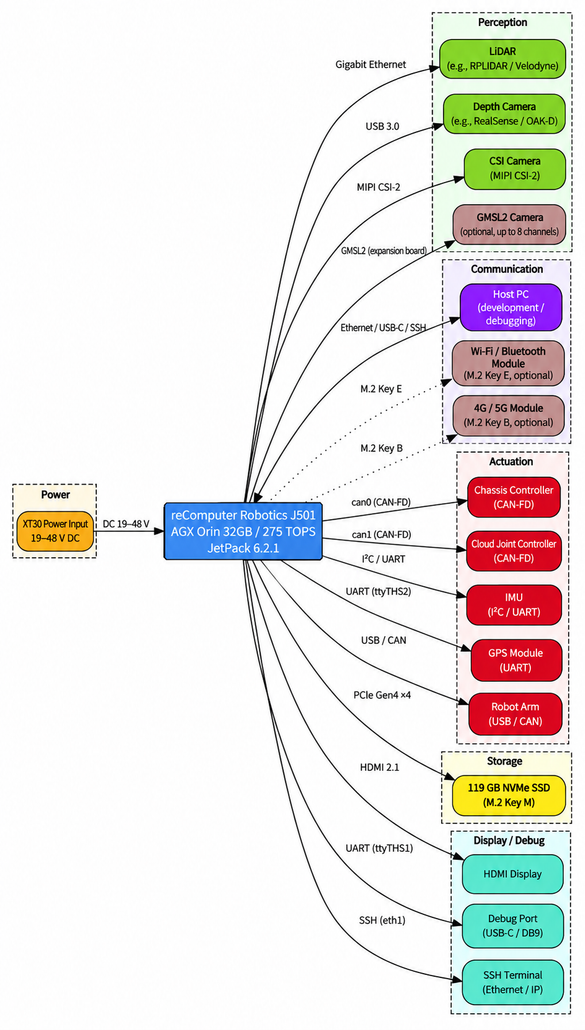
The J501 acts as the connection point between sensing, compute, communication, and robot actuation.
JetPack Is Not Just “Ubuntu for Jetson”
Once the hardware is visible, the next layer is the Jetson software stack.
It is easy to think of JetPack as simply an Ubuntu image for Jetson, but that misses most of what makes the platform useful for robotics and edge AI.
The reference environment uses JetPack 6.2.1 with L4T 36.4.4, CUDA 12.6.11, cuDNN 9.3, TensorRT 10.3, VPI 3.2.4, OpenCV, PyTorch, FFmpeg, and GStreamer.
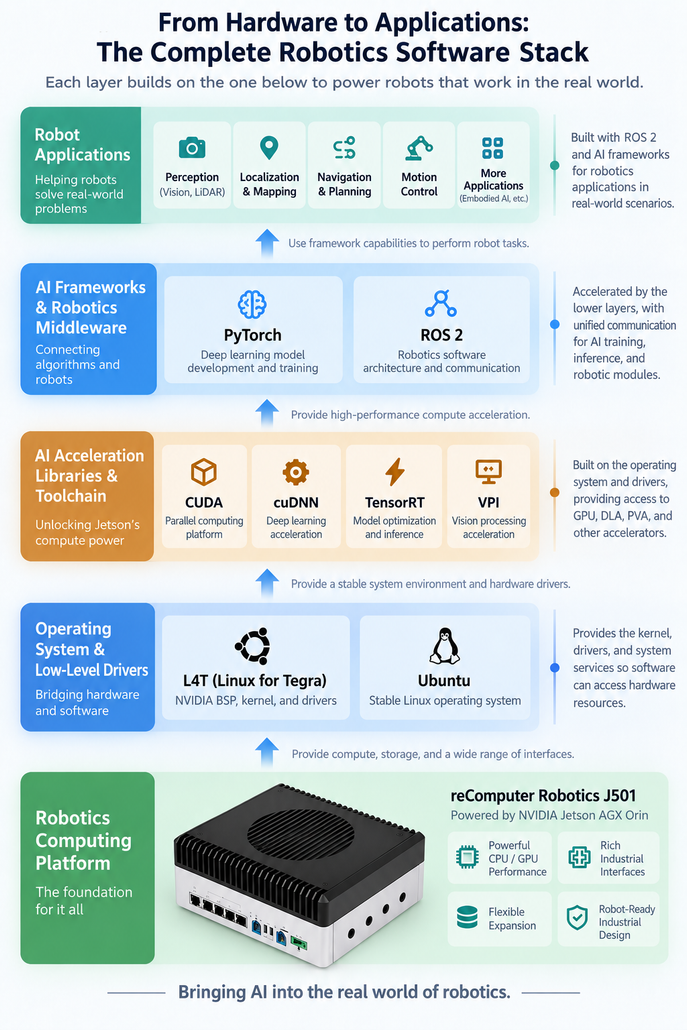
A useful way to understand the stack is layer by layer:
J501 hardware → L4T / Ubuntu → CUDA / cuDNN / TensorRT / VPI → PyTorch / ROS 2 → robotics applications
At the bottom, the Jetson platform provides CPU, GPU, memory, and I/O resources. L4T and the Linux BSP provide the kernel, drivers, and platform support. CUDA, cuDNN, TensorRT, and VPI expose hardware acceleration to software. PyTorch and ROS 2 then sit higher in the stack, where developers actually build perception, inference, communication, and control applications.
That dependency chain matters.
Ubuntu may boot normally while CUDA is broken. PyTorch may import successfully while GPU acceleration is unavailable. TensorRT may be installed but not on the expected path. A camera may physically be connected while the driver layer is still wrong.
So a healthy Jetson environment should be verified, not assumed.
A practical baseline check looks like this:
# L4T / JetPack base
cat /etc/nv_tegra_release

# Ubuntu
cat /etc/os-release

# Kernel
uname -a

# CPU
lscpu

# Memory and disk
free -h
df -h

# GPU
nvidia-smi

# CUDA
/usr/local/cuda/bin/nvcc --version

# TensorRT Python binding
python3 -c "import tensorrt; print(tensorrt.__version__)"

# OpenCV
python3 -c "import cv2; print(cv2.__version__)"
There are a few details worth remembering.
The OpenCV 4.8.0 build in the reference environment does not include CUDA acceleration by default. Having CUDA installed does not automatically mean every OpenCV operation will run on the GPU. If your workflow depends on CUDA-enabled OpenCV, you need an appropriate build or container.
Likewise, tools such as nvcc and TensorRT’s trtexec may exist without being available directly in your shell PATH.
Jetson also forces you to think about something desktop AI development often hides:
performance, power, and thermals are coupled.
Using nvpmodel, you can inspect and change power modes. jetson_clocks can lock CPU, GPU, and memory clocks for more consistent performance testing.
For short benchmarks, MAXN may be appropriate. Inside a battery-powered mobile robot, however, runtime, heat, and sustained stability matter just as much as peak throughput.
That distinction becomes increasingly important once the robot starts running perception and planning continuously rather than in short demos.
Suggested image: Vertical Jetson robotics software stack
Caption: Each software layer depends on the layer below it, from J501 hardware and L4T to CUDA acceleration, ROS 2, and robot applications.
From “The System Runs” to “The System Is Pleasant to Develop On”
A validated JetPack installation means the machine is capable of running AI workloads.
It does not yet mean the development workflow is efficient.
Real robot development involves a repetitive loop: remotely connect to the robot, sync code, create or switch environments, install dependencies, run containers, inspect logs, monitor GPU and memory usage, modify code, and repeat.
Without a clean workflow, the system gradually becomes difficult to reproduce and harder to debug.
For this part, the course points developers to Seeed’s reComputer Jetson for Beginners material, which covers everyday Jetson tooling such as Linux networking, SSH, remote desktop, Python, CUDA, TensorRT, PyTorch, Docker, Jtop, VS Code, JupyterLab, and uv.
Basic Tools and Getting Started:
https://github.com/Seeed-Projects/reComputer-Jetson-for-Beginners/tree/main/3-Basic-Tools-and-Getting-Started
Remote Development First
Once the J501 is mounted inside a robot, attaching a monitor and keyboard every time you need to change code becomes impractical.
A better model is:
Host PC = development console
J501 = onboard robot computer
SSH handles most command-line work:
# On J501: check the IP address
ip addr

# On the host PC: test network reachability
ping <J501_IP>

# Connect remotely
ssh <username>@<J501_IP>
This same network-first mindset also helps later with ROS 2.
If the machines cannot even ping each other, there is no reason to start debugging DDS.
For graphical workflows, NoMachine or another remote desktop solution can be used when needed.
Isolate Python Projects
Robot projects tend to accumulate dependencies quickly.
A vision experiment may need one version of a package, while another tool requires something different. Installing everything into the system Python is a reliable way to create conflicts over time.
A cleaner approach is to give each project its own environment. With uv, for example:
mkdir robot_project
cd robot_project

uv venv

source .venv/bin/activate
The important point is not the specific tool. It is the habit of keeping project environments isolated and reproducible.
On Jetson, GPU frameworks require an extra level of care.
PyTorch compatibility depends on JetPack and CUDA versions, so the safe order is:
Verify JetPack / CUDA → choose a compatible PyTorch build → install project dependencies
not:
Install the latest package and hope CUDA works.
Use Docker for the Whole Runtime
Python virtual environments isolate Python dependencies. Docker can isolate a much broader runtime, including system libraries, Python packages, application code, and parts of the AI software stack.
That matters because robotics and edge AI applications often depend on specific combinations of CUDA, TensorRT, and system packages.
On Jetson, however, a container must also be able to access the NVIDIA GPU.
Before relying on a GPU container, at least verify:
docker --version
docker info

nvidia-smi
cat /etc/nv_tegra_release
Later, the Isaac ROS environment provides a more practical test by checking whether ROS 2 and the Orin GPU are both visible inside the development container.
Monitor the Robot Computer Like a Robot Computer
When frame rate suddenly drops, the model is not always the problem.
The GPU may not be saturated. Memory may be tight. The power mode may be wrong. Thermal throttling may be reducing clocks.
Monitoring tools such as Jtop make CPU, GPU, memory, frequency, power, and thermal behavior much easier to inspect. Combined with nvpmodel and jetson_clocks, they turn “the robot feels slower today” into a measurable systems problem.
VS Code and JupyterLab then serve different roles in the development cycle.
A notebook is convenient for testing a camera frame or a small inference pipeline. A maintained ROS 2 package is a better home for production robot software.
The healthy progression is usually:
quick experiment → validated idea → reusable package → integrated robot node
By this point, the J501 has stopped being “a Jetson that boots” and has become an actual robotics workstation: remotely accessible, environment-aware, container-ready, and observable.
ROS 2: A Robot Is Not One Big Program
This is the point where the setup becomes a robotics system.
A real mobile robot should not be one enormous Python script.
The camera driver should capture images. A perception node should process them. Localization should estimate pose. Navigation should plan motion. A chassis node should execute velocity commands.
These components may be maintained by different developers and may even run on different computers.
ROS 2 provides the coordination layer.
Its core concepts map cleanly to common robotics patterns:
- Node — an independent functional component
- Topic — asynchronous streaming data, such as camera frames
- Service — request/response operations
- Action — longer-running tasks with feedback and cancellation
- Parameter — runtime configuration
- DDS — middleware responsible for discovery and data transport
A standard ROS 2 workspace can be created with:
mkdir -p ~/ros2_ws/src
cd ~/ros2_ws

colcon build --symlink-install

source ~/ros2_ws/install/setup.bash
colcon builds the workspace, while --symlink-install is especially useful during Python development because script changes can be reflected without repeatedly copying installed files.
As the robot grows, camera, perception, chassis, localization, and navigation packages can all live inside the same workspace while remaining logically separated.
That small architectural choice prevents the project from slowly turning into a folder full of unrelated scripts.
A Minimal but Real ROS 2 Pattern: Robot Status Up, Commands Down
Instead of stopping at a generic “Hello World,” the module uses a small Robot Commander demo.
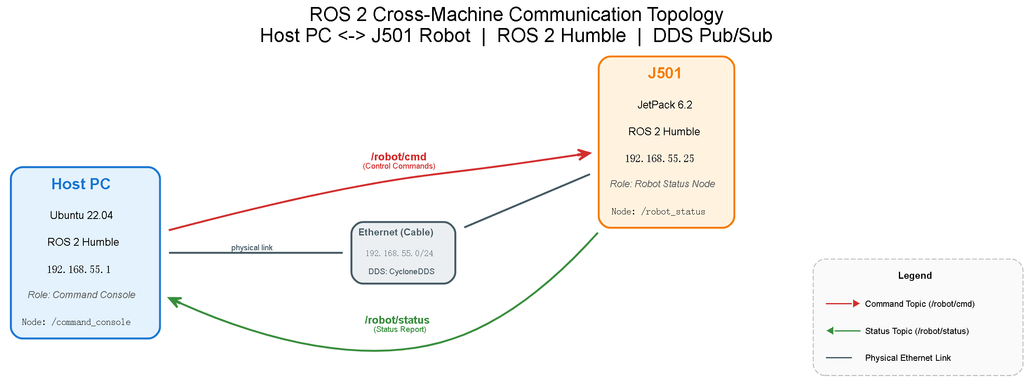
On the J501, the robot_status node periodically reads CPU temperature, memory usage, and disk status and publishes the result on:
/robot/statusThe same node subscribes to:
/robot/cmdand responds to simple commands such as LED control, a text message, or an immediate status request.
On the host PC, the command_console node does the reverse: it subscribes to robot status and publishes control commands.
It is a small demo, but the pattern is exactly what many real systems use:
Robot → Host: status and telemetry
Host → Robot: commands
Start the robot-side node:
source ~/ros2_ws/install/setup.bash
ros2 run j501_robot robot_status
Then publish a command from another terminal:
source /opt/ros/humble/setup.bash

ros2 topic pub --once \
  /robot/cmd \
  std_msgs/String \
  "data: 'LED:ON'"
If the robot node receives the message, you have verified publishers, subscribers, callbacks, and the message path.
At this point, a ROS 2 topic is no longer an abstract diagram. It is real data moving between software components.
Take the Same Nodes Across Two Machines
The more interesting step is moving the two nodes onto separate computers.
The J501 continues running robot_status. The host PC runs command_console.
Once both machines are on the same network, DDS can discover the remote nodes and establish communication.
The host can subscribe to /robot/status, publish to /robot/cmd, and see nodes running on both machines.
These commands are useful for debugging almost every ROS 2 system:
# List topics
ros2 topic list

# Inspect publishers and subscribers
ros2 topic info /robot/status

# Measure publish rate
ros2 topic hz /robot/status

# Read one message
ros2 topic echo /robot/status --once

# List nodes
ros2 node list
If both computers can ping each other but cannot discover ROS 2 nodes, the next places to investigate are DDS configuration, firewall behavior, and ROS_DOMAIN_ID.
The documentation also includes CycloneDDS and domain isolation options for more controlled network setups.
This is one of the most important ideas to carry forward:
a robotics system is naturally distributed.
A node does not need to live on a specific machine as long as the communication contract remains consistent.
One More Check Before Perception: Can Docker, GPU, and ROS 2 Work Together?
Once cross-machine ROS 2 communication works, the software architecture is already useful.
Before moving into the perception modules, however, there is one more integration point worth validating:
Can JetPack, Docker, the NVIDIA GPU, and ROS 2 work together as one stack?
That is where Isaac ROS enters.
Isaac ROS is NVIDIA’s collection of GPU-accelerated ROS 2 packages for robotics perception, using Jetson acceleration resources such as GPU, DLA, and PVA.
This module does not try to teach the full Isaac ROS ecosystem. The purpose here is simply to prove that the underlying environment is ready for the next stage.
The development container can be launched with:
mkdir -p ~/isaac_ros_ws/src
cd ~/isaac_ros_ws

git clone \
  https://github.com/NVIDIA-ISAAC-ROS/isaac_ros_common.git \
  ~/isaac_ros_ws/src/isaac_ros_common

cd ~/isaac_ros_ws/src/isaac_ros_common/scripts
./run_dev.sh
Then validate the environment inside the container:
ros2 topic list
echo "ROS_DISTRO=$ROS_DISTRO"
nvidia-smi
If the container reports ROS_DISTRO=humble and can see the Orin GPU, then the chain from JetPack to Docker, NVIDIA runtime, and ROS 2 is working.
The next step is to run isaac_ros_image_pipeline, where /image_raw passes through GPU-accelerated image processing and produces /image_rect_color.
The goal is not to teach image rectification yet.
It is to verify that a GPU-accelerated ROS 2 data path works before the perception module begins.
This closes the loop nicely:
physical interfaces → Jetson software stack → developer workflow → ROS 2 communication → GPU-accelerated ROS 2 application
That is the foundation the rest of the series builds on.
What You Should Remember Is the Debugging Order
If you only want to finish this setup, you can copy the commands and move on.
If you want the article to remain useful months later, keep the debugging order instead.
If a camera stops producing data, do not immediately reinstall ROS 2. Check the USB, GMSL2, or Ethernet connection first. Confirm the driver and device node. Then inspect the ROS node and topic.
If a model cannot use the GPU, do not start by reinstalling PyTorch. Verify JetPack and CUDA first, then the framework build, and finally GPU access inside the container.
If two computers cannot see each other’s ROS 2 nodes, start with IP connectivity before investigating DDS, firewall rules, or ROS_DOMAIN_ID.
A simple way to remember the order is:
Hardware → OS / Drivers → Development Environment → Middleware → Application
Lower layers should usually be ruled out first.
That habit is far more valuable than memorizing every command in the tutorial.
By the end of this first stage, the result is not simply “a Jetson with software installed.”
It is a robotics computer that is ready to grow:
- physical interfaces are visible;
- the Jetson AI acceleration stack has been verified;
- the development environment is manageable;
- ROS 2 can connect software components across machines;
- Docker and Isaac ROS prove that GPU-accelerated robotics applications can run on top of the stack.
The next article moves into perception.
The question changes from:
“How do we make the robot system run?”
to:
“How does the robot begin to see the world?”
That means cameras, RGB-D, GMSL2, and GPU-accelerated image processing are next.
Build Along, Break Things, and Share What You Learn
Mobile Robot Full-stack Development In Practice is an open-source series, and we want it to become more than a sequence of tutorials.
If you reproduce the setup and encounter a different result, find a better configuration, integrate another sensor, or build your own demo on top of the platform, share it.
You do not need to wait until you have built a complete autonomous robot.
Your first successful ROS 2 message between the host PC and J501, the first time the GPU becomes visible inside a container, the first sensor you integrate, or even a bug you cannot solve can all be useful starting points for discussion.
The global Seeed Studio robotics community is open to developers who want to share demos, compare setups, discuss what they are learning, ask practical questions, and connect directly with Seeed Studio developers and engineers.
Join the community:
- Seeed Studio Discord
- WhatsApp Robotics Discussion Group
- Facebook AI Robotics Community Group
- Course GitHub ⭐ & Fork it
Build something small. Share what worked. Share what broke. Help someone else reproduce it.
That is how an open robotics course becomes an open robotics community.
Resources Used in This Article
Hardware
reComputer Robotics J501 Series
Powered by NVIDIA Jetson AGX Orin 32GB / 64GB
Product and getting-started information:
https://wiki.seeedstudio.com/ai_robotics_recomputer_j501_robotics_getting_started/
Software Stack
- JetPack 6.2.1
- L4T 36.4.4
- CUDA 12.6
- cuDNN
- TensorRT
- VPI
- PyTorch
- Docker
- ROS 2 Humble
- Isaac ROS
Hands-on Documentation
M01 — Platform and Development Environment
reComputer Jetson for Beginners — Basic Tools and Getting Started
About Author

WOW,
Frank… This has got to be one of the best BLOG posts from any Seeed Studio engineers.
Very concise and thorough, Great READ, and I actually understand almost all of it. The ROS2 stuff I’m new to.
Great Read and I look forward to following it, I have the J501 , but still working to put together enough ,”Dough-bread-cheese-money”
for the SOM for it. >$1000 ouch! But i’ll get it soon. So PLEASE keep updating the course and highlighting the Great Tech from Seeed :+1:
Great Article.
PJ Glasso