What is Arduino?: Overview and How to Get Started
Ever heard of the term “Arduino” but not know what it is or what it means? Today, you will learn all about Arduino with this comprehensive Arduino guide!
- Overview of Arduino
- Why use Arduino?
- What makes up an Arduino Board?
- Getting started with Arduino – with Seeed Grove
- What is Arduino IDE
- Types of Arduino Boards
- Arduino Shields
- Arduino Sensors
- What can the Arduino do?
- Helpful Resources
Without further ado, let us jump right into what is an Arduino?
Overview of Arduino
Arduino is an open-source electronics platform that is based on beginner-level hardware and software.
The hardware component of an Arduino board is a programmable circuit board that is also known as a microcontroller. A microcontroller is a small computer with a processor, memory, and other peripherals designed for embedded applications. The software component is called Arduino IDE (Integrated Development Environment) where developers write and upload the code onto the microcontroller, it will be further explained later in the article.
Arduino is mainly used to build electronic projects for everyone – electricians, tinkerers, hobbyists, makers, and beginners. You can feed an Arduino board a set of instructions for it to carry out certain tasks. It is able to read the inputs and turn them into an output, for example, it will read a finger on a button and turn on an LED.
Let us now look at some reasons why one would use Arduino!
Why use Arduino?
Simplicity
Besides the main microcontroller chip, a microcontroller will require many different parts to work. What Arduino did was take away all the essential components of a microcontroller and design it so that it is effortless to operate on a piece of Printed Circuit Board (PCB) — making it very welcoming to all beginners!
Furthermore, Arduino’s easy-to-use IDE software for beginners is a more manageable program to learn as it uses a simplified version of C++ compared to other programming software. Because of this, Arduino is commonly cited as the pathway for everyone looking to learn about microcontrollers. With it being optimized for users of all levels, even advanced users are also taking advantage of the Arduino IDE!
Community
The Arduino community is vast and active, with users and organizations from all over the world. There is extensive documentation readily available online. A wide variety of tutorials and projects are pre-coded for you to learn and build using Arduino, allowing non-coders to get started very easily.
Cheap
Arduino Micro only costs $18.90, but it packs a powerful ATmega32U4 and has 20 digital pins.
You can also get your very own Raspberry Pi – RP2040 microcontroller Arduino Nano for only $25.50. It is filled with 20 digital pins and has WiFi and Bluetooth connectivity thanks to the Nina W102 uBlox module.
Arduino Nano v3 only costs $19.80 but is powered with the ATmega328 and boasts 14 digital pins with 32 kb of flash memory!
Cross-Platform
Arduino IDE is also cross-platform, which means you can run it on Windows, Mac OS, and Linux operating systems compared to other microcontrollers, which primarily run only Windows.
Wide Variety
Arduino has many more variations for you to choose from, you can pick the one that suits your project needs the most! There is currently a plethora of Arduino-compatible boards on the market. It is all supported very strongly by the Arduino community. It ranges from thumb-sized boards (21×17.5mm) to mega boards (115x75mm), each serving different project needs.
Introducing the Seeeduino product line and XIAO series by Seeed Studio. It caters to almost every project you can think of, ranging from small projects like wearables to mega IoT projects!
We will talk more about all the different types of Arduino boards later on. But now, we will take a look at what makes up an Arduino board.
What makes up an Arduino Board?
The physical hardware of Arduino is the board itself. However, when it comes to Arduino boards, there are multiple varieties with different functionalities.
Today we will be looking at our Seeeduino V4.2, which has the same functions as one of the most popular Arduino boards – the Arduino UNO.
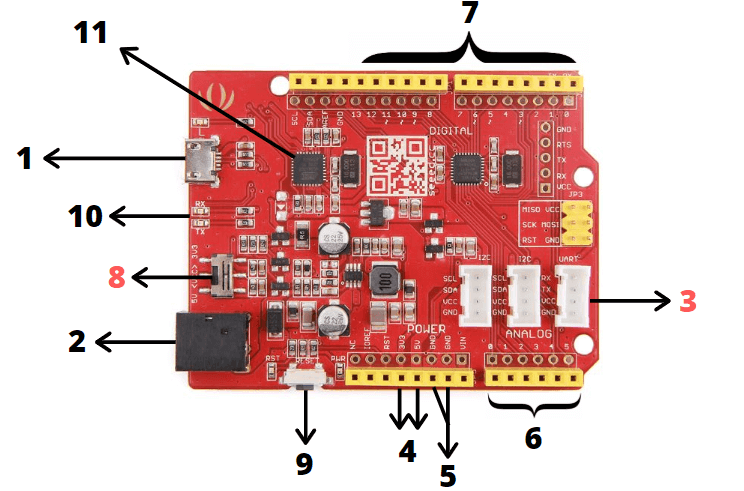
Compared to the Arduino UNO, it has some extra features highlighted in red and can only be found on our Seeeduino boards!
1 – USB Input
- USB Port connects the board to your PC for programming and powering up the Arduino board.
- This USB connection is important as it will be through this port that you will upload your code onto your Arduino board.
To learn more about how to Upload Code on your Arduino, you can check out our tutorial on How to Upload Code on Arduino.
2 – DC Input
- The DC power jack allows your Arduino board to be powered from a wall adapter so that you can supply more power to your project if needed.
3 – Grove Connectors
- These Grove connectors can only be found on our Seeeduino boards.
- Seeed Studio has a variety of sensors and devices that can use this I2C or UART connection.
- With our Grove Connectors, you can easily plug-in modules with Arduino without any soldering or jumper systems.
- We will elaborate more about Grove later in our Sensors and shields section.
4 – 3.3V and 5V Pins
- As the name specifies, the 3.3V and 5V pins supply volts of power to your modules. The 3.3V pin provides 3.3 volts of power, while the 5V pin provides 5 volts of power.
5 – GND pins
- The GND (Ground) pins are used to ground your circuit.
- GND means this pin is at zero voltage with respect to the power supply and ground plane of the circuit board.
6 – Analog Pins
- The analog pins allow the board to read signals from an analog sensor, like a light sensor and convert it into a digital value.
- Even though the primary function of the analog pins for most Arduino users is to read analog sensors, the analog pins also have all the functionality of general-purpose input/output (GPIO) pins.
7 – Digital Pins
- The digital pins on the Seeeduino or Arduino UNO are on Pin 0 to 13.
- They allow the board to read digital inputs like pushing a button and output something like turning on an LED.
8 – System Power Switch
- This system power switch can only be found on our Seeeduino boards.
- This slide switch is used to change the board’s logic level and operating voltage to either 5V or 3.3V, which is helpful as if you want to save power, you can set it to 3.3V.
9 – Reset Button
- This reset button allows you to reset the board and restart any code uploaded on your Arduino board. Once pressed, the reset pin will be temporarily connected to the ground.
- This reset button is handy for your projects if your code does not repeat itself, but you wish to test it multiple times.
- This button is conveniently placed on the side to allow you to reset the Seeeduino board even when a shield is placed on top. This is different from other Arduino boards where the button is placed on top, making it hard to access.
10 – RX/TX Indicator
- Also known as the Transmit and Receive Indicators
- The TX and RX LED indicators are connected to the TX and RX of the USB-to-UART chip.
- They work automatically and let you know when the board is sending or receiving data. For example, when you upload a program onto your Arduino board.
11 – Microcontroller
- The Seeeduino V4.2 and Arduino UNO are based on the microcontroller ATmega328P.
- This is the primary chip that acts as your Arduino board’s brain.
- They allow you to program your Arduino for it to be able to execute commands and decisions based on the code.
- You will have to know which type of microcontroller your board uses before loading a new program from the Arduino Software.
- Even though the microcontroller on the Arduino boards is different, their difference is not significant. The only difference you may notice is the different amounts of onboard memory.
Getting Started with Arduino – with Seeed Grove!
Now that you understand what you can do with an Arduino and the components in an Arduino board, it is time to get started on your journey into the world of electronics with Arduino and Seeed’s Grove product line.
Grove is a modular, standardized connector prototyping system. Grove takes a building block approach to assemble electronics. It is easier to connect, experiment, and create than a jumper or solder-based approach, and it streamlines the learning method without becoming too simplistic.
Find out more about Grove at Seeed’s wiki page!
Grove Beginner Kit for Arduino
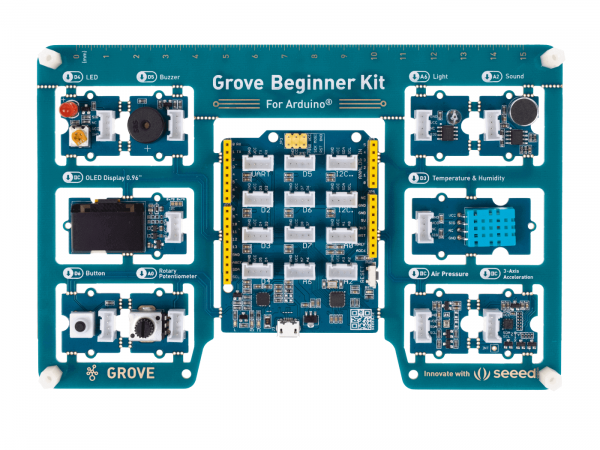
To help you avoid all the hassle of getting all the individual components and sensors, we have prepared an Arduino Beginner Kit for you! This kit includes the main control board Seeeduino Lotus and 10 Grove modules that you can play with without any soldering!
Features:
- Arduino UNO compatible board (ATmega328p based Seeeduino Lotus) + 10 most commonly used Arduino modules
- All modules are pre-wired, no breadboard and jumper cables required
- 74 pages PDF wiki + 12 step-by-step project tutorials
- Super friendly to beginners and STEAM education
In addition, we have prepared detailed instructions on the use of Arduino and the use of each module, which includes 10 lessons each for every sensor module and 2 Arduino projects to show how the modules can be combined and applied in real-life applications.
With this kit, you can learn about Arduino and how to use the different sensor modules together. After this, you can easily start building your own Arduino project with all the knowledge gained!
What is Arduino IDE?
After understanding the hardware of Arduino, you will require software and programming to make your Arduino come to life and allow it to interact with various sensors and shields.
To program your Arduino, you will require the Arduino IDE software.

Arduino IDE makes it easy for you to write and upload your code onto your Arduino board. As previously mentioned, this program is cross-platform, which means it is able to run on Windows, Mac OS X, and Linux.
This software can also be used with any Arduino board, like our Seeeduino V4.2, Arduino UNO Mini, etc. The environment is written in Java and based on processing and other open-source software.
This program uses a simplified version of C++ with syntax highlighting and other features, making it easier to learn to program, thus being perfect for beginners who want to start learning programming and coding!
After you finish writing your code, you can then easily load your code on your Arduino IDE with a USB cable with a click of a button.
To learn more about Arduino IDE, you can check out Arduino’s official documentation!
Latest Update on September 14th, 2022
Arduino IDE 2.0 is available for download now. It carries a modern editor and provides a better overall user experience thanks to a responsive interface and faster compilation time.
Updates of Key Features:
- Autocomplete during sketch editing
- Dark Mode
- Never lose a sketch keeping them safely at Arduino Cloud
- Serial Plotter
- In-app updates
Check Arduino’s official announcement to know more: It’s here: please welcome Arduino IDE 2.0
Types of Arduino Boards
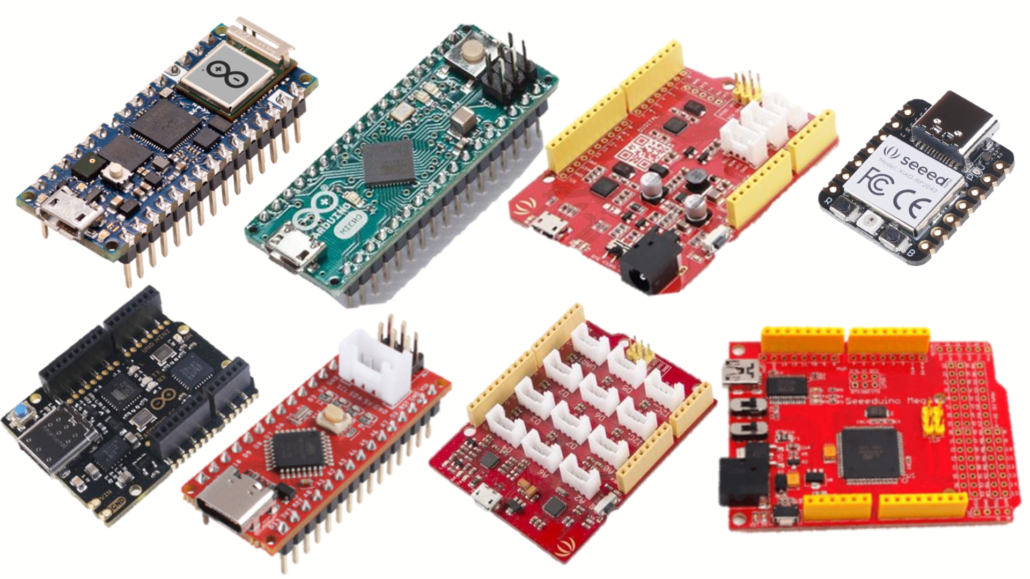
Now that you have understood the hardware and software part of the Arduino, it is time to pick your own Arduino Board! However, you may notice many variations from official Arduino boards to Arduino-compatible boards, each unique with different capabilities and price points.
Today, we have compiled some of the most suitable for beginners! They are:
Arduino Nano RP2040 Connect $25.50
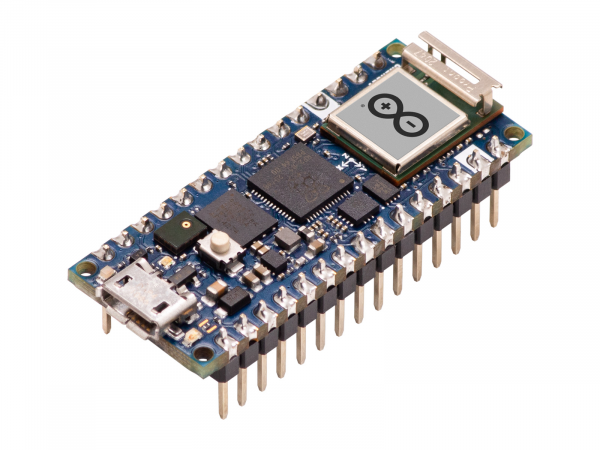
The Arduino Nano RP2040 brings the famed Raspberry Pi RP2040 microcontroller to the Nano form factor. With a dual-core 32-bit Arm Cortex-M0+ processor and U-Blox Nina W102 module, you are able to create IoT projects with Bluetooth and WiFi connectivity.
It boasts a 6-axis IMU and a powerful co-processor, ATECC608A, which allows you to dive into real-world projects and develop robust embedded AI solutions with minimal effort!
Arduino Micro $18.90
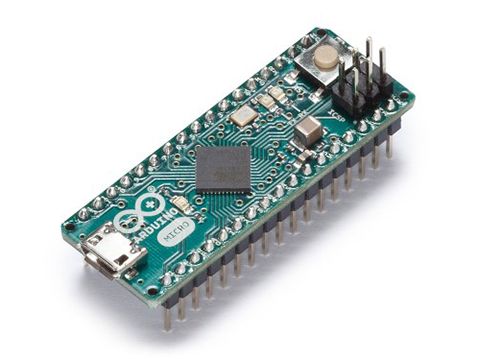
The Arduino Micro is powered by the ATmega32U4 processor and has a 16Mhz crystal oscillator, micro USB connection, ICSP header, and reset button.
It boasts 20 digital I/O pins, 12 analog inputs, and 7 PWM-enabled pins. In addition, with a native USB, you can use it as a mouse, keyboard, etc. However, the Micro bootloader can only be programmed with a USB that requires a special driver. With Linux, only a few selective versions have the needed driver.
Arduino UNO Mini Limited Edition $45.00
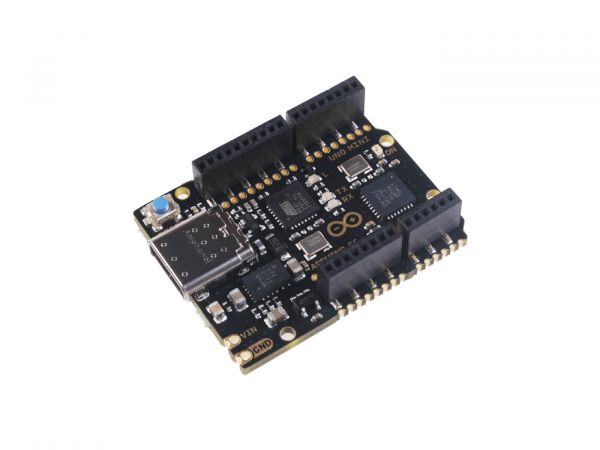
Each Arduino UNO Mini Limited Edition comes with its unique number printed on the PCB and was made to celebrate the Arduino community on its most iconic board, the Arduino UNO. It has a black and gold finish, elegant design and packaging, all delivered to the highest standard!
The Arduino UNO Mini Limited Edition functions exactly the same as the classic Arduino UNO. It can be very effortlessly integrated and used in any Arduino UNO project. It uses the same ATmega328P microcontroller and the same USB-Serial Processor ATmega16U2 but differs in size and peripherals, such as having a USB-C connector and half the female header pins. It also doesn’t feature a barrel plug connector for an external power supply. Instead, two pins are available, “VIN” and “GND” for external power supply connection.
Moving on to Seeed Studio’s very own Seeduino boards, they are the cheaper alternatives to Arduino official boards and very compatible with the Arduino Sensors, which will be further explained later, to conduct various IoT, home application projects, etc.
The Alternative of Arduino Boards
Seeeduino V4.2 $7.60

We learned about the Seeeduino V4.2 parts earlier, it is based on the famed Arduino UNO, but it is significantly cheaper, costing only $7.60!
It has the same hardware and functions with a few additional features like:
- Switch the system supply voltage (3.3V or 5V) according to your needs
- 3 on-board Grove interfaces that allow your board to connect easily to our Grove modules.
- Use of a DC-to-DC converter instead of an LDO (Low Drop Out regulator) for enhanced efficiency
Seeeduino Nano $7.60

Want a smaller Arduino UNO or Seeeduino V4.2 for your project needs? Then the Seeeduino Nano would be perfect for you!
The Seeeduino Nano is a compact board that is fully compatible with Arduino Nano on pinout and sizes. It is powered by the same ATmega328P processor, so you can use the same program code. Standing at 43 x 18 mm, it is less than a quarter size of the Seeeduino V4.2. Its compact size and reliability allow it to be readily integrated into many projects like wearables, mini robots, and many more!
In addition, the Seeeduino Nano features 1 on-board Grove interface, which allows your board to connect to our Grove modules easily.
Seeeduino Mega $43.00
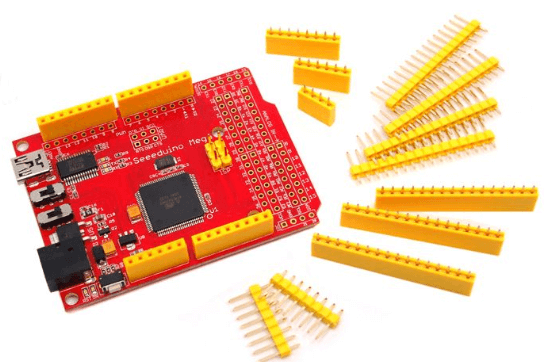
Want something bigger and better? Try the Seeeduino Mega!
The Seeeduino Mega is a powerful microcontroller derived from the Arduino Mega. However, it is 30% smaller. It features the ATmega2560 processor and very rich peripherals: 70 digital I/O, 16 analog inputs, 14 PWM, and 4 UART. It is suitable for projects that require many digital inputs or outputs, such as smart home systems, industrial robots, etc.
Seeeduino Lotus V1.1 $10.90
The Seeeduino Lotus V1.1 is a combination of a Seeeduino board and the Grove Base Shield. It is based on the ATmega328P-MU – a high-performance, low-power 8-bit AVR microcontroller. It boasts 14 digital pins, 6 PWM and 7 analog, micro USB connection, ICSP header, 12 Grove connections, and a reset button. It is also compatible with Windows and Mac OS.
Seeeduino Crypto $21.90
As the name indicates, this board is born for encryption. The Seeeduino Crypto is based on high-performance ATmega4809 and features an ECC608 crypto chip. Aside from the I2C encryption, the Seeeduino Crypto is functionally the same as the Seeeduino V4.2 / Arduino Uno Rev3. It has rich interface resources, including 6 analog input pins, 14 digital I/O – 5 of which can work as PWM output. Furthermore, it boasts 2 Grove I2C and 1 Grove UART to allow easy prototyping.
XIAO Series Starting from $5.4
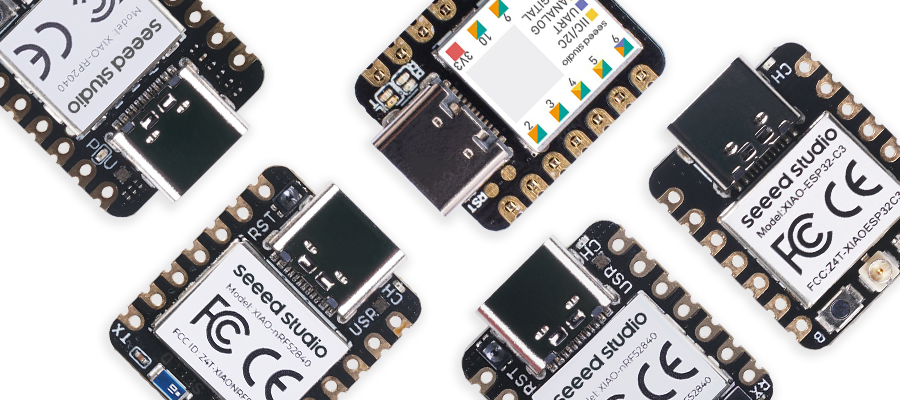
The XIAO series contains many small but powerful Arduino-compatible boards, such as the XIAO SAMD21, XIAO RP 2040, XIAO nRF52840, and XIAO ESP32C3. They are all powered by different processors and serve various applications.
Learn more about it here!
Summary Table
| Board | Processor | Voltage | Digital Pins | PWM Pins | Analog Pins | Flash Memory | RAM | Clock Speed | Price |
| Arduino Nano RP2040 | RP2040 | 3.3V | 20 | 20 | 8 | 16MB | 264KB | 133Mhz | $45.90 |
| Arduino Micro | ATmega32u4 | 5V | 20 | 7 | 12 | 32KB | 2.5KB | 16Mhz | $18.90 |
| Arduino UNO Mini Limited Edition | ATmega328p | 5V | 14 | 6 | 6 | 32KB | 2KB | 16Mhz | $45.00 |
| Seeeduino V4.2 | ATmega328 | 3.3/5V | 14 | 6 | 6 | 32KB | 2KB | 16MHz | $7.60 |
| Seeeduino Nano | ATmega328 | 5V | 14 | 6 | 8 | 32KB | 2KB | 16Mhz | $7.60 |
| Seeeduino Mega | ATmega2560 | 3.3/5V | 70 | 14 | 16 | 256KB | 8KB | 16Mhz | $43.00 |
| Seeeduino Lotus V1.1 | ATmega328P-MU | 5V | 14 | 6 | 7 | 32KB | 2KB | 16Mhz | $10.90 |
| Seeeduino Crypto | ATmega4809 | 5V | 14 | 5 | 6 | – | – | 16Mhz | $21.90 |
| Seeed XIAO ESP32C3 | ESP32-C3 | 3.3V | 11 | 11 | 4 | 4MB | 400KB | 160Mhz | $4.99 |
| Seeed XIAO nRF52840 Sense | nRF52840 | 3.3V | 11 | 11 | 6 | 2MB | 256KB | 64MHz | $15.99 |
| Seeed XIAO nRF52840 | nRF52840 | 3.3V | 11 | 11 | 6 | MB | 256KB | 64Mhz | $9.90 |
| Seeed XIAO RP2040 | RP2040 | 3.3V | 11 | 11 | 4 | 2MB | 264KB | 133Mhz | $5.40 |
| Seeed XIAO SAMD21 | ATSAMD21 | 3.3V | 11 | 10 | 11 | 256KB | 32KB | 16Mhz | $5.40 |
Over the years, Arduino has evolved into one of the most commonly used prototyping platforms for all hobbyists, designers, and students alike for electronic projects. For different project ideas, you may need different sensors to convert a physical quantity, such as light intensity or temperature, into an electrical quantity, for example, in a smart weather station project, you will need a temperature&humidity sensor, or if you want to build a higher-level one, you may need light intensity sensor. Therefore, sometimes the original sensors in the Arduino board may not be enough to support your project. At this time, choosing suitable Arduino Shields and sensors can help you easily extend the functionality of your Arduino boards and make your project goes ahead easily.
Arduino Shields
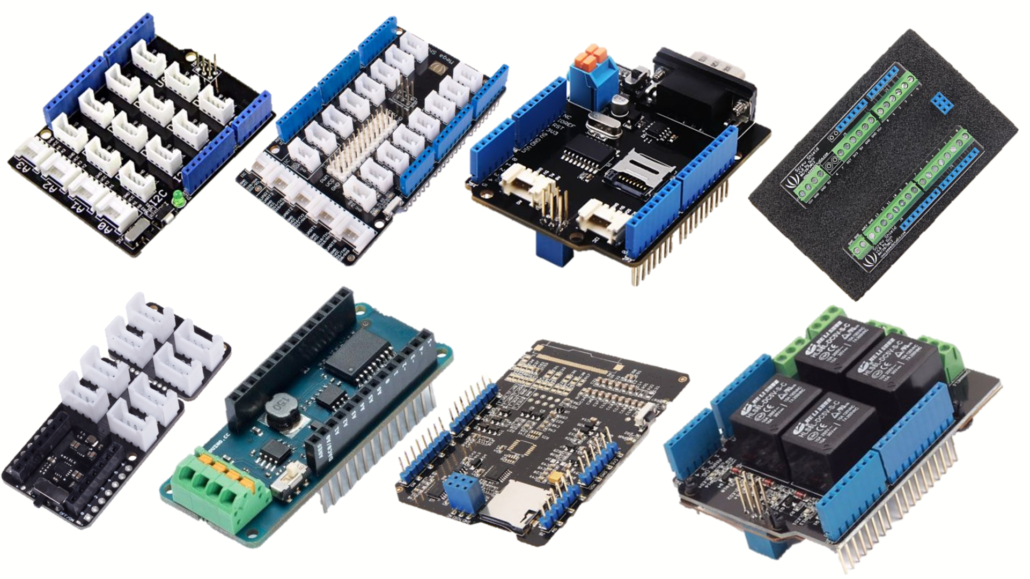
Arduino shields are pre-built circuit boards easily plugged on top of your Arduino headers to extend their capabilities.
With Arduino, adding certain features such as CAN-Bus connection can be complicated, especially if you are new. With shields, you can avoid all the trouble and effortlessly plug in a shield on the back of your Arduino and start on your projects instantly!
Interested? You can check out all of our Arduino Shields here!
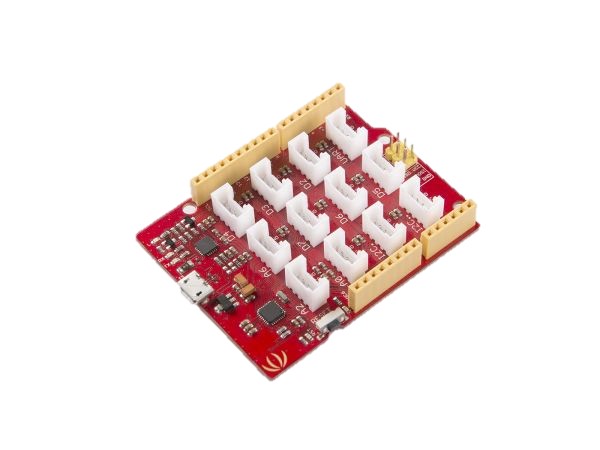
Grove Base Shield V2.0 for Arduino
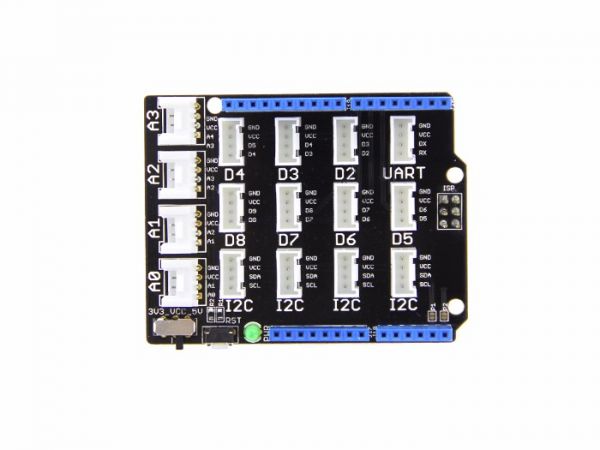
The Grove Base Shield provides a simple way to connect your Arduino boards and eliminates breadboard and jumper wires. With the 16 on-board Grove Connectors, you can easily connect with over 300 Grove modules! Apart from the rich Grove connectors on the board, there is also a reset button and a green LED to indicate power status. The pinout of Base Shield V2 is the same as Arduino Uno R3.
Grove Mega Shield V1.2
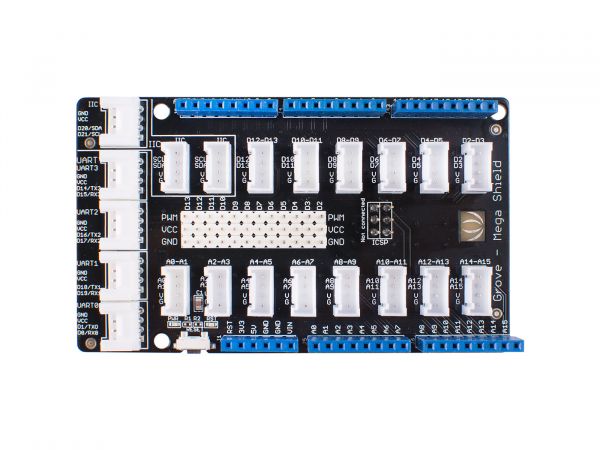
Mega Shield is an extension board for Arduino Mega and Google ADK. We have standardized all the connectors into 4 pins (Signal 1, Signal 2, VCC, and GND) 2mm connectors and kept some of the 3pin (Signal, VCC, and GND) 2.54mm headers for servo and electronic bricks, which simplify the wiring of electronics projects. The 4pins buckled connectors also make the wiring situation more stable.
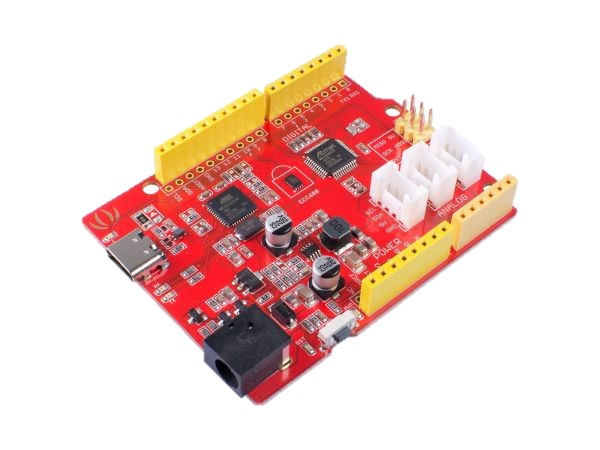
Shield for Seeed Studio XIAO
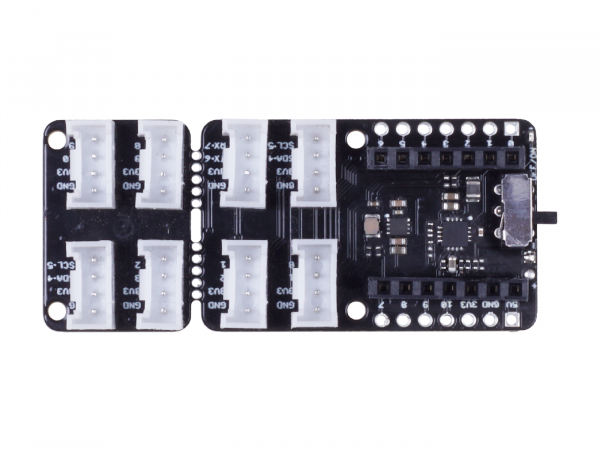
This shield is a plug-and-play Grove extension board for Seeed Studio XIAO. It helps to get rid of jumper wires and soldering work by pulling out the pins of the Seeed Studio XIAO and expanding to 8 Grove connectors, including two Grove IICs and one UART. It acts as a bridge between Seeed Studio XIAO and Seeed’s Grove system, which includes 300+ Grove modules. No more jumper wires and soldering work, you can enjoy creating more projects with Seeed Studio XIAO easily and quickly.
Arduino MKT CAN Shield
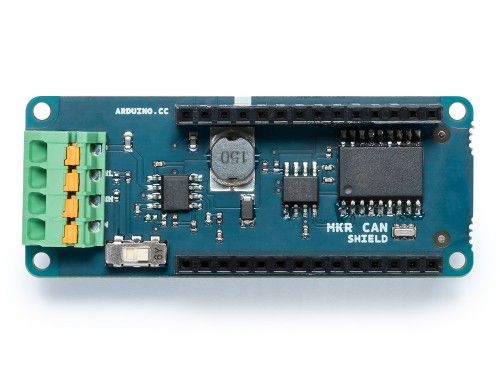
The MKR CAN Shield allows you to connect to a CAN (Controller Area Network) Bus easily. It simplifies the connection of the MKR boards with industrial systems, especially for automotive applications. This shield opens a new set of possible applications like smart vehicles, autonomous cars, and drones. A CAN connection also allows connecting an MKR board directly with several types of industrial-grade sensors, motors, and displays.
CAN-BUS Shield V2
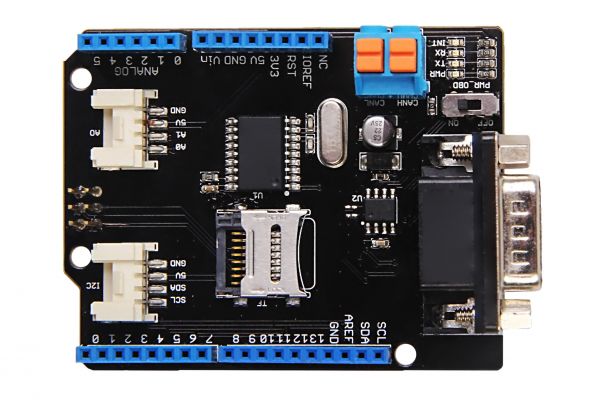
Hacking vehicles becomes easy with the CAN-BUS shield and Arduino! It adopts the MCP2515 CAN-BUS controller with SPI interface and MCP2551 CAN transceiver to give you Arduino/Seeeduino CAN-BUS capability. It also provides selectable OBD-II and CAN standard pinout, changeable CS pin for TF card slot, and INT pin. A screw terminal can easily connect CAN_H and CAN_L.
Relay Shield V3.0
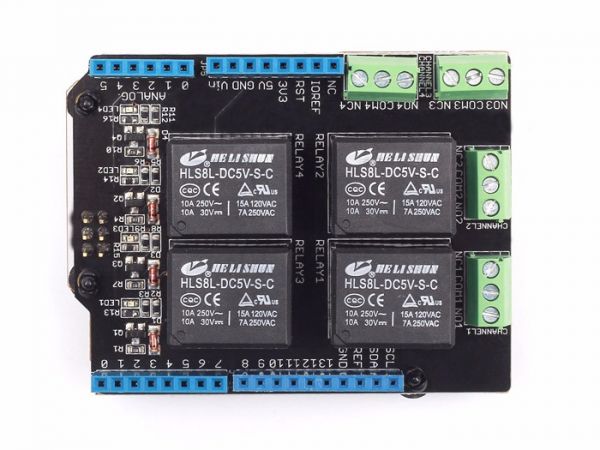
The Relay Shield provides four high-quality relays that can control high current loads to Arduino / Seeeduino boards. It also provides a NO (Normally Open) / NC (Normally Closed) interface to control devices that Arduino’s Digital I/Os could not directly control. The standardized shield form factor enables a smooth connection with Arduino and compatibles. It is also very helpful in switching on/off appliances like fans, lights, motors, or high current DC actuators like solenoid valves.
Small e-paper Shield V2.0
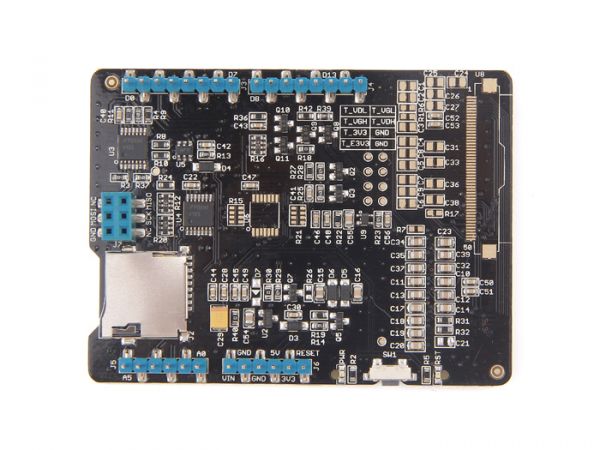
The Small e-paper shield is a driver shield for e-paper 2.0” and 2.7”. It displays texts, graphics, and images and supports more than 170 languages. The upper surface of the shield is flat and clean, which supports the e-paper attached to it.
Screw Shield
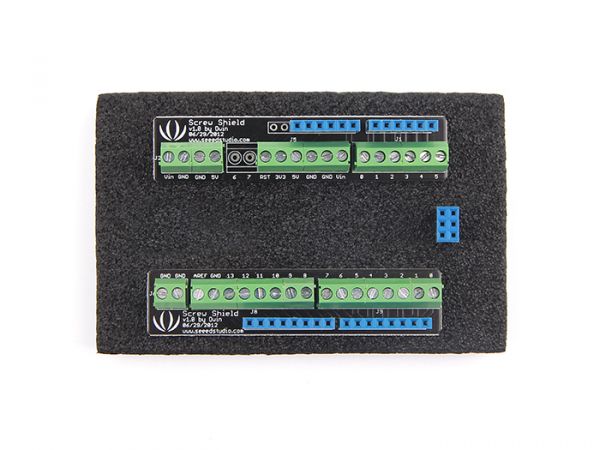
Screw shield is a wing-like shield that extends both sides of your Arduino or Arduino variants into sturdy and reliable screw terminal blocks. A special extension block for the SPI interface is also included in this product to make it a truly stackable shield for other shields to mount on.
Arduino Sensors
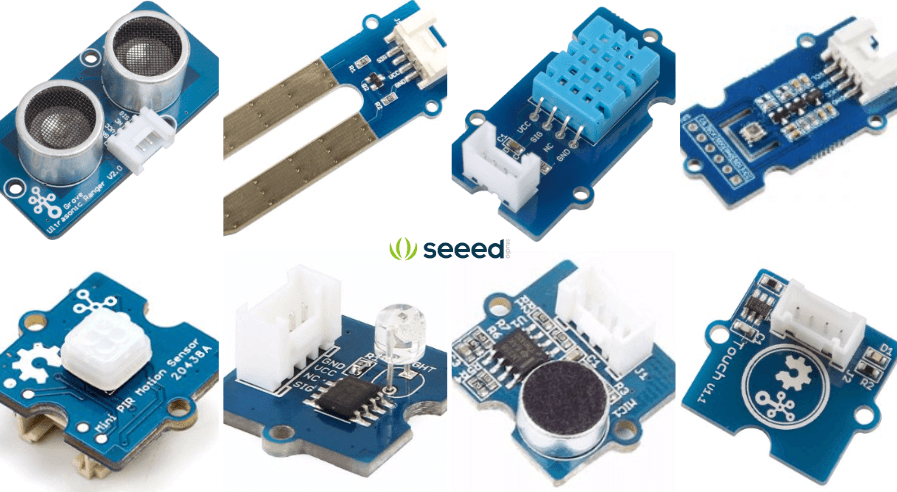
Sensors are devices whose output changes according to a given property of the surrounding environment, e.g., a change in light intensity. It helps Arduino interact with its surroundings and allows them to be used in countless applications, making dream ideas a reality.
Introducing Seeed Studio’s very own line of sensor modules – the Grove system. It consists of a base unit and various modules with standardized connectors. The Base unit allows easy connection of any input or output from the Grove modules. And every Grove module typically addresses a single function, such as a simple button or a more complex heart rate sensor. You don’t need a Base unit to connect up to Grove modules. You can use a cable (Grove to Pin Header Converter) to run from the Raspberry Pi or Arduino pins to the Grove connectors.
With a few lines of code on your Arduino, you can play around and control a wide variety of sensors and build awesome projects. Our sensors can measure light, ultrasonic distance, moisture, temperature, humidity, gas, pressure, motion, sound, and many more!
All of the above-mentioned Arduino boards are compatible with our Grove system. With over 300+ choices, they cover almost every application you can think of! Get yours today here!
What can the Arduino do?
Last but not least, let’s move on to the applications of Arduino and what can the Arduino do.
Common Arduino applications are:
- Entry-level Robotics
- Smart Home
- Weather Station
- Lighting
- Gardening
- Audio
- Art
Arduino Arm Flamethrower
Ever wanted to be the Human Torch from the Fantastic 4? With this Arduino project, you can now shoot fireballs from your fists every time you punch like a fire bender!
Components required:
- Arduino Pro Mini
- Triple Axis Accelerometer
Arduino Robotic Arm
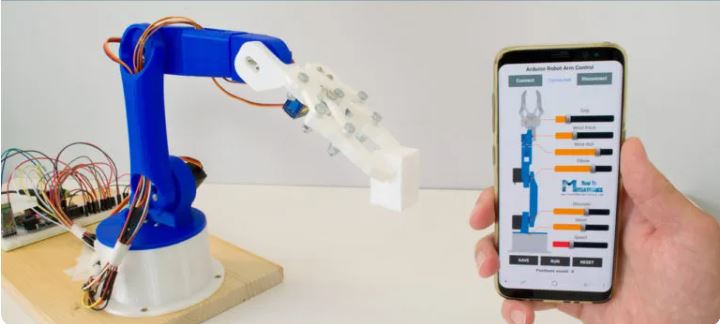
Make your very own Arduino Robotic Arm which can be wirelessly controlled and programmed with your smartphone!
Components required:
- Arduino UNO
- MG996R Servo Motor
- SG90 Micro Servo Motor
- HC-05 Bluetooth Module
- Power Supply
Arduino Formula LED Race
This interactive Arduino project allows you to have an intense race with your family and friends using LED strips!
Components required:
- Arduino Nano
- WS2813 RGB LED Strip
- Switch Actuator
- Capacitor
- 10k ohm Resistor & 470 ohm Through Hole Resistor
- Audio/Video Cable Assembly
- Jumper Wires
Arduino Walking Monster
We have seen a smartphone-controlled robotic arm, but what about a walking robot? Meet Bert, a bipedal walking monster robot powered by Arduino!
Components required:
- Arduino 101
- MG996R Tower Pro
- Grove – Infrared Reflective Sensor v1.2
- LED
- 9V Battery
- Battery Holder
Home Automation with Arduino
This project features a smart RFID door lock, weather station (which tells you the temperature, humidity, and gas quality at home), motion detector, plant watering reminder, mood lighting, and a real-time camera feed. To make things better, you can also control all of your household appliances through an app! It is truly an all-in-one home automation system!
Components required:
- Arduino UNO
- Arduino MKR WiFi 1010
- Maxim MAX32630FTHR
- Raspberry Pi Zero Wireless
- DHT11 Temperature & Humidity Sensor
- Grove – Gas Sensor
- Soil Moisture Sensor
- PIR Motion Sensor
- RFID Reader
- RGB Diffused Common Cathode
- Raspberry Pi Camera Module
- MG996R Tower Pro
- Buzzer
- LED
Those are just a few amazing and cool projects you can do with your Arduino! You can do much more with Arduino as it can work as the brain of almost any electronic project you can think of. Whatever you can do with the Arduino is just limited to your imagination!
If you are interested in more Arduino projects, do check out our blog post: 40 Awesome Arduino Projects That You Must Try in 2022.
Helpful Resources
To help you on your journey in Arduino, here are some valuable resources that you can look at to get started and go further!
- Seeed Wiki – Information and tutorials on our Grove modules, sensors, and Seeeduino boards.
- Seeed Project Hub – Find awesome Arduino projects with instructions and make them yourself!
- AllAboutCircuits – Electrical engineering & electronics community filled with Arduino tutorials
- Hackster.io and Instructables – Similar to the Seeed project hub, you can find awesome projects done by makers with instructions and try them out for yourself!
- Udemy – Online learning platform with Arduino learning courses to learn more about electronics and Arduino.
Here are some Arduino project guides that you can take a look at as well!
- 40 Awesome Arduino Projects that you must try 2022
- 27 Arduino LED Projects you need to try! Including Special Section for Upcoming Halloween
- Arduino Ultrasonic Sensor Overview and Tutorial
- PIR Sensor: Overview, Applications and Projects