27 Arduino LED Projects you need to try! Including Special Section for Upcoming Halloween
LED projects are an excellent way for beginners to start and learn more about Arduino. You could start a project as simple as blinking a LED, the equivalent of “Hello World” in programming. Thanks to the rich documentation and libraries available in the community, you can take your LED projects to the next level and expand more possibilities in this field, such as artworks, clocks and lamps, and so on.
In this article, I will show you 27 Arduino LED projects you do not want to miss – ranging from practical and useful lighting to fun and wacky projects!
With Halloween around the corner, there is also a special section to showcase projects that can meet the atmosphere of Halloween. You can grab some Arduino boards and LEDs and design some unique Halloween decorations or costumes. Without further ado, let us look at these interesting Halloween LED projects!

1. Light Up Halloween Pumpkin
It is not Halloween without the infamous Jack-o’-lanterns! This project is simple and doesn’t require fancy tools or skills. It would be an excellent way to start your Arduino LED project journey as a beginner!
What you’ll need:
- Arduino Nano RP2040 Connect (or XIAO RP2040)
- Red LEDs (or Chainable RGB LED)
- Pumpkins
Start your very first Arduino and LED project this autumn and Halloween with this guide!
2. Smoking Pumpkin
All your neighbors are going to display generic carved or light-up pumpkins. Try something unique by adding a spooky element with smoking effects so that your pumpkin will differentiate your house and attract more trick-or-treaters!
What you’ll need:
- Arduino Uno (or XIAO ESP32C3 / nRF52840/ RP2040 / SAMD21)
- 2x Grove – WS2813 RGB LED Strip
- Grove – Relay
- IR Module
- Piezoelectric disc
- NE555
- 220uH inductor
- IRF Z44 MOSFET
- 10nf capacitor
- 2*100nf capacitors
- 10ohm Resistors
- 5k variable Resistors
- Pumpkin
Learn how to get a cool smoking effect pumpkin here from hackster!
3. LED Skeleton Head
Partner up your Jack-o’-lanterns with his best friend – a skull head! This project is also straightforward but uses sensors and motors to light up only when needed and allow the jaws to simulate a bite!
What you’ll need:
- Arduino Uno (or Grove Beginner Kit for Arduino including Arduino UNO compatible board and 10 most commonly used Arduino modules like Grove – LED, Sound and Light Sensors for you to expand more possibilities)
- Grove – Ultrasonic Distance Sensor
- Grove – Servo
- MicroServo Motor
- 2x Grove – Red LED
- Skull
Get your own skull here and learn from this guide on Instructables on how to scare guests!
4. Scary Pumpkin Candy Machine
Everyone knows Halloween is all about candy! Do your own Halloween candy dispenser machine for trick-or-treaters and place it outside your doorstep! It has a motion sensor, so whenever someone approaches the pumpkin, it will light up, play music, and most importantly, spit out candies for them!
What you’ll need:
- Seeeduino V4.2
- Seeed Base Shield V2
- Grove – PIR Motion Sensor
- Grove – MP3 Player
- EMax 12g ES08MD high sensitive servo
- Grove – WS2813 RGB LED Strip
- Pumpkin and Candies
Make yours today from this guide!
5. Halloween Candy Machine Dispenser
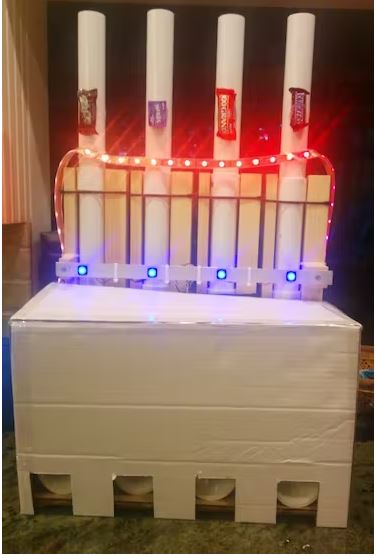
Go one step further and be the coolest house every kid wants to visit during Halloween! Set up this insane candy machine where trick-or-treaters can pick from four different candies to their liking, as if they were in a store, instead of just grabbing it from a bag!
What you’ll need:
- Arduino Leonardo (or Seeeduino V4.2)
- Motor Shield
- Grove – Proto Shield
- Power Supply
- Pushbutton (or Grove – Button(P))
- Grove – WS2813 RGB LED Strip (or Grove – RGB LED Stick WS2813)
- NEMA-17 Stepper Motors
- Jumper Wires
- Resistors 330 ohm, 10k ohm
- Equipment for the machines (wood, tubes, candies)
Learn how to make this complicated contraption for your house on hackster!
6. Sensor Activated Scare Prank

Prank your trick-or-treaters that dare to approach your place! It reacts to any movement in front of it and growls menacingly with flashing red eyes and thunder flashes.
What you’ll need:
- Arduino Uno (or XIAO ESP32C3 / nRF52840/ RP2040 / SAMD21)
- Grove – PIR Motion Sensor
- 2x Grove – Red LED
- Grove – White LED
- Grove – MP3 Player
- 2x Grove – Relay
Learn how to make yours today from hackster!
7. WhatsApp RFID Talking Doorbell
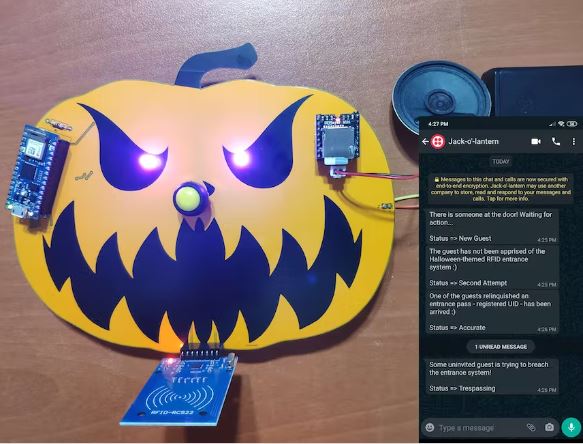
Startle your guests who do not have an entrance permit (RFID tag) and get notified with WhatsApp messages without checking who’s at the door. This allows you to mingle with your guests instead of constantly opening the door for new guests. This doorbell can also interact with guests when they ring the doorbell, with pre-generated texts for each occasion.
What you’ll need:
- Custom PCB
- Arduino Nano 33 IoT (or XIAO nRF52840)
- Raspberry Pi 3 Model B
- Raspberry Pi 4 Model B
- Mini MP3 Player
- Speaker; 0.25W 8 ohms
- MFRC522 RFID Reader
- Red LEDs (or Grove – LED Pack)
- Pushbutton (or Grove – Button(P))
- Resistors (1k, 10k)
- MB102 Power Supply Module
- Cardboard printout
Interested in this complicated project? Learn how to do so here!
8. Vivid Flashing Minecraft Creeper Cosplay

Dress up as your favorite Minecraft character, the Creeper, and scare everyone at the party! It has an exploding effect thanks to flashing LEDs, so go on chasing people down the street and ask for candies!
What you’ll need:
Learn how to scare people on Halloween here!
9. Halloween Shield Necklace
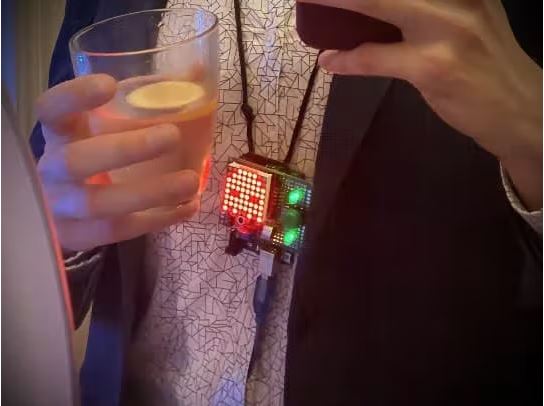
Everyone is dressing up in different Halloween costumes; why not pair them with cool gadgets like a shield necklace? You can customize whatever you want to put up on the 8×8 LED display, you can put your favorite characters on it or their famous logos!
What you’ll need:
- Arduino Uno (or XIAO ESP32C3 / nRF52840/ RP2040 / SAMD21)
- 8×8 LED matrix
- KY-037 Sound Detection Sensor Module
- Grove – Green LED (or Grove – RGB LED Ring WS2813)
- Push Button (or Grove – Button(P))
- Battery Pack 10,000 mAh
Learn how to make your very own customizable necklace here!
10. Arduino LED Lightsaber

“The Force is what gives a Jedi his power.” However, a battery is all it needs to give this Arduino LED lightsaber its power. If you’re a major Star Wars fan and feeling a little adventurous, this is for you! This elegant customizable lightsaber will give you an advantage over your most formidable foes… or at least allow you to have fun trick-or-treating this Halloween as a Jedi!
What you’ll need:
- Arduino MKR Zero (or Seeeduino V4.2)
- NeoPixel 12 LED Ring (or Grove – RGB LED Ring WS2813)
- Color Sensor
- Speaker – 0.25W, 8 ohms
- Powerboost 500c
- Battery Holder
- 2.5w Amp
- Resistors 10k ohm
- Pushbutton Switch
- Slide Switch
- Male Header 40 Position 1 Row (0.1″)
- Micro-USB to USB Cable (Generic)
- Jumper Wires
- Lightsabers
Check out this project now if you are ready to wield this mighty weapon.
11. Pac-Man LED Pixel Panel Costume
Dress up as your favorite 8-bit arcade game character, Pac-Man! It is light and wearable as cardboard and translucent covers were used to make it. It will be the most unique costume on the street, and your kids won’t get lost as they are very bright and easy to find!
What you’ll need:
- Arduino Uno (or XIAO ESP32C3 / nRF52840/ RP2040 / SAMD21)
- Grove – WS2813 RGB LED Strip
- Power Supply
- Drafting Paper
- Cardboard
Learn how to make yours here!
12. Fallout Doctor Cosplay
Win the coolest costume contest with a light-up Fallout doctor costume! It combines the plague doctor mask, gas mask, and Arduino LED strips for you to show everyone the post-apocalyptic future!
What you’ll need:
- Arduino Pro Mini (or XIAO ESP32C3 / nRF52840/ RP2040 / SAMD21)
- Grove – WS2813 RGB LED Strip
- Battery Pack
- Plague doctor & gas mask
Learn how to make your own on hackster!
13. LED Mask Costume
Last but not least, want to dress up as a cooler and better version of the Front Man from the hit Netflix Series Squid Game? Instill fear in your friends by having LEDs on your forehead. The mouthpiece also flashes red and glows in response to your voice!
What you’ll need:
- Arduino Pro Mini (or Arduino UNO Mini)
- Electret Microphone Breakout
- Grove – WS2813 RGB LED Strip
- Grove – Red LED
- Horror Mask
Learn how to make your own mask here!
Now we will head to the non-Halloween Arduino LED projects that you can also try your hands on!
14. Environmental Sensor Tree
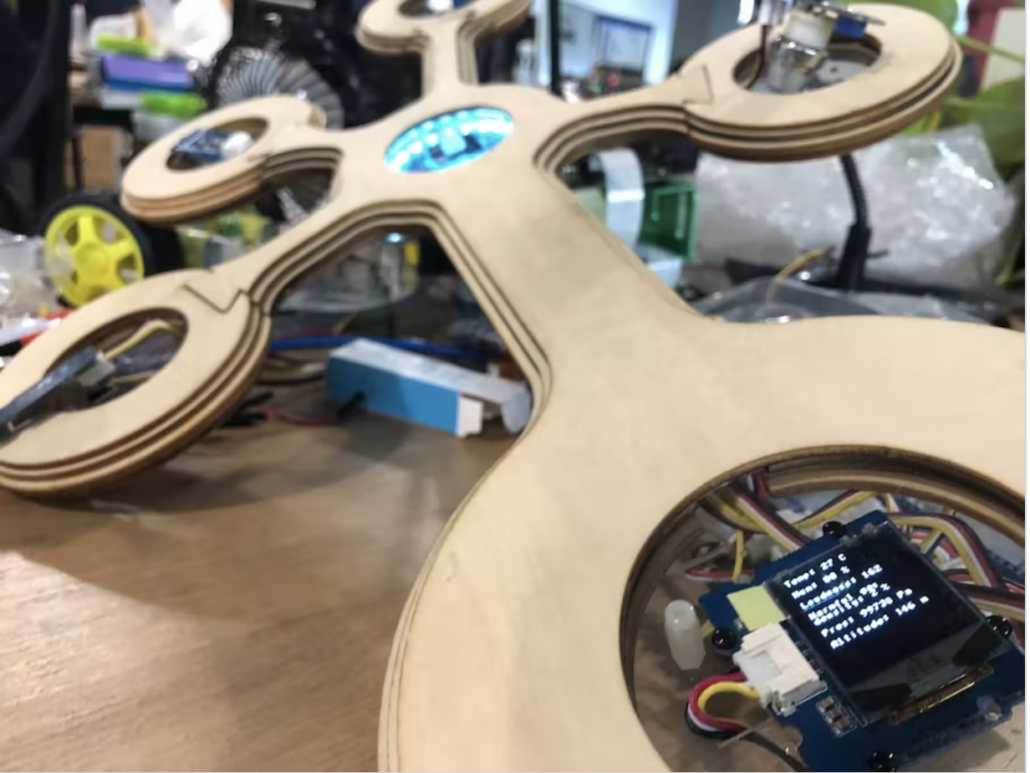
This environmental tree is a great sample project for Grove accessories. It gives a detailed description of the surrounding environment. You can change to other Grove sensors and test them for your different needs!
What you’ll need:
- Arduino Uno (or XIAO ESP32C3 / nRF52840/ RP2040 / SAMD21)
- Grove – RGB LED Ring WS2813
- Grove – OLED Yellow Blue Display 0.96
- Grove – Temperature, Humidity, Pressure, Gas Sensor (BME680)
- Grove – Mini PIR Motion Sensor
- Grove – I2C High Accuracy Temperature and Humidity Sensor (SHT35)
- Grove – Gas Sensor (MQ2)
- Grove – Loudness Sensor (LM2904)
- Grove – Base Shield V2
- Wooden Parts
Learn more about this huge project from this hackster guide!
15. LED Matrix Animated Display

This project is a multifaceted display that tells you the current time, date, temperature, and humidity! Now you won’t have to pull up different applications on your phone to find this crucial information.
What you’ll need:
- Arduino Uno (or XIAO ESP32C3 / nRF52840/ RP2040 / SAMD21)
- 16 x 8 LED Matrix
- Grove – Real Time Clock
- Grove – Temperature Humidity Sensor (DHT11)
- Breadboard
- Jumper Wires
If you’re in need of a new cool desk accessory, head on over here to find out more.
16. Arduino LED Dice
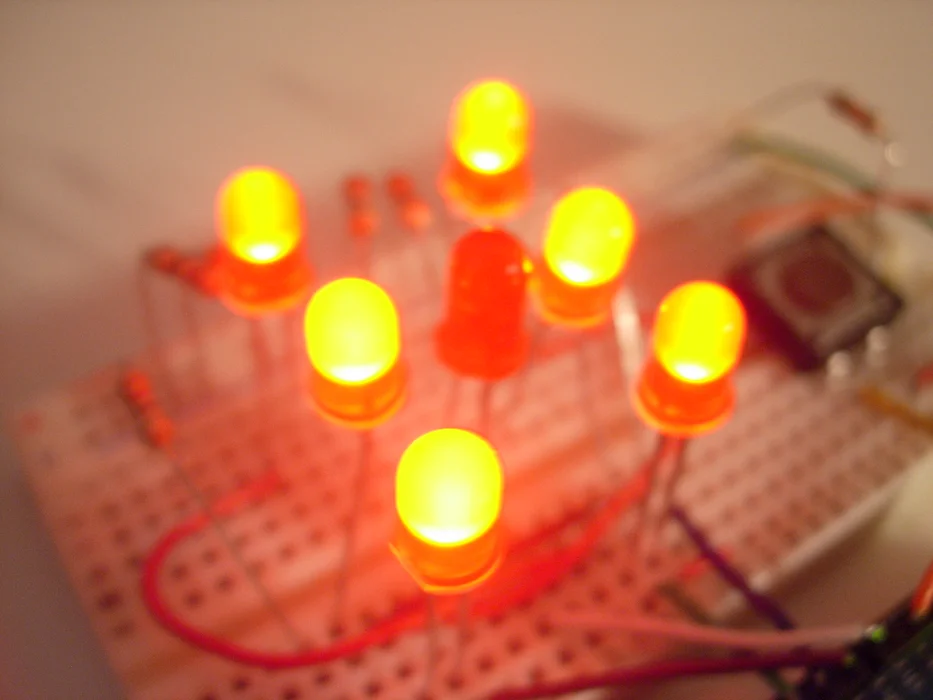
An Arduino LED Dice is a simple, inexpensive, and fun project suitable for beginner learning Arduino. With a minimal amount of components, you will be able to make a very cool dice to play with your friends!
What you’ll need:
- Arduino Duemilanove (or Seeeduino V4.2)
- 7x Red LEDs (or Grove – LED Pack)
- 1x 10k, 7x 220/330 Resistors
- Push Button (or Grove – Button(P))
- Breadboard
- Jumper Wires
Find out more on Instructables.
17. Valentine’s Day Magical Bouquet

For next year’s Valentine’s Day, instead of the generic roses or flowers that die within a few days, try out this unconventional gift for your partner! This project shows you how you can 3D print flowers and present them with beautiful LEDs! The best thing? You only need a few components to recreate this project!
What you’ll need:
- Arduino Uno (or XIAO ESP32C3 / nRF52840/ RP2040 / SAMD21)
- Flexible Drinking Straws
- Natural PLA
- Bone White PLA
- Grove – WS2813 RGB LED Strip
- Power Supply
- 3D printer
Sounds like the perfect gift for your partner? Check out this project before Valentine’s Day!
18. Baby High Chair Musical

Got a baby that is constantly full of energy and curious about everything? This project allows you to set up a game for your child and when they press a button the light of the same color, it turns on, and a sound is played! It helps to keep them entertained so you’ll have more time for yourself.
What you’ll need:
- Arduino Uno (or XIAO ESP32C3 / nRF52840/ RP2040 / SAMD21)
- 4x 45mm Arcade Button
- 4x Red, Blue, White, Green LEDs (or Grove – LED Pack)
- Grove – Speaker
- 10uf Capacitor
- Jumper Wires
- Resistors 10k Ohms 5% here
- 9V battery (or any power supply for Arduino)
- Baby chair with table
Does this sound like something your child would enjoy? Check out this project and start building now!
19. Arduino Indoor Garden
If you possess green fingers, you will know that gardening requires a lot of effort. However, if we add an Arduino into the equation, things get way easier! By adding some sensors, actuators, and a few simple lines of code, you’ll have yourself a fully automated indoor garden that is controllable via your Android device! The white LED significantly helps plant growth as it provides artificial lighting similar to natural sunlight, which you normally won’t be able to get in an indoor garden.
What you’ll need:
- Arduino Nano (or Seeeduino Nano)
- JLCPCB Customized PCB
- ESP01 Module
- HC05/06 Bluetooth Module
- Grove – Digital Light Sensor (TSL2561)
- Grove – Soil Moisture Sensor
- Grove – Temperature & Humidity Sensor (DHT11)
- Grove – White LED
- Water Pump
- DC 12V cooling fan
- Plants and Baskets
Find out more on Instructables.
20. LED Matrix Info Display
This is a 6-in-1 display that tells you the day of the week, month, year, time, temperature, and humidity! Encased in this beautiful wood case, this 32×8 LED display will look good on any tabletop. If you are looking for a fairly simple, practical, and fun project to work on, this is the one. You will definitely be pleased with the end results.
What you’ll need:
- Arduino Nano (or Seeeduino Nano)
- Grove – DS1302 Real Time Clock for Arduino
- Grove – Temperature and Humidity Sensor (DHT22)
- Grove – PIR Motion Sensor
- 8×8 LED matrix
- Wooden Box
Find out more on Hackster.
21. DIY Arduino 1D Pong Game
Looking to build a game for your family to enjoy? This project shows you how to build your 1-dimensional version of the classic game ‘Pong’ with LEDs! It is a 2-player game in which the ‘ball’ travels down the length of the LED strip and will bounce back if the button is pressed.
What you’ll need:
- Arduino Nano (or Seeeduino Nano)
- Grove – WS2813 RGB LED Strip (or Grove – RGB LED Stick WS2813)
- Grove – Buzzer
- Grove – Button
- Transistor
- 2x Resistors 2.2k ohm
- PVC plate for the board
Enjoy DIY games? Check out this project and have fun with your family and friends!
22. Mood Lamp
Set the mood of your room or home workspace with an Arduino Mood Lamp. Easily change the color of the lights to create an atmosphere that can enhance the atmosphere you want. For example, set blue colors lights to relax, yellow lights for a happy vibe, and green lights for a soothing effect. The lamp also features a fully customizable “smart” RGB diode that allows for more complicated effects.
What you’ll need:
- Arduino Nano (or Seeeduino Nano)
- Grove – WS2813 RGB LED Strip
- Microphone Module
- Wooden Boards
Find out more on Instructables.
23. Dragon Fire LED Lamp
Go one step further and try to do your very own dragon fire LED lamp to spruce up your living room.
What you’ll need:
- Arduino Pro Mini (or Arduino UNO Mini)
- 4x Grove – WS2813 RGB LED Strip
- 4x PL9823 LED
- Potentiometer
- Grove – Touch Sensor
24. LED EMOJI Display
Do you have a favorite Emoji? Do you regularly use Emojis to display your mood while texting? Well, now you can do it in real life too, with the LED EMOJI Display!
What you’ll need:
- Arduino Uno (or XIAO ESP32C3 / nRF52840/ RP2040 / SAMD21)
- 8×8 LED matrix
- Jumper Wires
Sounds like the kind of gimmick you’re into? Learn more from this guide!
25. Controlled Traffic Lights for Toy Cars
Every child loves playing with toy cars. Toy cars are fun, but we can make them even better. A traffic light can be made using an Arduino and LEDs, which can make playing with toy cars even more fun. It is also a good and intuitive way to teach a child traffic rules.
What you’ll need:
- Arduino Nano (or Seeeduino Nano)
- 5mm Red, Yellow, Green LED (or Grove – LED Pack)
- Rotary Potentiometer
- Slide Switch
- Resistors 100 ohm
- Cardboard boxes and toy cars
Find out more here.
26. Gesture Control LED Game
Create a fun and interactive LED board game made using gesture sensors and LEDs, powered solely by Arduino boards.
What you’ll need:
- ESP8266 (try XIAO nRF52840 or ESP32C3)
- Grove – WS2813 RGB LED Strip (or Grove – RGB LED Ring WS2813)
- Grove – Gesture Sensor
If you want to try out this fun but complicated game, check out the tutorial here!
27. Music Reactive Multicolor LEDs
With the final project, control your LED colors by playing different music and spice up your parties! All made possible thanks to Arduino and sensors!
What you’ll need:
- Customized PCB (or Arduino Uno)
- Grove – Sound Sensor (LM358)
- LED Strip 5050
- IRFZ44N Transistor
- L7805CV TO220
- Ceramic Capacitor
- Electrolytic Capacitor
- Red, Blue, White, Green LEDs (or Grove – LED Pack)
- Jumper Wires
- Resistors
Try out this fun music LED project with the help of this hackster guide!
Summary
That comes to an end for our Arduino LED projects article. We hope you will be interested in trying out some of these projects for yourself, especially with Halloween. You can pick up some home decorations projects or costumes to go out and flaunt your new hobby!